このブログ投稿は、前のパート1の続きであり、ClusterControlとのSNMP統合の基本について説明しました。
このブログ投稿では、SNMPトラップとアラートに焦点を当てます。 SNMPトラップは、リモートSNMP対応デバイス(エージェント)から中央コレクターである「SNMPマネージャー」に送信される最も頻繁に使用されるアラートメッセージです。 ClusterControlの場合、クラスターのクリティカルアラームが0でない場合、トラップはアラートである可能性があり、何か問題が発生していることを示します。
前のブログ投稿で示したように、この概念実証のために、2つのSNMPトラップ通知定義があります。
criticalAlarmNotification NOTIFICATION-TYPE
    OBJECTS { totalCritical, clusterId }
    STATUS current
    DESCRIPTION
        "Notification if critical alarm is not 0"
    ::= { alarmNotification 1 }

criticalAlarmNotificationEnded NOTIFICATION-TYPE
    OBJECTS { totalCritical, clusterId }
    STATUS  current
    DESCRIPTION
        "Notification ended - Critical alarm is 0"
    ::= { alarmNotification 2 }
通知(またはトラップ)は、criticalAlarmNotificationおよびcriticalAlarmNotificationEndedです。両方の通知イベントを使用して、クラスターがアクティブにクリティカルアラームを発生しているかどうかに関係なく、Nagiosサービスに信号を送ることができます。 Nagiosでは、これの用語はパッシブチェックであり、Nagiosはホスト/サービスがダウンしているか到達不能であるかを判断しようとはしません。また、アクティブチェックを構成します。チェックは、サービス定義を使用してNagiosデーモンのチェックロジックによって開始され、クラスターによって報告されたクリティカル/警告アラームも監視します。
このブログ投稿では、このブログシリーズの最初の部分に示されているように、SevereninesMIBとSNMPエージェントが正しく構成されている必要があることに注意してください。
NagiosCoreのインストール
Nagios Coreは、Nagiosモニタリングスイートの無料バージョンです。まず第一に、それと必要なすべてのパッケージをインストールし、次にNagiosプラグイン、snmptrapdとsnmpttをインストールする必要があります。このブログ投稿の手順は、すべてのノードがCentOS7で実行されていることを前提としていることに注意してください。
$ yum -y install httpd php gcc glibc glibc-common wget perl gd gd-devel unzip zip sendmail net-snmp-utils net-snmp-perl外部コマンドをWebインターフェイスから実行できるようにするnagiosユーザーとnagcmdグループを作成し、nagiosとapacheユーザーをnagcmdグループの一部として追加します。
$ useradd nagios
$ groupadd nagcmd
$ usermod -a -G nagcmd nagios
$ usermod -a -G nagcmd apache
ここからNagiosCoreの最新バージョンをダウンロードし、コンパイルしてインストールします:
$ cd ~
$ wget https://assets.nagios.com/downloads/nagioscore/releases/nagios-4.4.6.tar.gz
$ tar -zxvf nagios-4.4.6.tar.gz
$ cd nagios-4.4.6
$ ./configure --with-nagios-group=nagios --with-command-group=nagcmd
$ make all
$ make install
$ make install-init
$ make install-config
$ make install-commandmode
Nagios Web構成をインストールします:
$ make install-webconfオプションで、Nagiosエクスフォリエーションテーマをインストールします(またはデフォルトのテーマに固執することもできます):
$ make install-exfoliationNagios Webインターフェースにログインするためのユーザーアカウント(nagiosadmin)を作成します。このユーザーに割り当てたパスワードを覚えておいてください:
$ htpasswd -c /usr/local/nagios/etc/htpasswd.users nagiosadminApache Webサーバーを再起動して、新しい設定を有効にします:
$ systemctl restart httpd
$ systemctl enable httpd
ここからNagiosプラグインをダウンロードし、コンパイルしてインストールします:
$ cd ~
$ wget https://nagios-plugins.org/download/nagios-plugins-2.3.3.tar.gz
$ tar -zxvf nagios-plugins-2.3.3.tar.gz
$ cd nagios-plugins-2.3.3
$ ./configure --with-nagios-user=nagios --with-nagios-group=nagios
$ make
$ make install$ /usr/local/nagios/bin/nagios -v /usr/local/nagios/etc/nagios.cfg
Nagios Core 4.4.6
Copyright (c) 2009-present Nagios Core Development Team and Community Contributors
Copyright (c) 1999-2009 Ethan Galstad
Last Modified: 2020-04-28
License: GPL
Website: https://www.nagios.org
Reading configuration data...
Read main config file okay...
Read object config files okay...
Running pre-flight check on configuration data...
Checking objects...
Checked 8 services.
Checked 1 hosts.
Checked 1 host groups.
Checked 0 service groups.
Checked 1 contacts.
Checked 1 contact groups.
Checked 24 commands.
Checked 5 time periods.
Checked 0 host escalations.
Checked 0 service escalations.
Checking for circular paths...
Checked 1 hosts
Checked 0 service dependencies
Checked 0 host dependencies
Checked 5 timeperiods
Checking global event handlers...
Checking obsessive compulsive processor commands...
Checking misc settings...
Total Warnings: 0
Total Errors: 0
Things look okay - No serious problems were detected during the pre-flight check
If everything looks okay, start Nagios and configure it to start on boot:
$ systemctl start nagios
$ systemctl enable nagiosブラウザを開き、http:// {IPaddress} / nagiosにアクセスすると、HTTP基本認証がポップアップ表示されます。ここで、ユーザー名をnagiosadminとして指定し、選択したパスワードを先に作成します。
ClusterControlサーバーをNagiosに追加する
ClusterControlのNagiosホスト定義ファイルを作成します:
$ vim /usr/local/nagios/etc/objects/clustercontrol.cfgそして、次の行を追加します:
define host {
        use                     linux-server
        host_name               clustercontrol.local
        alias                   clustercontrol.mydomain.org
        address                 192.168.10.50
}

define service {
        use                     generic-service
        host_name               clustercontrol.local
        service_description     Critical alarms - ClusterID 23
        check_command           check_snmp! -H 192.168.10.50 -P 2c -C private -o .1.3.6.1.4.1.57397.1.1.1.2 -c0
}

define service {
        use                     generic-service
        host_name               clustercontrol.local
        service_description     Warning alarms - ClusterID 23
        check_command           check_snmp! -H 192.168.10.50 -P 2c -C private -o .1.3.6.1.4.1.57397.1.1.1.3 -w0
}


define service {
        use                     snmp_trap_template
        host_name               clustercontrol.local
        service_description     Critical alarm traps
        check_interval          60 ; Don't clear for 1 hour
}
-
最初のセクションでは、ClusterControlサーバーのホスト名とアドレスを使用してホストを定義します。
-
Nagiosによって監視されるサービス定義を配置するサービスセクション。最初の2つは基本的に、特定のオブジェクトIDのSNMP出力をチェックするようにサービスに指示しています。最初のサービスはクリティカルアラームに関するものであるため、check_snmpコマンドに-c0を追加して、値が0を超えた場合にNagiosでクリティカルアラートになることを示します。警告アラームの場合は、次の場合に警告で示します。値は1以上です。
-
最後のサービス定義は、重大なアラームが発生した場合にClusterControlサーバーから送信されると予想されるSNMPトラップに関するものです。 raiseは0より大きい。このセクションでは、次のステップに示すように、snmp_trap_template定義を使用します。
/usr/local/nagios/etc/objects/templates.cfgに次の行を追加して、snmp_trap_templateを構成します。
define service {
        name                            snmp_trap_template
        service_description             SNMP Trap Template
        active_checks_enabled           1       ; Active service checks are enabled
        passive_checks_enabled          1       ; Passive service checks are enabled/accepted
        parallelize_check               1       ; Active service checks should be parallelized
        process_perf_data               0
        obsess_over_service             0       ; We should obsess over this service (if necessary)
        check_freshness                 0       ; Default is to NOT check service 'freshness'
        notifications_enabled           1       ; Service notifications are enabled
        event_handler_enabled           1       ; Service event handler is enabled
        flap_detection_enabled          1       ; Flap detection is enabled
        process_perf_data               1       ; Process performance data
        retain_status_information       1       ; Retain status information across program restarts
        retain_nonstatus_information    1       ; Retain non-status information across program restarts
        check_command                   check-host-alive      ; This will be used to reset the service to "OK"
        is_volatile                     1
        check_period                    24x7
        max_check_attempts              1
        normal_check_interval           1
        retry_check_interval            1
        notification_interval           60
        notification_period             24x7
        notification_options            w,u,c,r
        contact_groups                  admins       ; Modify this to match your Nagios contactgroup definitions
        register                        0
}
ClusterControl構成ファイルをNagiosに含めます。その中に、次の行を追加します。
/usr/local/nagios/etc/nagios.cfg:
cfg_file=/usr/local/nagios/etc/objects/clustercontrol.cfg
飛行前の構成チェックを実行します:
$ /usr/local/nagios/bin/nagios -v /usr/local/nagios/etc/nagios.cfg出力の最後に次の行が表示されていることを確認してください。
"Things look okay - No serious problems were detected during the pre-flight check"Nagiosを再起動して変更をロードします:
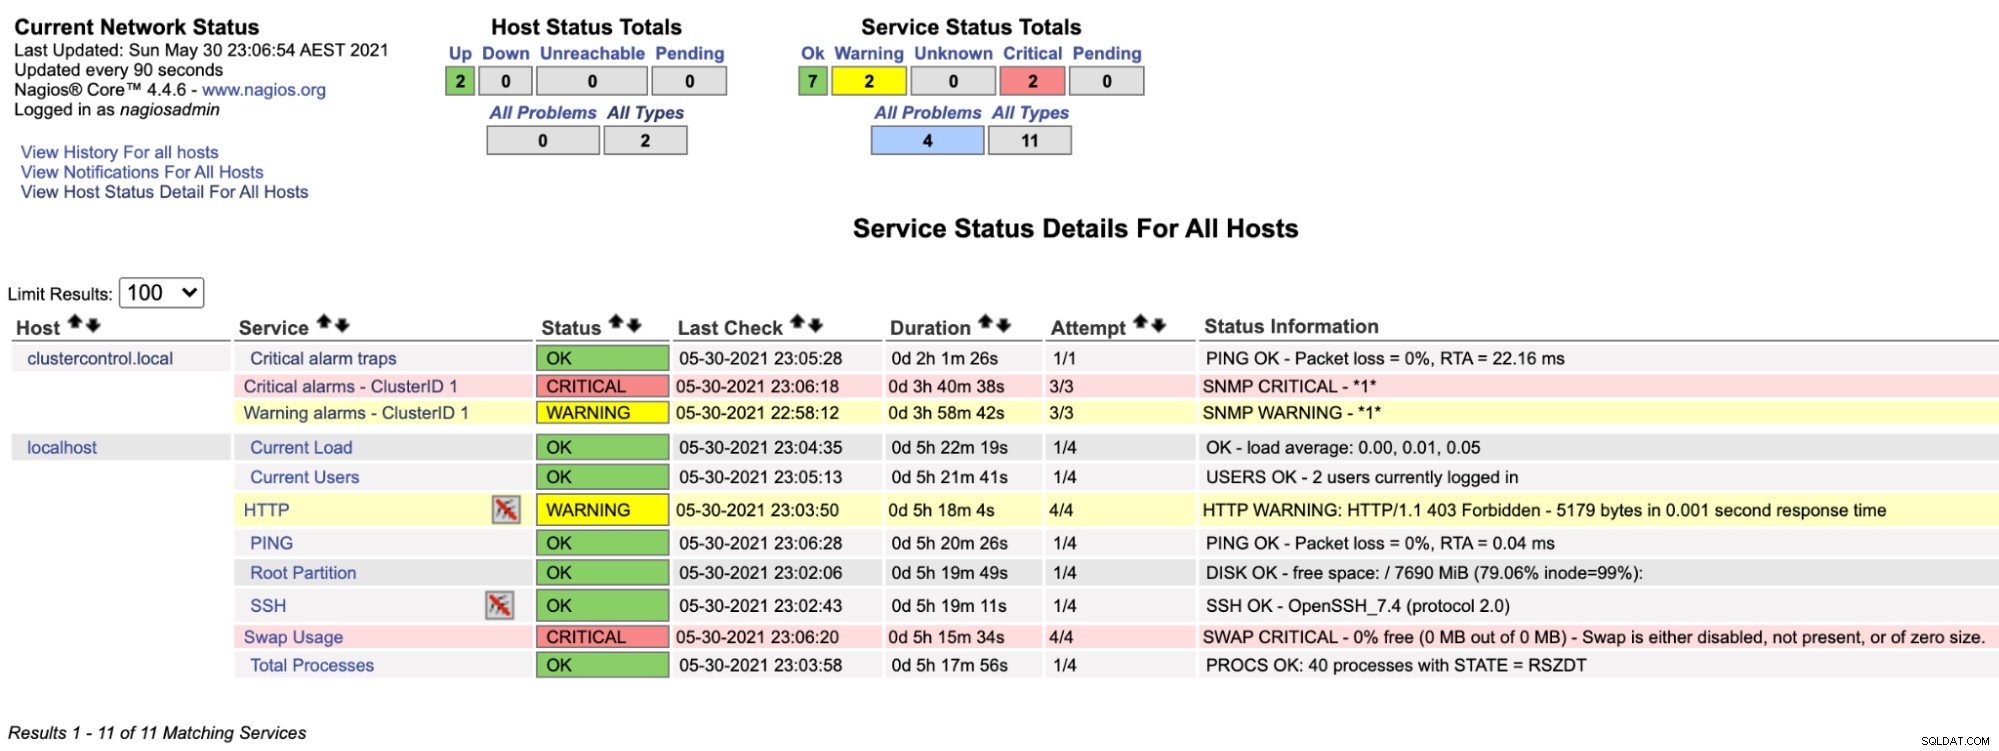
$ systemctl restart nagiosここで、[サービス]セクション(左側のメニュー)の下にあるNagiosページを見ると、次のようになります。

ClusterControlによって報告されたクリティカルアラーム値が0より大きい場合、「クリティカルアラーム-ClusterID 1」の行が赤に変わり、「警告アラーム-ClusterID 1」が黄色になり、警告アラームが発生したことを示します。興味深いことが何も起こらない場合は、clustercontrol.localのすべてが緑色で表示されます。
トラップはリモートデバイスからNagiosサーバーに送信されます。これは、パッシブチェックと呼ばれます。トラップを送信するかどうかは、送信デバイスがトラップの送信を決定するかどうかに依存するため、理想的にはわかりません。たとえば、UPS(バッテリーバックアップ)の場合、デバイスの電源が切れるとすぐに、「ねえ、電源が切れました」というトラップが送信されます。このようにして、Nagiosはすぐに通知されます。
SNMPトラップを受信するには、Nagiosサーバーを次のように構成する必要があります。
-
snmptrapd(SNMPトラップレシーバーデーモン)
-
snmptt(SNMPトラップトランスレーター、トラップハンドラーデーモン)
snmptrapdはトラップを受信すると、それをsnmpttに渡し、そこでNagiosシステムを更新するように構成し、Nagiosは連絡先グループの構成に従ってアラートを送信します。
EPELリポジトリをインストールしてから、必要なパッケージをインストールします。
$ yum -y install epel-release
$ yum -y install net-snmp snmptt net-snmp-perl perl-Sys-Syslog
/etc/snmp/snmptrapd.confでSNMPトラップデーモンを構成し、次の行を設定します。
disableAuthorization yes
traphandle default /usr/sbin/snmptthandler
上記は、snmptrapdデーモンが受信したトラップが/ usr / sbin/snmptthandlerに渡されることを意味します。
/usr/share/snmp/mibs/SEVERALNINES-CLUSTERCONTROL-MIB.txtを作成して、SEVERALNINES-CLUSTERCONTROL-MIB.txtを/ usr / share / snmp/mibsに追加します。
$ ll /usr/share/snmp/mibs/SEVERALNINES-CLUSTERCONTROL-MIB.txt
-rw-r--r-- 1 root root 4029 May 30 20:08 /usr/share/snmp/mibs/SEVERALNINES-CLUSTERCONTROL-MIB.txt
/etc/snmp/snmp.confを作成し(「d」なしで通知)、そこにカスタムMIBを追加します:
mibs +SEVERALNINES-CLUSTERCONTROL-MIBsnmptrapdサービスを開始します:
$ systemctl start snmptrapd
$ systemctl enable snmptrapd
次に、/ etc / snmp/snmptt.ini内に次の構成行を構成する必要があります。
net_snmp_perl_enable = 1
snmptt_conf_files = <<END
/etc/snmp/snmptt.conf
/etc/snmp/snmptt-cc.conf
END
net_snmp_perlモジュールを有効にし、snmptt.ini内に別の構成パス/etc/snmp/snmptt-cc.confを追加したことに注意してください。ここでClusterControlsnmpttイベントを定義して、Nagiosに渡すことができるようにする必要があります。 /etc/snmp/snmptt-cc.confに新しいファイルを作成し、次の行を追加します。
MIB: SEVERALNINES-CLUSTERCONTROL-MIB (file:/usr/share/snmp/mibs/SEVERALNINES-CLUSTERCONTROL-MIB.txt) converted on Sun May 30 19:17:33 2021 using snmpttconvertmib v1.4.2

EVENT criticalAlarmNotification .1.3.6.1.4.1.57397.1.1.3.1 "Status Events" Critical
FORMAT Notification if the critical alarm is not 0
EXEC /usr/local/nagios/share/eventhandlers/submit_check_result $aA "Critical alarm traps" 2 "Critical - Critical alarm is $1 for cluster ID $2"
SDESC
Notification if critical alarm is not 0
Variables:
  1: totalCritical
  2: clusterId
EDESC

EVENT criticalAlarmNotificationEnded .1.3.6.1.4.1.57397.1.1.3.2 "Status Events" Normal
FORMAT Notification if the critical alarm is not 0
EXEC /usr/local/nagios/share/eventhandlers/submit_check_result $aA "Critical alarm traps" 0 "Normal - Critical alarm is $1 for cluster ID $2"
SDESC
Notification ended - critical alarm is 0
Variables:
  1: totalCritical
  2: clusterId
EDESC-
2つのトラップが定義されています-criticalAlarmNotificationとcriticalAlarmNotificationEnded。
-
criticalAlarmNotificationは、クリティカルアラートを発生させ、Nagiosで定義されている「クリティカルアラームトラップ」サービスに渡します。 $ aAは、トラップエージェントのIPアドレスを返すことを意味します。値2は、この場合は重要なチェック結果値です(0 =OK、1 =警告、2 =重要、3 =不明)。
-
criticalAlarmNotificationEndedは、OKアラートを発生させ、それを「クリティカルアラームトラップ」サービスに渡して、キャンセルします。すべてが正常に戻った後の前のトラップ。 $ aAは、トラップエージェントのIPアドレスを返すことを意味します。値0はチェック結果の値であり、この場合はOKです。 snmpttによって認識される文字列置換の詳細については、「FORMAT」セクションのこの記事を確認してください。
-
snmpttconvertmibを使用して、特定のMIBのsnmpttイベントハンドラーファイルを生成できます。
デフォルトでは、eventhandlersパスはNagiosCoreによって提供されないことに注意してください。したがって、以下に示すように、そのeventhandlersディレクトリをcontribディレクトリの下のNagiosソースからコピーする必要があります。
$ cp -Rf nagios-4.4.6/contrib/eventhandlers /usr/local/nagios/share/
$ chown -Rf nagios:nagios /usr/local/nagios/share/eventhandlers
また、nagcmdグループの一部としてsnmpttグループを割り当てる必要があります。これにより、submit_check_resultスクリプト内でnagios.cmdを実行できるようになります。
$ usermod -a -G nagcmd snmpttsnmpttサービスを開始します:
$ systemctl start snmptt
$ systemctl enable snmptt
これで、SNMPマネージャー(Nagiosサーバー)は、着信SNMPトラップを受け入れて処理する準備が整いました。
ClusterControlサーバーからトラップを送信する
クラスターID1のクリティカルアラームの総数が2に達したため、SNMPトラップをSNMPマネージャー192.168.10.11(Nagiosサーバー)に送信したいとします。次のコマンドを実行します。 ClusterControlサーバー(クライアント側)、192.168.10.50:
$ snmptrap -v2c -c private 192.168.10.11 '' SEVERALNINES-CLUSTERCONTROL-MIB::criticalAlarmNotification \
SEVERALNINES-CLUSTERCONTROL-MIB::totalCritical i 2 \
SEVERALNINES-CLUSTERCONTROL-MIB::clusterId i 1
または、OID形式(推奨):
$ snmptrap -v2c -c private 192.168.10.11 '' .1.3.6.1.4.1.57397.1.1.3.1 \
.1.3.6.1.4.1.57397.1.1.1.2 i 2 \
.1.3.6.1.4.1.57397.1.1.1.4 i 1
ここで、.1.3.6.1.4.1.57397.1.1.3.1はcriticalAlarmNotificationトラップイベントと等しく、後続のOIDは、それぞれ現在のクリティカルアラームの総数とクラスターIDを表します。 。
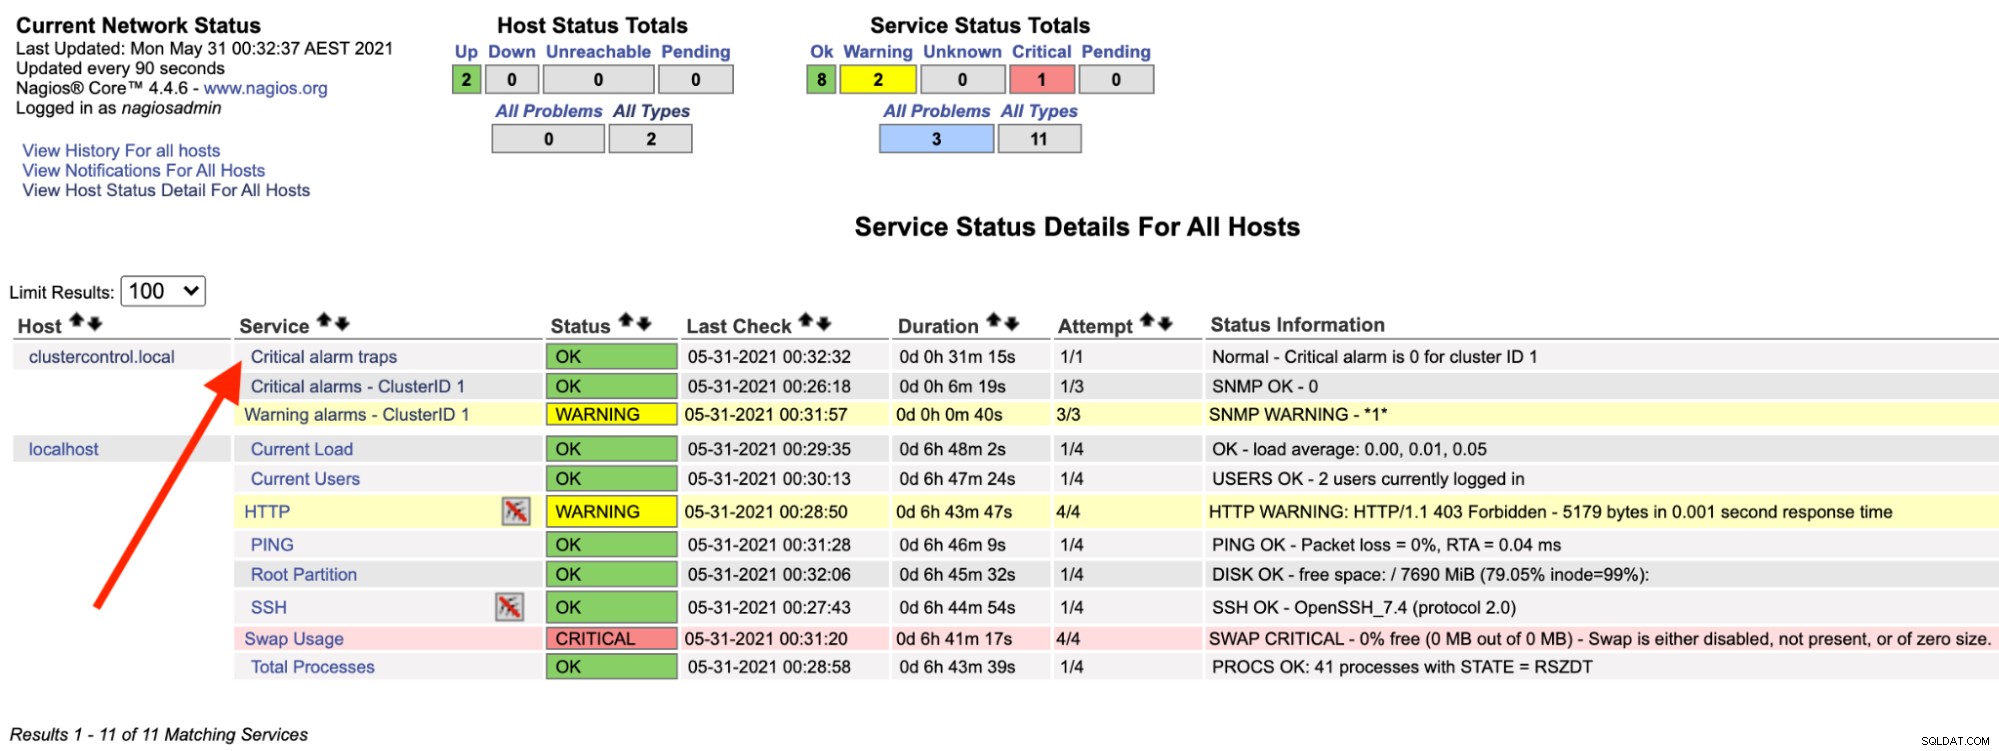
Nagiosサーバーで、トラップサービスが赤に変わったことに気付くはずです:

次の行の/var/ log/messagesでも確認できます。
May 30 23:52:39 ip-10-15-2-148 snmptrapd[27080]: 2021-05-30 23:52:39 UDP: [192.168.10.50]:33151->[192.168.10.11]:162 [UDP: [192.168.10.50]:33151->[192.168.10.11]:162]:#012DISMAN-EVENT-MIB::sysUpTimeInstance = Timeticks: (2423020) 6:43:50.20#011SNMPv2-MIB::snmpTrapOID.0 = OID: SEVERALNINES-CLUSTERCONTROL-MIB::criticalAlarmNotification#011SEVERALNINES-CLUSTERCONTROL-MIB::totalCritical = INTEGER: 2#011SEVERALNINES-CLUSTERCONTROL-MIB::clusterId = INTEGER: 1
May 30 23:52:42 nagios.local snmptt[29557]: .1.3.6.1.4.1.57397.1.1.3.1 Critical "Status Events" UDP192.168.10.5033151-192.168.10.11162 - Notification if critical alarm is not 0
May 30 23:52:42 nagios.local nagios: EXTERNAL COMMAND: PROCESS_SERVICE_CHECK_RESULT;192.168.10.50;Critical alarm traps;2;Critical - Critical alarm is 2 for cluster ID 1
May 30 23:52:42 nagios.local nagios: PASSIVE SERVICE CHECK: clustercontrol.local;Critical alarm traps;0;PING OK - Packet loss = 0%, RTA = 22.16 ms
May 30 23:52:42 nagios.local nagios: SERVICE NOTIFICATION: nagiosadmin;clustercontrol.local;Critical alarm traps;CRITICAL;notify-service-by-email;Critical - Critical alarm is 2 for cluster ID 1
May 30 23:52:42 nagios.local nagios: SERVICE ALERT: clustercontrol.local;Critical alarm traps;CRITICAL;HARD;1;Critical - Critical alarm is 2 for cluster ID 1
アラームが解決したら、通常のトラップを送信するために、次のコマンドを実行できます。
$ snmptrap -c private -v2c 192.168.10.11 '' .1.3.6.1.4.1.57397.1.1.3.2 \
.1.3.6.1.4.1.57397.1.1.1.2 i 0 \
.1.3.6.1.4.1.57397.1.1.1.4 i 1
ここで、.1.3.6.1.4.1.57397.1.1.3.2はcriticalAlarmNotificationEndedイベントと等しく、後続のOIDは、現在のクリティカルアラームの総数を表します(この場合は0である必要があります)。 )とクラスターID。
Nagiosサーバーでは、トラップサービスが緑色に戻っていることに気付くはずです:

上記は、単純なbashスクリプトで自動化できます:
#!/bin/bash
# alarmtrapper.bash - SNMP trapper for ClusterControl alarms

CLUSTER_ID=1
SNMP_MANAGER=192.168.10.11
INTERVAL=10

send_critical_snmp_trap() {
        # send critical trap
        local val=$1
        snmptrap -v2c -c private ${SNMP_MANAGER} '' .1.3.6.1.4.1.57397.1.1.3.1 .1.3.6.1.4.1.57397.1.1.1.1 i ${val} .1.3.6.1.4.1.57397.1.1.1.4 i ${CLUSTER_ID}
}

send_zero_critical_snmp_trap() {
        # send OK trap
        snmptrap -v2c -c private ${SNMP_MANAGER} '' .1.3.6.1.4.1.57397.1.1.3.2 .1.3.6.1.4.1.57397.1.1.1.1 i 0 .1.3.6.1.4.1.57397.1.1.1.4 i ${CLUSTER_ID}
}

while true; do
        count=$(s9s alarm --list --long --cluster-id=${CLUSTER_ID} --batch | grep CRITICAL | wc -l)
        [ $count -ne 0 ] && send_critical_snmp_trap $count || send_zero_critical_snmp_trap
        sleep $INTERVAL
done
スクリプトをバックグラウンドで実行するには、次のようにします。
$ bash alarmtrapper.bash &この時点で、クラスターに障害が自動的に発生した場合に、Nagiosの「クリティカルアラームトラップ」サービスが動作していることを確認できるはずです。
このブログシリーズでは、SNMPプロトコルを使用して、ClusterControlを監視、トラップの生成/処理、およびアラート用に構成する方法に関する概念実証を示しました。これは、将来のリリースにSNMPを組み込むための私たちの旅の始まりでもあります。このエキサイティングな機能に関する最新情報をお届けしますので、ご期待ください。
