1 MS Access 2010、2013、2016、および2019チュートリアルの概要
MSAccessチュートリアルへようこそ。このチュートリアルは、ユーザーがMS Access(以降、単に「Access」)を使用してすばやく実行できるように設計されています。アクセスの4つの基本モジュール(テーブル、フォーム、レポート、クエリ)が示されています。最初に、単純なデータベースを開発するための背景を提供するビジネス例について説明します。
このチュートリアルのユーザーは、Microsoft Windows XP / Vista / Win7/Win10などおよびMSExcelの操作に習熟していることを前提としています。これには、キーボードとマウスの使用が含まれます。このチュートリアルは、MS Excel、MS Word、MSPowerpointを含むMicrosoftOfficeProfessionalスイートの一部であるMicrosoftAccessに基づいています。
このチュートリアルでは、以前のバージョンとは異なる共通のインターフェイス(上部にある「リボンバー」)を備えたMS Access 2007、2010、2013、2016、および2019について説明します。 MS Access ’97または2000の使用に興味がある場合は、Microsoft Accessチュートリアル– MS Access ’97および2000のWebページを参照してください。
チュートリアルは、リレーショナルデータベースの概要から始まります。 。現在使用されているデータベース管理システムの大部分は、いわゆるリレーショナルデータベースモデルに基づいています。 Accessはリレーショナルデータベース管理システムです。次に、ビジネスの例を説明し、開発したいデータベースとアプリケーションの概要を示します。次のセクションでは、アプリケーションのテーブル、データ入力フォーム、レポート、クエリを作成するための手順を説明します。
1.1対象読者
このチュートリアルは、MSAccessデータベース管理システムを使い始めたばかりの学生を対象としています。
1.2前提条件となる知識
このチュートリアルは、学生がパーソナルコンピュータとWindows 2000、Windows XP、Windows Vista、またはWindows7の基本的な操作に精通していることを前提としています。このチュートリアルに必要な特定のスキルは次のとおりです。
- マウスとキーボードの使用
- たとえば、ハードディスクやUSBメモリスティック(サムドライブ)でファイルを開いて保存する
- ドライブ文字やハードディスクなどの違いを含む、一般的なファイルの管理
- Windowsの[スタート]メニューからプログラムを実行する
- ウィンドウの最小化、最大化、サイズ変更
学生は、このチュートリアル中に作成されるファイルを保存するために、USBメモリスティック(サムドライブ)またはその他のポータブルメモリデバイスを用意する必要があります。
1.3AppleMacでのMicrosoftAccessの実行
一部の学生が直面する可能性のある問題の1つは、MS AccessがWindowsオペレーティングシステム(Windows XP、Vista、Windows 7など)でのみ実行されるという事実です。 Intel CPUを使用するMacOSを実行しているMacBook、iMac、またはその他のAppleシステムを使用している場合は、いくつかの代替案を試すことができます。 Intel CPUを使用する最新のAppleコンピュータの多くは、Windowsオペレーティングシステムを実行できます。これを行うには、Windowsオペレーティングシステムの合法的にライセンスされたコピーが必要になることに注意してください。これを実現するには、主に2つの方法があります。
- MacOSXとWindowsの両方を「デュアルブート」するようにMacを設定できます。これを可能にする製品の1つは、AppleBootCampソフトウェアです。
- VirtualBoxなどの「仮想」コンピュータを使用して、WindowsOSをMacOSXと「並べて」実行できます
目次
- 1MSAccessチュートリアルの概要
- 1.1対象読者
- 1.2前提条件となる知識
- 1.3AppleMacでのMicrosoftAccessの実行
- 2リレーショナルデータベースとデータベースアプリケーションの概要
- 3ビジネス例
- 4MicrosoftAccessの起動
- 4.1MicrosoftAccessの開始のレビュー
- 5テーブルの作成と表示
- 5.1デザインビューを使用したテーブルの作成
- 5.2演習:テーブルの作成
- 5.3データの表示とテーブルへの追加
- 5.4演習:テーブルへのデータの追加
- 5.5テーブル間の関係の作成
- 5.6テーブルの作成と表示のレビュー
- 6クエリの作成と実行
- 6.1単一テーブルクエリ
- 6.2演習:単一テーブルクエリ
- 6.3複数のテーブルクエリ
- 6.4演習:複数のテーブルクエリ
- 6.5クエリの作成と実行のレビュー
- 7データ入力フォームの作成と実行
- 7.1ウィザードを使用した単一テーブルフォームの作成
- 7.2演習:単一のテーブルフォームの作成
- 7.3データ入力フォームの作成と実行のレビュー
- 8レポートの作成と実行
- 8.1ウィザードを使用した単一テーブルレポートの作成
- 8.2演習:単一のテーブルレポートの作成
- 8.3レポートの作成と実行のレビュー
- 9マスター/詳細フォーム(サブフォーム付きのフォーム)の作成と実行
- 10配電盤の作成と実行
- 11ナビゲーションフォームの作成と実行
- 11.1演習:ナビゲーションフォームの変更
- 11.2ナビゲーションフォームをデフォルトとして設定する
- 12チュートリアルの概要と高度なトピック
次のページでは、リレーショナルデータベースについて簡単に紹介します。
2リレーショナルデータベースとデータベースアプリケーションの概要
1960年代と1970年代に実装された最初のデータベースは、フラットデータファイルまたは階層データモデルまたはネットワークデータモデルのいずれかに基づいていました。データを保存するこれらの方法は、その堅固な構造と、最も日常的な処理を実行するためのアプリケーションプログラムへの依存度が高いため、比較的柔軟性がありませんでした。
1970年代後半、リレーショナルデータベースモデル 学術研究コミュニティで生まれたものは、IBMDB2やOracleなどの商用実装で利用できるようになりました。リレーショナルデータモデルは、リレーションズに保存されているデータを指定します いくつかの関係があります それらの中で(したがって、名前はリレーショナル 。
Sybase、MySQL、Oracle、IBM DB2、MS SQL Server、MS Accessなどのリレーショナルデータベースでは、データはテーブルに保存されます。 1つ以上の列で構成されています (Accessは列をフィールドと呼びます )。各列に格納されるデータは、単一のデータ型である必要があります 文字(「文字列」と呼ばれることもあります)、数値、日付など。テーブルの各列の値のコレクションは、レコードと呼ばれます。 または行 テーブルに。
異なるテーブルに同じ列を共通に含めることができます。この機能は、2つのテーブル間の関係を明示的に指定するために使用されます。あるテーブルの列Aに表示される値は、別のテーブルと共有されます。
以下は、ローカル銀行のリレーショナルデータベースのテーブルの2つの例です。
顧客テーブル
| CustomerID | 名 | 姓 | 番地 | 市 | 州 | Zip |
|---|---|---|---|---|---|---|
| 番号 | キャラクター | キャラクター | キャラクター | キャラクター | キャラクター | キャラクター |
| 1001 | ジョセフ | スミス | 123レキシントン | スミスビル | KY | 91232 |
| 1002 | アルバータ | ジョーンズ | 12 Davis Ave. | スミスビル | KY | 91232 |
| 1003 | ナサニアル | 斧 | 443グラインダーLn。 | ブロードビル | GA | 81992 |
| 1004 | パウリナ | ビルダー | 661パーカーロード | ストリートビル | GA | 81990 |
アカウントテーブル
| CustomerID | AccountNumber | AccountType | DateOpened | バランス |
|---|---|---|---|---|
| 番号 | 番号 | キャラクター | 日付 | 番号 |
| 1001 | 9987 | 確認中 | 1989年10月12日 | 4000.00 |
| 1001 | 9980 | 節約 | 1989年10月12日 | 2000.00 |
| 1002 | 8811 | 節約 | 1992年1月5日 | 1000.00 |
| 1003 | 4422 | 確認中 | 1994年12月1日 | 6000.00 |
| 1003 | 4433 | 節約 | 1994年12月1日 | 9000.00 |
| 1004 | 3322 | 節約 | 1994年8月22日 | 500.00 |
| 1004 | 1122 | 確認中 | 1988年11月13日 | 800.00 |
Customerテーブルには、7つの列(CustomerID、名、姓、住所、市区町村、都道府県、郵便番号)と4行(またはレコード)のデータがあります。 Accountsテーブルには5つの列(CustomerID、AccountNumber、AccountType、DateOpened、Balance)があり、7行のデータがあります。
各列は、3つの基本的なデータ型のいずれかに準拠しています。 :文字、数字、または日付。列のデータ型は、その列に格納される可能性のあるデータ値の型を示します。
- 数値–おそらく小数点付きの数値のみを格納できます。正または負の場合があります。
- 文字–数字、文字、句読点を格納できます。 Accessはこのデータ型をテキストと呼びます 。
- 日付–日付と時刻のデータのみを保存できます。
一部のデータベース実装では、画像(画像またはその他のデータ用)などの他のデータ型が存在します。ただし、上記の3つのデータ型が最も一般的に使用されます。
2つのテーブルが列CustomerIDを共有し、CustomerテーブルのCustomerID列の値がAccountsテーブルのCustomerID列の値と同じであることに注意してください。この関係 お客様がNathanialAxeであることを指定できます 1994年12月1日の同じ日に開設された、小切手口座と普通預金口座の両方があります。
このような関係に付けられた別の名前は、マスター/詳細です。 。マスター/詳細関係では、単一のマスターレコード(Customer 1003、Nathanial Axeなど)に多数の詳細レコード(2つのアカウント)を関連付けることができます。
マスター/詳細関係では、マスターレコードが詳細なしで存在する可能性があります。ただし、一致するマスターレコードなしで詳細レコードを作成することはできません。たとえば、顧客は必ずしもアカウント情報を持っているとは限りません。ただし、アカウント情報は必須 単一の顧客に関連付けられます。
各テーブルには、キーと呼ばれる特別な列も必要です。 これは、テーブル内の行またはレコードを一意に識別するために使用されます。キー列(または複数の列)の値が重複することはありません。上記の表では、CustomerIDはCustomerテーブルのキーであり、AccountNumberはAccountsテーブルのキーです。
3ビジネス例
このセクションでは、チュートリアル全体で例の基礎として使用されるビジネス例の概要を説明します。組織では、ビジネスを分析し、適切なデータベース構造(テーブルと列)を決定する作業は、通常、システムアナリストによって実行されます。 。システムアナリストは、ビジネスの運営方法に関する情報を収集し、モデルを形成します。 データストレージ要件の。このモデルから、データベースプログラマーはデータベーステーブルを作成し、アプリケーション開発者と協力して残りのデータベースアプリケーションを開発します。
このチュートリアルでは、単純な銀行業務について検討します。銀行には、1つ以上の口座を開設して維持している多くの顧客がいます。お客様ごとに、お客様の名前と住所を記録します。また、一意のCustomerIDを割り当てます。この一意の識別子は、利便性と正確性の両方のために割り当てられています。フルネームと住所を検索するよりも、CustomerIDを使用して単一の顧客を識別する方がはるかに簡単です。さらに、銀行が同じ名前の2人の顧客(Bill Smithなど)を持つ可能性があります。このような場合、一意のCustomerIDを常に使用して区別することができます。
同様に、すべてのアカウントに一意のアカウント番号が割り当てられます。アカウントは、当座預金口座または普通預金口座のいずれかになります。普通預金口座は利息を稼ぎますが、許可される取引は預金と引き出しのみです。口座の確認は利息を獲得しません。アカウントが開設された日付を保持します。これは、顧客を追跡するのに役立ち、マーケティング目的に役立ちます。最後に、アカウントの現在の残高を維持します。
前のセクションでは、CustomerテーブルとAccountsテーブルの構造といくつかのサンプルデータを示しました。これらは、バンキングアプリケーションのデータストレージ部分をサポートするために使用されます。
データベースアプリケーション
どのデータベースアプリケーションでも、各テーブルには、データをテーブルに取り込み、後でデータを取得して変更する手段が必要です。データをテーブルに取り込む主な方法は、データ入力フォームを使用することです。テーブルからデータを取得したり、テーブルにデータを表示したりする主な方法は、クエリまたはレポートを使用することです。完全なデータベースアプリケーションでは、すべてのフォームとレポートがナビゲーションフォームでリンクされます。これは、アプリケーションの各部分へのリンクを持つ単一のページです。大規模なデータベースアプリケーションには、数十のデータ入力フォームとレポートが含まれる場合があります。
このチュートリアルでは、各テーブルのデータ入力フォーム、各テーブルのクエリ、および各テーブルのレポートを作成します。
次のセクションでは、最初にAccessを開始する方法と新しいデータベースを作成する方法を紹介します。
4MicrosoftAccessの起動
ほとんどのWindowsプログラムと同様に、Accessは、Windowsデスクトップの左下隅にある[スタート]メニューに移動することで実行できます。
Accessを開始するには、[スタート]ボタン、[プログラム]メニューの順にクリックし、[Microsoft Office]メニューに移動して、最後に[MicrosoftAccess]メニュー項目をクリックします。 MSOfficeProfessionalのメニューを以下に示します。
このメニューの配置は、使用しているPCにMSOfficeがどのようにインストールされているかによって異なる場合があることに注意してください。
Accessが実行されると、初期画面が表示されます。
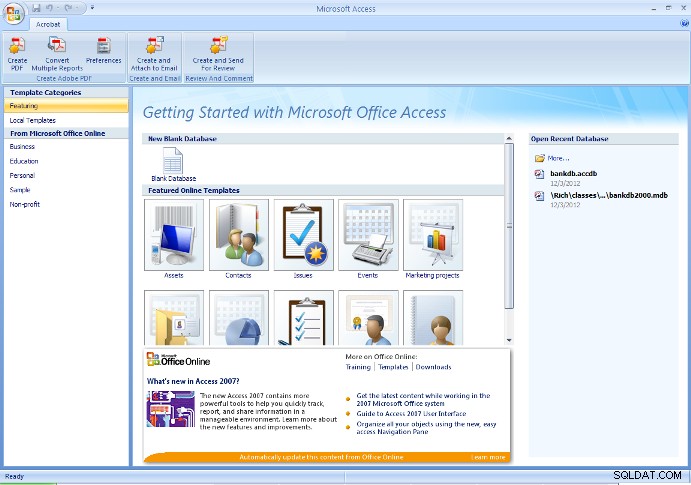
この初期画面から、ユーザーは新しいデータベースを作成するか(空白、またはデータベースウィザードで作成されたいくつかのテーブルを使用して)、既存のデータベースを開くことができます。
一般に、プロジェクトを初めて開始するときは、新しい空のデータベースを作成する必要があります。その後、既存のデータベースを開くを使用します 以前に作成したデータベースを再度開くオプション。
警告 –以前にデータベースを作成し、同じ名前を使用して再度データベースを作成した場合は、行った作業を上書きします。
このチュートリアルの目的上、これらの手順を初めて実行する場合は、上の図に示すように、新しい空のデータベースを作成するオプションを選択してください。
Access 2007では、左上隅にある丸いOfficeボタンをクリックし、ドロップダウンメニューから[新規]を選択します。 ファイル名を入力します bankdb.accdbとして作成し、[作成]ボタンをクリックして、次の図のようにデータベースを作成します。
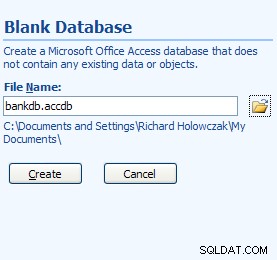
Access2007の新しいデータベース画面
上記のファイル名で、bankdbはこの特定のデータベースに選択された名前であり、.accdbは Microsoft DataBase 2007に付けられたファイル名拡張子です。 2010および2013ファイル。
データベースの名前(上記の例ではbankdb)を比較的短くし、データベースの名前にスペースやその他の句読点を使用しないことをお勧めします。また、データベースの名前はデータベースの内容を反映している必要があります。
新しいデータベースが作成されると、次のメインアクセス画面が表示されます。
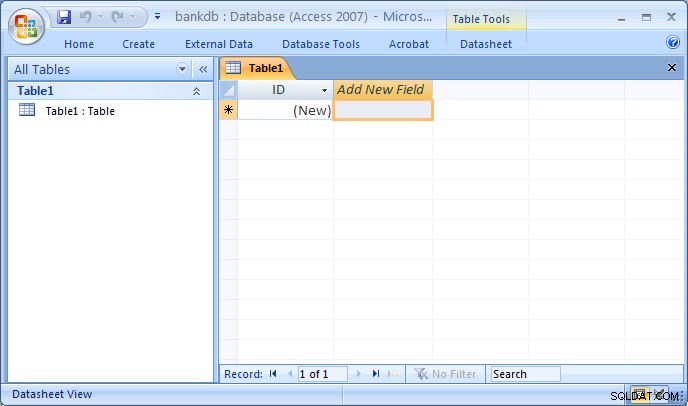
MS Access 2007の画面レイアウトは、以前のバージョンとは大幅に異なります。画面上部のほとんどのタブが再配置されました。さらに、新しいデータベースを作成した後のデフォルトのメイン画面は、自動的にデザインビューに切り替わり、新しいテーブルを作成します。
画面の上部に次のタブが表示されます。
- [ホーム]タブ –フォントの変更、クエリの実行、データのコピー/貼り付け/切り取りなどのコントロール。
- [作成]タブ –テーブル、フォーム、レポートなどを作成するためのコントロール
- [外部データ]タブ –他のデータソースからMSAccessにデータをロードするためのコントロール。
- [データベースツール]タブ –データベースを管理するためのコントロール(セキュリティ、配電盤など)
- [デザイン]タブ –これは、新しいテーブル、フォーム、レポートなどを設計するときに表示されます。
Access 2007、2010、および2013のインターフェースはすべて類似していますが、使用するバージョンは、このチュートリアルに含まれている写真とは少し異なる場合があります。
4.1MicrosoftAccessの開始のレビュー
Microsoft Accessを開始するには:
- タスクバーの[スタート]ボタンを使用して、[プログラム]-> [MS Office]->[MicrosoftAccess]を開きます。
- 新しいデータベースを作成するには、空白のデータベースを選択します データベースの新しいファイル名を指定します。新しいデータベースには、わかりやすい名前を使用してください。 [OK]ボタンをクリックして、新しいデータベースを作成します。
- 既存のデータベースを開くには、既存のデータベースを開くを選択します 、その他のファイル…を強調表示します [OK]ボタンをクリックします。次に、ドライブに移動し、ハードディスクまたはUSBドライブ上の既存のデータベースファイルを強調表示し、[OK]ボタンをもう一度クリックしてデータベースを開きます。
Accessを終了するには、[ファイル]メニュー(または[Office]メニュー)をプルダウンして、[終了]メニュー項目を選択します。
5テーブルの作成と表示
テーブルは、Accessのデータストレージの主要な単位です。テーブルは1つ以上の列で構成されていることを思い出してください (またはフィールド )そして、テーブル間の関係を示すために、特定の列が複数のテーブルに表示される場合があります。
前述のビジネス例から、顧客に関するデータを格納するには2つのテーブルで十分であると結論付けました。 とその銀行のアカウント 。ここで、Accessでこれら2つのテーブルを作成するための手順を説明します。
Accessでテーブルを作成する方法はいくつかあります。アクセスはウィザードを提供します これは、テーブルと列の名前を提案することにより、ユーザーがテーブルを作成するためのガイドです。テーブルを作成するもう1つの主な方法は、デザインビューを使用することです。 列(フィールド)とそのデータ型を手動で定義します。
ウィザードを使用するとテーブルをすばやく作成できますが、ユーザーは列名(フィールド)とデータ型をあまり制御できません。このチュートリアルでは、デザインビューを使用してテーブルを作成する手順について説明します。 。生徒は、テーブルの作成ウィザードを使用して自分で実験することをお勧めします。
5.1デザインビューを使用したテーブルの作成
デザインビューを使用してAccessでテーブルを作成するには、次の手順を実行します。
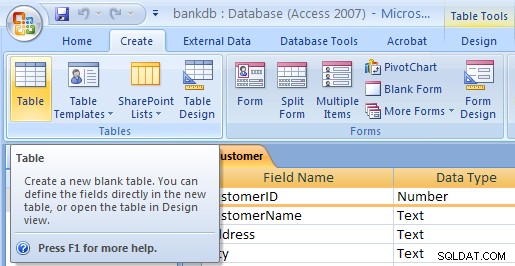
- Access 2007、2010、2013では、[新しいテーブルの作成]タブが既に強調表示され、table1という名前の新しいテーブルが作成されているはずです。そうでない場合は、作成をクリックします。 タブをクリックし、テーブルをクリックします アイコン。次に、表示をプルダウンします メニューからデザインビューを選択します 。

- テーブルデザインビューが表示されます。 フィールド名を入力します 、データ型 および説明 テーブルの各列/フィールド。 CustomerIDフィールドは以下に入力されます:
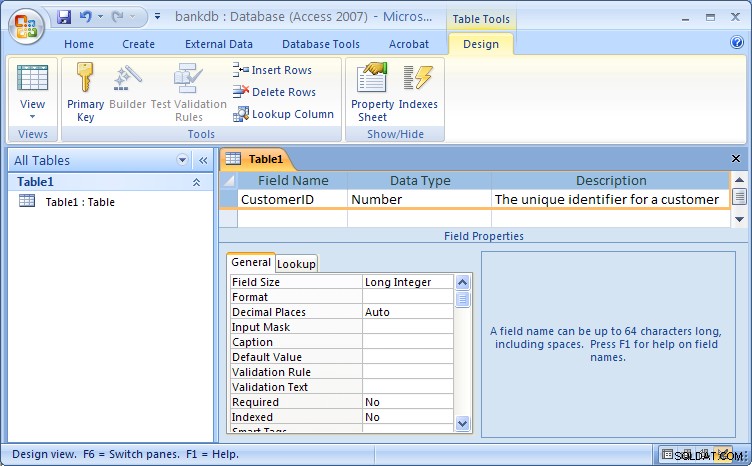
Access2007のテーブルデザインビューテーブルに付けられたデフォルトの名前はTable1であることに注意してください 。後のステップで、このテーブルに適切な名前を割り当てます。
次のようにフィールドの情報を入力します。
フィールド名 データ型 説明 CustomerID 番号 顧客の一意の識別子 FirstName テキスト お客様の名 姓 テキスト お客様の名前 StreetAddress テキスト お客様の住所 市 テキスト お客様の街 状態 テキスト お客様の本国 ジップ テキスト お客様の郵便番号 新しいテーブル定義が入力されたデザインビューを示す図を以下に示します。

次のステップは、テーブルのキーを定義し、テーブルを保存することです。
- テーブルに対してすべてのフィールドが定義されたので、主キーを定義する必要があります。主キーは、テーブル内のレコード(この場合は顧客)を一意に識別するために使用されることを思い出してください。 CustomerIDを強調表示します フィールドに移動し、ボタンバーの[主キー]ボタンをクリックします
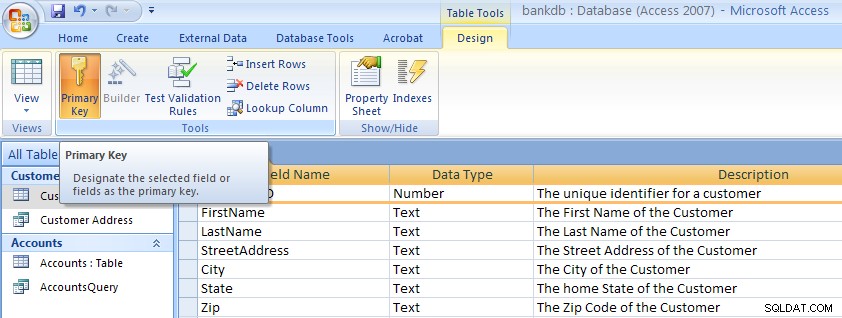 左側のフィールド名の横に小さなキーが表示されていることに注意してください。注:主キーを削除するには、この手順を繰り返して、主キーをオフに切り替えます。
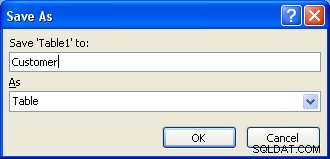
- 最後のステップとして、テーブルを保存する必要があります。 Officeメニューをプルダウンし、[名前を付けて保存]メニュー項目を選択します。新しいテーブルの名前を指定するダイアログボックスが表示されます。 Accessには、 Table1などのデフォルト名が付けられていることに注意してください。 または表2 。このデフォルト名をテーブルの名前で上書きするだけです。この例では、テーブルに Customerという名前を付けます。 次に、[OK]ボタンをクリックします。
この時点で、新しいCustomerテーブルが作成されて保存されています。
MS Accessのフィールド(列)の命名に関する注意
テーブルのフィールド(列)を定義するときは、列のデータ内容を明確に理解できるフィールド名を使用することが重要です。たとえば、フィールドCNOは顧客番号またはコンテナ番号を示していますか?
Accessのフィールド名は、最大64文字の長さで、スペースを含めることができます。 ただし、フィールド名とテーブル名にスペースを使用することは強くお勧めしません。 。フィールド名を読みやすくしたい場合は、アンダースコア文字を使用して単語を区切ることを検討してください。ただし、アンダースコアの前後にスペースが表示されないようにしてください。
次の表は、フィールド名を付けるためのいくつかの異なる方法をまとめたものです。
| 説明 | 悪い | 良い |
|---|---|---|
| 顧客の一意の識別子 | CID | CustomerIDまたはCustomer_ID |
| 製品の説明 | PDESC | 製品の説明 |
| 従業員の自宅の電話番号 | Employee_home_telephone_number | 自宅の電話 |
| 銀行口座番号 | BA# | アカウント番号 |
5.2演習:テーブルの作成
アカウントを作成します Customerテーブルの作成に使用したのと同じ手順に従ってテーブルを作成します。
- [作成]タブをクリックしてから、テーブルをクリックします。 ボタン。
- [表示]メニューをプルダウンして、[デザイン]を選択します。テーブルデザインビューが表示されます。 フィールド名を入力します 、データ型 および説明 Accountsテーブルの各列/フィールド。
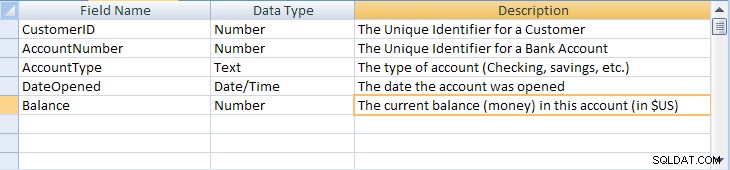
フィールド名 データ型 説明 CustomerID 番号 顧客の一意の識別子 AccountNumber 番号 銀行口座の一意の識別子 AccountType テキスト アカウントの種類(チェック、貯蓄など) DateOpened 日付 アカウントが開設された日付 バランス 番号 このアカウントの現在の残高(お金)($ US) 新しいテーブル定義が入力されたデザインビューを示す図を以下に示します。
- Accountsテーブルの主キーを定義します。 アカウント番号をクリックします 右のフィールド マウスボタンを押して、ポップアップメニューから[主キー]を選択します。
- [ファイル]メニューをプルダウンし、[保存]メニュー項目を選択して、新しいアカウントテーブルを保存します。表の名前を入力します:アカウント 次に、[OK]ボタンをクリックします。
デフォルト値の指定、ルックアップ値の作成、特定のパターンに従うためのデータ入力のマスキングなど、MSAccessのテーブルを改善および装飾するために実行できる追加の手順がいくつかあることに注意してください。この現在のチュートリアルでは詳細は重要ではありませんが、興味がある場合は、ここにリンクされているAdvancedMSAccessテーブルの設計ページを確認してください。
5.3データの表示とテーブルへの追加
単純なスプレッドシートのような表示を使用して、テーブル内のデータを追加、削除、または変更できます。単一のテーブルのデータのこのビューを表示するには、テーブルの名前を強調表示してから、テーブルの名前をダブルクリックします。
次の図に示すCustomerテーブルのこのビューでは、フィールド(列)がウィンドウの上部に表示され、行またはレコードが下に表示されます。このビューは、スプレッドシートの設計方法に似ています。
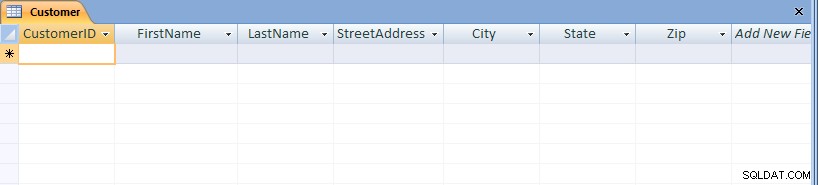
ウィンドウの下部にレコード数が表示されていることに注意してください。この場合、テーブルが作成されたばかりなので、空白のレコードが1つだけ表示されます。
テーブルにデータを追加するには、各フィールド(列)の値を入力するだけです。 Tabキーを押して、レコード内のフィールド間を移動します。上下の矢印キーを使用して、レコード間を移動します。以下のようにデータを入力します:
| CustomerID | FirstName | LastName | StreetAddress | 市 | 州 | Zip |
|---|---|---|---|---|---|---|
| 1001 | ジョセフ | スミス | 123レキシントン | スミスビル | KY | 91232 |
| 1002 | アルバータ | ジョーンズ | 12 Davis Ave. | スミスビル | KY | 91232 |
| 1003 | ナサニアル | 斧 | 443グラインダーLn。 | ブロードビル | GA | 81992 |
| 1004 | パウリナ | ビルダー | 661パーカーロード | ストリートビル | GA | 81990 |

新しいデータを保存するには、Officeメニューをプルダウンして[保存]を選択します。
テーブル内の他のレコードに移動するには、画面の下部にあるナビゲーションバーを使用します。 
既存のデータを変更するには、目的のレコードに移動し、適切なフィールドにタブで移動します。矢印キーと削除キーまたはバックスペースキーを使用して、既存のデータを変更します。
レコードを削除するには、最初に目的のレコードに移動します。次に、[編集]メニューをプルダウンして、[削除]メニュー項目を選択します。
テーブルを閉じてAccessのメイン画面に戻るには、[ファイル]メニューをプルダウンして[閉じる]メニュー項目を選択します。
5.4演習:テーブルへのデータの追加
この演習では、Accountsテーブルを開き、セクション2に示されている7つのアカウントのデータを追加します。AccountTypeフィールドにデータの大文字と小文字を含め、示されているとおりにデータを入力してください。例:「貯蓄」や「貯蓄」ではなく「貯蓄」と入力します。
日付を入力するときは、年の4桁全体を入力することに注意してください。デフォルトでは、Accessは年の4桁すべてを表示します(古いバージョンのAccessは2桁しか表示しませんでした)。
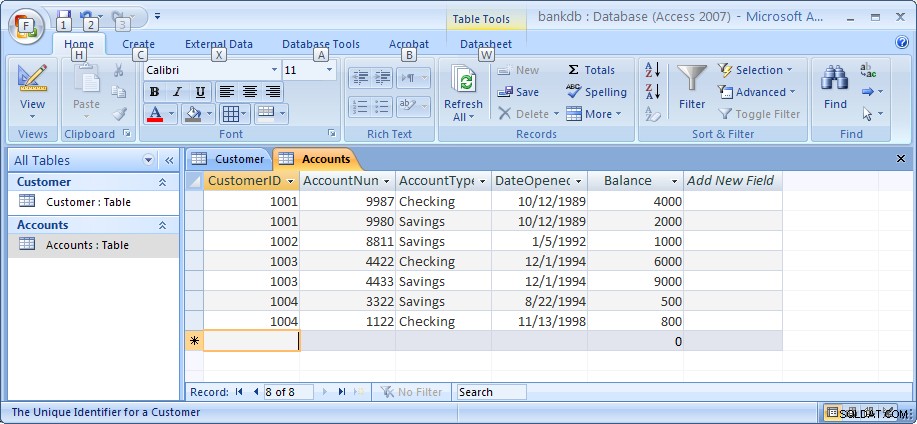
完了したら、必ずデータを保存してください。次の図は、この演習が終了したときに表示されるアカウントテーブルとデータを示しています。
チュートリアルのこの時点で、CustomersとAccountsの2つのテーブルを作成し、それぞれにデータを追加しました。以降のセクションでは、テーブル内のデータをクエリしてレポートする方法と、アクセスウィザードを使用してユーザーフレンドリーなデータ入力フォームを作成する方法について説明します。
注:MS Access Advanced Table Designに関する私のチュートリアルは、このリンクにあります。このチュートリアルの残りの部分を完了した後で、それを確認することをお勧めします。
5.5テーブル間の関係の作成
リレーショナルデータベースの主な特徴の1つは、すべてのテーブルが相互に関連しているという事実であることを思い出してください。これまでのBankデータベースでは、Customersテーブルは、両方のテーブルに表示されるCustomerIDフィールドによって、Accountsテーブルに関連付けられています。 Accessには、[関係]画面を使用してこの関係を明示的にする手段があります。 Accessは、複数のテーブルを表示する必要があるレポート、フォーム、クエリを設計するときにこの情報を使用します。
開始するには、AccountsテーブルとCustomerテーブルの両方が閉じていることを確認してください。テーブルが現在開いている場合、Accessはリレーションシップの作成を停止します。テーブルを閉じるには、テーブルの上のタブでテーブル名を右クリックして[閉じる]メニュー項目を選択するか、テーブルのすぐ上にある小さなXをクリックします。

次に、以下に示すように、[データベースツール]タブをクリックして[関係]画面を表示し、[関係]ボタンをクリックします。 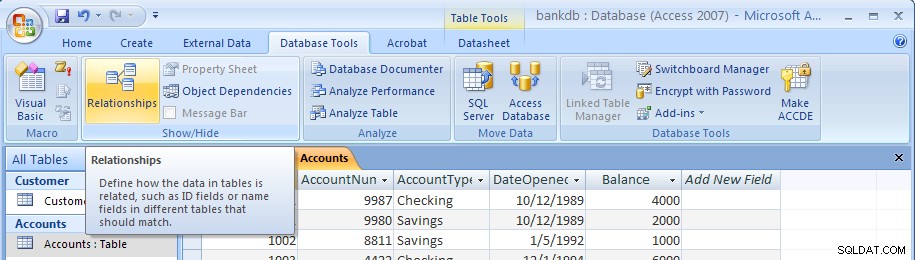
空白の[関係]画面が次のように表示されます。
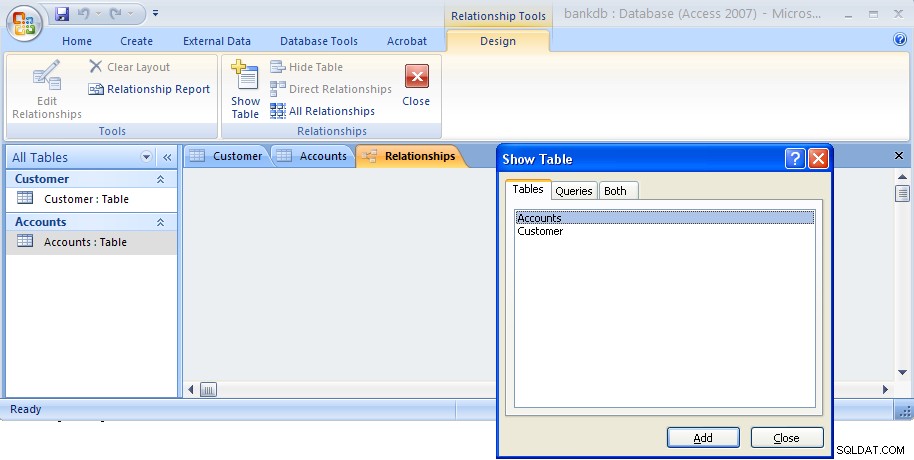
デフォルトでは、[テーブルの表示]ダイアログボックスが表示されます。以下に示すように、CustomersテーブルとAccountsテーブルの両方を強調表示してから、[追加]ボタンをクリックします。

次に、[閉じる]ボタンをクリックして、このダイアログボックスを閉じます。リレーションシップ画面が再表示され、2つのテーブルが次のように表示されます。
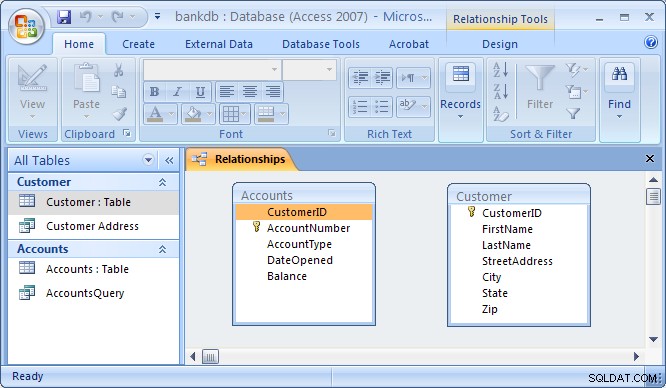
CustomersテーブルをAccountsテーブルに接続して関係を形成するには、CustomersテーブルのCustomerIDフィールドをクリックし、AccountsテーブルのCustomerIDフィールドの上にドラッグします。マウスボタンを離すと、[関係の編集]ダイアログボックスが次のように表示されます。
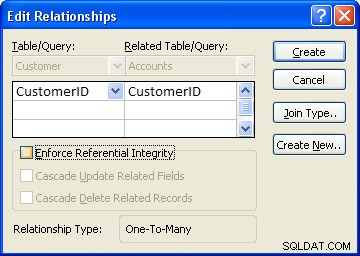
アクセスは、関係タイプを決定するために最善を尽くします(ほとんどの場合、1対多を選択します) )。 For this example, Access knows that CustomerID is a key of the Customer table so it chooses this field as the “One” side. This makes the Accounts table the “Many” side as One customer may have Many accounts.
One additional step to be taken is the check off the box labeled “Enforce Referential Integrity”. This option puts constraints into effect such that an Accounts record can not be created without a valid Customer record, and Access will also prevent a user from deleting a Customer record if a related Accounts record exists. At this point, click on the Create button to create the relationship. The Relationships screen should reappear with the new relationship in place as follows:
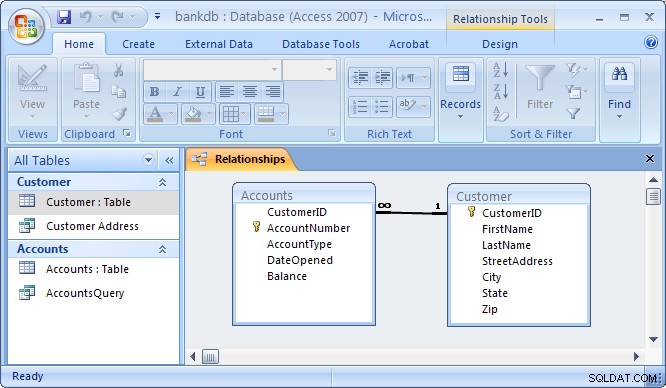
Note the symbols “1” (indicating the “One” side) and the infinity symbol (indicating the “Many” side) on the relationship. Close the relationships screen and select Yes to save the changes to the Relationships layout.
If the relationship does not appear in the above fashion, highlight it and press the delete key to delete it. Then go back to the table design view and make certain that the CustomerID field is designated as the key of the Customers table. Then go back to the Relationships screen and try to recreate the relationship.
5.6 Review of Creating and Viewing Tables
Creating a new table requires the following steps:
- Click on the Tables tab on the Access main screen
- Click on the New button.
- Choose the Design View and click the OK button.
- Fill in the name, data type and description of each of the fields in the table.
- Designate a primary key by clicking on one of the fields with the right mouse button and then choose Primary Key from the pop-up menu.
- Save the table by pulling down the File menu and choosing Save.
- Close the new table by pulling down the File menu and choosing Close.
To change the design of an existing table (e.g., to add, change or delete a field):
- Click on the Tables tab on the Access main screen
- Highlight the name of the table to be modified and click on the Design button.
- Make the necessary changes.
- Save the table by pulling down the File menu and choosing Save.
- Close the table by pulling down the File menu and choosing Close.
To add, delete or change data in an existing table:
- Click on the Tables tab on the Access main screen
- Highlight the name of the table to be modified and click on the Open button.
- Make the necessary changes to the data.
- Save the table data by pulling down the File menu and choosing Save.
- Close the table by pulling down the File menu and choosing Close.
To create or edit relationships between tables:
- Pull down the Tools menu and select the Relationships menu item.
- To display tables, right click and choose Add Tables
- To create new relationships, drag a key field from one table and drop it on the associated field in another table
- To edit an existing relationship, double click on the relationship line.
- To delete an existing relationship, click on the relationship line and press the delete key.
6 Creating and Running Queries
Queries are a fundamental means of accessing and displaying data from tables. Queries can access a single table or multiple tables. Examples of queries for our bank database might include:
- Which Customers live in Georgia ?
- Which Accounts have less than a $500 balance ?
- What is the total amount of money deposited by each Cusomter?
- Which Checking account has the largest balance?
Queries can be used to carry out other tasks such as for creating formatted reports and data entry forms, and for exporting subsets of data to Excel or another software program.
In this section, we show how to use the Access Wizards to create queries for a single table and for multiple tables.
6.1 Single Table Queries
In this section, we demonstrate how to query a single table. Single table queries are useful to gain a view of the data in a table that:
- only displays certain fields (columns) in the output
- sorts the records in a particular order
- performs some statistics on the records such as calculating the sum of data values in a column or counting the number of records, or
- filters the records by showing only those records that match some criteria. For example, show only those bank customers living in GA.
Creating a query can be accomplished by using either the query design view or the Query wizard. In the following example, we will use the query wizard to create a query.
To create a new query, click on the Create tab. Then click on the Query wizard button.
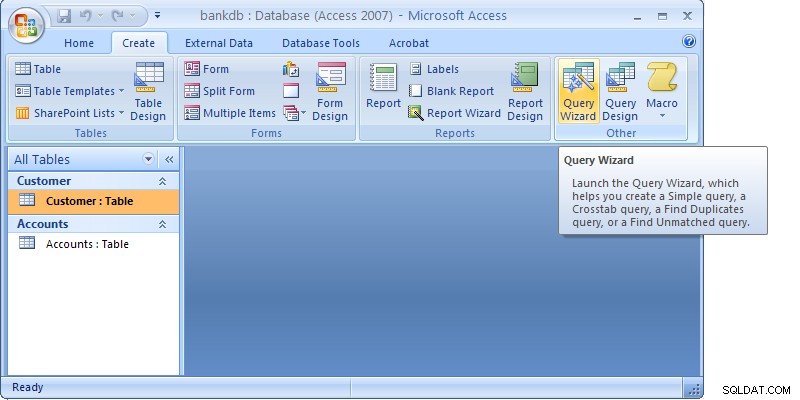
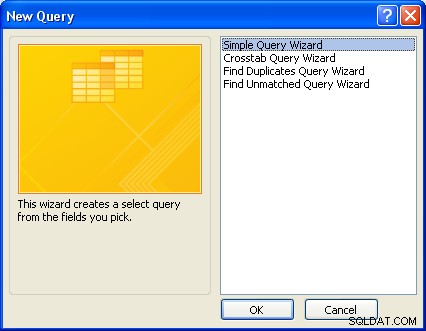
When the Query wizard appears, highlight the Simple Query Wizard selection and click on the OK button.
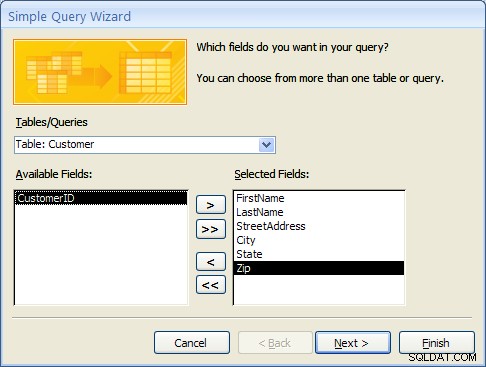
The first step in the Simple Query wizard is to specify the table for the query and which fields (columns) should be displayed in the query output. Three main sections of this step are:
- Tables/Queries – A pick list of tables or queries you have created.
- Available Fields – Those fields from the table that can be displayed.
- Selected Fields – Those fields from the table that will be displayed.
For this example, pull down the Tables/Queries list and choose the Customer table. Notice that the available fields change to list only those fields in the Customer table. This step is shown below:

From the list of Available fields on the left, move the FirstName, LastName, StreetAddress, City and State fields over to the Selected Fields area on the right. Highlight one of the fields and then click on the right arrow button  in the center between the two areas. Repeat this for each of the four fields to be displayed. When done with this step, the wizard should appear as below:
Click on the Next button to move to the next and final step in the Simple Query wizard.
In the final step, give your new query a name. For this example, name the query:Customer Address
At this point, the wizard will create the new query with the option to either:
- Open the query to view information – that is, the wizard will execute the query and show the data.
- Modify the query design – the wizard will switch to the Design View to allow further modification of the query.
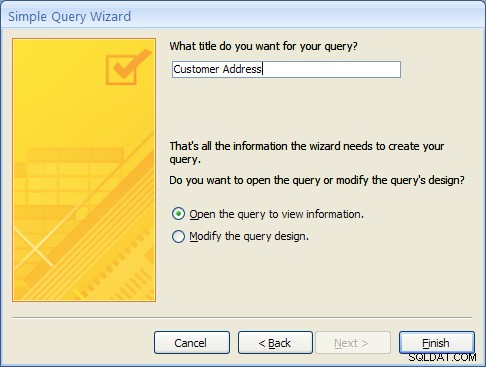
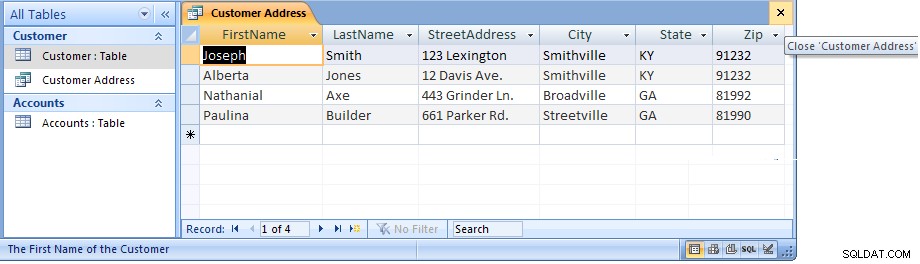
For this example, choose Open the query to view information and click on the Finish button. When this query executes, only the customer’s name, address, city and state fields appear, however, all of the rows appear as shown in the figure below:

Close this query by clicking on the X in the upper right corner of the query results as shown in the figure below:
The Access main screen showing the Queries tab should appear. Note the new query Customer Address appears under the Customers table.
6.1 Single Table Queries (Continued)
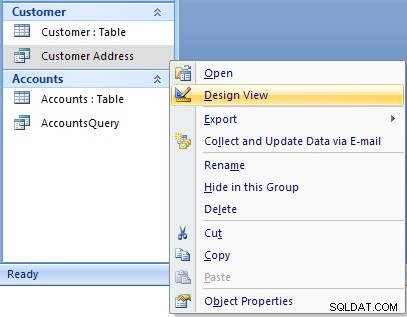
In the following example, we will modify the Customer Address query to only display customers in a certain state. To accomplish this, we will make use of the Query Design View.
Open up the Customer Address query in the design view by right-clicking on the name of the query. Then select the Design View menu item as shown below.
The design view will appear as in the figure below:
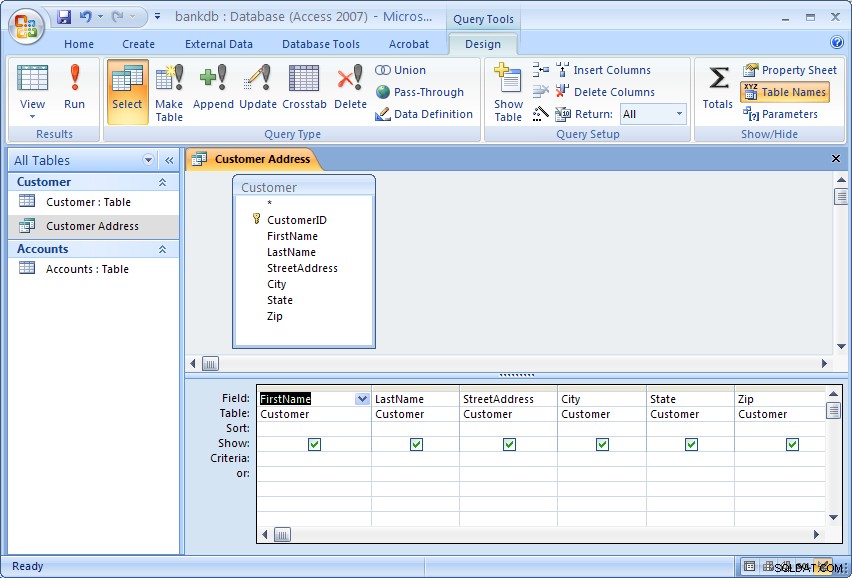
The Query Design view has two major sections. In the top section, the table(s) used for the query are displayed along with the available fields. In the bottom section, those fields that have been selected for use in the query are displayed.
Each field has several options associated with it:
- Field – The name of the field from the table
- Table – The table the field comes from
- Sort – The order in which to sort on this field (Ascending, Descending or Not Sorted)
- Show – Whether or not to display this field in the query output
- Criteria – Indicates how to filter the records in the query output.
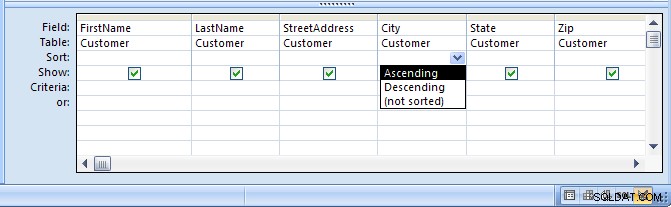
For this example, we will filter the records to only display those customers living in the State of Georgia (GA). We will also sort the records on the City field.
To sort the records on the City field, click in the Sort area beneath the City 分野。 Choose Ascending from the list as shown in the figure below:
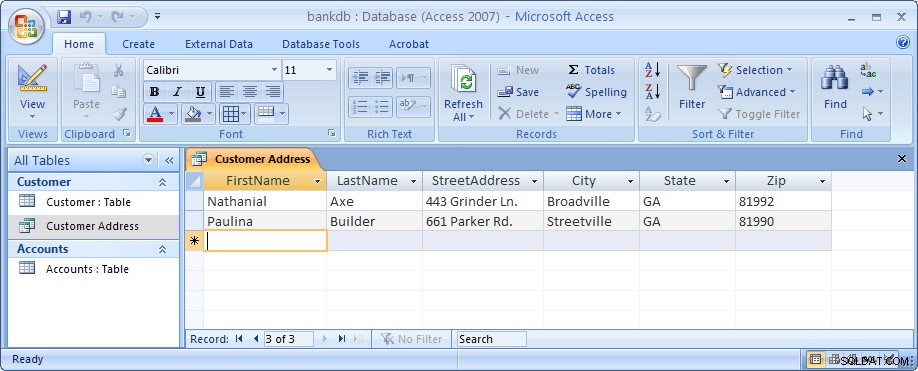
To filter the output to only display Customers in Georgia, click in the Criteria area beneath the State field and type the following statement: ='GA'
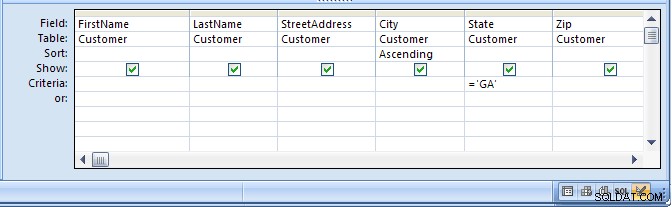
The ='GA' statement tells Access to only show those records where the value of the State field is equal to ‘GA’. Note the use of single quotes to surround the characters.
Run the query by clicking on the Run button (with the large red exclamation point). The output is shown in the figure below:
Finally, save and close this query to return to the Access main screen.
6.2 Exercise:Single Table Queries
For this exercise, use the Simple Query wizard to create a query on the Accounts table showing just the AccountNumber, AccountType and Balance fields.
- From the Access main screen, click on the Create tab. Then click on the Query Wizard button.
- Choose the Simple Query wizard option and click on the OK button.
- Under Table/Queries:choose the Accounts table. Then move the AccountNumber, AccountType and Balance fields over to the Selected fields area. Then click the Next button.
- In the next panel, you will be asked to choose between a detail or summary query. Choose detailed query and click on the Next button.
- Name the new Query :AccountsQuery and click on the Finish button.
The output is shown below:

Close this query by pulling down the Office menu and choosing Close.
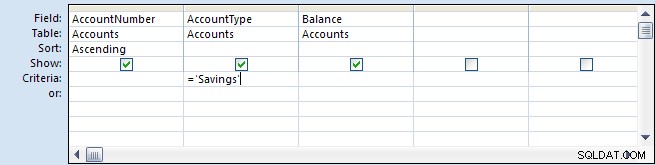
In the next part of the exercise, we will modify the query to sort the output on the account number and only display the Savings accounts.
- From the Queries tab on the Access main screen, highlight the AccountsQuery and click on the Design button.
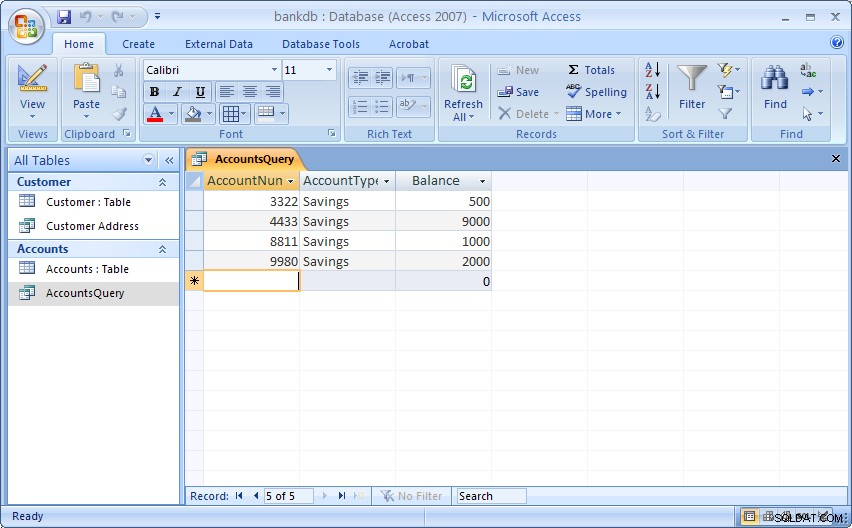
- Change the Sort order for the AccountNumber field to Ascending.Add the following statement to the Criteria:are under the AccountType field:=‘Savings’
- Run the query by double-clicking on the AccountsQuery name. The output is shown below:
- Finally, save and close the query to return to the Access main screen.
6.3 Multiple Table Queries
Up to this point, queries involving only one table have been demonstrated. It is almost a given that queries will need to involve more than one table. For this example, assume that a manager would like to see a list of all of the customers and the type of account(s) that each one maintains at the bank. Such a query requires data from both the Customers table as well as the Accounts table. In such queries, Access will rely on the Relationships established between tables to guide how the data will be assembled to satisfy the query.
Before proceeding with these next instructions, make certain the One-to-Many relationship between the Customers and Accounts table has been created (see section 5.5 Creating Relationships for a review of this process).
To start the process of creating a multiple table query, highlight the Create tab and click on the Query Wizard button to create a new query. Select the “Simple Query Wizard” option as was done previously.
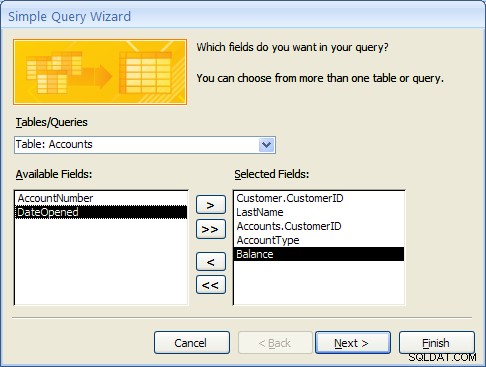
When the simple query wizard appears, select the CustomerID and LastName fields from the Customers table, then switch the Tables/Queries selection to the Accounts table and select the CustomerID, AccountType and Balance fields from the Accounts table. The result from this step is down below:
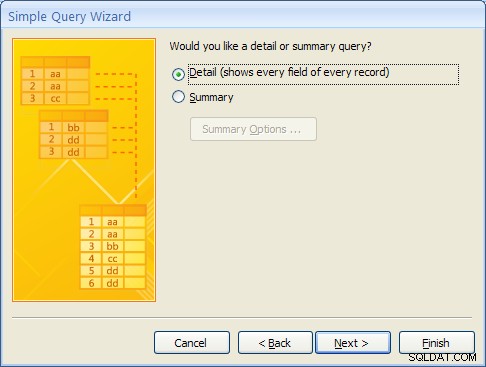
Click the Next button to continue. In the next step of the wizard, an option will appear to provide some level of Summary. For this example, leave the default at “Detail …” as shown below and then click on the Next button.
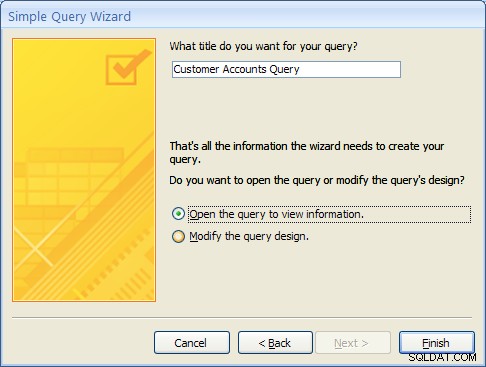
In the final step of the wizard, name the query “Customer Accounts Query” and click on the Finish button. The multiple table query results should appear as follows:
MS Access knows how to line up (or “join”) the accounts table to the Customer table for this query due to the relationship that was created when the tables were first defined.
As with single table queries demonstrated previously, one can change the query definition in design view by adding filters (e.g., show account information for all customers in ‘GA’).
6.4 Exercise:Multiple Table Queries
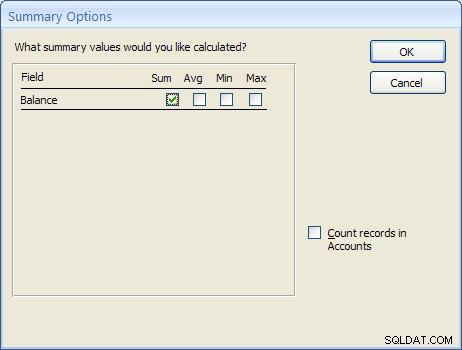
For this exercise, create a new query called “Accounts Summary Query” that joins the Customers table (include the CustomerID and LastName fields) with the Accounts table (include the Balance field only). In the second step of the wizard, click on the Summary choice (instead of Details) and then click on the Summary Options… button. Check off all of the Summary option boxes such as Sum , AVG , Min and Max as shown in the figure below:
The resulting query should appear as follows:
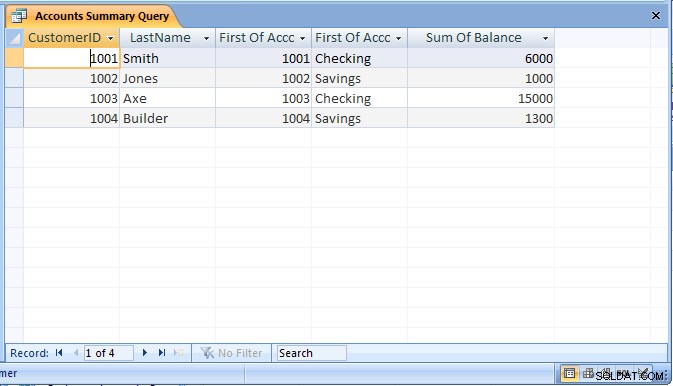
Be sure to save the query as “Accounts Summary Query”.
6.5 Review of Creating and Running Queries
In this section, the basic steps for creating and running queries were introduced. The query wizard can be used to create simple queries that access a single table. It is also possible to then modify the query to sort or filter the records.
Creating a query using the query wizard:
- From the Access main screen, click on the Queries tab. Then click on the New button.
- From the Queries tab on the main Access screen, click on the New button and choose the Simple Query wizard option.
- Under Table/Queries:choose the appropriate table for the query and then indicate which fields in the table will appear in the query output.If querying more than one table, change the Table/Queries:selection to display additional tables and select the necessary fields.
- If the table contains numeric fields, either detailed or summary information may be specified for the query.
- Finally, name the new query and click on the Finish button.
As a final note, Forms and Reports can be created based on existing queries.
7 Creating and Running a Data Entry Form
Data entry forms are the primary means of entering data into tables in the database. In a previous section, we described how to add data to a table using a spreadsheet-like view of the data. Data entry forms offer a more user-friendly interface by adding labels for each field and other helpful information.
Access provides several different ways of creating data entry forms. These include:
- Creating the forms by hand using a Design View
- Creating a default form based on all of the fields available in a table or a query
- Creating a form based on a number of different wizards that walk the user through the forms creation process.
As with queries, a data entry form can be based on a single table or it can work on multiple tables at the same time.
In this section, we cover the basic steps for using a wizard to create a data entry form based on a single table. After this exercise, a multiple-table form is demonstrated.
7.1 Creating a Single Table Form using the Wizard
In this example, we will create a simple data entry form for the Customer table. To begin the process, click on the Create tab on the Access main screen. As with the other components in Access, there are buttons for creating a New form, Open an existing form and Design an existing form. For this example, click on the New button to create a new form.
Several buttons for creating a new form will appear. For this tutorial, choose the Form wizard.
In the first step of the Form wizard, we need to specify the fields from the Customer table that will appear on the form. In this case, we want all of the fields to appear. Move each of the fields from the Available Fields side over to the Selected Fields side as in the following figure. Then click on the Next button.

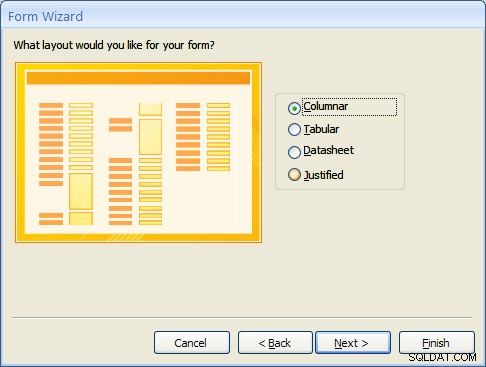
Forms can have several different layouts or arrangement of the labels and fields on the screen.
- Columnar – Places the labels to the left of each field. This is similar to a paper form. This layout is suitable for viewing data one record at a time.
- Tabular – Places the field labels at the top of the screen and the records are displayed below. This is similar to how a spreadsheet would display the data and is suitable for displaying multiple records of data at a time.
- Datasheet – The data appears in the same fashion as when viewing or adding data to a table.
- Justified – Places the labels above each field with the fields spread out on the form. This is suitable for viewing a single record at a time as with the columnar layout.
For this example, choose the columnar layout as shown in the figure below and click on the Next button.
At this point, MS Access 2007 and 2010/2013 versions are a bit different. Access 2007 will show several sample display styles that determine how the form will appear, including elements such as fonts, colors and the background used in the form. Access 2010 and 2013 skips this step in this wizard and provides styles that can be applied to the form in Design mode. For this example, for MS Access 2007, select the Office style as shown below and click on the Next button.

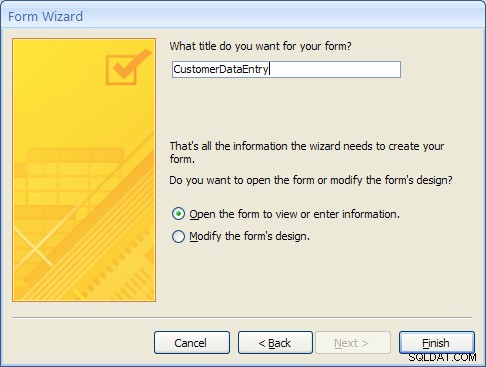
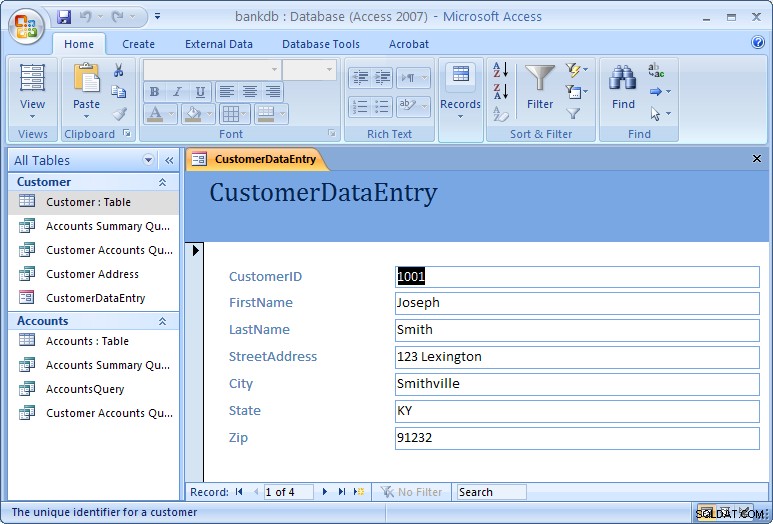
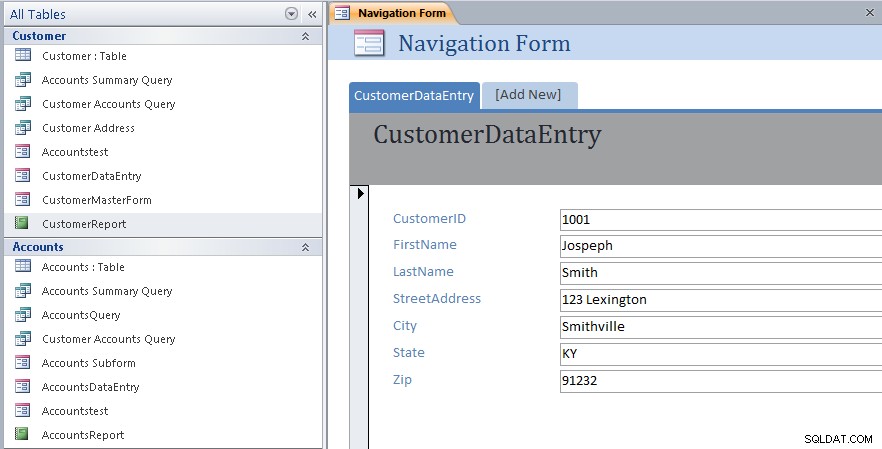
As a final step, give this new form the name:CustomerDataEntry and then click on the Finish button as shown below:
The new form will be created by the wizard and then opened. It should appear as in the figure below:
Use the tab key to navigate between fields in the form. To move to the next or previous record, use the record navigation bar at the bottom of the form:
The buttons on the navigation bar perform the following functions:
 | Go to the first record. |
 | Go to the previous record. |
 | Go to the next record. |
 | Go to the last record.  Go past the last record to add a new record. Go past the last record to add a new record. |
To close the form and return to the Access main screen, pull down the File menu and choose Close.
To open the form at any time, highlight the form name under the Forms tab on the Access main screen and click on the Open button.
One quick final note on forms. When the form is created, MS Access looks at how the table is designed and creates the form based on the properties of the table. If you make any changes to the table, you will need to re-create the form again in order to see those table changes reflected in the form. One example where this might happen is is if you change a column in your table from a text box to a combo box, or if you add or remove any columns from your table.
7.2 Exercise:Creating a Single Table Form
For this exercise, we will create a data entry form for the Accounts table created in a previous exercise.
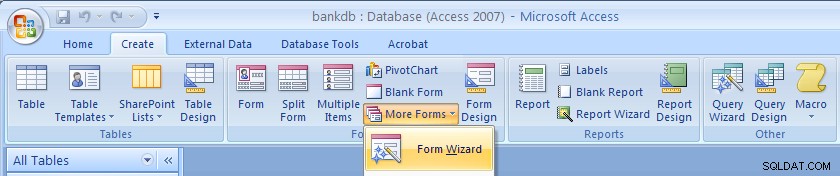
- Click on the Create tab on the Access main screen and then click on the More Forms… button and the “Forms Wizard” to create a new form.
- Select the Accounts table and all of the available fields and click on the Next button.
- Choose a Tabular layout and click on the Next button.
- For Access 2007 choose the Office style and click on the Next button.
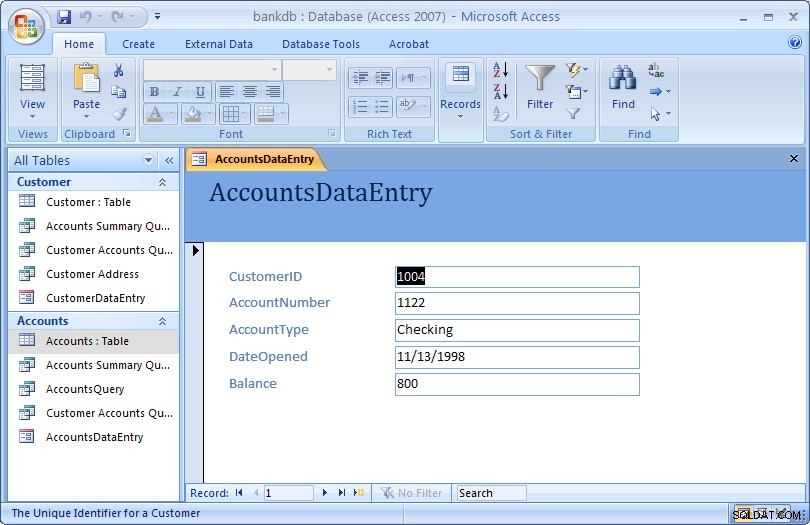
- Name the form:AccountsDataEntry Then click on the Finish button to create, save and view the new form.
The new form is shown in the figure below:
Close the form and return to the Access main screen, by pulling down the File (or Office) menu and choosing Close.
7.3 Review of Creating and Running a Data Entry Form
The basic steps for creating a simple data entry form are:
- Choose a table and a form wizard
- Specify the fields (columns) that will appear in the form
- Specify the layout for the form
- Specify the style (fonts/colors, etc.) for the form
- Save, create and run the new form
In this section we covered the basic steps required to create and run a data entry form. Access provides wizards which are adept at building simple forms with a minimal amount of work. More advanced work on forms would concentrate on using the Design View to change a form’s appearance and to add or remove fields and labels once a form is created. A more advanced tutorial on MS Access Forms Design is linked here.
8 Creating and Running a Report
Reports are similar to queries in that they retrieve data from one or more tables and display the records. Unlike queries, however, reports add formatting to the output including fonts, colors, backgrounds and other features. Reports are often printed out on paper rather than just viewed on the screen. They can also be attached to e-mail and exported and posted as web pages.
As with data entry forms, there are a number of ways to create reports in MS Access:
- A report can be created “by hand” in Design view
- A default report can be created automatically based on all of the firleds for a given table.
- A report can be created using the Create Report wizard.
In this section, we cover how to create simple reports using the Report wizard.
8.1 Creating a Single Table Report using the Wizard
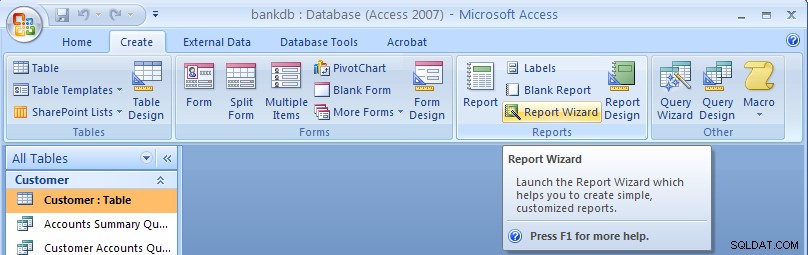
In this example, we will create a simple report for a single table using the Report wizard. As with the Queries and Forms, we begin by selecting the Create tab from the Access main screen.
To create a new report, click on the Report Wizard button.
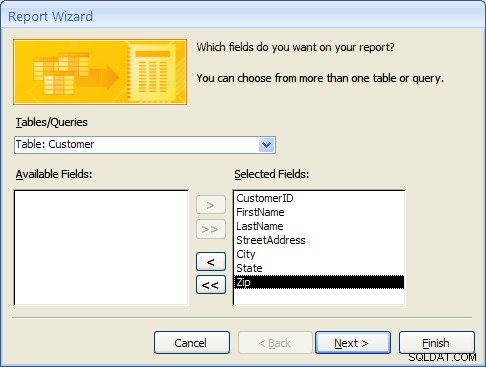
In the next step of the Report wizard, is used to specify the fields from the Customer table that will appear on the report. In this case, we want all of the fields to appear. Move each of the fields from the Available Fields side over to the Selected Fields side as in the following figure. Then click on the Next button.
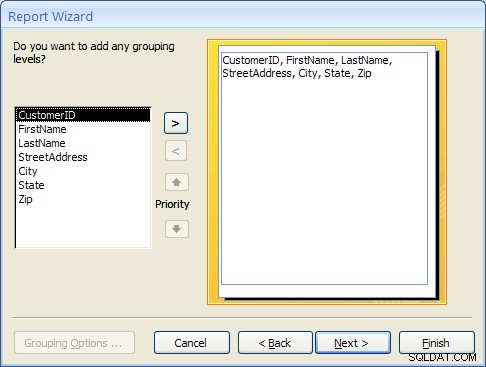
In the next step, we have the opportunity to add Grouping Levels to the report. A grouping level is where several records have the same value for a given field and we only display the value for the first records. In this case, we will not use any grouping levels so simply click on the Next button as shown below.
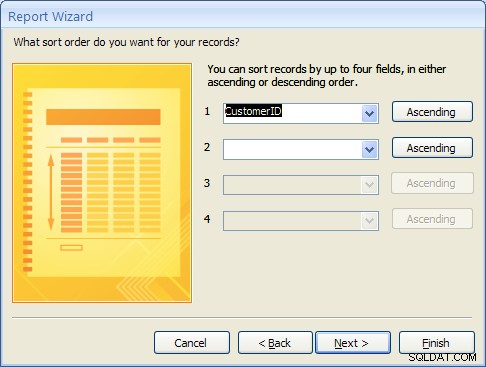
In the next step, the sorting order of the report can be specified. For this example, we will sort the records on the CustomerID field. To achieve this, pull down the list box next to the number 1:and choose the CustomerID field as shown in the figure below. Then click on the Next button.
8.1 Creating a Single Table Report using the Wizard (Continued)
The next step is to specify the layout of the report. The three options are:
- Columnar – Places the labels to the left of each field. This is similar to a paper form.
- Tabular – Places the field labels at the top of the report page and the records are displayed below. This is similar to how a spreadsheet would display the data.
- Justified – Places the labels above each field with the fields spread out on the report page.
Generally, reports use the tabular layout. For this example, choose Tabular layout and set the page Orientation to Landscape so that all of the fields will fit across one page. This is shown in the figure below. Click on the Next button to continue.

In the next step, the style of the report can be selected. For this example, choose the Office style and click on the Next button to continue.

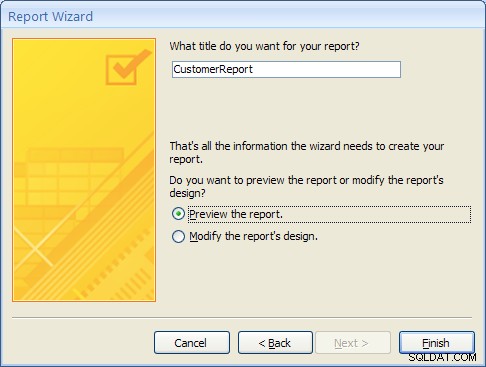
Finally, give a name for the new report:CustomerReport and then click on the Finish button to create, save and display the new report.
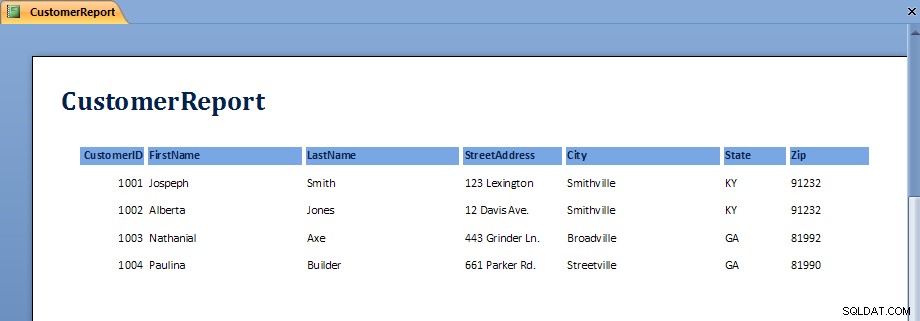
The output from the report is shown in the figure below. Note that on some screens, the last field, Zip, may not display without scrolling over to the right.
Once the report is displayed, it can be viewed, printed or transferred into Microsoft Word or Microsoft Excel. The button bar across the top of the screen has the following functions:
 | Print the report |
 | Zoom into a region of the report |
 | Display the report as one, two or multiple pages |
 | Zoom into or out of the report |
 | Transfer the report into MS Word |
 | Close the report |
To close the report and return to the Access main screen, click on the Close button.
8.2 Exercise:Creating a Single Table Report
For this exercise, we will create a report showing all of the Accounts information.
- From the Access main screen, click on the Create tab and Click on the Report wizard.
- Select all of the fields in the Accounts table by moving them all over to the Selected Fields side and then click Next
- Group the report by CustomerID by clicking on the CustomerID field and then clicking on the right arrow button. This is shown in the following figure:
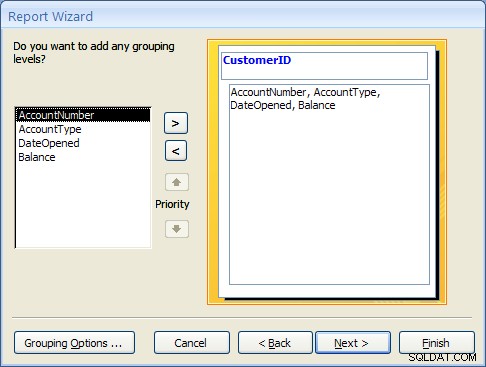
Click on the Next button to continue. - Choose to sort the report on the AccountNumber 分野。 Note that a new button will appear called Summary Options.
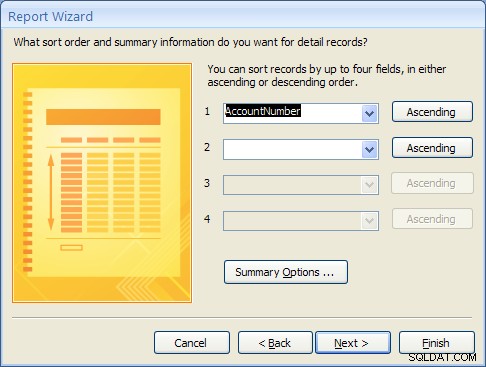
Click on the Summary Options button. Choose the Balance field and select the Sum option. Choose the option to show both Detail and Summary data. Then click on the OK button.

Click on the Next button. - Choose a Block layout and click on the Next button.
- Choose the Corporate style and the click on the Next button.
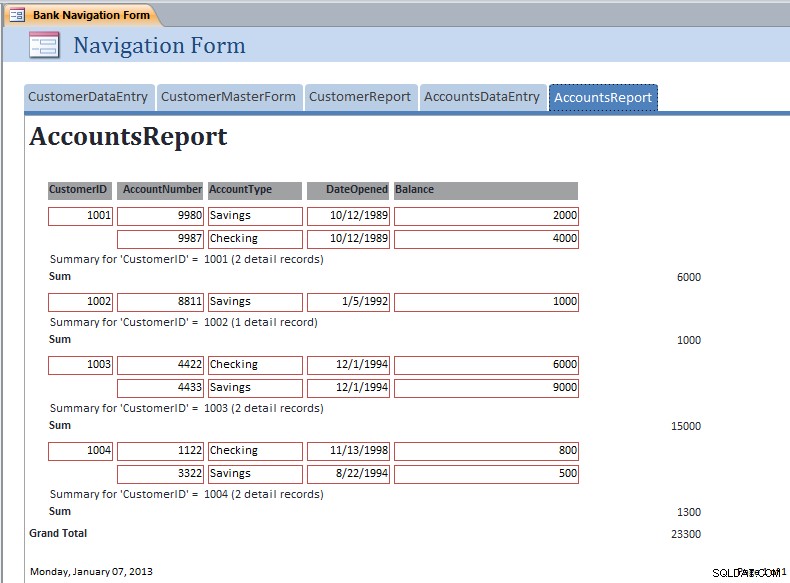
- Finally, name the report:AccountsReport and click on the Finish button to create, save and run the report.
The output from the AccountsReport is shown below:
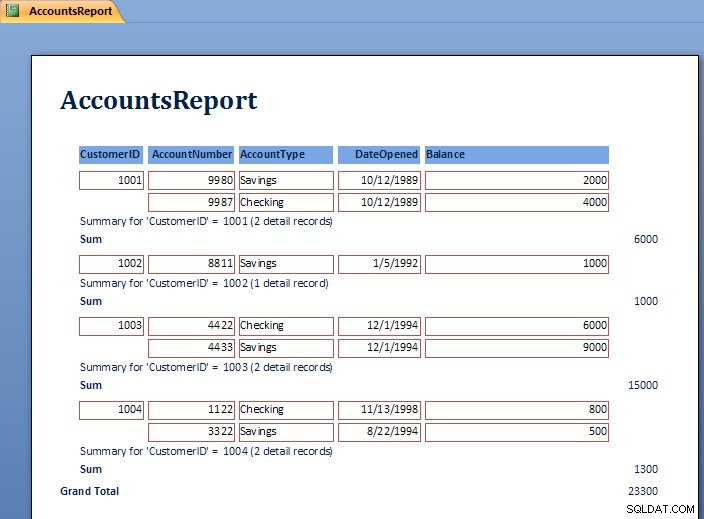
Note the Grouping at the level of the CustomerID and the Sum for each customer’s balances.
To close the report and return to the Access main screen, pull down the File menu and choose Close.
8.3 Review of Creating and Running a Report
As can be seen in the report exercise, there are many ways to create reports to show summation, sorting and layout of the data. Further study of Reports will show how to modify the layout using the Design View. Students are encouraged to work with the Report wizards to create different styles and types of reports.
9 Creating and Running a Master/Detail Form
Master/Detail forms are used to display data from two tables at the same time. MS Access calls the “details” a “subform”. The forms are linked according to the relationship between the tables. Recall that in the example database, the CustomerID is used to link the Customer table (Master) to the Accounts table (Detail). In this section a master / detail form for the Customer and Accounts tables will be created.
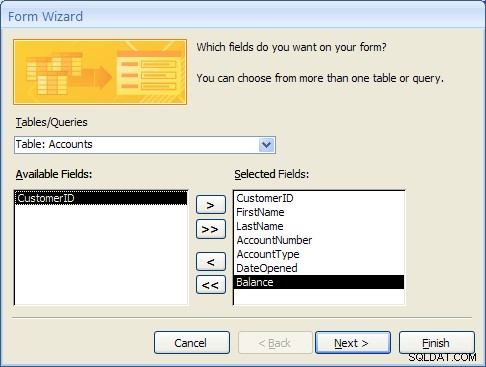
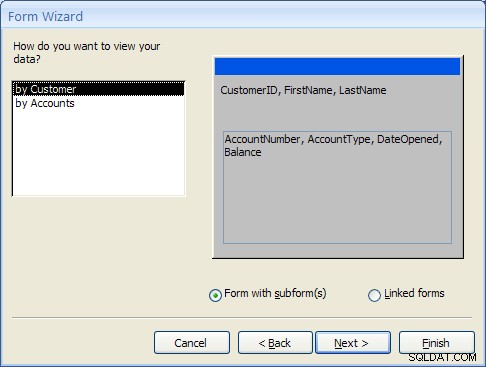
- From the Access main screen, click on the Create tab and Click on the “More Forms…” section and finally the “Forms Wizard”.Select the Customer table first and move the CustomerID, FirstName and LastName fields to the Selected Fields list.Next, select the Accounts table and move the AccountNumber, AccountType, DateOpened and Balance fields to the Selected Fields list as shown below.
Click the Next… button to move to the next step. - At this point MS Access detects that this form will involve data from two different tables. The first prompt asks how the form should be organized at the top or “Master” level. The “by Customer” selection should be highlighted.The second prompt asks how the forms should be created. For this example, select “Form with Subform(s)” as shown below and click the Next… button to move to the next step.
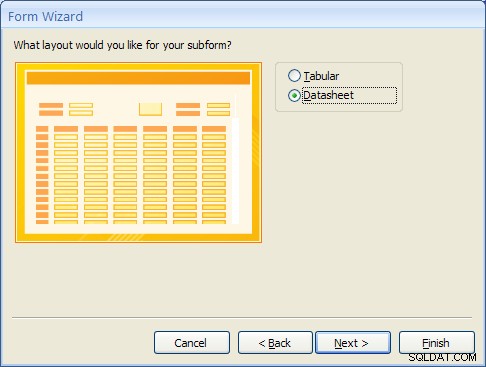
- The Subform is the form that will display the detailed data from the Accounts table. Selecting the “Datasheet” layout will make it easy for the user to view the multiple accounts a Customer may have. Select “Datasheet” and click the Next… button to move to the next step.
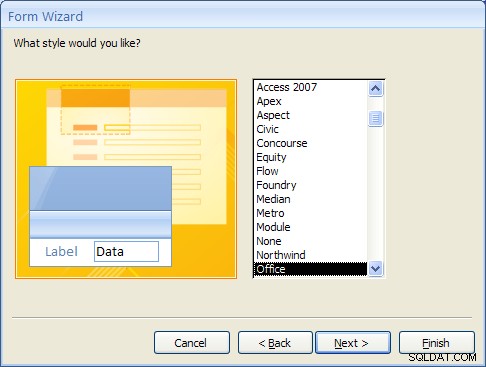
- For Access 2007, select the Office style and click the Next… button to move to the next step. (This step will not appear in MS Access 2010 or 2013).
- Finally, give the main form the name “CustomerMasterForm” and the Subform the name “Accounts Subform”.
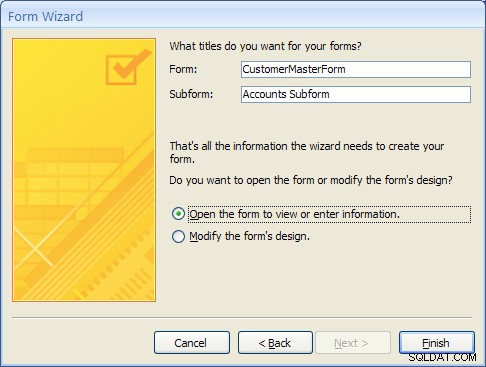
- After clicking on the Finish button the new Master/Detail form will appear as shown below.
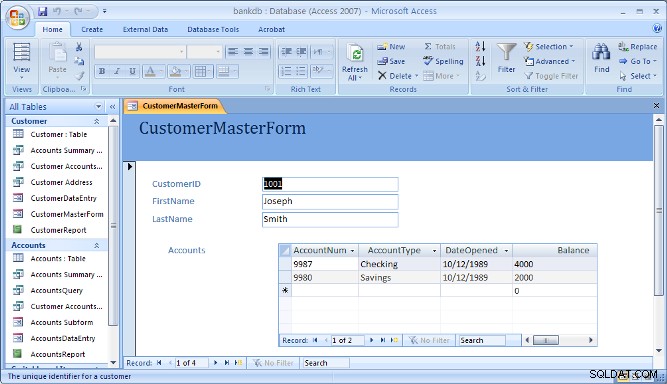
Note that the navigation bar at the bottom of the form is used to navigate through the records in the Master (or top) part of the form.
10 Creating and Running a Switchboard
A Switchboard is a type of form that displays a menu of items that a user can click on to launch data entry forms, reports, queries and other actions in the database. A switchboard is typically created after all of the forms and reports for a database application have been completed. It can be used to guide the user to an appropriate set of forms and reports.
Note that starting with Access 2010, Switchboards are not available by default (you will need to add this to the ribbon bar manually using the Options). Access 2010 and 2013 make use of the Navigation Forms.
In this section, a default switchboard will be created.
- From the Access main screen, click on the Database Tools tab and Click on the Switchboard Manager as shown in the figure below.

If this is the first switchboard made for this database, you will be prompted to create a new one as shown below. Click the Yes button.

- The Switchboard manager will appear as shown below:
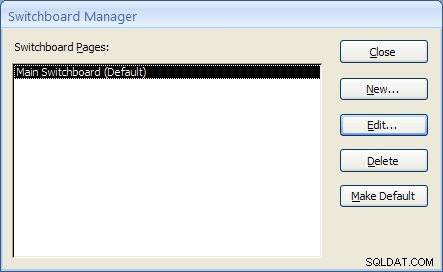
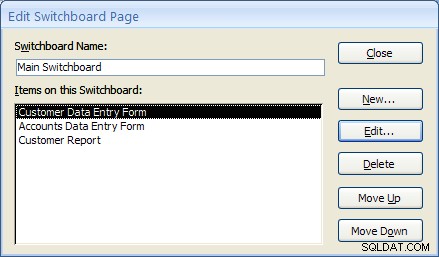
- Click on the Edit menu to edit the “Main Switchboard”. The Edit Switchboard Page will appear as shown below:
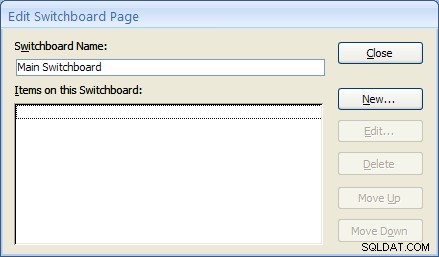
- Add a new switchboard item by clicking on the New… button. The Edit Switchboard Item form will appear as shown below. Fill in the fields as follows:
Text: Customer Data Entry Form Command: Select Open Form in Edit Mode from the drop down list. Form: Select the “CustomerDataEntry” form from the drop down list. 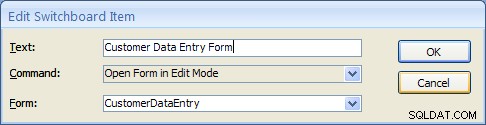
Click on the OK button to save this new Switchboard item.
- Repeat the above step two more times to add Switchboard items for the Accounts DataEntry form and the Customer Report.
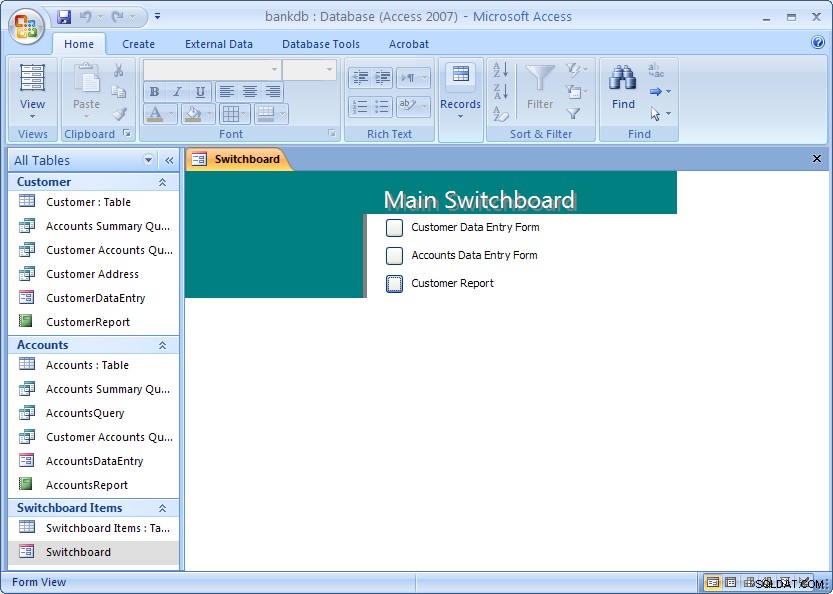
Once completed, click the Close button. Then click the Close button once more to close the Switchboard manager. - From the main MS Access screen look for a new section labeled Switchboard items. To view the switchboard, double-click on name “Switchboard”.
The next section covers creating a Navigation Form which is the recommended navigation screen for MS Access 2007, 2010 and newer versions.
11 Creating and Running a Navigation Form
MS Access 2010 introduced a new form called a Navigation Form. Navigation forms take the place of Switchboards but provide much the same functionality. Namely, they are designed to give the user the ability to run forms and reports without having to hunt through all of the different menus and lists objects. Typically a database application will have one main Navigation form that will appear when the database is opened.
In this section, the basic steps for creating and running a Navigation Form in MS Access 2010 will be demonstrated.
A Navigation Form is another type of form in MS Access 2010 and 2013
- To get started, click on the Create tab on the Access 2010 or 2013 ribbon bar. Under the section for Forms look for the item labeled Navigation Form. Note that this may be located on the button labeled Other Forms.
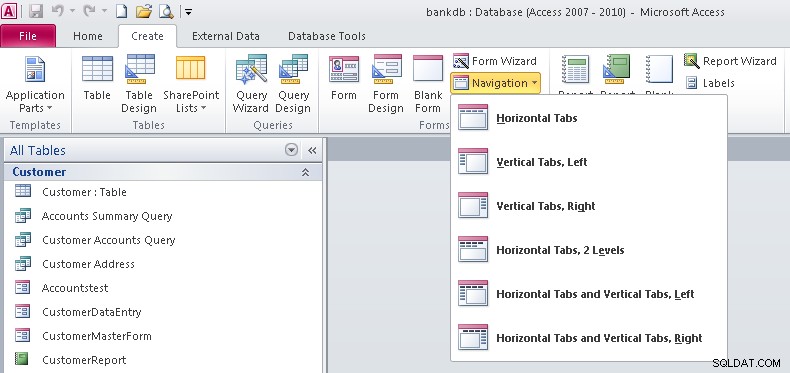
- Note that there are 6 different default styles of Navigation Forms. Each one places the buttons in a different configuration on the screem. Buttons can be aligned across the top, either side or some combination.For this tutorial select the Horizontal Tabs configuration which appears as the first item on the list.
- At this point a new Navigation Form will be created with a row of tabs across the top. The first tab will be labeled [Add New]
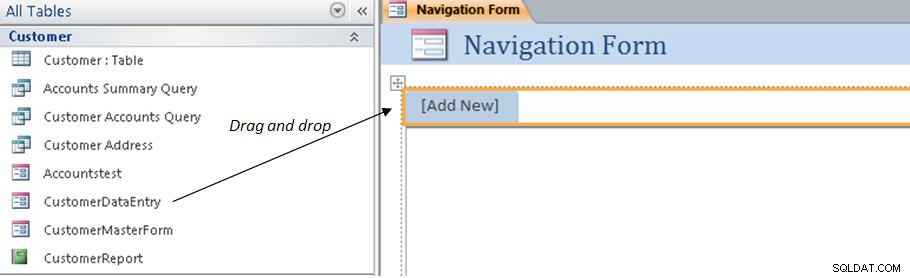
- To add items to the Navigation form, drag the items from the list on the left over to the spot on the Navigation Form labeled [Add New]. This is shown by the arrow in the above figure. For example, drag over the CustomerDataEntry form to the Navigation Form. The result is shown below.
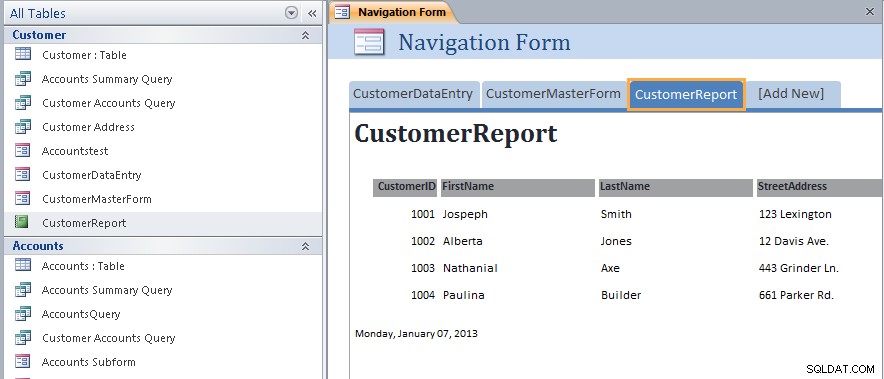
- Next drag and drop the CustomerMasterForm as shown below.

- Next drag and drop the CustomerReport as shown below.
- At this point we have created a new navigation Form and added three items along the top of the page. Save the Navigation Form by right-clicking on the name of the form and choosing Save as shown below:
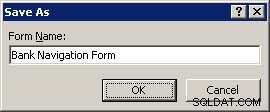
- Name the Navigation Form:Bank Navigation Form and click the OK button.
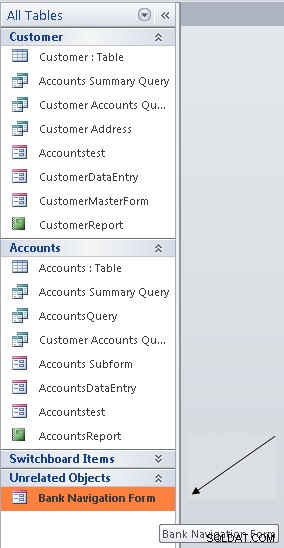
- Close up the Navigation Form by right-clicking again on the name of the form and choosing Close menu item.At this point the new Navigation Form has been created and saved. The next step will be to view the Navigation Form and navigate the different forms and reports linked to it.
- To view the Navigation Form, look for the Unrelated Objects group on the left side of the screen. Double click on the Bank Navigation Form item as shown below:
The Navigation Form will appear: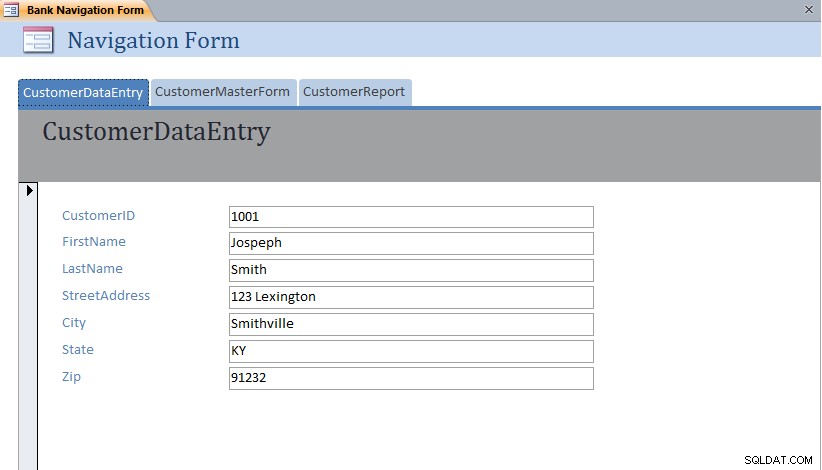 Note that each form or report can be displayed simply by clicking on the different tabs across the top of the Navigation Form.
11.1 Exercise:Modifying a Navigation Form
For this exercise, edit the Bank Navigation Form in Layout View and add the following new items to the Navigation Form:
- AccountsDataEntry
- AccountsReport
The resulting Navigation Form should appear as below with the AccountsReport opened:
11.2 Setting the Navigation Form as the Default
MS Access 2007 and 2010 (as well as earlier versions) have the ability to set a default form that will open up automatically once the MS Access data file is opened. This is especially useful for end users so that they always see the same form when they open up the database.
To set the Default Form, pull down the File menu and select the Options menu item.

The Database Options form will appear. Click on the Current Database item on the left hand side.
Under the Application Options heading, look for the Display Form:prompt and set this to the Bank Navigation Form as shown below:
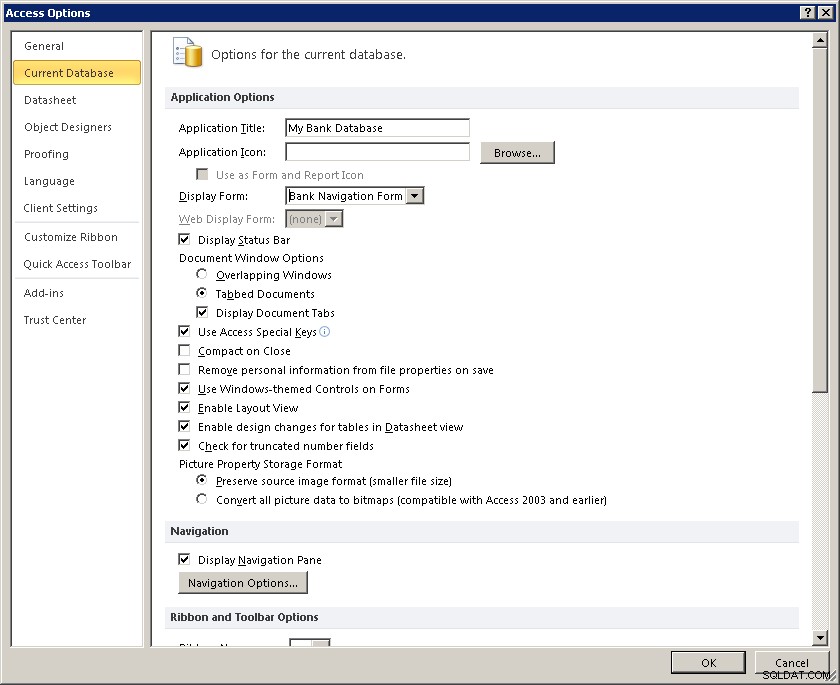
Click on the OK button to close up the Database Options screen.
The next time this database (bankdb.accdb) is opened, the Bank Navigation Form will open up.
12 Tutorial Summary
In this tutorial, we have covered the basics for creating an Access database including tables with data, queries to retrieve data, forms to enter data and reports to display and summarize data.
Students are encouraged to further their Access knowledge and skills by working through more advanced tutorials such as Advanced Access Database Table Design and Advanced Access Forms Design, and by reading the on-line help and Access documentation.
You may also be interested in this tutorial that covers up-sizing the Access database to Microsoft SQL Server using the Microsoft SQL Server Migration Assistant.