MySQLは、リレーショナルデータベースの管理に使用される世界で最も人気のあるオープンソースデータベースソフトウェアです。強力な機能に加えて、Microsoft SQL ServerやOracleデータベースよりも高速でスケーラブルで、使いやすいです。その結果、PHPスクリプトは、強力で動的なサーバー側/Webベースのアプリケーションを作成するために一般的に使用されます。
注: データベースは構造化されたデータのコレクションです
SQLはStructuredQueryLanguageの略語であり、データベースへのアクセスに使用される標準化された言語です。
SQLは次の3つの部分で構成されています。
- データ定義言語: これらは、データベースとそれに関連するテーブルなどのオブジェクトを定義するのに役立つステートメントです。
- データ操作言語: データの更新とクエリを可能にするステートメントが含まれています。
- データ制御言語: データベース内の特定のデータにアクセスするためのアクセス許可をユーザーに付与できます。
それでは、MySQLの使い方を詳しく見ていきましょう。
MySQLを使用する前に、まずシステムにインストールする必要があります。 UbuntuにMySQLをインストールする以前の公開と、WindowsにMySQLをインストールしてここに戻る方法をご覧ください。
MySQL Workbench
MySQL Workbenchは、統合されたビジュアルデータベースツールまたはグラフィカルユーザーインターフェイス(GUI)ツールであり、ユーザーはデータベースアーキテクト、管理者、および開発者と連携できます。 MySQLワークベンチはOracleによって管理されて作成されています。
このツールは、SQL開発、データ移行、モデリング、およびサーバーの管理、構成などに使用される完全な管理ツールを提供するため、不可欠です。たとえば、開発者はサーバー管理者を使用して、SQL開発用の新しいE-Rダイアグラム、物理データモデル、およびクエリを作成できます。
MySQL Workbenchは、Windows、macOS、Linuxなどのすべての主要なオペレーティングシステムで使用できます。
MySQLワークベンチの5つの主な機能を以下に示します。
- サーバー管理: この機能により、監査データを検査する管理者および検査官によるMySQLサーバーインスタンスの管理が可能になります。また、データベースの状態の表示と監視、復元とバックアップの実行、およびMySQLサーバーのパフォーマンスの監視にも役立ちます。
- SQL開発: この機能は、組み込みのSQLエディターを使用してSQLクエリを実行し、データベースサーバー接続を管理および作成できるため、開発者にとって不可欠です。
- データ移行: この機能により、Microsoft SQL Server、Microsoft Access PostgreSQL、SQL Anywhere、SQLite、Sybase ASE、およびその他のリレーショナルデータベース管理システムとオブジェクト、データ、およびテーブルからMySQLへの移行が容易になります。さらに、MySQLの古いリリースから新しいリリースへの移行をサポートします。
- データのモデリングと設計: この機能により、ユーザーはデータベースモデルをグラフィカルに作成し、ライブデータベースとスキーマの間でフォワードエンジニアリングとリバースエンジニアリングを実行できます。さらに、この機能により、ユーザーは完全なテーブルエディターを使用してすべてのデータベースアスペクトを編集できます。テーブルエディタは、インデックス、ビュー、パーティション分割、列、およびテーブルの編集機能を提供するため、非常に重要です。
MySQL Enterpriseは、MySQL Enterprise Backup、MySQLファイアウォールなどのエンタープライズ製品をサポートし、MySQLAuditはこの機能を利用してサポートを取得します。
MySQLワークベンチエディション
1。コミュニティエディション: これはオープンソース版です。したがって、ユーザーは自分のオペレーティングシステムとニーズに合ったバージョンを自由にダウンロードできます。コミュニティ版はGPLライセンスの下にありました。したがって、コミュニティ開発者によってサポートされています
2。標準版: この商用版では、高性能の配信が保証され、ユーザーはスケーラブルなOLTP(オンライントランザクション処理)アプリケーションも保証されます。このエディションは、MySQLを信頼性、パフォーマンス、および個人の強さで有名にすることに貢献しています。
3。 Enterprise Edition: これは、他のすべてのバージョンと比較して、より高度な機能、セキュリティ、稼働時間、技術サポート、管理ツール、およびスケーラビリティを含む別の商用エディションです。 Enterprise Editionは、アプリケーションの管理と展開におけるコスト、リスク、および開発の複雑さを軽減します。
以下は簡略化された比較表です:
| Enterprise Edition |
|---|
| MySQLEnterpriseFirewallのGUI |
コミュニティエディションは唯一のオープンソースエディションですが、スタンダードエディションとエンタープライズエディションは商用エディションです。
注: 選択するワークベンチエディションの概要については、上記の比較表を参照してください。
MySQLWorkbenchの使用方法
インストールプロセスが完了したら、ワークベンチの使用方法に移動します。
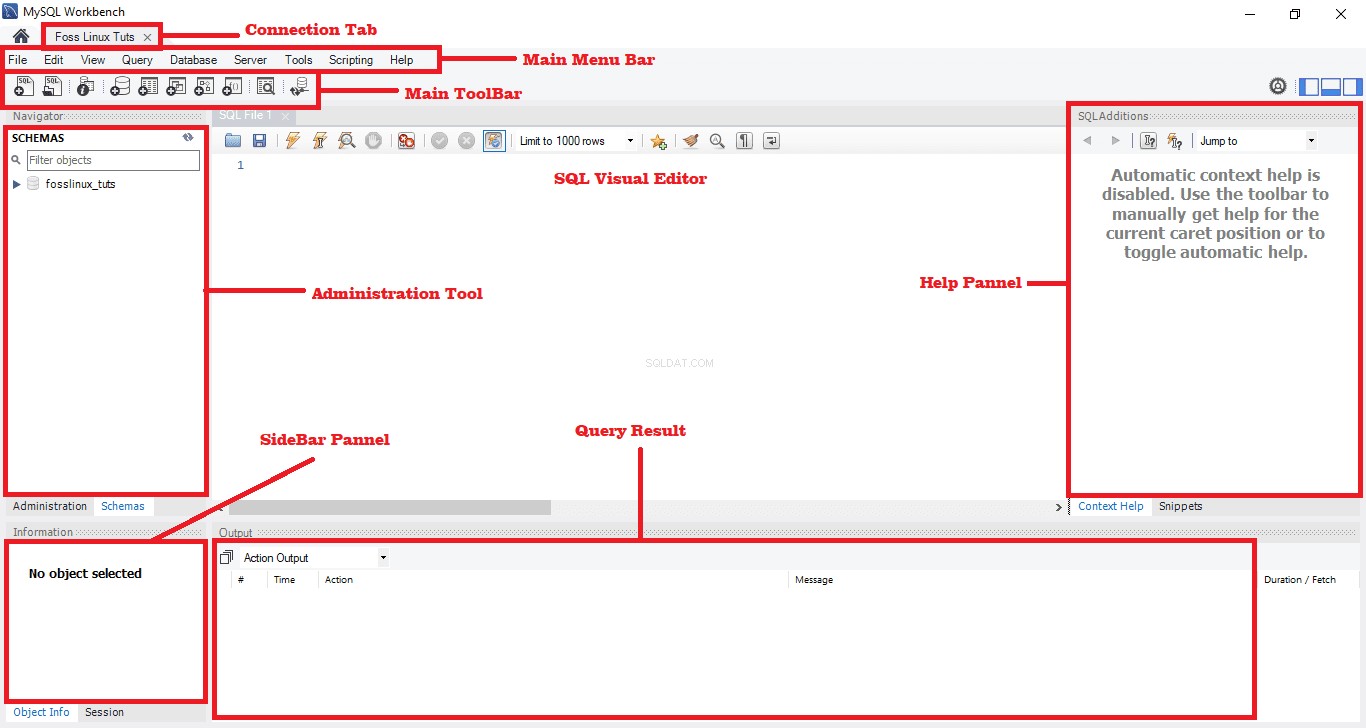
MySQLワークベンチには次の画面があります:
- [接続]タブ
- メインメニューバー
- メインツールバー
- 管理ツール
- SQLビジュアルエディター
- ヘルプパネル
- クエリ結果
- サイドバーパネル

MySQL管理ツール
これは、会社のデータを保護するのに役立つため、MySQLワークベンチで最も重要なツールです。このツールでは、ユーザー管理、データベースのバックアップ、データベースの復元、サーバー構成、サーバーログの詳細を確認します。
ユーザー管理
ユーザー管理または管理ツールは、ユーザーがアクティブなMySQLサーバーインスタンスを管理できるようにする便利なビジュアルツールです。このセクションでは、ユーザーはユーザーアカウントの追加、特権の削除、ユーザーアカウントの管理、およびユーザープロファイルの表示を行うことができます。
データベースのバックアップ
これは、ユーザーがMySQLダンプファイルをインポートできるようにするもう1つのビジュアルツールです。ダンプファイルは、データベース、テーブル、ストアドプロシージャ、およびビューを許可するSQLスクリプトの組み合わせです。
データベースの復元
データベースの復元は、ユーザーがMySQLダンプファイルをエクスポートできるようにする視覚的なツールです。上記のように、ダンプファイルは、データベース、ビュー、テーブル、およびストアドプロシージャを作成する上で重要な役割を果たします。
サーバー構成
このツールを使用すると、高度なサーバー構成が可能になります。サーバー、いくつかのスレッド、ステータス変数、微調整、およびバッファー割り当てサイズに関するすべての必要な情報をユーザーに提供するため、これは非常に重要です。これらの機能はすべて、適切なサーバー構成に明確に対応しています。
パフォーマンスダッシュボード
このタブは、MySQLサーバーのパフォーマンスの統計ビューをユーザーに提供するために不可欠です。このタブを開き、[ナビゲーション]タブと[パフォーマンス]セクションに移動して、[ダッシュボード]を選択します。
サーバーログ
このツールは、各接続タブを介してMySQLサーバーのログ情報を表示します。サーバーログには、各接続タブのすべてのログ情報が含まれ、追加のタブの一般的なエラーログも含まれます。
MySQLワークベンチでデータベースを作成、削除、変更する方法
ここでは、MySQLワークベンチを使用してデータベースを作成、変更、および削除する方法を簡単に確認します。
データベースを作成する
MySQLワークベンチでデータベースを正常に作成するために従うことができる2つの方法があります。この記事のすべての方法を確認します:
方法1:
以下の手順に従って、MySQLワークベンチにデータベースを作成します。
1.WindowsオペレーティングシステムでMySQLWorkbenchを開きます。次に、プログラムのインストール時に指定した資格情報を使用してログインします。ログインに成功すると、以下に示すような画面が表示されます。
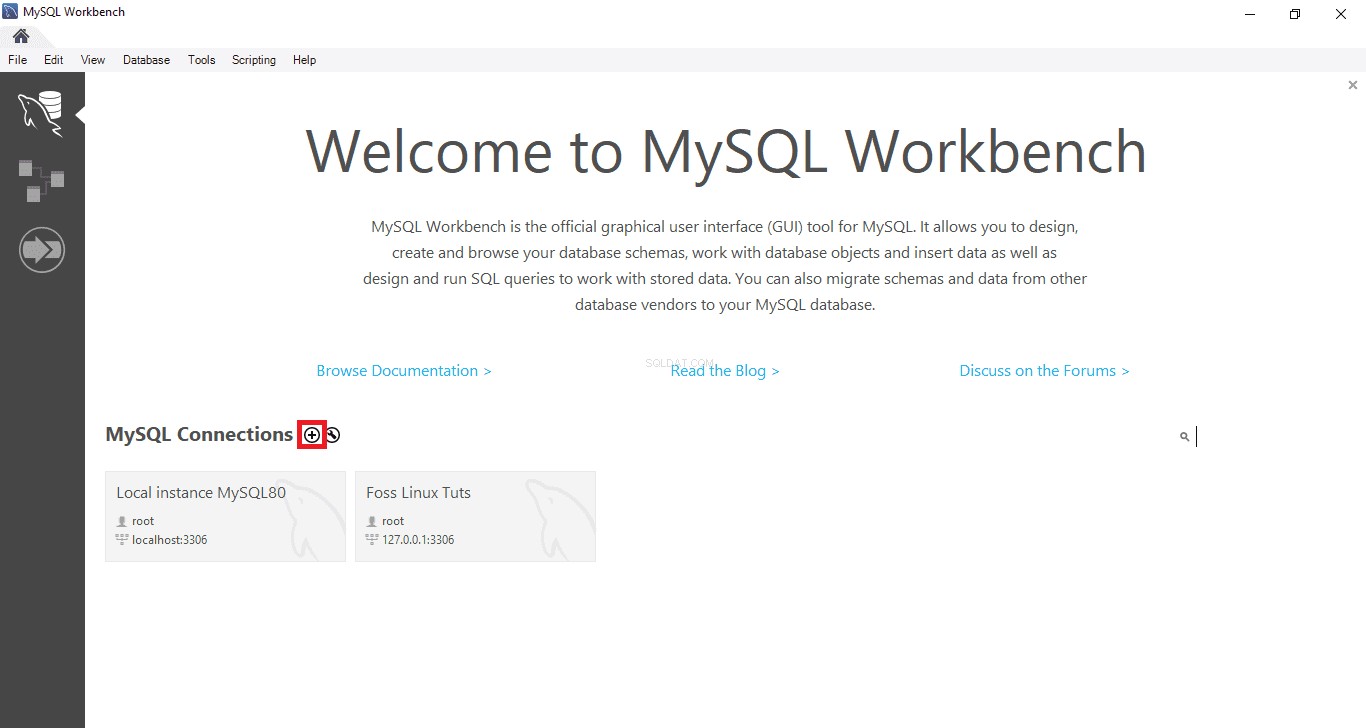
2.ワークベンチアプリケーションを開いた後、下に表示されている「+」と書かれたボタンをクリックして、新しい接続を設定します。

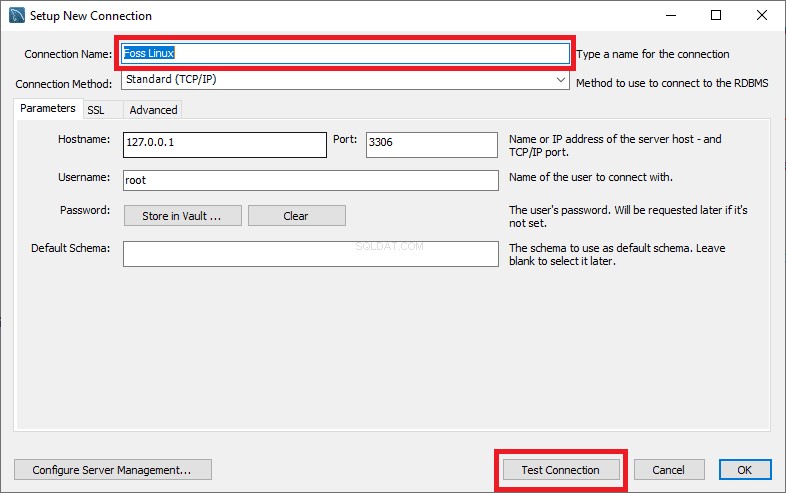
3.次に、接続の名前を入力し、[接続のテスト]ボタンをクリックします。

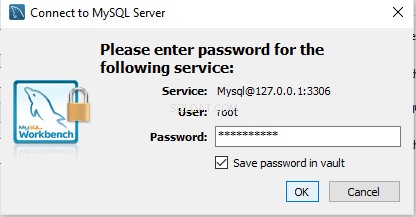
4.そのボタンをクリックすると、ベンチが実行され、「root」ユーザーのパスワードを入力するように求めるダイアログボックスが表示されます。
5.このセクションでは、最初にrootユーザーのパスワードを入力する必要があります。その後、[パスワードをボールトに保存]の[チェックボックス]をクリックし、下部にある[OK]ボタンをクリックしてプロセスを続行します。

6.前の手順が完了したら、以下のサンプルに示すように、接続名「Foss Linux」をダブルクリックして、MySQLサーバーに接続します。
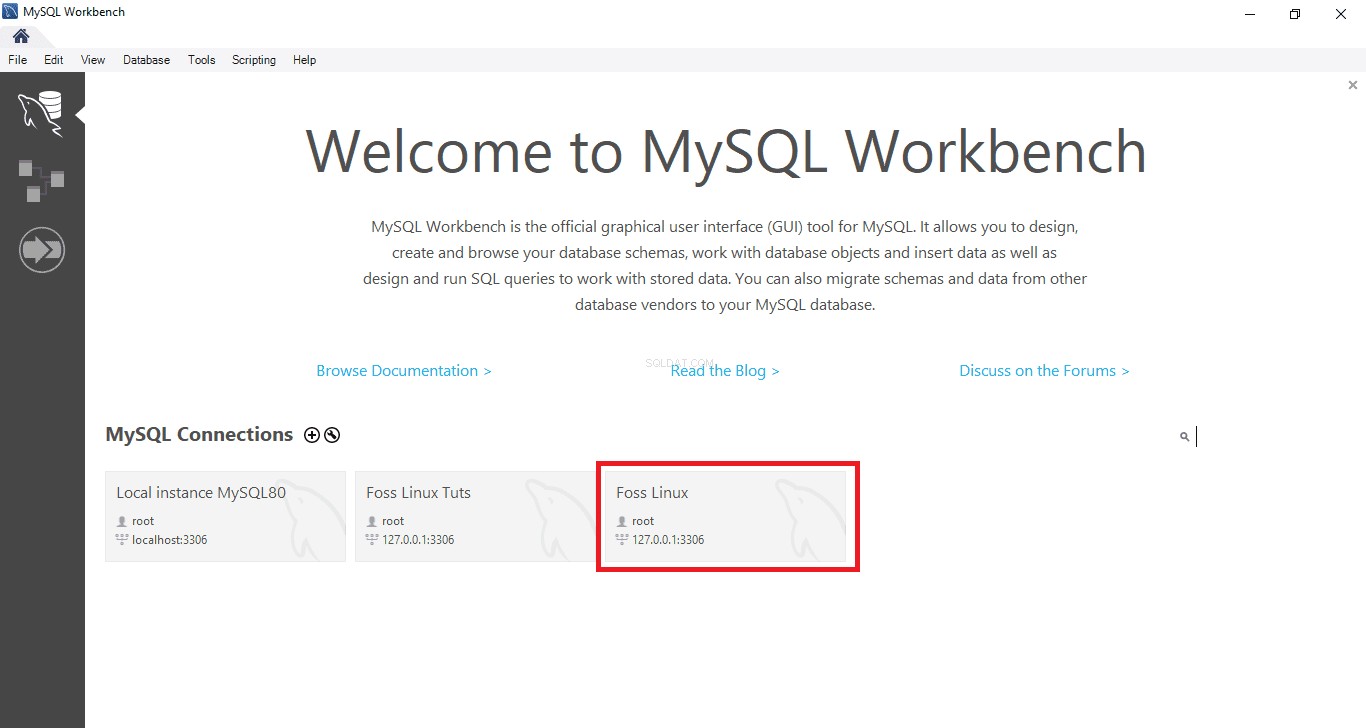

7.その後、MySQL Workbenchが開き、ナビゲーター、クエリ、情報、出力の4つのセクションを含む次のウィンドウが表示されます。
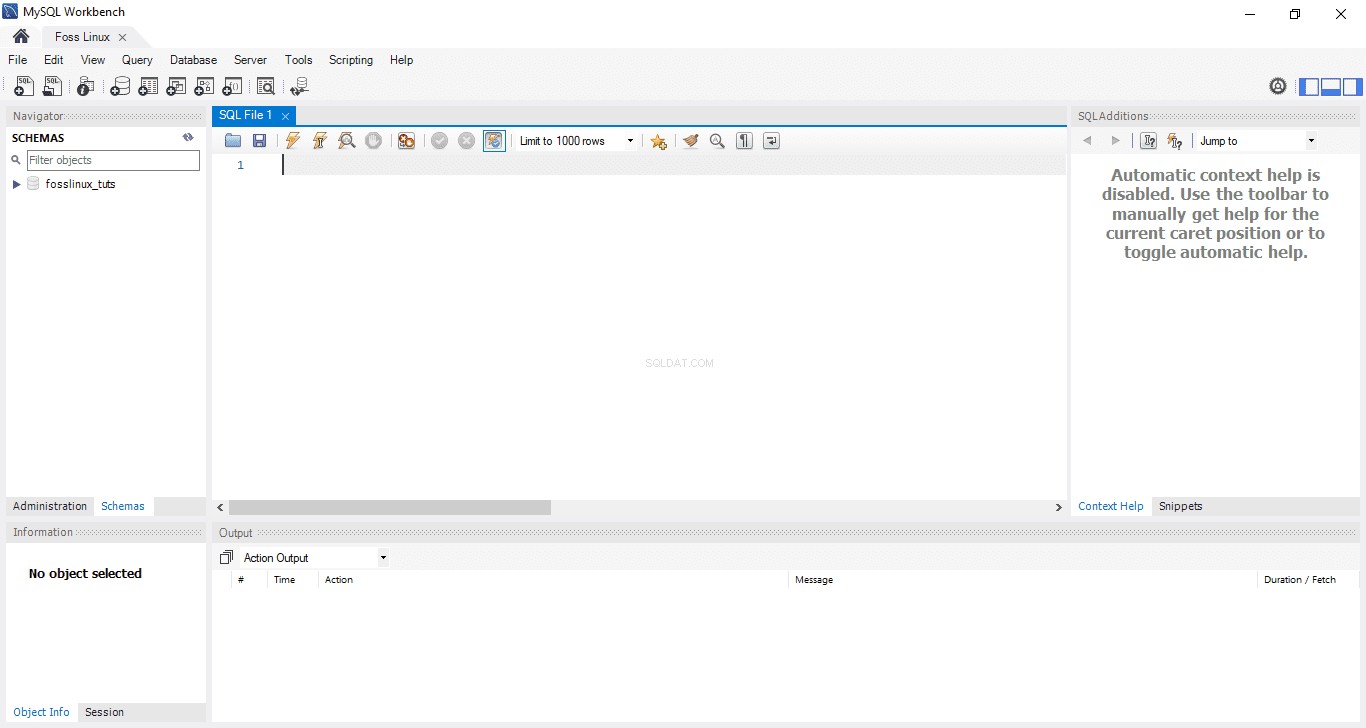

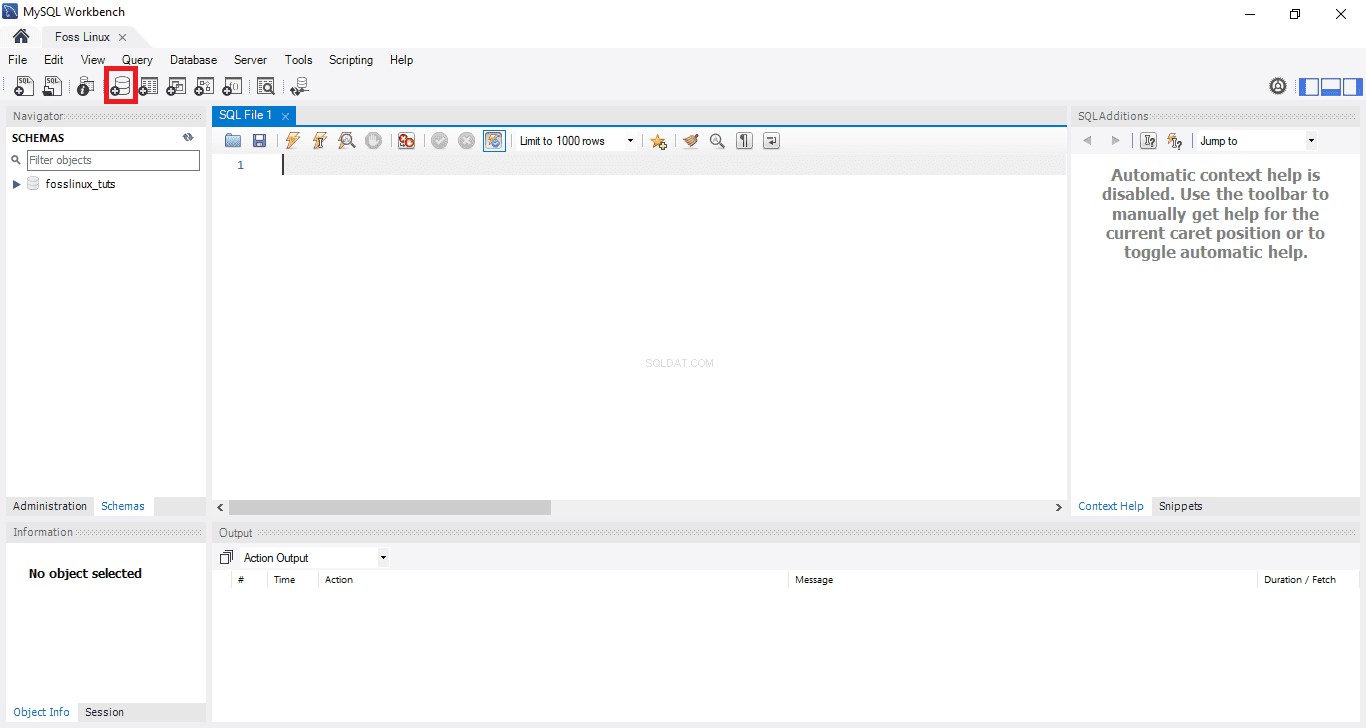
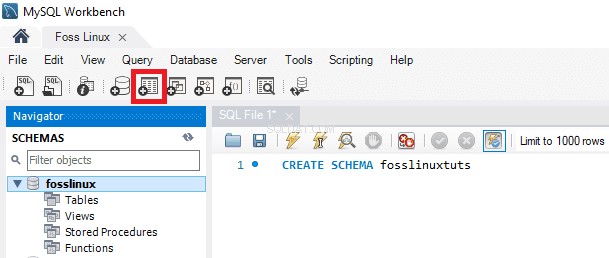
8.次に進み、ツールバーから「接続されたサーバーに新しいスキーマを作成する」ボタンをクリックします。以下のスクリーンショットのようなものが表示されるはずです。

注: ユーザーは、より簡単なナビゲーションとワークフローを提唱するために、データベースで使用されているすべての用語に精通している必要があります。たとえば、スキーマという用語は、一部の人にとっては新しいように聞こえるかもしれません。ただし、それは単にデータベースを意味します。したがって、新しいスキーマを作成するように求められた場合は、簡単な用語でデータベースを作成するように指示されます。
スキーマ名を入力して、次のステップに進みます。
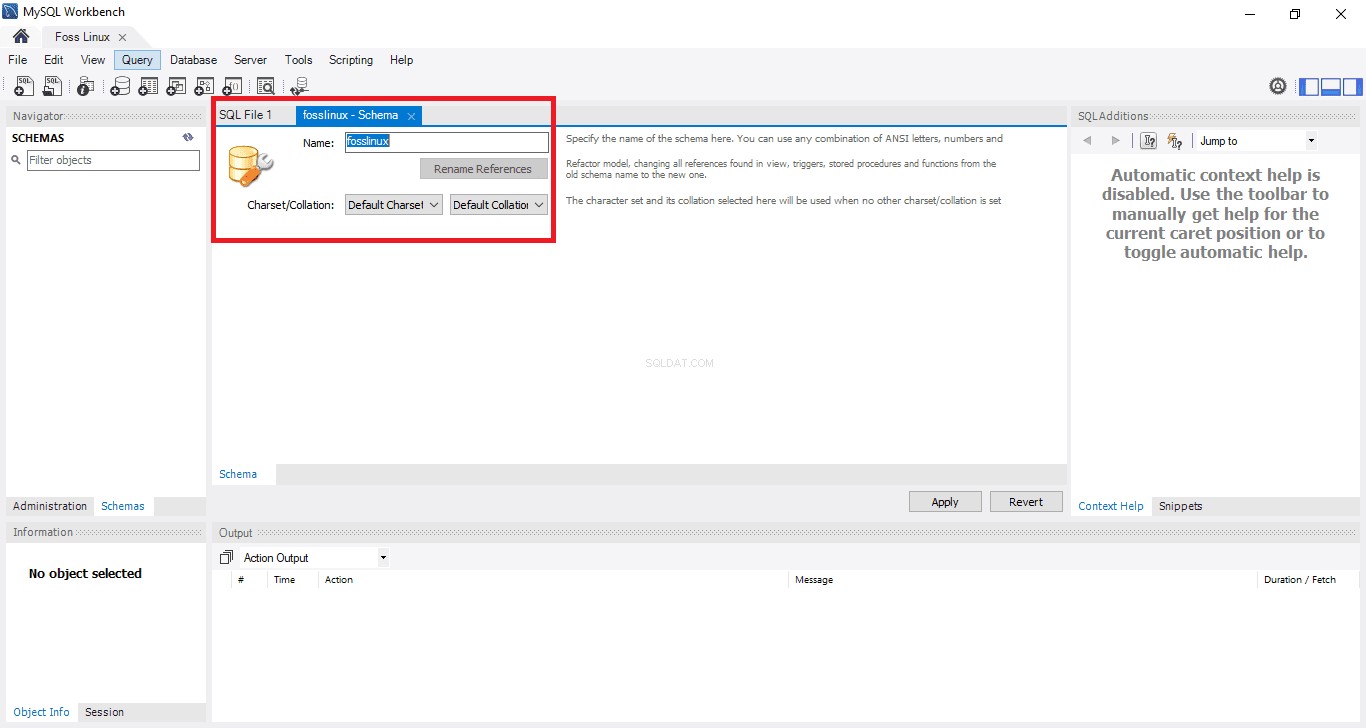

注: データベースの作成中、文字セットと照合はデフォルトで設定されます。したがって、照合と文字セットを変更または変更する必要はありません。照合は、主に外国語を保持するために使用される特定のデータ文字を格納するために使用される機能です。対照的に、文字セットは文字列内の有効な文字セットです。
スキーマ名の入力であった前の手順が完了したら、ウィンドウの下部にある[適用]ボタンをクリックします。

注: 間違ったことをしたと思われる場合でも、MySQLワークベンチには以前に行ったことをすべて元に戻すのに役立つ「元に戻す」ボタンがあるので気を悪くしないでください。
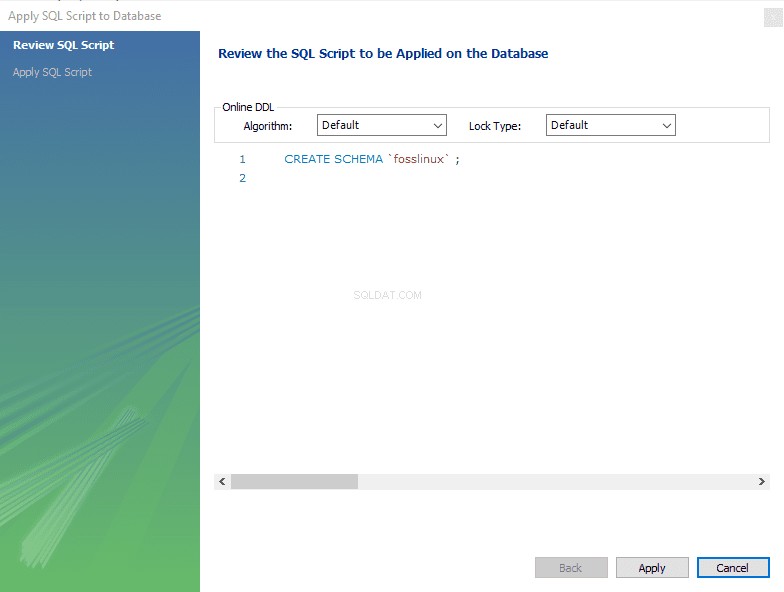
「適用」ボタンをクリックしたら、MySQLワークベンチは、実行するSQLスクリプトを表示するウィンドウを開きます。
CREATE SCHEMAに注意する必要があります コマンドはCREATEDATABASEと同じです 声明。したがって、自分に合ったものを使用してデータベースを作成できます。
完了すると、新しく作成されたデータベースが[スキーマ]タブに表示されます。


方法2:
この方法では、MySQLワークベンチを開き、ログインしてからクエリエディタに次のステートメントを入力し、それを実行して新しいデータベースを作成します。
注: このメソッドはメソッド1のショートカットです。したがって、データベースの作成を急いでいる場合は、方法2に固執することをお勧めします。
例:
fosslinuxtutsという名前のデータベースを作成するには、次のステートメントを使用します。
CREATE SCHEMA fosslinuxtuts
 >
> 
上の画像で強調表示されている実行ボタンを使用してこのステートメントを実行すると、データベース「fosslinuxtuts」が作成されます。
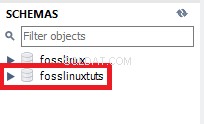

注: プロジェクト全体でこのデータベースをプライマリデータベースとして使用する場合は、次のことを行う必要があります。
- 新しく作成されたデータベース名を右クリックします
- 「デフォルトスキーマとして設定」というオプションを選択します。
これで、新しく作成したデータベースがデフォルトのスキーマまたはデータベースになります。
一部のユーザーは、実行ボタンを実行した後、データベースが正常に作成されたことを意味する緑色のチェックマークが出力に表示されると不満を漏らしています。ただし、[スキーマ]タブにデータベースを表示することはできません。
あなたが言及された問題の犠牲者であると仮定してください、私たちが解決策を持っているのでびっくりしないでください。 「スキーマ」の直後にある更新ボタンをクリックするだけで、新しく作成したDBが表示されます。
 >
> 
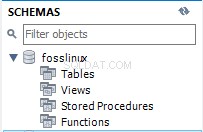
デフォルトのデータベースには次のものが含まれます:
- テーブル
- ビュー
- ストアドプロシージャ
- 機能
したがって、データベース名をダブルクリックすると、前述の機能が表示されます。

注: MySQLワークベンチでは、デフォルトでデータベースの名前を変更できません。したがって、ユーザーは、すでに構築されているデータベース内のデータとテーブル行のみを作成、更新、および削除できます。
ただし、間違ったデータベースを作成したと思われる場合は、次の記事に記載されている手順に従ってデータベースを削除してください。
データベースの削除
MySQLでデータベースを削除することは、データベースを削除することと同じです。ユーザーが既存のデータベースに同意しない、または同意しない場合は、データベースを削除するだけでデータベースを削除できます。
したがって、データベースを削除するには、以下の手順に従ってください。
- 削除するデータベースを選択して右クリックします。下の画像に示すように、「ドロップスキーマ」オプションを選択します。


- ポップアップウィンドウで、2番目のオプションである[今すぐドロップ]を選択します。選択すると、データ行、テーブル、関数、ストアドプロシージャ、ビューを含むデータベース全体がMySQLデータベースサーバーから削除されます。
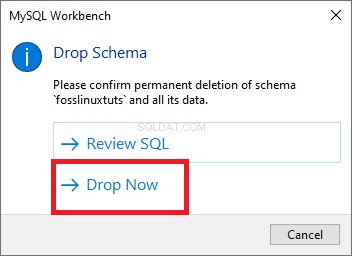

注: 選択したデータベースを削除する前に、上のスクリーンショットに示されている最初のオプションである[SQLの確認]をクリックしてデータベースを確認できます。
MySQLワークベンチでテーブルを作成、更新、削除する方法
このセクションでは、MySQLワークベンチを使用してテーブルを作成し、更新してドロップする方法を確認します。
テーブルの作成方法
以下の手順に従って、テーブルを作成します。
1.まず、MySQLワークベンチを開き、インストールプロセス中に指定したrootパスワードを使用してログインします。次に、[ナビゲーション]タブに移動し、[スキーマ]タブを選択します。スキーマメニューには、作成されたすべてのデータベースが表示されます。新しいデータベースを作成する必要があると思われる場合は、上記のガイドに従ってデータベースを作成してください。
2.データベースを選択し、ダブルクリックして、テーブル、ビュー、関数、ストアドプロシージャなどのデータベースサブメニューにアクセスします
3.テーブルのサブメニューを選択し、それを右クリックして[テーブルの作成]オプションを選択します。または、スキーマメニューを作成した後、メインツールバーから新しいテーブルを作成することもできます。

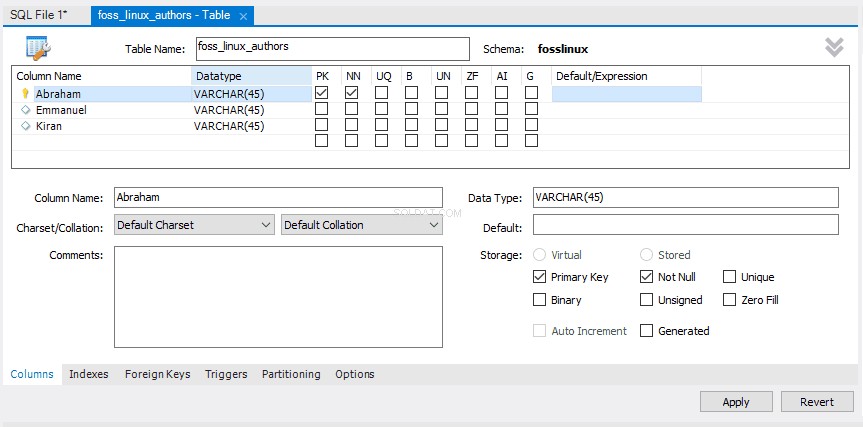
4.新しいテーブル画面が開いたら、すべての詳細を入力する必要があります。たとえば、テーブルでは、テーブル名(Foss Linux)を入力してから、デフォルトのエンジンと照合を使用します。
5.中央のウィンドウ内をクリックして、列の詳細を入力します。列名には、主キー(PK)、一意のインデックス(UI)、自動増分(AI)、非ヌル(NN)、バイナリ(B)、符号なしデータ型(UN)、G(生成された列)などの属性が常に含まれます。 。
上記の属性を明確に理解して理解するには、以下のスクリーンショットを参照してください。すべての詳細の入力が完了したら、「適用」ボタンをクリックします。ただし、誤って間違ったことをした場合は、[元に戻す]ボタンを使用して元に戻すことができます。

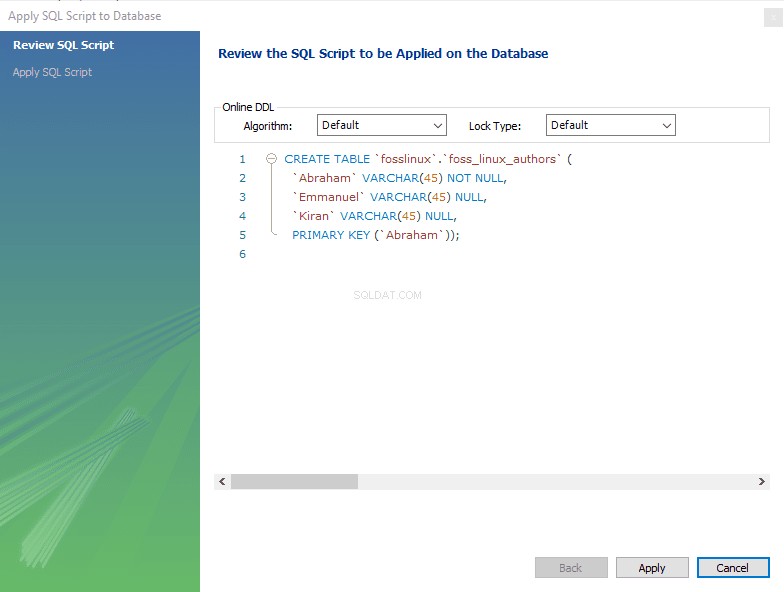
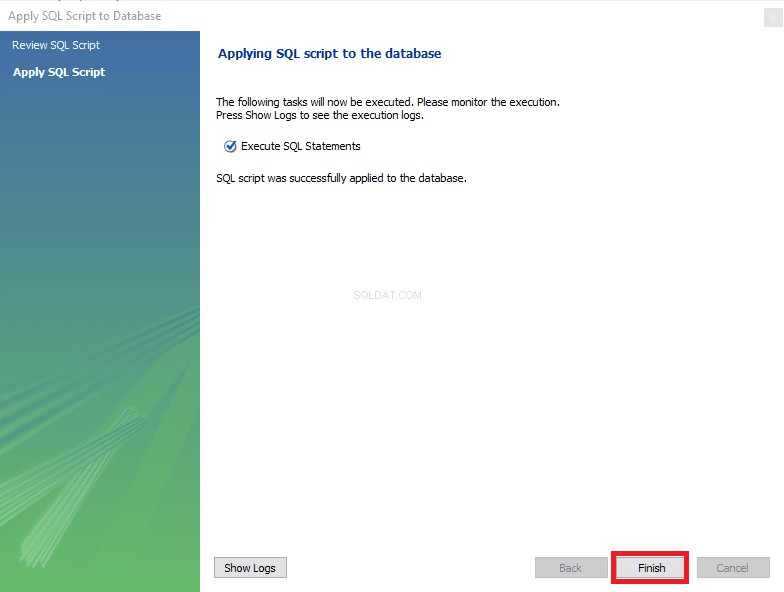
6. [適用]ボタンをクリックするとすぐに、SQLステートメントウィンドウが開きます。この段階では、[適用]ボタンをクリックしてステートメントを実行し、[完了]ボタンを押して変更を保存する必要があります。

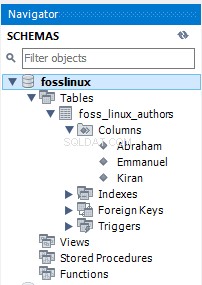
7.最後に、[スキーマ]メニューに移動し、データベースを選択してダブルクリックし、下の画像に示すように、新しく作成したテーブルを開きます。

テーブルを更新する方法
以下のフェーズに従って、テーブルを更新してください。
注: テーブルを更新できるのは、テーブルを作成した後でのみです。そうでなければ、それは不可能です。
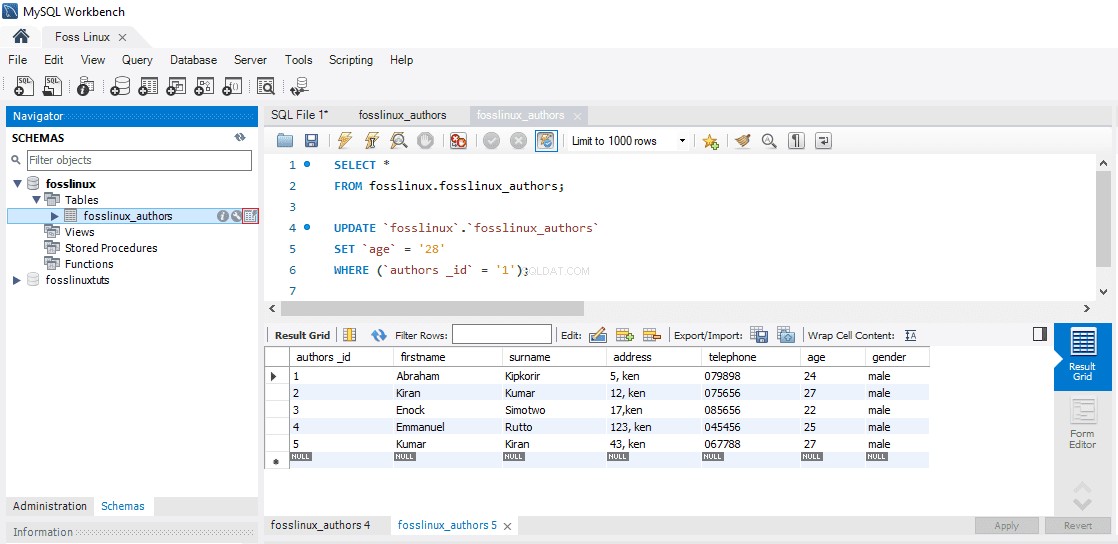
- データベースの下で変更するテーブルを選択し、スクリーンショットで強調表示されている「テーブルアイコン」アイコンをクリックします。
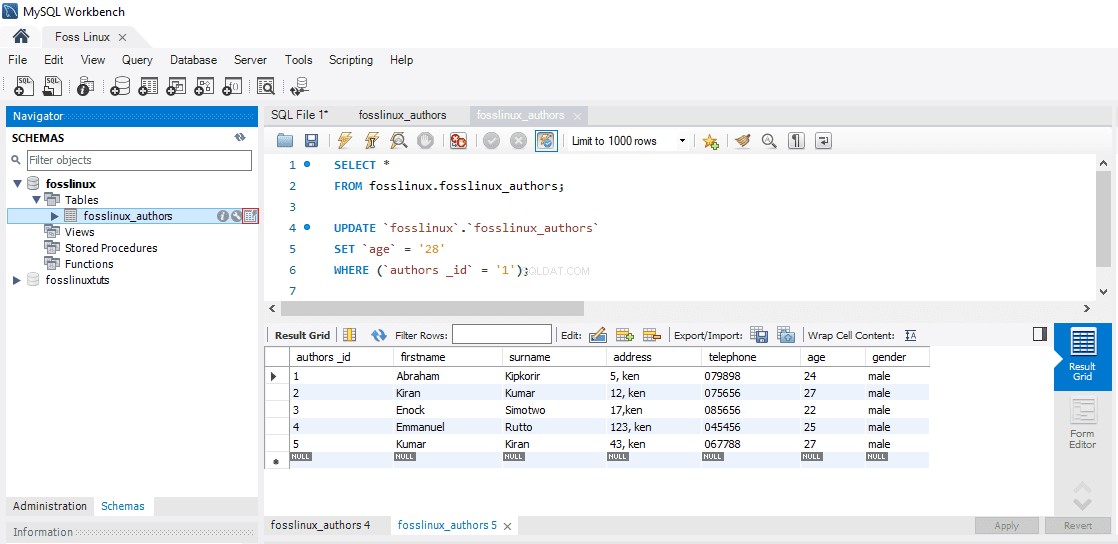

- 上記の画面で、列名、データ型、およびその他すべてのテーブル設定を必要に応じて更新および変更できます。たとえば、次の画像で更新されたテーブルを確認できます。
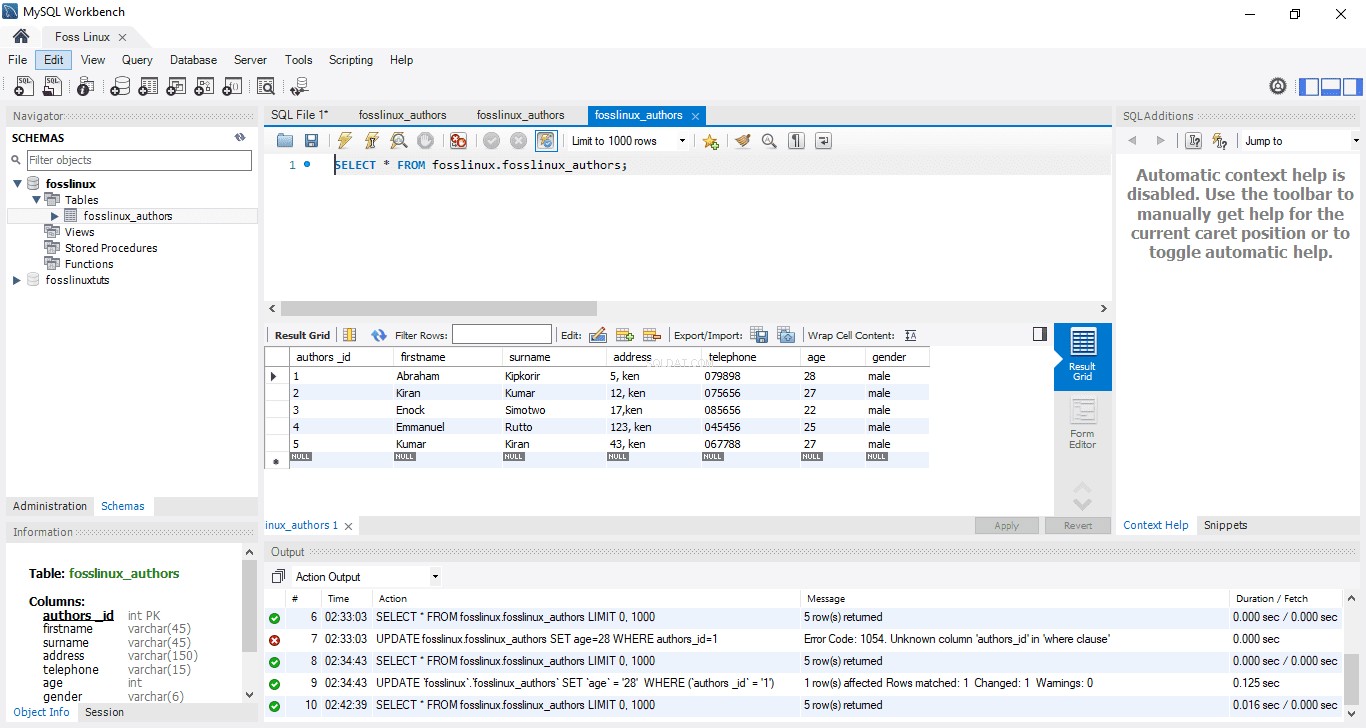

注:上の画像をよく見ると、「アブラハム」の作者の年齢が24歳から28歳に変更されていることがわかります。
MySQLWorkbenchでテーブルを削除する方法
テーブルを削除する手順は、記事に記載されているデータベースを削除する手順と似ています。したがって、次のプロンプトに従ってテーブルを正常に削除してください。
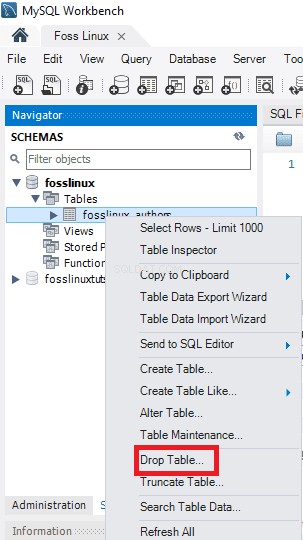
- ダウンロードするテーブルを選択し、右クリックして[テーブルの削除]オプションを選択します。以下のようなポップアップウィンドウが表示されます。

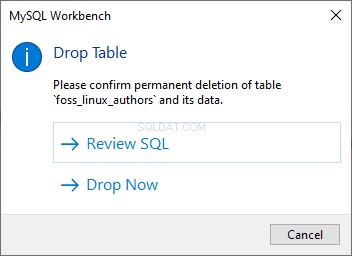
- ポップアップウィンドウから2番目のオプションである[今すぐドロップ]オプションを選択して、データベースからテーブルを即座に削除します。

MySQL Workbenchでデータ行を挿入、読み取り、更新、および削除する方法
ここでは、MySQLワークベンチを使用してデータ行を挿入、読み取り、削除、および更新する方法について説明します。まず、あなたがする必要があるのは:
- MySQL Workbenchを起動し、正しいクレデンシャル(rootパスワード)を使用してログインします。次に、ナビゲーションタブに進み、「スキーマ」メニューをクリックします。ここには、正常に作成されたデータベース(Foss Linux)と、MySQLワークベンチを使用した作成者を含むテーブルがあります。
- 作成済みのテーブルを選択し、作成者のリストテーブルの上にマウスを置きます。 「作成者」列の右側に3つのアイコンが表示されます。表をクリックして新しいウィンドウを開きます(サポートセクションまたはクエリエディターがMySQLステートメントを示し、下部セクションまたは出力セクションがデータ行を示していることを確認してください)。以下のスクリーンショットを参照してください。

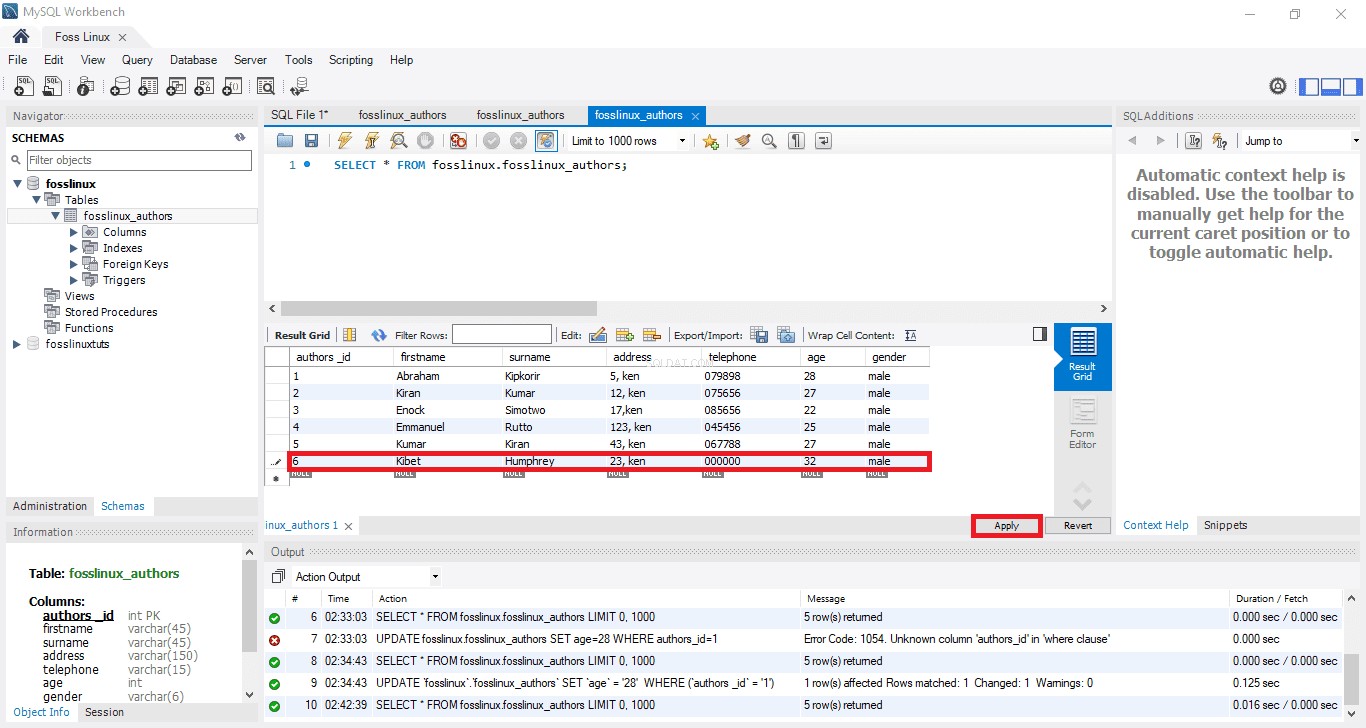
- 行にデータを入力してデータ値を挿入する場合は、目的の列を選択します。データの挿入はExcelワークシートに似ているので、びっくりしないでください。したがって、簡単に関連付けることができます。
- データ行の入力が完了したら、[適用]ボタンと[完了]ボタンをクリックして、入力したデータ行を保存します。

MySQLワークベンチを使用してデータ行を更新する方法
このプロセスは、テーブルの更新方法についてすでに処理したプロセスと似ています。この場合、保存されたデータ行を変更および編集できます。変更を調整した後、「適用」ボタンをクリックして変更を保存できます。これにより、SQL更新ステートメントが生成されます。[完了]をクリックして、データ行に加えられたすべての変更を保存してください。
MySQLワークベンチで行を削除する方法
データ行を選択し、行の前に表示されているアイコンを右クリックして、[行の削除]オプションを選択します。この手順は、テーブルから個々の行を削除するのに役立ちます。完了したら、「適用」ボタンをクリックして変更を確認できます。その後、[完了]ボタンをクリックして、データベースに加えられたすべての変更を保存します。

MySQLWorkbenchでテーブルまたはデータベースをインポート/エクスポートする方法
MySQLワークベンチを使用して、データベースまたはテーブルをインポートおよびエクスポートする方法を確認します。
データベースまたはテーブルのエクスポート
MySQLワークベンチを使用してデータベースまたはテーブルをエクスポートするには、以下の手順に従います。
- まず、メニューバーに移動して[サーバー]をクリックし、次に下の画面に示すように[データのエクスポート]オプションを選択します。 「データエクスポート」オプションをクリックすると、データエクスポートオプションと設定を含む新しいウィンドウがポップアップ表示されます。


- データベースを選択すると、選択したデータベースの対応するすべてのテーブルが表示されます。このセクションでは、ユーザーは提供されたチェックボックスを使用して複数のデータベースを選択できます。選択したデータベースはすべてエクスポートファイルに含まれることに注意してください。同様に、下の画像に示すように、ユーザーは左側のセクションウィンドウから複数のテーブルを選択できます。
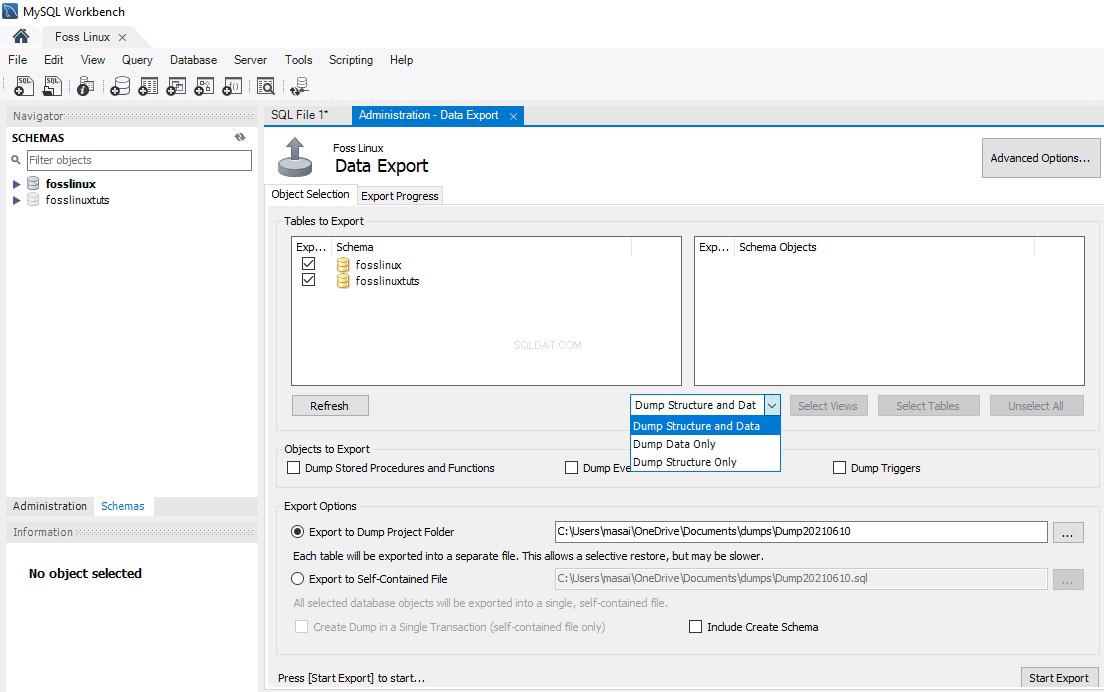

- この記事のチュートリアルの場合、2つのデータベース(fosslinuxとfosslinuxtuts)を選択します。また、データベースの下のテーブルが選択されます。次に、ドロップダウンボックスに移動し、ユーザーのニーズと要件に応じて、[構造とデータのダンプ]、[データのみのダンプ]、および[構造のダンプのみ]を選択します。
- データと構造のダンプ: このオプションを選択すると、データ行とテーブル構造の両方が保存されます
- データのダンプのみ: このオプションは、挿入されたデータ行をテーブルにのみ保存します。
- ダンプ構造のみ: このオプションは、テーブル構造のみを保存します(これは、ユーザーが定義したデータベース列とデータ型です)
4.エクスポートファイルのエクスポートパスを選択することができます。ただし、このガイドでは、デフォルトのパス設定を使用します。
注:以下で説明するように、2つのラジオボタンがあります。
- ダンププロジェクトフォルダにエクスポート: このオプションは、すべてのテーブルを別々のSQLファイルとして同じフォルダーに保存します。これは、ユーザーがエクスポートファイルを1つずつ復元する場合に常に役立ちます。
- 自己完結型ファイルへのエクスポート: このオプションは、すべてのテーブルとデータベースを単一のSQLファイルに格納します。このオプションは、ユーザーがすべてのデータベース、テーブル、およびデータ行を単一のSQLファイルとしてインポートすることを選択した場合に常に推奨されます。
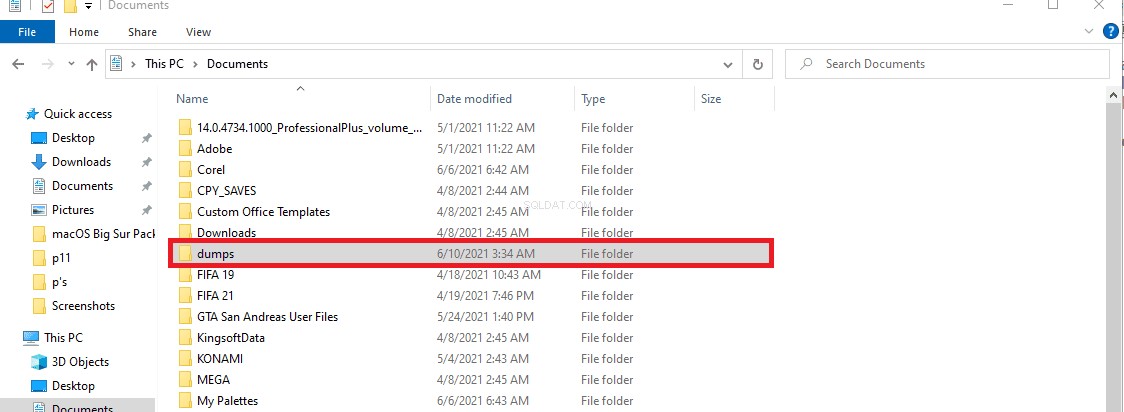
5.このセクションの最終段階は、「エクスポートの開始」ボタンをクリックすることです。これにより、ログとプログレスバーが表示されます。エクスポートしたファイルをすばやく見つけるには、Windowsオペレーティングシステムでドキュメントフォルダを開きます。

データベースまたはテーブルのインポート
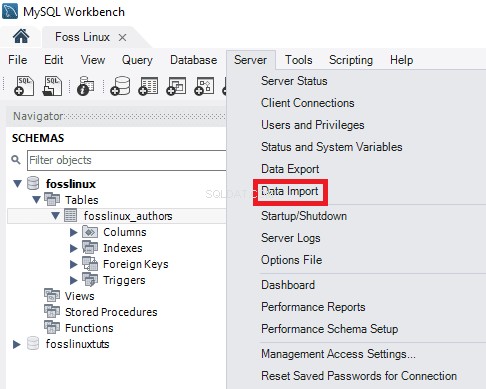
1. MySQLワークベンチが開いたら、メニューバーに移動します。確認。 MySQLプログラムをオペレーティングシステムにインストールするときに、rootユーザーに提供した資格情報を忘れないでください。次に、「サーバー」をクリックし、「データのインポート」オプションを選択します。これにより、データのインポートオプションと設定を含む新しいウィンドウが開きます。

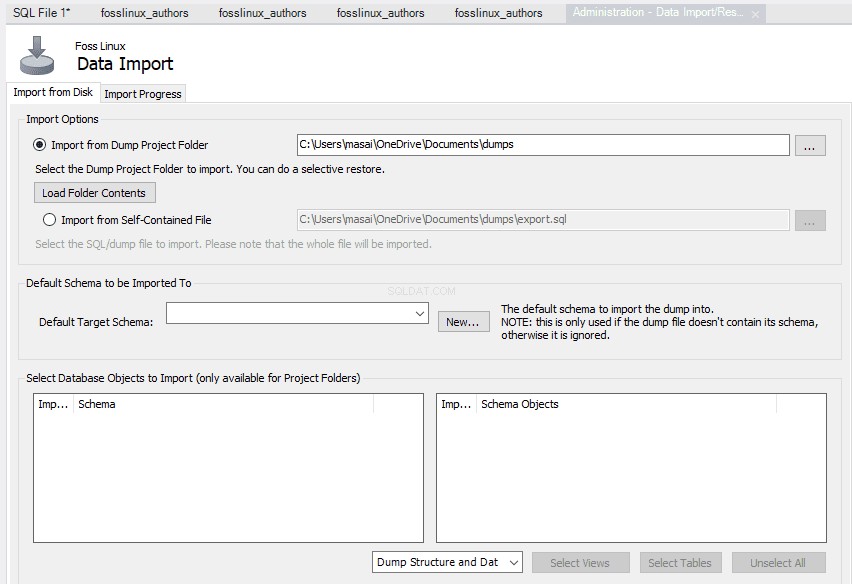
2.テーブルとデータベースをインポートするための2つのオプションが表示されます。これらは次のとおりです。
- 「ダンププロジェクトフォルダからインポート」
- 「自己完結型ファイルからインポートします。」

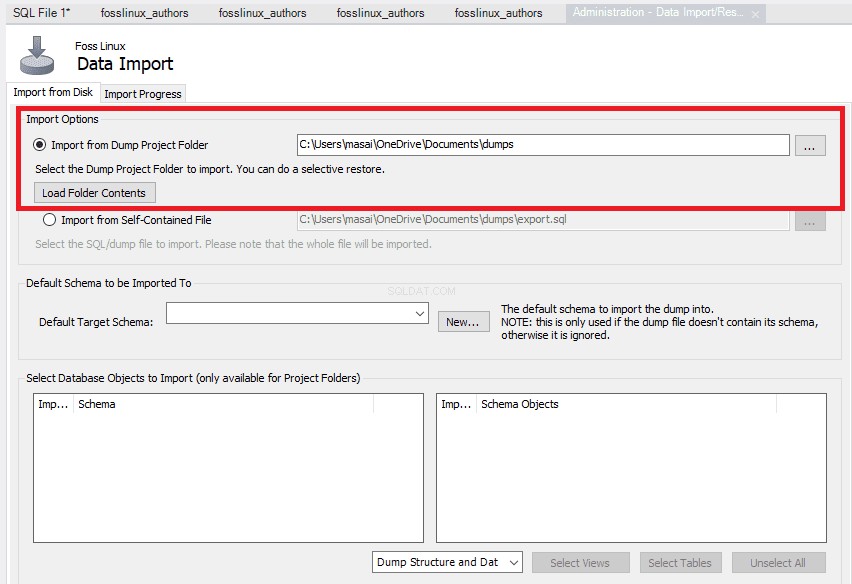
3.最初のオプションである「ダンププロジェクトフォルダからインポート」を選択します。その後、「ダンププロジェクトフォルダからインポート」のすぐ下にある「フォルダコンテンツのロード」をクリックして、プロジェクトフォルダに含まれる利用可能なすべてのデータベースを表示します。

4.作成したデータベース「FossLinux」とそれに対応する作成者のテーブルを「データインポートオプション」から選択します。
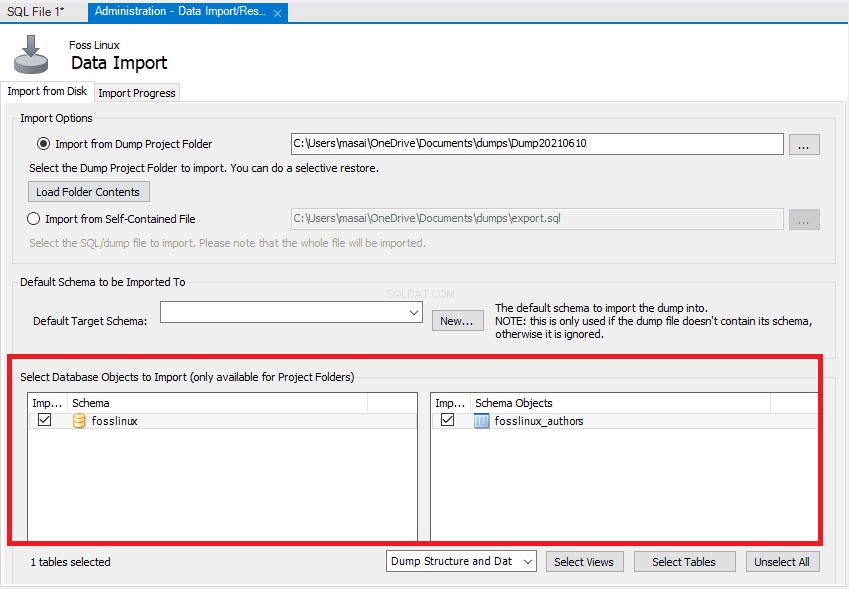

5.フェーズの次のステップは、[構造とデータのダンプ]オプションを選択し、[インポートの開始]ボタンをクリックして、バックアップされたファイルからテーブルとデータベースをインポートすることにより、プロセスを完了します。


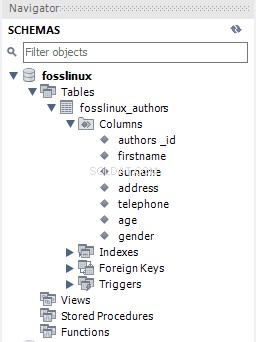
6. Your newly imported database and tables can be found in the Schema section. If your table and database do not reflect, you will click the refresh button next to the schemas option. This will display all the newly updated files on your MySQL server.

Connecting to MySQL server
Once you have the server installed, you can connect it using any client program such as MySQL command line and MySQL workbench.
Connect to MySQL using command line client
MySQL allows you to interact with MySQL in the interactive and non-interactive mode.
The command-line Client is typically located in the bin directory of the installation folder
To invoke the program, you just simply navigate to the bin directory of the MySQL’s installation folder and type:
mysql
If the program is already in the PATH, you can simply invoke it using the “mysql” syntax.
On the other hand, use this command to connect to the MySQL server:
shell>mysql -u root –p
- -u root:Enables the user to connect to the MySQL Server with the help of the root account
- -p:instructs MySQL to prompt for a password.
Input the password to your root account and press “Enter” to continue to the next step
Ensure you enter the correct credentials to connect to the MySQL server using this command:
mysql>
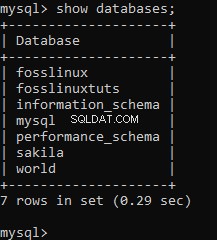
To display databases like the output below:
In the current server, you use the SHOW DATABASES statement:
mysql> show databases;
Here is the output:

You can use the following link to Download MySQL Sample Database
The download file is zipped. Hence you require to decompress it using a zip program.
After uncompressing the sampledatabase.zip file, you can load the sample database into the MySQL database server and test it by using the following SQL statements:
USE classicmodels;
SELECT * FROM customers;


Basically, the essence of the statements is to switch the current database to classic models and query data from the customer’s table. So, if you see the customer data returned, you have successfully imported the sample database into the MySQL database server.
MySQL database schema
MySQL database schema has the following tables:
- Customers: stores the customers’ data
- Products: stores list of scale model cars
- Product lines: stores list of product line categories
- Orders: stores sales orders placed by customers
- Order details: stores order line details for each auctions order
- Payments: stores disbursements made by customers grounded on their accounts
- Employees: stores employee information as well as the organization structure such as who reports to whom
- Offices: stores sales office data
How to load the sample database into the server
Step 1: Download the classicmodels schema from the MySQL sample database section
Step 2: Decompress the downloaded file to a folder you can easily access. You can use any folder you want. For our case, let’s unzip the file to the desktop directory.


Step 3:Create the database using the following syntax:
create database mysqlsimpledatabase;


Step 3: With the aid of the USE statement, let us now use the newly created sample database. To do so, use the following syntax;
use mysqlsimpledatabase;


Step 5:Once the database has been changed, we shall now proceed to the next step, which is importing our ‘mysqlsampledatabase’ into our MySQL server. Use the syntax below to import the database;
Source C:\Users\masai\OneDrive\Desktop\mysqlsampledatabase.sql
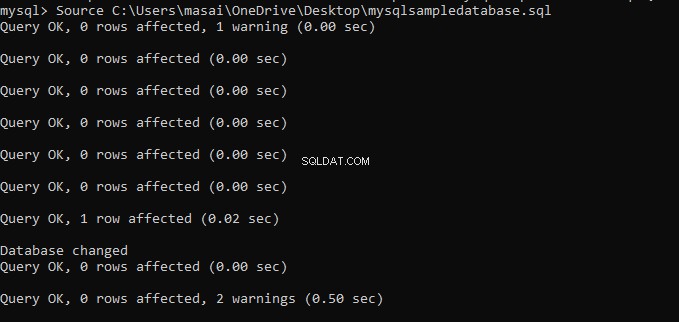

Note: After the “Source” statement, place the path to where you decompressed the database. This differs as your directory is not the same as mine.
Step 5: Use the “SHOW DATABASES” command to list all the databases in the current server:
show databases;
The output provided should be similar to the one shown below, which the newly created classic models databases.
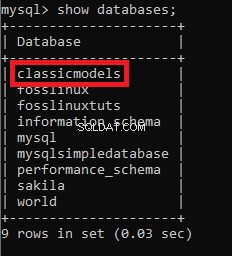

You are now done importing the database into MySQL server using MySQL command-line client.
Understand MySQL Shell Commands
MySQL shell is vital and valuable as it enables the user to modify environment execution of the code editor, such as active programming language configuration or MySQL server connection. Below is a comparison table entailing all the commands regardless of the language used or selected.
Note:commands are to be independent of the execution mode; thus, they start with “\” (an escape sequence)
| Command | Shortcut | Description |
|---|---|---|
| \help | \h or \? | Get help with MySQL |
| \quit | \q or \exit | Exit MySQL shell |
| \status | \s | Display the current status of the MySQL shell |
| \ | Begin multiple-line mode in SQL mode. (when an empty line is entered, code is cached then executed) | |
| \js | Change the execution mode to JavaScript | |
| \connect | \c | Connecting to MySQL instance |
| \py | Change the execution mode to Python | |
| \reconnect | Reconnecting to MySQL instance | |
| \sql | Change to SQL execution mode | |
| \source | \. Or source (without a backslash) | A script will be executed using the active language |
| \disconnect | Disconnect from the global session | |
| \use | \u | Specifies the schema to be used |
| \history | Editing and viewing the command line history | |
| \warnings | \W | Shows warnings generated by an executed statement |
| \nowarnings | \w | Do not display the warning generated by an executed statement |
| \watch | Running the provided report with the help of options and arguments and refresh the result at regular intervals | |
| \rehash | Manually updates the autocomplete name cache | |
| \show | Runs the provided reports with the help of arguments and options | |
| \option | Change and query MySQL shell configuration options | |
| \system | \! | Runs the specified operating system commands and displays results in MySQL shell |
| \pager | \p | Configure the pager used by MySQL to display text |
| \edit | \e | Opens command in the default system editor then runs it in MySQL shell |
| \nopager | Disables all the pagers MySQL shell was previously configured to use |
How to create a user in MYSQL
What do you understand by the term MySQL user? This is a record stored in the “USER” table containing account privileges, login information, and host information for the MySQL server. Creating a user is essential as it plays a crucial role in managing and accessing databases.
To create a new MySQL user, we use the Create User statement. This statement makes a new user account in the database server. The newly created account provides resource-limit, role, TLS/SSL, authentication, and password management properties for new accounts. It also gives the user the ability to control the accounts that require locking and unlocking.
Ensure to have a global privilege of “Create User Statement” if you plan on using this statement. Additionally, you can have the “INSERT” privilege instead.
Note: creating an already existing user will throw an error message. However, if you use the “IF NOT EXISTS” clause, the statement will warn for all the names that already exist instead of throwing an error message.
By default, MySQL servers contain root user account that allows the rightful owners to manage and access the databases. However, there are times whereby other users can be granted the opportunity to access databases without providing them complete control. In such cases, a non-root user is provided with limited privileges to access and modify databases.
How to create a user:
First, we need to check for all existing users in our server. to do so, use the syntax below:
select host, user from mysql.user;


Use the syntax below to create a new user in the database
create user 'account_name'@'localhost' identified by 'MyPassword';
Let us break down the above syntax so that you clearly understand what we are talking about:
The “account_name” is the new user, while ‘MyPassword’ is the password the new user will use to log in to the MySQL server.
Note:the “account_name” contains two parts:the username and hostname. The username and hostname are separated by @symbol.
The hostname:is the name of the host in which the user can use to connect to the database.
The username is the name of the user accessing or modifying the database.
username@hostname
Note: the hostname is optional. Therefore, if you don’t create it, the user can use any other created host on the server.
To write the username without the hostname, use the syntax below:
username@%
It is essential to understand that using the create user statement will create a user with full privileges. To limit the privileges, you will use the “GRANT” statement.
How to create a new user example:
Stick to the guidelines below to create a new user in the MySQL database server:
- With the help of the MySQL client tool, open MySQL server
- Enter the credentials provided during the installation period
- To show all the users in the current MySQL server, execute the following command:
select user from mysql.user;


- Create a new user using the command below:
create user 'fosslinux'@'localhost' identified by 'Kip$$348';


- Run the previous command to show all the users as shown in the image below
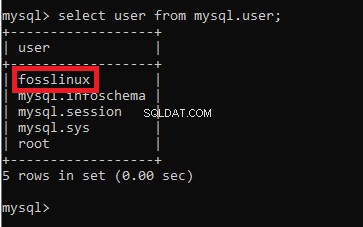

From the above screen, you can see that the “fosslinux” user has been successfully created.
Let us try to use the “IF NOT EXISTS ” statement together with the “CREATE USER ” statement.
Syntax:
CREATE USER IF NOT EXISTS foss@localhost IDENTIFIED BY 'kip34834331';


How to allow privileges to the recently created user
Below are some of the commonly used privileges that the MySQL server provides.
- ALL PRIVILEGES: the new user in this instance is permitted to control the entire database.
- CREATE: allows the user the ability to create tables and databases
- DELETE: enables the user to delete rows for a specific table
- SELECT: will enable the user to read the database
- UPDATE: This will allow the user ability to update table rows
- INSERT: allows the user to insert a row into a specific table
- DROP: Allows the user ability to drop tables and databases
To grant the newly created user privileges, execute the commands below:
GRANT ALL PRIVILEGES ON * . * TO fosslinux@localhost;


To provide specific privileges, run the following command:
GRANT CREATE, SELECT, INSERT ON * . * TO fosslinux@localhost;


There are times when you will need to strip off user privileges. To do so, execute the following command:
FLUSH PRIVILEGES;


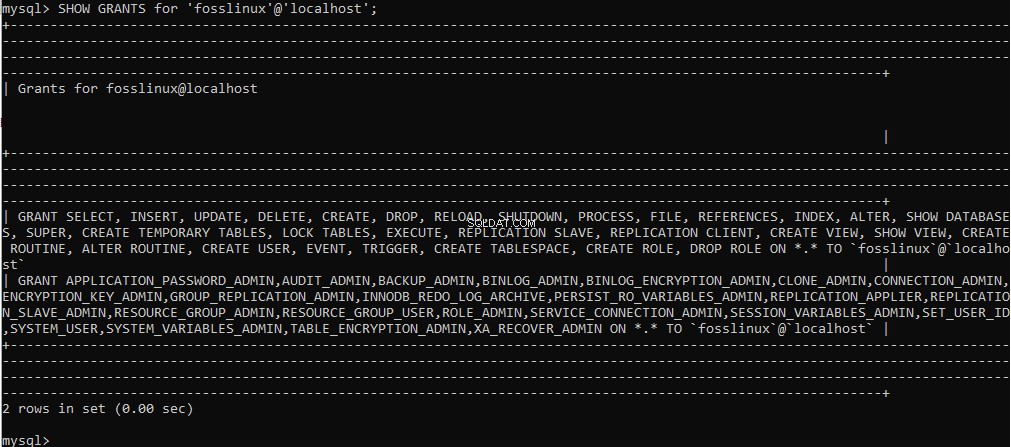
Also, if you want to see the privileges granted to a user, execute the command below:
SHOW GRANTS for 'fosslinux'@'localhost';

How to drop users in the MySQL server
As seen earlier in this article, MySQL drop statement is used to remove or delete. Therefore, if used with the user, the statement will remove the user plus all their granted privileges from the database server.
Note: you will get an error if you try to drop a user that does not exist in your database server.
Always ensure to have the required global privilege of the “Create User” statement or “Delete” privilege for the MySQL system schema if you plan on using the “Drop User” statement.
Use the syntax below to drop all the user accounts from the MySQL database server.
DROP USER ‘account_name’;
例:
Follow the steps mentioned in this example to drop a user in the MySQL database server.
- Use the MySQL client tool to open the MySQL server
- Enter the correct credentials
- Show all users using the command below
select user from mysql.user;
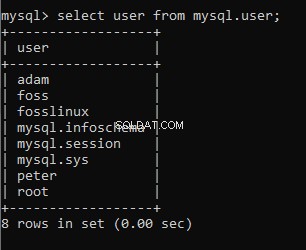

- Now execute the following command to drop a user account
DROP USER adam@localhost, peter@localhost;


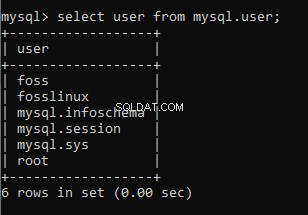
The command we executed will delete or drop the “adam” and “peter” accounts from our database server, as shown in the screenshot below. Once you have successfully dropped the user accounts, you need to re-run the show all user command to ascertain that the users have been successfully dropped.
If “adam” and “peter” user accounts have been successfully dropped, you will get an output similar to the one displayed here:

Conclusion
We believe this article has been comprehensive enough to cover everything concerning MySQL that you need to understand. Ensure to try out the process to be acquainted with all the required knowledge on using MySQL. Remember, you can always reach out if you find any problem or you have a topic that you will want us to cover in the future. Use the comments section to interact with us as we are always ready to help. Thanks for reading.
