MySQLは、今日の市場で最も人気のあるデータベース管理システム(DBMS)の1つです。今年のDB-Enginesランキングでは、OracleDBMSに次ぐ第2位でした。ほとんどのソフトウェアアプリケーションは何らかの形でデータとやり取りする必要があるため、Pythonなどのプログラミング言語は、これらのデータソースを保存してアクセスするためのツールを提供します。
このチュートリアルで説明する手法を使用すると、MySQLデータベースをPythonアプリケーションと効率的に統合できます。映画のレイティングシステム用の小さなMySQLデータベースを開発し、Pythonコードから直接クエリする方法を学びます。
このチュートリアルを終了すると、次のことができるようになります。
- MySQLの固有の機能を特定します
- アプリケーションを接続する MySQLデータベースへ
- データベースにクエリを実行して、必要なデータを取得します。
- 例外を処理する データベースへのアクセス中に発生する
- ベストプラクティスを使用する データベースアプリケーションの構築中
このチュートリアルを最大限に活用するには、 forなどのPythonの概念に関する実用的な知識が必要です。 ループ、関数、例外処理、および pipを使用したPythonパッケージのインストール 。また、リレーショナルデータベース管理システムと SELECTなどのSQLクエリの基本的な知識も必要です。 、 DROP 、 CREATE 、および JOIN 。
MySQLと他のSQLデータベースの比較
SQL Structured Query Languageの略で、リレーショナルデータベースを管理するために広く使用されているプログラミング言語です。 SQLベースのDBMSのさまざまなフレーバーについて聞いたことがあるかもしれません。最も人気のあるものには、MySQL、PostgreSQL、SQLite、およびSQLServerが含まれます。これらのデータベースはすべてSQL標準に準拠していますが、準拠の程度はさまざまです。
オープンソースであること 1995年の開始以来、MySQLはすぐにSQLソリューションのマーケットリーダーになりました。 MySQLはOracleエコシステムの一部でもあります。そのコア機能は完全に無料ですが、いくつかの有料アドオンもあります。現在、MySQLは、Google、LinkedIn、Uber、Netflix、Twitterなどを含むすべての主要なテクノロジー企業で使用されています。
サポートのための大規模なオープンソースコミュニティとは別に、MySQLの成功には他にも多くの理由があります:
-
インストールのしやすさ: MySQLはユーザーフレンドリーになるように設計されました。 MySQLデータベースのセットアップは非常に簡単で、phpMyAdminなどの広く利用可能ないくつかのサードパーティツールにより、セットアッププロセスがさらに合理化されます。 MySQLは、Windows、macOS、Linux、Solarisを含むすべての主要なオペレーティングシステムで利用できます。
-
速度: MySQLは、非常に高速なデータベースソリューションであるという評判を持っています。フットプリントが比較的小さく、長期的には非常にスケーラブルです。
-
ユーザー権限とセキュリティ: MySQLには、パスワードのセキュリティレベルの設定、管理者パスワードの割り当て、およびユーザーアカウント権限の追加と削除を可能にするスクリプトが付属しています。このスクリプトは、Webホスティングユーザー管理ポータルの管理プロセスを複雑にしません。 PostgreSQLなどの他のDBMSは、使用がより複雑な構成ファイルを使用します。
MySQLはその速度と使いやすさで有名ですが、PostgreSQLを使用するとより高度な機能を利用できます。また、MySQLは完全にSQLに準拠しておらず、 FULL JOIN がサポートされていないなど、特定の機能制限があります。 条項。
また、MySQLでの読み取りと書き込みの同時実行でいくつかの問題が発生する可能性があります。ソフトウェアに一度に多くのユーザーがデータを書き込んでいる場合は、PostgreSQLの方が適している可能性があります。
注: 実際のコンテキストでのMySQLとPostgreSQLのより詳細な比較については、UberEngineeringがPostgresからMySQLに切り替えた理由を確認してください。
SQL Serverも非常に人気のあるDBMSであり、その信頼性、効率、およびセキュリティで知られています。これは、特に銀行のドメインで、大量のトラフィックのワークロードを定期的に処理する企業に好まれています。これは商用ソリューションであり、Windowsサービスと最も互換性のあるシステムの1つです。
2010年にOracleがSunMicrosystemsとMySQLを買収したとき、多くの人がMySQLの将来について心配していました。当時、OracleはMySQLの最大の競争相手でした。開発者は、これがMySQLを破壊することを目的としたOracleからの敵対的買収であると恐れていました。
MySQLの最初の作者であるMichaelWideniusが率いる数人の開発者は、MySQLコードベースのフォークを作成し、MariaDBの基礎を築きました。目的は、MySQLへのアクセスを保護し、永久に無料で維持することでした。
現在まで、MariaDBは完全にGPLライセンスを取得したままであり、完全にパブリックドメインに保たれています。一方、MySQLの一部の機能は、有料ライセンスでのみ使用できます。また、MariaDBは、分散SQLや列型ストレージなど、MySQLサーバーではサポートされていない非常に便利な機能をいくつか提供します。 MySQLとMariaDBの違いは、MariaDBのWebサイトにリストされています。
MySQLは、標準SQLと非常によく似た構文を使用します。ただし、公式ドキュメントに記載されているいくつかの注目すべき違いがあります。
MySQLサーバーとMySQLコネクタ/Pythonのインストール
ここで、このチュートリアルの作業を開始するには、2つの設定を行う必要があります。MySQLサーバー およびMySQLコネクタ 。 MySQLサーバーは、データベースの処理に必要なすべてのサービスを提供します。サーバーが稼働すると、MySQL Connector/Pythonを使用してPythonアプリケーションをサーバーに接続できます。
MySQLサーバーのインストール
公式ドキュメントには、MySQLサーバーをダウンロードしてインストールするための推奨される方法が詳しく説明されています。 Windows、macOS、Solaris、Linuxなど、一般的なすべてのオペレーティングシステムの手順が記載されています。
Windowsの場合、最良の方法はMySQLインストーラーをダウンロードして、プロセス全体を処理させることです。インストールマネージャは、MySQLサーバーのセキュリティ設定を構成するのにも役立ちます。 [アカウントと役割]ページで、ルートのパスワードを入力する必要があります (admin)アカウント、およびオプションでさまざまな権限を持つ他のユーザーを追加します:
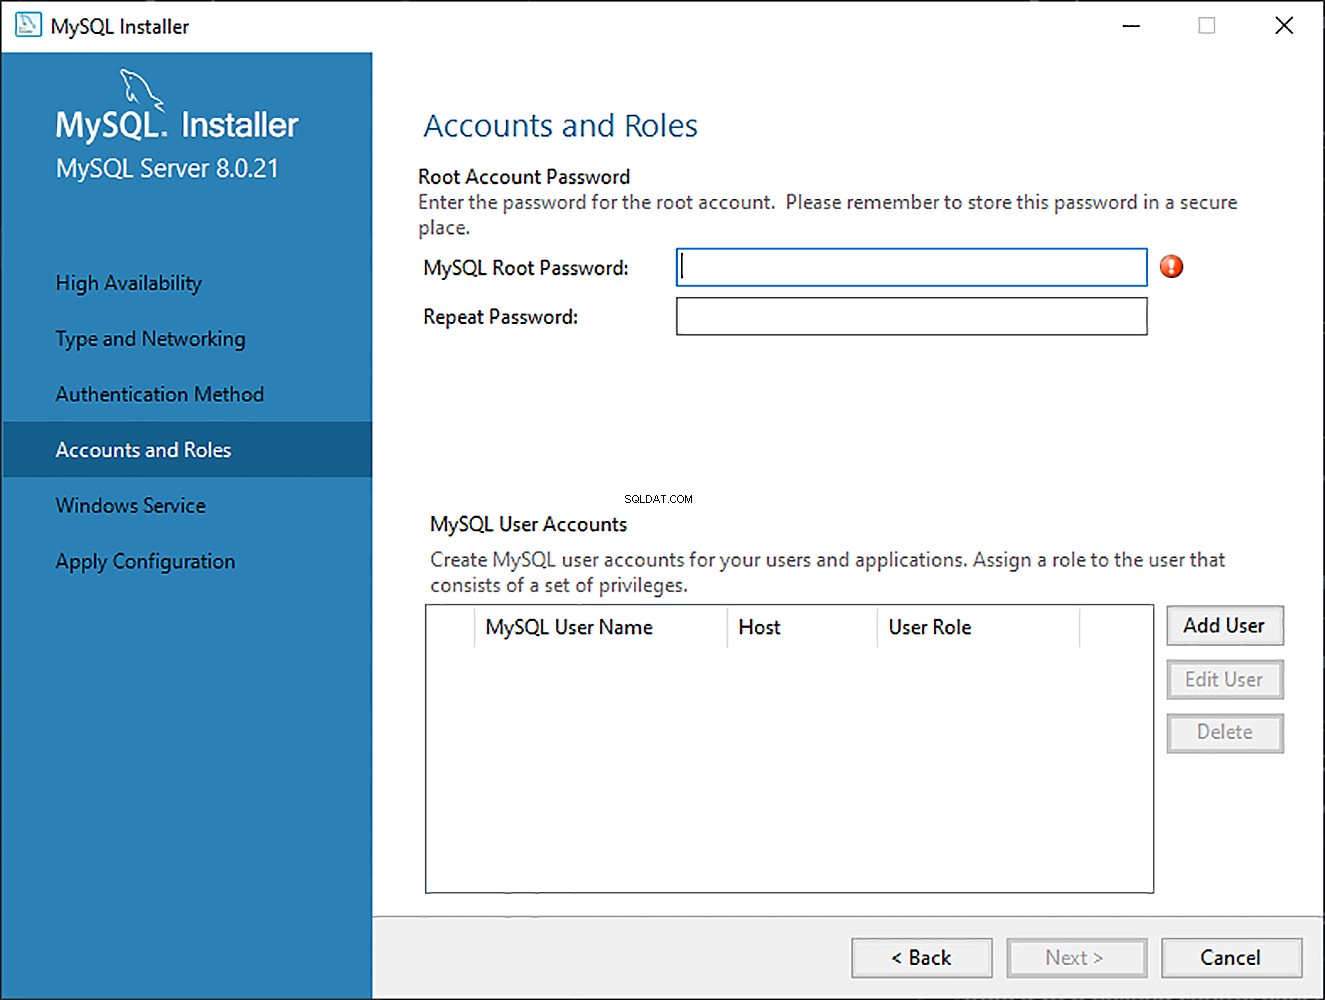
セットアップ中にrootアカウントのクレデンシャルを指定する必要がありますが、これらの設定は後で変更できます。
注: ホスト名、ユーザー名、およびパスワードは、後でMySQLサーバーとの接続を確立するために必要になるため、覚えておいてください。
このチュートリアルに必要なのはMySQLサーバーだけですが、これらのインストーラーを使用してMySQLWorkbenchなどの他の便利なツールをセットアップすることもできます。 MySQLをオペレーティングシステムに直接インストールしたくない場合は、Dockerを使用してLinuxにMySQLをデプロイするのが便利な代替手段です。
MySQL Connector/Pythonのインストール
データベースドライバは、アプリケーションがデータベースシステムに接続して対話できるようにするソフトウェアです。 Pythonのようなプログラミング言語は、特定のベンダーのデータベースと通信する前に、特別なドライバーが必要です。
これらのドライバーは通常、サードパーティのモジュールとして入手されます。 PythonデータベースAPI (DB-API)は、すべてのPythonデータベースドライバーが準拠する必要のある標準インターフェイスを定義します。これらの詳細はPEP249に記載されています。SQLiteのsqlite3、PostgreSQLのpsycopg、MySQLのMySQLコネクタ/ PythonなどのすべてのPythonデータベースドライバは、これらの実装ルールに従います。
注: MySQLの公式ドキュメントでは、コネクタという用語を使用しています ドライバーの代わりに 。技術的には、コネクタはデータベースへの接続にのみ関連付けられており、データベースとの対話には関連付けられていません。ただし、この用語は、コネクタおよびで構成されるデータベースアクセスモジュール全体によく使用されます。 ドライバー。
ドキュメントとの一貫性を維持するために、コネクタという用語が表示されます MySQLが言及されるときはいつでも。
多くの一般的なプログラミング言語には、独自のデータベースAPIがあります。たとえば、JavaにはJava Database Connectivity(JDBC)APIがあります。 JavaアプリケーションをMySQLデータベースに接続する必要がある場合は、JDBCAPIに続くMySQLJDBCコネクタを使用する必要があります。
同様に、Pythonでは、MySQLデータベースと対話するためにPythonMySQLコネクタをインストールする必要があります。多くのパッケージはDB-API標準に準拠していますが、その中で最も人気のあるものはMySQL Connector/Pythonです。 pipで入手できます :
$ pip install mysql-connector-python
pip 現在アクティブな仮想環境にサードパーティモジュールとしてコネクタをインストールします。すべての依存関係とともに、プロジェクト用に分離された仮想環境をセットアップすることをお勧めします。
インストールが成功したかどうかをテストするには、Pythonターミナルで次のコマンドを入力します。
>>>>>> import mysql.connector
上記のコードがエラーなしで実行される場合は、 mysql.connector インストールされ、使用する準備ができています。エラーが発生した場合は、正しい仮想環境にいて、適切なPythonインタープリターを使用していることを確認してください。
正しいmysql-connector-pythonをインストールしていることを確認してください パッケージ。これは純粋なPythonの実装です。 mysql-connector のように、同じ名前であるが現在は減価償却されているコネクタに注意してください 。
MySQLサーバーとの接続の確立
MySQLはサーバーベースです データベース管理システム。 1つのサーバーに複数のデータベースが含まれる場合があります。データベースと対話するには、最初にサーバーとの接続を確立する必要があります。 MySQLベースのデータベースと相互作用するPythonプログラムの一般的なワークフローは次のとおりです。
- MySQLサーバーに接続します。
- 新しいデータベースを作成します。
- 新しく作成されたデータベースまたは既存のデータベースに接続します。
- SQLクエリを実行して結果を取得します。
- テーブルに変更が加えられた場合は、データベースに通知します。
- MySQLサーバーへの接続を閉じます。
これは一般的なワークフローであり、個々のアプリケーションによって異なる場合があります。ただし、アプリケーションが何であれ、最初のステップはデータベースをアプリケーションに接続することです。
接続の確立
MySQLサーバーと対話する最初のステップは、接続を確立することです。これを行うには、 connect()が必要です mysql.connectorから モジュール。この関数は、 hostなどのパラメーターを受け取ります 、 user 、および password MySQLConnectionを返します 物体。これらのクレデンシャルをユーザーからの入力として受け取り、 connect()に渡すことができます :
from getpass import getpass
from mysql.connector import connect, Error

try:
    with connect(
        host="localhost",
        user=input("Enter username: "),
        password=getpass("Enter password: "),
    ) as connection:
        print(connection)
except Error as e:
    print(e)
上記のコードは、入力されたログインクレデンシャルを使用してMySQLサーバーとの接続を確立します。その見返りとして、 MySQLConnectionを取得します connectionに保存されているオブジェクト 変数。今後は、この変数を使用してMySQLサーバーにアクセスします。
上記のコードには、注意すべき重要な点がいくつかあります。
-
MySQLサーバーへの接続を確立する際に発生する可能性のある例外に常に対処する必要があります。これが、
tryを使用する理由です。 …except発生する可能性のある例外をキャッチして出力するためにブロックします。 -
データベースへのアクセスが完了したら、必ず接続を閉じる必要があります。未使用の開いた接続を残すと、いくつかの予期しないエラーやパフォーマンスの問題が発生する可能性があります。上記のコードは、
withを使用するコンテキストマネージャーを利用しています 、接続のクリーンアッププロセスを抽象化します。 -
ログイン認証情報をハードコーディングしないでください 、つまり、Pythonスクリプトで直接ユーザー名とパスワードを入力します。これは展開には悪い習慣であり、深刻なセキュリティ上の脅威をもたらします。上記のコードは、ユーザーにログイン資格情報の入力を求めます。組み込みの
getpassを使用します パスワードを非表示にするモジュール。これはハードコーディングよりも優れていますが、環境変数を使用するなど、機密情報を保存するためのより安全な方法が他にもあります。
これで、プログラムとMySQLサーバー間の接続が確立されましたが、新しいデータベースを作成するか、サーバー内の既存のデータベースに接続する必要があります。
新しいデータベースの作成
前のセクションでは、MySQLサーバーとの接続を確立しました。新しいデータベースを作成するには、SQLステートメントを実行する必要があります。
CREATE DATABASE books_db;
上記のステートメントは、 books_dbという名前の新しいデータベースを作成します 。
注: MySQLでは、セミコロン(; )を付ける必要があります )ステートメントの最後。これはクエリの終了を示します。ただし、MySQL Connector / Pythonはクエリの最後にセミコロンを自動的に追加するため、Pythonコードでセミコロンを使用する必要はありません。
PythonでSQLクエリを実行するには、カーソルを使用する必要があります。カーソルを使用すると、データベースレコードへのアクセスが抽象化されます。 MySQL Connector / Pythonは、 MySQLCursorを提供します クラス。PythonでMySQLクエリを実行できるオブジェクトをインスタンス化します。 MySQLCursorのインスタンス クラスはcursorとも呼ばれます 。
カーソル オブジェクトはMySQLConnectionを利用します MySQLサーバーと対話するオブジェクト。 カーソルを作成するには 、 .cursor()を使用します 接続のメソッド 変数:
cursor = connection.cursor()
上記のコードは、 MySQLCursorのインスタンスを提供します クラス。
実行する必要のあるクエリは、 cursor.execute()に送信されます。 文字列形式。この特別な機会に、 CREATE DATABASEを送信します cursor.execute()へのクエリ :
from getpass import getpass
from mysql.connector import connect, Error

try:
    with connect(
        host="localhost",
        user=input("Enter username: "),
        password=getpass("Enter password: "),
    ) as connection:
        create_db_query = "CREATE DATABASE online_movie_rating"
        with connection.cursor() as cursor:
            cursor.execute(create_db_query)
except Error as e:
    print(e)
上記のコードを実行すると、 online_movie_ratingという新しいデータベースが作成されます。 MySQLサーバーで。
CREATE DATABASE クエリはcreate_db_queryに文字列として保存されます 変数になり、 cursor.execute()に渡されます 実行のため。このコードは、 cursorでコンテキストマネージャーを使用します クリーンアッププロセスを処理するオブジェクト。
同じ名前のデータベースがサーバーにすでに存在する場合、ここでエラーが発生する可能性があります。これを確認するために、サーバー内のすべてのデータベースの名前を表示できます。同じMySQLConnectionを使用する 以前のオブジェクトで、 SHOW DATABASESを実行します ステートメント:
>>> show_db_query = "SHOW DATABASES"
>>> with connection.cursor() as cursor:
...     cursor.execute(show_db_query)
...     for db in cursor:
...         print(db)
...
('information_schema',)
('mysql',)
('online_movie_rating',)
('performance_schema',)
('sys',)
上記のコードは、現在MySQLサーバーにあるすべてのデータベースの名前を出力します。 SHOW DATABASES コマンドは、 information_schema など、サーバーで作成しなかったデータベースも出力します。 、 performance_schema 、 等々。これらのデータベースはMySQLサーバーによって自動的に生成され、さまざまなデータベースメタデータとMySQLサーバー設定へのアクセスを提供します。
CREATE DATABASE を実行して、このセクションで新しいデータベースを作成しました 声明。次のセクションでは、既存のデータベースに接続する方法を説明します。
既存のデータベースへの接続
前のセクションでは、 online_movie_ratingという新しいデータベースを作成しました 。ただし、まだ接続していません。多くの場合、Pythonアプリケーションに接続するMySQLデータベースがすでに用意されています。
同じconnect()を使用してこれを行うことができます databaseという追加のパラメータを送信して以前に使用した関数 :
from getpass import getpass
from mysql.connector import connect, Error

try:
    with connect(
        host="localhost",
        user=input("Enter username: "),
        password=getpass("Enter password: "),
        database="online_movie_rating",
    ) as connection:
        print(connection)
except Error as e:
    print(e)
上記のコードは、前に使用した接続スクリプトと非常によく似ています。ここでの唯一の変更は、追加のデータベースです。 データベースの名前がconnect()に渡されるパラメータ。 。このスクリプトを実行すると、 online_movie_ratingに接続されます。 データベース。
テーブルの作成、変更、および削除
このセクションでは、 CREATEなどの基本的なDDLクエリを実行する方法を学習します。 、 DROP 、および ALTER Pythonで。このチュートリアルの残りの部分で使用するMySQLデータベースを簡単に確認できます。また、データベースに必要なすべてのテーブルを作成し、後でこれらのテーブルに変更を加える方法を学習します。
データベーススキーマの定義
オンライン映画のレイティングシステムのデータベーススキーマを作成することから始めることができます。データベースは3つのテーブルで構成されます:
映画映画に関する一般的な情報が含まれ、次の属性があります。-
id タイトル-
release_year ジャンル-
collection_in_mil
-
レビュー担当者レビューや評価を投稿した人に関する情報が含まれており、次の属性があります。-
id -
first_name -
last_name
-
評価投稿された評価に関する情報が含まれ、次の属性があります。-
movie_id(外部キー) -
reviewer_id(外部キー) 評価
-
IMDbのような実際の映画のレイティングシステムでは、メールや映画のキャストリストなど、他の多くの属性を保存する必要があります。必要に応じて、このデータベースにさらにテーブルと属性を追加できます。ただし、このチュートリアルでは、これら3つの表で十分です。
次の画像は、データベーススキーマを示しています。
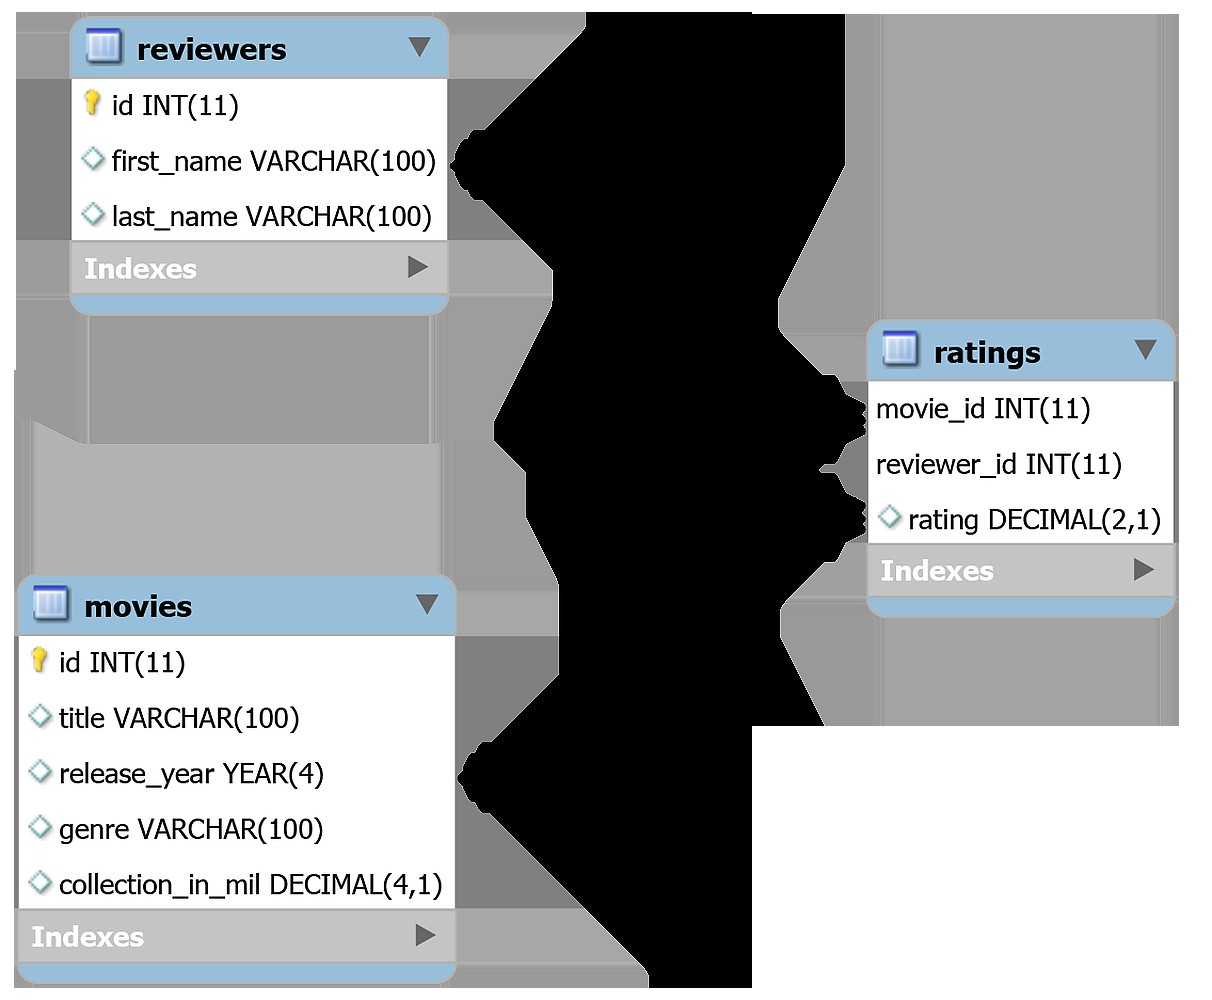
このデータベースのテーブルは相互に関連しています。 映画 およびreviewers 多対多があります 1つの映画を複数のレビューアがレビューでき、1人のレビューアが複数の映画をレビューできるため、関係があります。 評価 テーブルはmoviesを接続します reviewersのあるテーブル テーブル。
CREATE TABLEを使用したテーブルの作成 ステートメント
ここで、MySQLで新しいテーブルを作成するには、 CREATE TABLEを使用する必要があります。 声明。次のMySQLクエリは、 moviesを作成します online_movie_ratingのテーブル データベース:
CREATE TABLE movies(
    id INT AUTO_INCREMENT PRIMARY KEY,
    title VARCHAR(100),
    release_year YEAR(4),
    genre VARCHAR(100),
    collection_in_mil INT
);
以前にSQLステートメントを確認したことがある場合は、上記のクエリのほとんどが理にかなっている可能性があります。ただし、MySQLの構文には、注意が必要ないくつかの違いがあります。
たとえば、MySQLには、 YEAR など、さまざまなデータ型があります。 、 INT 、 BIGINT 、 等々。また、MySQLは AUTO_INCREMENTを使用します 新しいレコードの挿入時に列の値を自動的にインクリメントする必要がある場合のキーワード。
新しいテーブルを作成するには、このクエリを cursor.execute()に渡す必要があります 、MySQLクエリを受け入れ、接続されたMySQLデータベースでクエリを実行します。
create_movies_table_query = """
CREATE TABLE movies(
    id INT AUTO_INCREMENT PRIMARY KEY,
    title VARCHAR(100),
    release_year YEAR(4),
    genre VARCHAR(100),
    collection_in_mil INT
)
"""
with connection.cursor() as cursor:
    cursor.execute(create_movies_table_query)
    connection.commit()
これで映画ができました データベース内のテーブル。 create_movies_table_queryを渡します cursor.execute()へ 、必要な実行を実行します。
注: 接続 変数はMySQLConnectionを参照します データベースに接続したときに返されたオブジェクト。
また、 connection.commit()にも注意してください。 コードの最後にあるステートメント。デフォルトでは、MySQLコネクタはトランザクションを自動コミットしません。 MySQLでは、トランザクションで言及されている変更は、 COMMITを使用した場合にのみ発生します 最後にコマンド。実際のテーブルで変更を実行するには、トランザクションごとに必ずこのメソッドを呼び出してください。
moviesで行ったように テーブルで、次のスクリプトを実行して reviewersを作成します テーブル:
create_reviewers_table_query = """
CREATE TABLE reviewers (
    id INT AUTO_INCREMENT PRIMARY KEY,
    first_name VARCHAR(100),
    last_name VARCHAR(100)
)
"""
with connection.cursor() as cursor:
    cursor.execute(create_reviewers_table_query)
    connection.commit()
必要に応じて、メールIDや人口統計情報など、レビュー担当者に関する詳細情報を追加できます。ただし、 first_name およびlast_name 今のところあなたの目的を果たします。
最後に、評価を作成できます 次のスクリプトを使用したテーブル:
create_ratings_table_query = """
CREATE TABLE ratings (
    movie_id INT,
    reviewer_id INT,
    rating DECIMAL(2,1),
    FOREIGN KEY(movie_id) REFERENCES movies(id),
    FOREIGN KEY(reviewer_id) REFERENCES reviewers(id),
    PRIMARY KEY(movie_id, reviewer_id)
)
"""
with connection.cursor() as cursor:
    cursor.execute(create_ratings_table_query)
    connection.commit()
MySQLでの外部キー関係の実装は、標準のSQLと比較してわずかに異なり、制限されています。 MySQLでは、外部キー制約の親と子の両方が同じストレージエンジンを使用する必要があります 。
ストレージエンジンは、データベース管理システムがSQL操作を実行するために使用する基盤となるソフトウェアコンポーネントです。 MySQLでは、ストレージエンジンには2つの異なるフレーバーがあります。
-
トランザクションストレージエンジン トランザクションセーフであり、
rollbackなどの簡単なコマンドを使用してトランザクションをロールバックできます 。 InnoDBやNDBを含む多くの人気のあるMySQLエンジンは、このカテゴリに属します。 -
非トランザクションストレージエンジン データベースにコミットされたステートメントを元に戻すには、手の込んだ手動コードに依存します。 MyISAM、MEMORY、および他の多くのMySQLエンジンは非トランザクションです。
InnoDBは、デフォルトで最も人気のあるストレージエンジンです。外部キー制約をサポートすることにより、データの整合性を維持するのに役立ちます。これは、外部キーに対するCRUD操作がチェックされ、異なるテーブル間で不整合が発生しないことを確認することを意味します。
また、評価にも注意してください テーブルは列movie_idを使用します およびreviewer_id 、両方の外部キー、主キーとして共同で 。この手順により、レビュー担当者が同じ映画を2回評価できないようにします。
同じカーソルを複数の実行に再利用することを選択できます。その場合、すべての実行は、複数の個別のトランザクションではなく、1つのアトミックトランザクションになります。たとえば、すべての CREATE TABLEを実行できます 1つのカーソルでステートメントを作成し、トランザクションを1回だけコミットします:
with connection.cursor() as cursor:
    cursor.execute(create_movies_table_query)
    cursor.execute(create_reviewers_table_query)
    cursor.execute(create_ratings_table_query)
    connection.commit()
上記のコードは、最初に3つすべての CREATEを実行します ステートメント。次に、 COMMITを送信します トランザクションをコミットするMySQLサーバーへのコマンド。 .rollback()を使用することもできます ROLLBACKを送信します MySQLサーバーにコマンドを送信し、トランザクションからすべてのデータ変更を削除します。
DESCRIBEを使用したテーブルスキーマの表示 ステートメント
これで、3つのテーブルがすべて作成されたので、次のSQLステートメントを使用してそれらのスキーマを確認できます。
DESCRIBE <table_name>;
カーソルからいくつかの結果を取得するには オブジェクトの場合、 cursor.fetchall()を使用する必要があります 。このメソッドは、最後に実行されたステートメントからすべての行をフェッチします。すでにMySQLConnectionがあると仮定します connection内のオブジェクト 変数の場合、 cursor.fetchall()によってフェッチされたすべての結果を出力できます。 :
>>> show_table_query = "DESCRIBE movies"
>>> with connection.cursor() as cursor:
...     cursor.execute(show_table_query)
...     # Fetch rows from last executed query
...     result = cursor.fetchall()
...     for row in result:
...         print(row)
...
('id', 'int(11)', 'NO', 'PRI', None, 'auto_increment')
('title', 'varchar(100)', 'YES', '', None, '')
('release_year', 'year(4)', 'YES', '', None, '')
('genre', 'varchar(100)', 'YES', '', None, '')
('collection_in_mil', 'int(11)', 'YES', '', None, '')
上記のコードを実行すると、 moviesのすべての列に関する情報を含むテーブルが表示されます。 テーブル。列ごとに、列のデータ型、列が主キーであるかどうかなどの詳細を受け取ります。
ALTERを使用したテーブルスキーマの変更 ステートメント
movies テーブルには、 collection_in_milという列があります 、映画の興行収入が数百万ドルで含まれています。次のMySQLステートメントを記述して、 collection_in_milのデータ型を変更できます。 INTの属性 DECIMALへ :
ALTER TABLE movies MODIFY COLUMN collection_in_mil DECIMAL(4,1);
DECIMAL(4,1) 最大4を持つことができる10進数を意味します 数字、そのうち 1 120.1などの10進数です 、 3.4 、 38.0 、 等々。 ALTER TABLEを実行した後 ステートメントでは、 DESCRIBEを使用して更新されたテーブルスキーマを表示できます :
>>> alter_table_query = """
... ALTER TABLE movies
... MODIFY COLUMN collection_in_mil DECIMAL(4,1)
... """
>>> show_table_query = "DESCRIBE movies"
>>> with connection.cursor() as cursor:
...     cursor.execute(alter_table_query)
...     cursor.execute(show_table_query)
...     # Fetch rows from last executed query
...     result = cursor.fetchall()
...     print("Movie Table Schema after alteration:")
...     for row in result:
...         print(row)
...
Movie Table Schema after alteration
('id', 'int(11)', 'NO', 'PRI', None, 'auto_increment')
('title', 'varchar(100)', 'YES', '', None, '')
('release_year', 'year(4)', 'YES', '', None, '')
('genre', 'varchar(100)', 'YES', '', None, '')
('collection_in_mil', 'decimal(4,1)', 'YES', '', None, '')
出力に示されているように、 collection_in_mil 属性のタイプはDECIMAL(4,1)になりました 。上記のコードでは、 cursor.execute()を呼び出すことにも注意してください。 2回。ただし、 cursor.fetchall() 最後に実行されたクエリ( show_table_query )からのみ行をフェッチします 。
DROPを使用したテーブルの削除 ステートメント
テーブルを削除するには、 DROP TABLEを実行する必要があります MySQLのステートメント。テーブルの削除は元に戻せません 処理する。以下のコードを実行する場合は、 CREATE TABLEを呼び出す必要があります 評価を使用するには、もう一度クエリを実行してください 今後のセクションの表。
評価を削除するには テーブル、 drop_table_queryを送信します cursor.execute()へ :
drop_table_query = "DROP TABLE ratings"
with connection.cursor() as cursor:
    cursor.execute(drop_table_query)
上記のコードを実行すると、評価が正常に削除されます。 テーブル。
テーブルへのレコードの挿入
前のセクションでは、データベースに3つのテーブルを作成しました: movies 、 reviewers 、および評価 。次に、これらのテーブルにデータを入力する必要があります。このセクションでは、MySQL ConnectorforPythonにレコードを挿入する2つの異なる方法について説明します。
最初のメソッド、 .execute() 、レコードの数が少なく、レコードをハードコーディングできる場合にうまく機能します。 2番目のメソッド.executemany() 、より人気があり、実際のシナリオに適しています。
.execute()の使用
最初のアプローチでは、同じ cursor.execute()を使用します 今まで使ってきた方法。 INSERT INTOを記述します 文字列でクエリを実行し、それを cursor.execute()に渡します 。このメソッドを使用して、 moviesにデータを挿入できます テーブル。
参考までに、<code> movies テーブルには5つの属性があります:
-
id タイトル-
release_year ジャンル-
collection_in_mil
idのデータを追加する必要はありません AUTO_INCREMENTとして idを自動的に計算します あなたのために。次のスクリプトは、レコードを moviesに挿入します テーブル:
insert_movies_query = """
INSERT INTO movies (title, release_year, genre, collection_in_mil)
VALUES
    ("Forrest Gump", 1994, "Drama", 330.2),
    ("3 Idiots", 2009, "Drama", 2.4),
    ("Eternal Sunshine of the Spotless Mind", 2004, "Drama", 34.5),
    ("Good Will Hunting", 1997, "Drama", 138.1),
    ("Skyfall", 2012, "Action", 304.6),
    ("Gladiator", 2000, "Action", 188.7),
    ("Black", 2005, "Drama", 3.0),
    ("Titanic", 1997, "Romance", 659.2),
    ("The Shawshank Redemption", 1994, "Drama",28.4),
    ("Udaan", 2010, "Drama", 1.5),
    ("Home Alone", 1990, "Comedy", 286.9),
    ("Casablanca", 1942, "Romance", 1.0),
    ("Avengers: Endgame", 2019, "Action", 858.8),
    ("Night of the Living Dead", 1968, "Horror", 2.5),
    ("The Godfather", 1972, "Crime", 135.6),
    ("Haider", 2014, "Action", 4.2),
    ("Inception", 2010, "Adventure", 293.7),
    ("Evil", 2003, "Horror", 1.3),
    ("Toy Story 4", 2019, "Animation", 434.9),
    ("Air Force One", 1997, "Drama", 138.1),
    ("The Dark Knight", 2008, "Action",535.4),
    ("Bhaag Milkha Bhaag", 2013, "Sport", 4.1),
    ("The Lion King", 1994, "Animation", 423.6),
    ("Pulp Fiction", 1994, "Crime", 108.8),
    ("Kai Po Che", 2013, "Sport", 6.0),
    ("Beasts of No Nation", 2015, "War", 1.4),
    ("Andadhun", 2018, "Thriller", 2.9),
    ("The Silence of the Lambs", 1991, "Crime", 68.2),
    ("Deadpool", 2016, "Action", 363.6),
    ("Drishyam", 2015, "Mystery", 3.0)
"""
with connection.cursor() as cursor:
    cursor.execute(insert_movies_query)
    connection.commit()
The movies table is now loaded with thirty records. The code calls connection.commit() at the end. It’s crucial to call .commit() after preforming any modifications to a table.
Using .executemany()
The previous approach is more suitable when the number of records is fairly small and you can write these records directly into the code. But this is rarely true. You’ll often have this data stored in some other file, or the data will be generated by a different script and will need to be added to the MySQL database.
This is where .executemany() comes in handy. It accepts two parameters:
- A query that contains placeholders for the records that need to be inserted
- A list that contains all records that you wish to insert
The following example inserts records for the reviewers table:
insert_reviewers_query = """
INSERT INTO reviewers
(first_name, last_name)
VALUES ( %s, %s )
"""
reviewers_records = [
    ("Chaitanya", "Baweja"),
    ("Mary", "Cooper"),
    ("John", "Wayne"),
    ("Thomas", "Stoneman"),
    ("Penny", "Hofstadter"),
    ("Mitchell", "Marsh"),
    ("Wyatt", "Skaggs"),
    ("Andre", "Veiga"),
    ("Sheldon", "Cooper"),
    ("Kimbra", "Masters"),
    ("Kat", "Dennings"),
    ("Bruce", "Wayne"),
    ("Domingo", "Cortes"),
    ("Rajesh", "Koothrappali"),
    ("Ben", "Glocker"),
    ("Mahinder", "Dhoni"),
    ("Akbar", "Khan"),
    ("Howard", "Wolowitz"),
    ("Pinkie", "Petit"),
    ("Gurkaran", "Singh"),
    ("Amy", "Farah Fowler"),
    ("Marlon", "Crafford"),
]
with connection.cursor() as cursor:
    cursor.executemany(insert_reviewers_query, reviewers_records)
    connection.commit()
In the script above, you pass both the query and the list of records as arguments to .executemany() 。 These records could have been fetched from a file or from the user and stored in the reviewers_records list.
The code uses %s as a placeholder for the two strings that had to be inserted in the insert_reviewers_query 。 Placeholders act as format specifiers and help reserve a spot for a variable inside a string. The specified variable is then added to this spot during execution.
You can similarly use .executemany() to insert records in the ratings table:
insert_ratings_query = """
INSERT INTO ratings
(rating, movie_id, reviewer_id)
VALUES ( %s, %s, %s)
"""
ratings_records = [
    (6.4, 17, 5), (5.6, 19, 1), (6.3, 22, 14), (5.1, 21, 17),
    (5.0, 5, 5), (6.5, 21, 5), (8.5, 30, 13), (9.7, 6, 4),
    (8.5, 24, 12), (9.9, 14, 9), (8.7, 26, 14), (9.9, 6, 10),
    (5.1, 30, 6), (5.4, 18, 16), (6.2, 6, 20), (7.3, 21, 19),
    (8.1, 17, 18), (5.0, 7, 2), (9.8, 23, 3), (8.0, 22, 9),
    (8.5, 11, 13), (5.0, 5, 11), (5.7, 8, 2), (7.6, 25, 19),
    (5.2, 18, 15), (9.7, 13, 3), (5.8, 18, 8), (5.8, 30, 15),
    (8.4, 21, 18), (6.2, 23, 16), (7.0, 10, 18), (9.5, 30, 20),
    (8.9, 3, 19), (6.4, 12, 2), (7.8, 12, 22), (9.9, 15, 13),
    (7.5, 20, 17), (9.0, 25, 6), (8.5, 23, 2), (5.3, 30, 17),
    (6.4, 5, 10), (8.1, 5, 21), (5.7, 22, 1), (6.3, 28, 4),
    (9.8, 13, 1)
]
with connection.cursor() as cursor:
    cursor.executemany(insert_ratings_query, ratings_records)
    connection.commit()
All three tables are now populated with data. You now have a fully functional online movie rating database. The next step is to understand how to interact with this database.
Reading Records From the Database
Until now, you’ve been building your database. Now it’s time to perform some queries on it and find some interesting properties from this dataset. In this section, you’ll learn how to read records from database tables using the SELECT statement.
Reading Records Using the SELECT Statement
To retrieve records, you need to send a SELECT query to cursor.execute() 。 Then you use cursor.fetchall() to extract the retrieved table in the form of a list of rows or records.
Try writing a MySQL query to select all records from the movies table and send it to .execute() :
>>> select_movies_query = "SELECT * FROM movies LIMIT 5"
>>> with connection.cursor() as cursor:
...     cursor.execute(select_movies_query)
...     result = cursor.fetchall()
...     for row in result:
...         print(row)
...
(1, 'Forrest Gump', 1994, 'Drama', Decimal('330.2'))
(2, '3 Idiots', 2009, 'Drama', Decimal('2.4'))
(3, 'Eternal Sunshine of the Spotless Mind', 2004, 'Drama', Decimal('34.5'))
(4, 'Good Will Hunting', 1997, 'Drama', Decimal('138.1'))
(5, 'Skyfall', 2012, 'Action', Decimal('304.6'))
The result variable holds the records returned from using .fetchall() 。 It’s a list of tuples representing individual records from the table.
In the query above, you use the LIMIT clause to constrain the number of rows that are received from the SELECT statement. Developers often use LIMIT to perform pagination when handling large volumes of data.
In MySQL, the LIMIT clause takes one or two nonnegative numeric arguments. When using one argument, you specify the maximum number of rows to return. Since your query includes LIMIT 5 , only the first 5 records are fetched. When using both arguments, you can also specify the offset of the first row to return:
SELECT * FROM movies LIMIT 2,5;
The first argument specifies an offset of 2 , and the second argument constrains the number of returned rows to 5 。 The above query will return rows 3 to 7.
You can also query for selected columns:
>>>>>> select_movies_query = "SELECT title, release_year FROM movies LIMIT 5"
>>> with connection.cursor() as cursor:
... cursor.execute(select_movies_query)
... for row in cursor.fetchall():
... print(row)
...
('Forrest Gump', 1994)
('3 Idiots', 2009)
('Eternal Sunshine of the Spotless Mind', 2004)
('Good Will Hunting', 1997)
('Skyfall', 2012)
Now, the code outputs values only from the two specified columns:title and release_year 。
Filtering Results Using the WHERE Clause
You can filter table records by specific criteria using the WHERE clause. For example, to retrieve all movies with a box office collection greater than $300 million, you could run the following query:
SELECT title, collection_in_mil
FROM movies
WHERE collection_in_mil > 300;
You can also use ORDER BY clause in the last query to sort the results from the highest to the lowest earner:
>>> select_movies_query = """
... SELECT title, collection_in_mil
... FROM movies
... WHERE collection_in_mil > 300
... ORDER BY collection_in_mil DESC
... """
>>> with connection.cursor() as cursor:
...     cursor.execute(select_movies_query)
...     for movie in cursor.fetchall():
...         print(movie)
...
('Avengers: Endgame', Decimal('858.8'))
('Titanic', Decimal('659.2'))
('The Dark Knight', Decimal('535.4'))
('Toy Story 4', Decimal('434.9'))
('The Lion King', Decimal('423.6'))
('Deadpool', Decimal('363.6'))
('Forrest Gump', Decimal('330.2'))
('Skyfall', Decimal('304.6'))
MySQL offers a plethora of string formatting operations like CONCAT for concatenating strings. Often, websites will show the movie title along with its release year to avoid confusion. To retrieve the titles of the top five grossing movies, concatenated with their release years, you can write the following query:
>>> select_movies_query = """
... SELECT CONCAT(title, " (", release_year, ")"),
...       collection_in_mil
... FROM movies
... ORDER BY collection_in_mil DESC
... LIMIT 5
... """
>>> with connection.cursor() as cursor:
...     cursor.execute(select_movies_query)
...     for movie in cursor.fetchall():
...         print(movie)
...
('Avengers: Endgame (2019)', Decimal('858.8'))
('Titanic (1997)', Decimal('659.2'))
('The Dark Knight (2008)', Decimal('535.4'))
('Toy Story 4 (2019)', Decimal('434.9'))
('The Lion King (1994)', Decimal('423.6'))
If you don’t want to use the LIMIT clause and you don’t need to fetch all the records, then the cursor object has .fetchone() and .fetchmany() methods as well:
.fetchone()retrieves either the next row of the result, as a tuple, orNoneif no more rows are available..fetchmany()retrieves the next set of rows from the result as a list of tuples. It has asizeargument, which defaults to1, that you can use to specify the number of rows you need to fetch. If no more rows are available, then the method returns an empty list.
Try retrieving the titles of the five highest-grossing movies concatenated with their release years again, but this time use .fetchmany() :
>>> select_movies_query = """
... SELECT CONCAT(title, " (", release_year, ")"),
...       collection_in_mil
... FROM movies
... ORDER BY collection_in_mil DESC
... """
>>> with connection.cursor() as cursor:
...     cursor.execute(select_movies_query)
...     for movie in cursor.fetchmany(size=5):
...         print(movie)
...     cursor.fetchall()
...
('Avengers: Endgame (2019)', Decimal('858.8'))
('Titanic (1997)', Decimal('659.2'))
('The Dark Knight (2008)', Decimal('535.4'))
('Toy Story 4 (2019)', Decimal('434.9'))
('The Lion King (1994)', Decimal('423.6'))
The output with .fetchmany() is similar to what you received when you used the LIMIT clause. You might have noticed the additional cursor.fetchall() call at the end. You do this to clean all the remaining results that weren’t read by .fetchmany() 。
It’s necessary to clean all unread results before executing any other statements on the same connection. Otherwise, an InternalError:Unread result found exception will be raised.
Handling Multiple Tables Using the JOIN Statement
If you found the queries in the last section to be quite straightforward, don’t worry. You can make your SELECT queries as complex as you want using the same methods from the last section.
Let’s look at some slightly more complex JOIN queries. If you want to find out the name of the top five highest-rated movies in your database, then you can run the following query:
>>> select_movies_query = """
... SELECT title, AVG(rating) as average_rating
... FROM ratings
... INNER JOIN movies
...     ON movies.id = ratings.movie_id
... GROUP BY movie_id
... ORDER BY average_rating DESC
... LIMIT 5
... """
>>> with connection.cursor() as cursor:
...     cursor.execute(select_movies_query)
...     for movie in cursor.fetchall():
...         print(movie)
...
('Night of the Living Dead', Decimal('9.90000'))
('The Godfather', Decimal('9.90000'))
('Avengers: Endgame', Decimal('9.75000'))
('Eternal Sunshine of the Spotless Mind', Decimal('8.90000'))
('Beasts of No Nation', Decimal('8.70000'))
As shown above, Night of the Living Dead and The Godfather are tied as the highest-rated movies in your online_movie_rating database.
To find the name of the reviewer who gave the most ratings, write the following query:
>>>>>> select_movies_query = """
... SELECT CONCAT(first_name, " ", last_name), COUNT(*) as num
... FROM reviewers
... INNER JOIN ratings
... ON reviewers.id = ratings.reviewer_id
... GROUP BY reviewer_id
... ORDER BY num DESC
... LIMIT 1
... """
>>> with connection.cursor() as cursor:
... cursor.execute(select_movies_query)
... for movie in cursor.fetchall():
... print(movie)
...
('Mary Cooper', 4)
Mary Cooper is the most frequent reviewer in this database. As seen above, it doesn’t matter how complicated the query is because it’s ultimately handled by the MySQL server. Your process for executing a query will always remain the same:pass the query to cursor.execute() and fetch the results using .fetchall() 。
Updating and Deleting Records From the Database
In this section, you’ll be updating and deleting records from the database. Both of these operations can be performed on either a single record or multiple records in the table. You’ll select the rows that need to be modified using the WHERE clause.
UPDATE Command
One of the reviewers in your database, Amy Farah Fowler , is now married to Sheldon Cooper 。 Her last name has now changed to Cooper , so you need to update your database accordingly. For updating records, MySQL uses the UPDATE statement:
update_query = """
UPDATE
    reviewers
SET
    last_name = "Cooper"
WHERE
    first_name = "Amy"
"""
with connection.cursor() as cursor:
    cursor.execute(update_query)
    connection.commit()
The code passes the update query to cursor.execute() , and .commit() brings the required changes to the reviewers table.
注: In the UPDATE query, the WHERE clause helps specify the records that need to be updated. If you don’t use WHERE , then all records will be updated!
Suppose you need to provide an option that allows reviewers to modify ratings. A reviewer will provide three values, movie_id , reviewer_id , and the new rating 。 The code will display the record after performing the specified modification.
Assuming that movie_id =18 , reviewer_id =15 , and the new rating =5.0 , you can use the following MySQL queries to perform the required modification:
UPDATE
    ratings
SET
    rating = 5.0
WHERE
    movie_id = 18 AND reviewer_id = 15;

SELECT *
FROM ratings
WHERE
    movie_id = 18 AND reviewer_id = 15;
The above queries first update the rating and then display it. You can create a complete Python script that establises a connection with the database and allows the reviewer to modify a rating:
from getpass import getpass
from mysql.connector import connect, Error

movie_id = input("Enter movie id: ")
reviewer_id = input("Enter reviewer id: ")
new_rating = input("Enter new rating: ")
update_query = """
UPDATE
    ratings
SET
    rating = "%s"
WHERE
    movie_id = "%s" AND reviewer_id = "%s";

SELECT *
FROM ratings
WHERE
    movie_id = "%s" AND reviewer_id = "%s"
""" % (
    new_rating,
    movie_id,
    reviewer_id,
    movie_id,
    reviewer_id,
)

try:
    with connect(
        host="localhost",
        user=input("Enter username: "),
        password=getpass("Enter password: "),
        database="online_movie_rating",
    ) as connection:
        with connection.cursor() as cursor:
            for result in cursor.execute(update_query, multi=True):
                if result.with_rows:
                    print(result.fetchall())
            connection.commit()
except Error as e:
    print(e)
Save this code to a file named modify_ratings.py 。 The above code uses %s placeholders to insert the received input in the update_query string. For the first time in this tutorial, you have multiple queries inside a single string. To pass multiple queries to a single cursor.execute() , you need to set the method’s multi argument to True 。
If multi is True , then cursor.execute() returns an iterator. Each item in the iterator corresponds to a cursor object that executes a statement passed in the query. The above code runs a for loop on this iterator and then calls .fetchall() on each cursor オブジェクト。
注: Running .fetchall() on all cursor objects is important. To execute a new statement on the same connection, you must ensure that there are no unread results from previous executions. If there are unread results, then you’ll receive an exception.
If no result set is fetched on an operation, then .fetchall() raises an exception. To avoid this error, in the code above you use the cursor.with_rows property, which indicates whether the most recently executed operation produced rows.
While this code should solve your purpose, the WHERE clause is a prime target for web hackers in its current state. It’s vulnerable to what is called a SQL injection attack, which can allow malicious actors to either corrupt or misuse your database.
Warning :Don’t try the below inputs on your database! They will corrupt your table and you’ll need to recreate it.
For example, if a user sends movie_id=18 , reviewer_id=15 , and the new rating=5.0 as input, then the output looks like this:
$ python modify_ratings.py
Enter movie id: 18
Enter reviewer id: 15
Enter new rating: 5.0
Enter username: <user_name>
Enter password:
[(18, 15, Decimal('5.0'))]
The rating with movie_id=18 and reviewer_id=15 has been changed to 5.0 。 But if you were hacker, then you might send a hidden command in your input:
$ python modify_ratings.py
Enter movie id: 18
Enter reviewer id: 15"; UPDATE reviewers SET last_name = "A
Enter new rating: 5.0
Enter username: <user_name>
Enter password:
[(18, 15, Decimal('5.0'))]
Again, the output shows that the specified rating has been changed to 5.0 。 What’s changed?
The hacker sneaked in an update query while entering the reviewer_id 。 The update query, update reviewers set last_name ="A , changes the last_name of all records in the reviewers table to "A" 。 You can see this change if you print out the reviewers table:
>>> select_query = """
... SELECT first_name, last_name
... FROM reviewers
... """
>>> with connection.cursor() as cursor:
...     cursor.execute(select_query)
...     for reviewer in cursor.fetchall():
...         print(reviewer)
...
('Chaitanya', 'A')
('Mary', 'A')
('John', 'A')
('Thomas', 'A')
('Penny', 'A')
('Mitchell', 'A')
('Wyatt', 'A')
('Andre', 'A')
('Sheldon', 'A')
('Kimbra', 'A')
('Kat', 'A')
('Bruce', 'A')
('Domingo', 'A')
('Rajesh', 'A')
('Ben', 'A')
('Mahinder', 'A')
('Akbar', 'A')
('Howard', 'A')
('Pinkie', 'A')
('Gurkaran', 'A')
('Amy', 'A')
('Marlon', 'A')
The above code displays the first_name and last_name for all records in the reviewers table. The SQL injection attack corrupted this table by changing the last_name of all records to "A" 。
There’s a quick fix to prevent such attacks. Don’t add the query values provided by the user directly to your query string. Instead, update the modify_ratings.py script to send these query values as arguments to .execute() :
from getpass import getpass
from mysql.connector import connect, Error

movie_id = input("Enter movie id: ")
reviewer_id = input("Enter reviewer id: ")
new_rating = input("Enter new rating: ")
update_query = """
UPDATE
    ratings
SET
    rating = %s
WHERE
    movie_id = %s AND reviewer_id = %s;

SELECT *
FROM ratings
WHERE
    movie_id = %s AND reviewer_id = %s
"""
val_tuple = (
    new_rating,
    movie_id,
    reviewer_id,
    movie_id,
    reviewer_id,
)

try:
    with connect(
        host="localhost",
        user=input("Enter username: "),
        password=getpass("Enter password: "),
        database="online_movie_rating",
    ) as connection:
        with connection.cursor() as cursor:
            for result in cursor.execute(update_query, val_tuple, multi=True):
                if result.with_rows:
                    print(result.fetchall())
            connection.commit()
except Error as e:
    print(e)
Notice that the %s placeholders are no longer in string quotes. Strings passed to the placeholders might contain some special characters. If necessary, these can be correctly escaped by the underlying library.
cursor.execute() makes sure that the values in the tuple received as argument are of the required data type. If a user tries to sneak in some problematic characters, then the code will raise an exception:
$ python modify_ratings.py
Enter movie id: 18
Enter reviewer id: 15"; UPDATE reviewers SET last_name = "A
Enter new rating: 5.0
Enter username: <user_name>
Enter password:
1292 (22007): Truncated incorrect DOUBLE value: '15";
UPDATE reviewers SET last_name = "A'
cursor.execute() will raise an exception if it finds any unwanted characters in the user input. You should use this approach whenever you incorporate user input in a query. There are other ways of preventing SQL injection attacks as well.
DELETE Command
Deleting records works very similarly to updating records. You use the DELETE statement to remove selected records.
注: Deleting is an irreversible 処理する。 If you don’t use the WHERE clause, then all records from the specified table will be deleted. You’ll need to run the INSERT INTO query again to get back the deleted records.
It’s recommended that you first run a SELECT query with the same filter to make sure that you’re deleting the right records. For example, to remove all ratings given by reviewer_id =2 , you should first run the corresponding SELECT クエリ:
>>> select_movies_query = """
... SELECT reviewer_id, movie_id FROM ratings
... WHERE reviewer_id = 2
... """
>>> with connection.cursor() as cursor:
...     cursor.execute(select_movies_query)
...     for movie in cursor.fetchall():
...         print(movie)
...
(2, 7)
(2, 8)
(2, 12)
(2, 23)
The above code snippet outputs the reviewer_id and movie_id for records in the ratings table where reviewer_id =2 。 Once you’ve confirmed that these are the records that you need to delete, you can run a DELETE query with the same filter:
delete_query = "DELETE FROM ratings WHERE reviewer_id = 2"
with connection.cursor() as cursor:
    cursor.execute(delete_query)
    connection.commit()
With this query, you remove all ratings given by the reviewer with reviewer_id =2 from the ratings table.
Other Ways to Connect Python and MySQL
In this tutorial, you saw MySQL Connector/Python, which is the officially recommended means of interacting with a MySQL database from a Python application. There are two other popular connectors:
-
mysqlclient is a library that is a close competitor to the official connector and is actively updated with new features. Because its core is written in C, it has better performance than the pure-Python official connector. A big drawback is that it’s fairly difficult to set up and install, especially on Windows.
-
MySQLdb is a legacy software that’s still used in commercial applications. It’s written in C and is faster than MySQL Connector/Python but is available only for Python 2.
These connectors act as interfaces between your program and a MySQL database, and you send your SQL queries through them. But many developers prefer using an object-oriented paradigm rather than SQL queries to manipulate data.
Object-relational mapping (ORM) is a technique that allows you to query and manipulate data from a database directly using an object-oriented language. An ORM library encapsulates the code needed to manipulate data, which eliminates the need to use even a tiny bit of SQL. Here are the most popular Python ORMs for SQL-based databases:
-
SQLAlchemy is an ORM that facilitates communication between Python and other SQL databases. You can create different engines for different databases like MySQL, PostgreSQL, SQLite, and so on. SQLAlchemy is commonly used alongside the pandas library to provide complete data-handling functionality.
-
peewee is a lightweight and fast ORM that’s quick to set up. This is quite useful when your interaction with the database is limited to extracting a few records. For example, if you need to copy selected records from a MySQL database into a CSV file, then peewee might be your best choice.
-
Django ORM is one of the most powerful features of Django and is supplied alongside the Django web framework. It can interact with a variety of databases such as SQLite, PostgreSQL, and MySQL. Many Django-based applications use the Django ORM for data modeling and basic queries but often switch to SQLAlchemy for more complex requirements.
You might find one of these approaches to be more suitable for your application. If you’re not sure which one to use, then it’s best to go with the officially recommended MySQL Connector/Python that you saw in action in this tutorial.
Conclusion
In this tutorial, you saw how to use MySQL Connector/Python to integrate a MySQL database with your Python application. You also saw some unique features of a MySQL database that differentiate it from other SQL databases.
Along the way, you learned some programming best practices that are worth considering when it comes to establishing a connection, creating tables, and inserting and updating records in a database application. You also developed a sample MySQL database for an online movie rating system and interacted with it directly from your Python application.
In this tutorial, you learned how to:
- Connect your Python app with a MySQL database
- Bring data from a MySQL database into Python for further analysis
- Execute SQL queries from your Python application
- Handle exceptions while accessing the database
- Prevent SQL injection attacks on your application
If you’re interested, Python also has connectors for other DBMSs like MongoDB and PostgreSQL. For more information, check out Python Database Tutorials.