MySQL8.0用のPerconaServerは、すぐに使用できる高可用性のための多数のクラスタリングソリューションを提供します。
- シングルマスター:
もちろん、最も人気があり、テスト済みで、拡張性の高いソリューションは、非同期レプリケーションです。このブログ投稿では、特に高可用性のためにPerconaServerレプリケーションセットアップを展開します。ここで説明する手順は、CentOS7に基づいています。
Perconaサーバーのインストール
高可用性を実現するには、単純なマスタースレーブレプリケーションのセットアップで少なくとも2つのノードが必要です。
- db1-マスター(192.168.0.61)
- db2-スレーブ(192.168.0.62)
このセクションで説明する手順は、すべてのデータベース・ノード(db1およびdb2)で実行する必要があります。まず、Perconaリポジトリパッケージをインストールします:
$ yum -y install https://repo.percona.com/yum/percona-release-latest.noarch.rpm現時点での最新の安定バージョンは、MySQL8.0用のPerconaServerですが、デフォルトでは、リポジトリパッケージはバージョン5.7までしか構成されていません。 percona-releaseパッケージには、新しい製品の追加のリポジトリを有効にすることができるスクリプトが含まれています。そのスクリプトを実行して、8.0リポジトリを有効にしましょう:
$ percona-release setup ps80次に、最新のPerconaサーバーとPerconaXtrabackupをインストールします。
$ yum -y install percona-server-server percona-xtrabackup-80現時点では、MySQL8.0.21用のPerconaサーバーがインストールされているはずです。すべての依存関係パッケージは、shared-compat、shared、およびclientパッケージのようにインストールされます。その後、起動時にMySQLサービスを有効にして、サービスを開始できます。
$ systemctl enable mysql
$ systemctl start mysql$ cat /var/log/mysqld.log | grep temporary
2020-11-06T04:53:07.402040Z 6 [Note] [MY-010454] [Server] A temporary password is generated for example@sqldat.com: o%(_M>t1)R-Pご覧のとおり、生成されたパスワードは「o%(_ M> t1)R-P」です。次に、MySQLサーバーのインストールを保護するために、インストール後のタスクを実行する必要があります。次のコマンドを実行します:
$ mysql_secure_installation

Securing the MySQL server deployment.

Enter password for user root:

The existing password for the user account root has expired. Please set a new password.


New password:
Re-enter new password:

The 'validate_password' component is installed on the server.
The subsequent steps will run with the existing configuration
of the component.

Using existing password for root.


Estimated strength of the password: 100
Change the password for root ? ((Press y|Y for Yes, any other key for No) : y

New password:

Re-enter new password:

Estimated strength of the password: 100

Do you wish to continue with the password provided?(Press y|Y for Yes, any other key for No) : y

By default, a MySQL installation has an anonymous user,
allowing anyone to log into MySQL without having to have
a user account created for them. This is intended only for
testing, and to make the installation go a bit smoother.

You should remove them before moving into a production
environment.

Remove anonymous users? (Press y|Y for Yes, any other key for No) : y
Success.

Normally, root should only be allowed to connect from
'localhost'. This ensures that someone cannot guess at
the root password from the network.

Disallow root login remotely? (Press y|Y for Yes, any other key for No) : y
Success.

By default, MySQL comes with a database named 'test' that
anyone can access. This is also intended only for testing,
and should be removed before moving into a production
environment.

Remove test database and access to it? (Press y|Y for Yes, any other key for No) : y
 - Dropping test database...
Success.

 - Removing privileges on test database...
Success.

Reloading the privilege tables will ensure that all changes
made so far will take effect immediately.

Reload privilege tables now? (Press y|Y for Yes, any other key for No) : y
Success.

All done!
生成されたルートパスワードは、最初のルートログインの直後に期限切れになります。上記のヘルパースクリプトは、新しいMySQLルートパスワードを構成し、rootのリモートログインを無効にし、テストデータベースと匿名ユーザーを削除し、特権テーブルを再ロードするのに役立ちます。
これで、PerconaServer8.0の高可用性機能を構成する準備が整いました。
準同期レプリケーションは、非同期レプリケーションと完全同期レプリケーションの間にあります。ソースは、少なくとも1つのレプリカがイベントを受信してログに記録するまで待機してから、トランザクションをコミットします。ソースは、すべてのレプリカが受信を確認するのを待つわけではなく、レプリカからの確認のみが必要であり、イベントがレプリカ側で完全に実行されてコミットされていることはありません。したがって、準同期レプリケーションは、ソースがクラッシュした場合に、ソースがコミットしたすべてのトランザクションが少なくとも1つのレプリカに送信されることを保証します。
最高のレプリケーション整合性を得るには、準同期レプリケーションを選択してください。これを構成するには、最初のノードdb1(192.168.0.61)で、/ etc / my.cnf内に次の行を追加します([mysqld]セクションの下にある必要があります):
# Compatibility
default-authentication-plugin = mysql_native_password

# Replication
server_id = 61 # must be distinct on all nodes in the cluster
binlog_format = ROW
log_bin = binlog
log_slave_updates = 1
gtid_mode = ON
enforce_gtid_consistency = 1
binlog_expire_logs_seconds = 604800 # 7 days
sync_binlog = 1
report_host = 192.168.0.61 # IP address of this host
read_only = OFF # Set ON on slave
super_read_only = OFF # Set ON on slave

# Replication safety
master_info_repository = TABLE
relay_log_info_repository = TABLE
relay_log_recovery = ON

# Semi-sync
plugin_load_add = rpl_semi_sync_master=semisync_master.so
plugin_load_add = rpl_semi_sync_slave=semisync_slave.so
rpl_semi_sync_master_enabled = ON
rpl_semi_sync_master_timeout = 1000
rpl_semi_sync_slave_enabled = ON
2番目のノードdb2(192.168.0.62)で、/ etc / my.cnf内に次の行を追加します([mysqld]セクションの下にある必要があります):
# Compatibility
default-authentication-plugin = mysql_native_password

# Replication
server_id = 62 # must be distinct on all nodes in the cluster
binlog_format = ROW
log_bin = binlog
log_slave_updates = 1
gtid_mode = ON
enforce_gtid_consistency = 1
binlog_expire_logs_seconds = 604800 # 7 days
sync_binlog = 1
report_host = 192.168.0.62 # IP address of this host
read_only = ON # Set ON on slave
super_read_only = ON # Set ON on slave

# Replication safety
master_info_repository = TABLE
relay_log_info_repository = TABLE
relay_log_recovery = ON

# Semi-sync
plugin_load_add = rpl_semi_sync_master=semisync_master.so
plugin_load_add = rpl_semi_sync_slave=semisync_slave.so
rpl_semi_sync_master_enabled = ON
rpl_semi_sync_master_timeout = 1000
rpl_semi_sync_slave_enabled = ON
次に、「レプリケーションリンクの設定」で説明されているように、レプリケーションリンクの設定に進むことができます。
非同期レプリケーションの場合は、準同期レプリケーションに関連するすべてのオプションを削除するだけで問題ありません。最初のノードdb1(192.168.0.61)で、/ etc / my.cnf内に次の行を追加します([mysqld]セクションの下にある必要があります):
# Compatibility
default-authentication-plugin = mysql_native_password

# Replication
server_id = 61 # must be distinct on all nodes in the cluster
binlog_format = ROW
log_bin = binlog
log_slave_updates = 1
gtid_mode = ON
enforce_gtid_consistency = 1
binlog_expire_logs_seconds = 604800 # 7 days
sync_binlog = 1
report_host = 192.168.0.61 # IP address of this host
read_only = OFF # Set ON on slave
super_read_only = OFF # Set ON on slave

# Replication safety
master_info_repository = TABLE
relay_log_info_repository = TABLE
relay_log_recovery = ON
2番目のノードdb2(192.168.0.62)で、/ etc / my.cnf内に次の行を追加します([mysqld]セクションの下にある必要があります):
# Compatibility
default-authentication-plugin = mysql_native_password

# Replication
server_id = 62 # must be distinct on all nodes in the cluster
binlog_format = ROW
log_bin = binlog
log_slave_updates = 1
gtid_mode = ON
enforce_gtid_consistency = 1
binlog_expire_logs_seconds = 604800 # 7 days
sync_binlog = 1
report_host = 192.168.0.62 # IP address of this host
read_only = ON # Set ON on slave
super_read_only = ON # Set ON on slave

# Replication safety
master_info_repository = TABLE
relay_log_info_repository = TABLE
relay_log_recovery = ON
次に、以下の「レプリケーションリンクの設定」で説明されているようにレプリケーションリンクの設定に進むことができます。
マスター(db1)で、スレーブユーザーを作成し、ユーザーがこのネットワーク下のすべてのホストから接続できるようにします(%ワイルドカードを使用):
mysql> CREATE USER 'slave'@'192.168.0.%' IDENTIFIED WITH mysql_native_password BY 'example@sqldat.com&9';
mysql> GRANT REPLICATION SLAVE ON *.* TO 'slave'@'192.168.0.%';
スレーブ(db2)で、バイナリログをリセットし、レプリケーション資格情報を設定して、レプリケーションプロセスを開始します。
mysql> RESET MASTER;
mysql> CHANGE MASTER TO MASTER_HOST = '192.168.0.61', MASTER_USER = 'slave', MASTER_PASSWORD = 'example@sqldat.com&9', MASTER_AUTO_POSITION = 1;
mysql> START SLAVE;mysql> SHOW SLAVE STATUS\G
*************************** 1. row ***************************
Slave_IO_State: Waiting for master to send event
Master_Host: 192.168.0.61
Master_User: slave
Master_Port: 3306
Connect_Retry: 60
Master_Log_File: binlog.000008
Read_Master_Log_Pos: 912
Relay_Log_File: db2-relay-bin.000007
Relay_Log_Pos: 1081
Relay_Master_Log_File: binlog.000008
Slave_IO_Running: Yes
Slave_SQL_Running: Yes
Replicate_Do_DB:
Replicate_Ignore_DB:
Replicate_Do_Table:
Replicate_Ignore_Table:
Replicate_Wild_Do_Table:
Replicate_Wild_Ignore_Table:
Last_Errno: 0
Last_Error:
Skip_Counter: 0
Exec_Master_Log_Pos: 912
Relay_Log_Space: 1500
Until_Condition: None
Until_Log_File:
Until_Log_Pos: 0
Master_SSL_Allowed: No
Master_SSL_CA_File:
Master_SSL_CA_Path:
Master_SSL_Cert:
Master_SSL_Cipher:
Master_SSL_Key:
Seconds_Behind_Master: 0
Master_SSL_Verify_Server_Cert: No
Last_IO_Errno: 0
Last_IO_Error:
Last_SQL_Errno: 0
Last_SQL_Error:
Replicate_Ignore_Server_Ids:
Master_Server_Id: 66
Master_UUID: f60cf793-1feb-11eb-af72-5254008afee6
Master_Info_File: mysql.slave_master_info
SQL_Delay: 0
SQL_Remaining_Delay: NULL
Slave_SQL_Running_State: Slave has read all relay log; waiting for more updates
Master_Retry_Count: 86400
Master_Bind:
Last_IO_Error_Timestamp:
Last_SQL_Error_Timestamp:
Master_SSL_Crl:
Master_SSL_Crlpath:
Retrieved_Gtid_Set: f60cf793-1feb-11eb-af72-5254008afee6:5-7
Executed_Gtid_Set: f60cf793-1feb-11eb-af72-5254008afee6:1-7
Auto_Position: 1
Replicate_Rewrite_DB:
Channel_Name:
Master_TLS_Version:
Master_public_key_path:
Get_master_public_key: 0
Network_Namespace:レプリケーションが正しく構成され、スレーブがマスターに追いついたかどうかを判断するには、次の重要なステータスに注意してください。
- Slave_IO_Running:はい
- Slave_SQL_Running:はい
- Seconds_Behind_Master:0
準同期レプリケーションが有効になっている場合は、マスターに次の出力が表示されます。
mysql> SHOW STATUS LIKE '%semi%status';
+-----------------------------+-------+
| Variable_name               | Value |
+-----------------------------+-------+
| Rpl_semi_sync_master_status | ON    |
| Rpl_semi_sync_slave_status  | OFF   |
+-----------------------------+-------+
スレーブ上では、ステータスは次のとおりです。
mysql> SHOW STATUS LIKE '%semi%status';
+-----------------------------+-------+
| Variable_name               | Value |
+-----------------------------+-------+
| Rpl_semi_sync_master_status | OFF   |
| Rpl_semi_sync_slave_status  | ON    |
+-----------------------------+-------+
非同期レプリケーションの場合、準同期レプリケーションプラグインが有効になっていないため、上記のクエリは何も返しません(空のセット)。 1つのレプリケーションセットで、非同期および準同期レプリケーションを使用したスレーブホストレプリケーションを混在させることができます。
ClusterControlを使用したMySQL用のPerconaServerのデプロイ
ClusterControlを使用してマスタースレーブPerconaServerレプリケーションをデプロイするのは実質的に簡単であり、デフォルトでは、ClusterControlは非同期レプリケーションを使用してレプリケーションデプロイメントを構成します。デプロイするノードを準備するだけです。この例では、マスタースレーブレプリケーションを備えたMySQL8.0用の3ノードのPerconaサーバーをデプロイします。 ClusterControlが登場すると、ClusterControl用の追加ノードが必要になります。したがって、セットアップは次のようになります。
- ClusterControl --cc(192.168.0.19)
- マスター-db1(192.168.0.61)
- スレーブ-db2(192.168.0.62)
- スレーブ-db3(192.168.0.63)
ClusterControlサーバーで、インストーラースクリプトを使用してClusterControlをインストールします。ルートとして、以下を実行します:
$ wget https://severalnines.com/downloads/cmon/install-cc
$ chmod 755 install-cc
$ ./install-cc
完了するまで、インストール手順に従います。次に、ウェブブラウザを開いてhttp:// {ClusterControl_IP_address} / clustercontrolに移動し、デフォルトの管理者ユーザーとパスワードを作成します。次に、ClusterControlサーバーからすべてのデータベースノードへのパスワードなしのSSHを設定する必要があります。 rootユーザーとして、最初にSSHキーを生成する必要があります:
$ whoami
root
$ ssh-keygen -t rsa # press Enter on all prompts
次に、作成したSSH公開鍵をすべてのデータベースノードにコピーします。
$ ssh-copy-id -i ~/.ssh/id_rsa example@sqldat.com # db1
$ ssh-copy-id -i ~/.ssh/id_rsa example@sqldat.com # db2
$ ssh-copy-id -i ~/.ssh/id_rsa example@sqldat.com # db3
これで、クラスターの展開を開始する準備が整いました。 ClusterControl-> Deploy-> MySQL Replicationに移動し、以下のように必要な詳細を指定します。
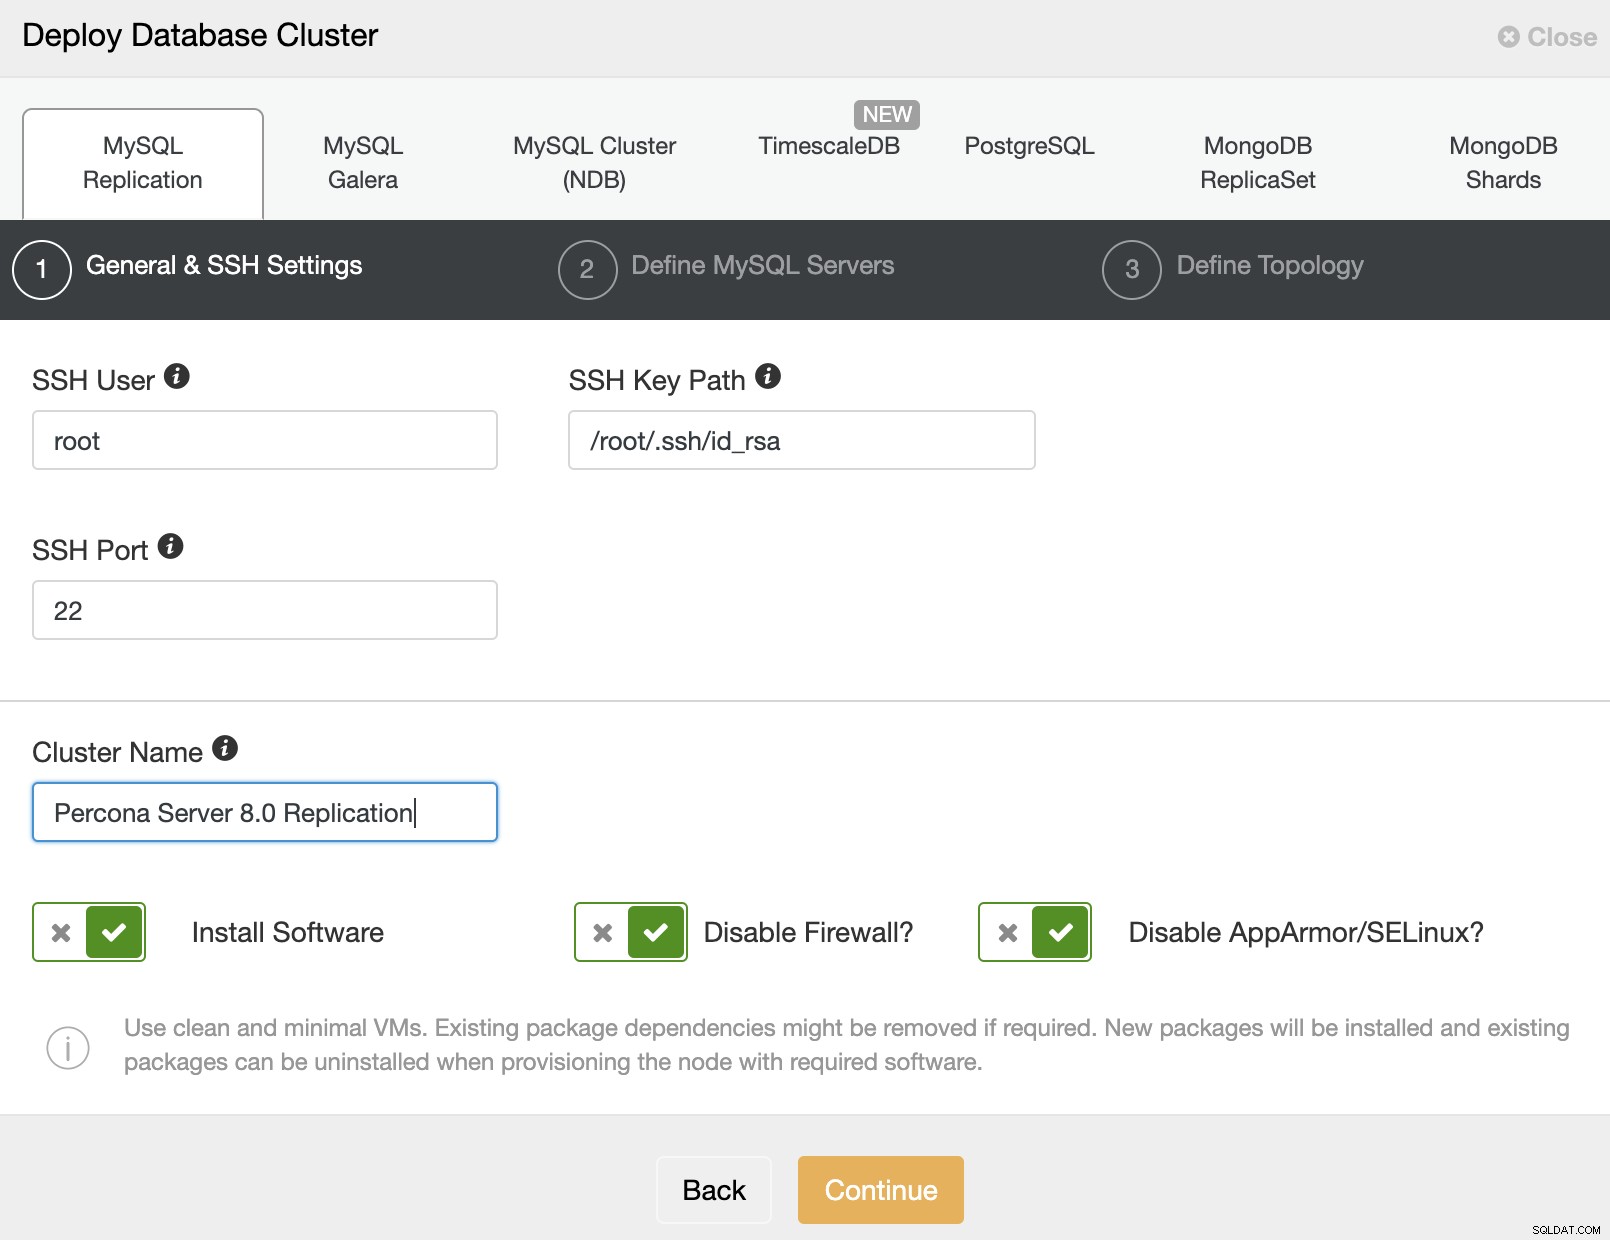
次に、[続行]をクリックして、構成する次のステップに進みますMySQLインストール仕様:
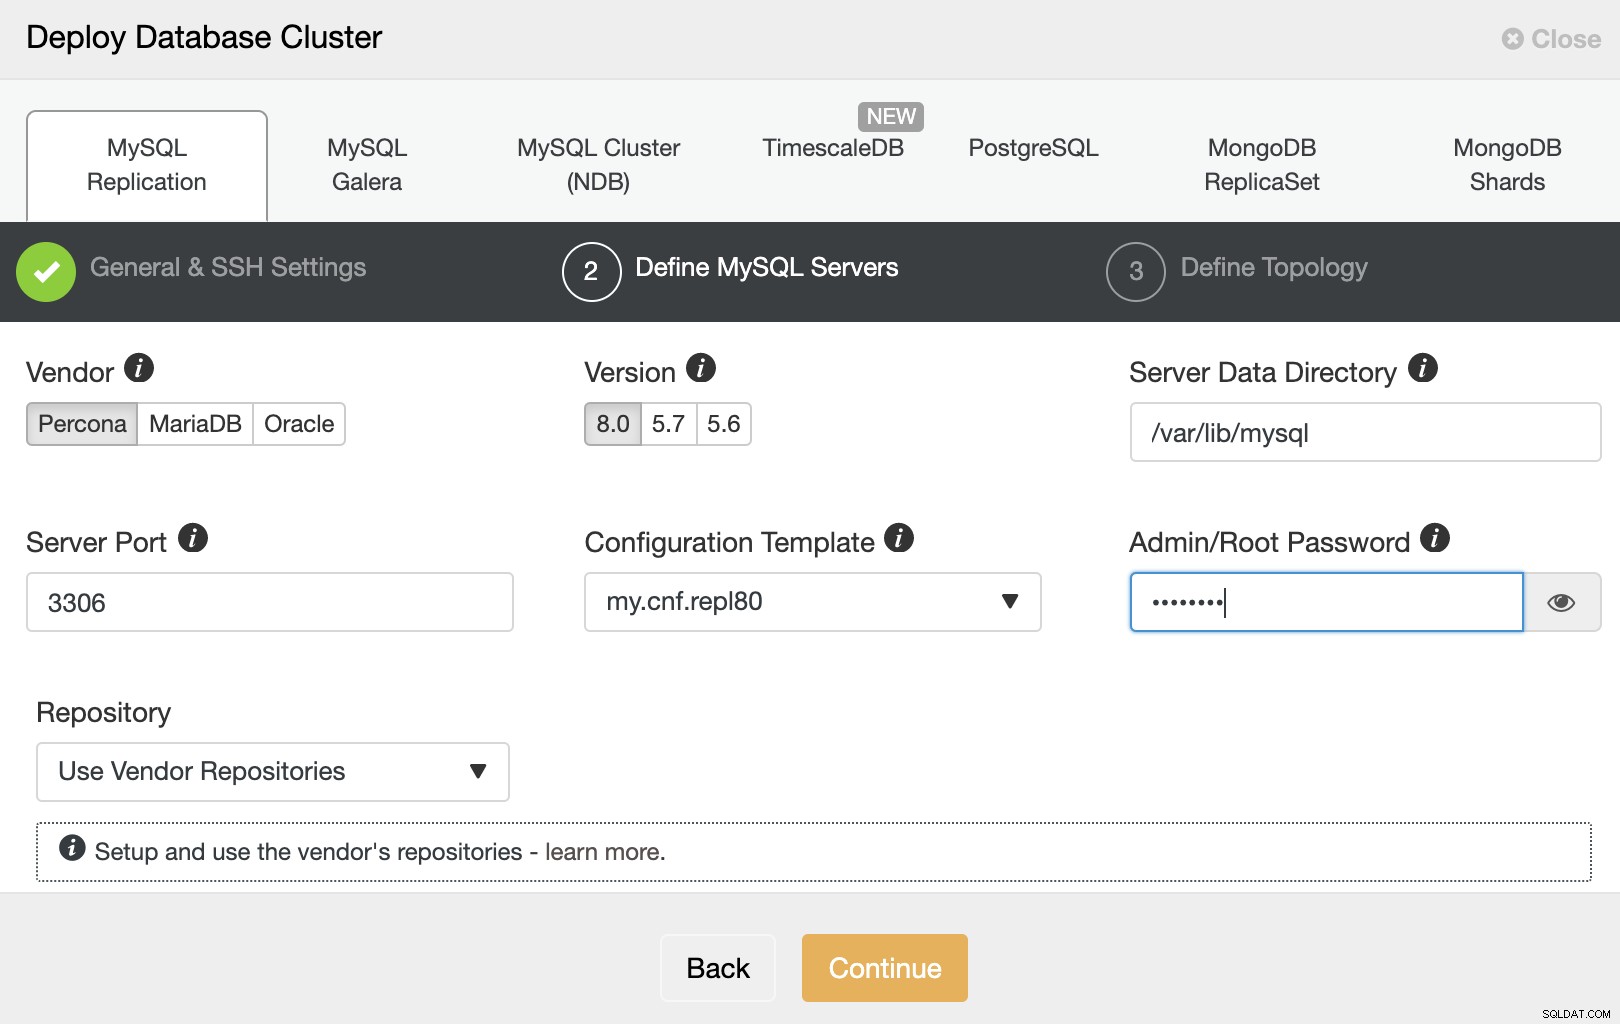
ベンダーには「Percona」を選択し、バージョンには8.0を選択します。残りはデフォルトのままにして、MySQLルートパスワードを入力します。 [続行]をクリックして、ホストとトポロジの構成に進みます。

データベースホストのIPアドレスまたはホスト名を1つずつ指定し、挿入するたびに緑色のチェックマークが表示されることを確認してください。これは、ClusterControlが、手順1で定義したように、提供されたSSHユーザーとキーを使用してパスワードなしのSSH経由で対応するホストに到達できることを示します。[展開]ボタンをクリックして展開を開始します。
次に、ClusterControlは、次のスクリーンショットに示すように、ClusterControl-> Activity-> Jobs-> Create Cluster-> Full Job Detailsに移動して、デプロイメントの進行状況を監視できるデプロイメントジョブをトリガーします。
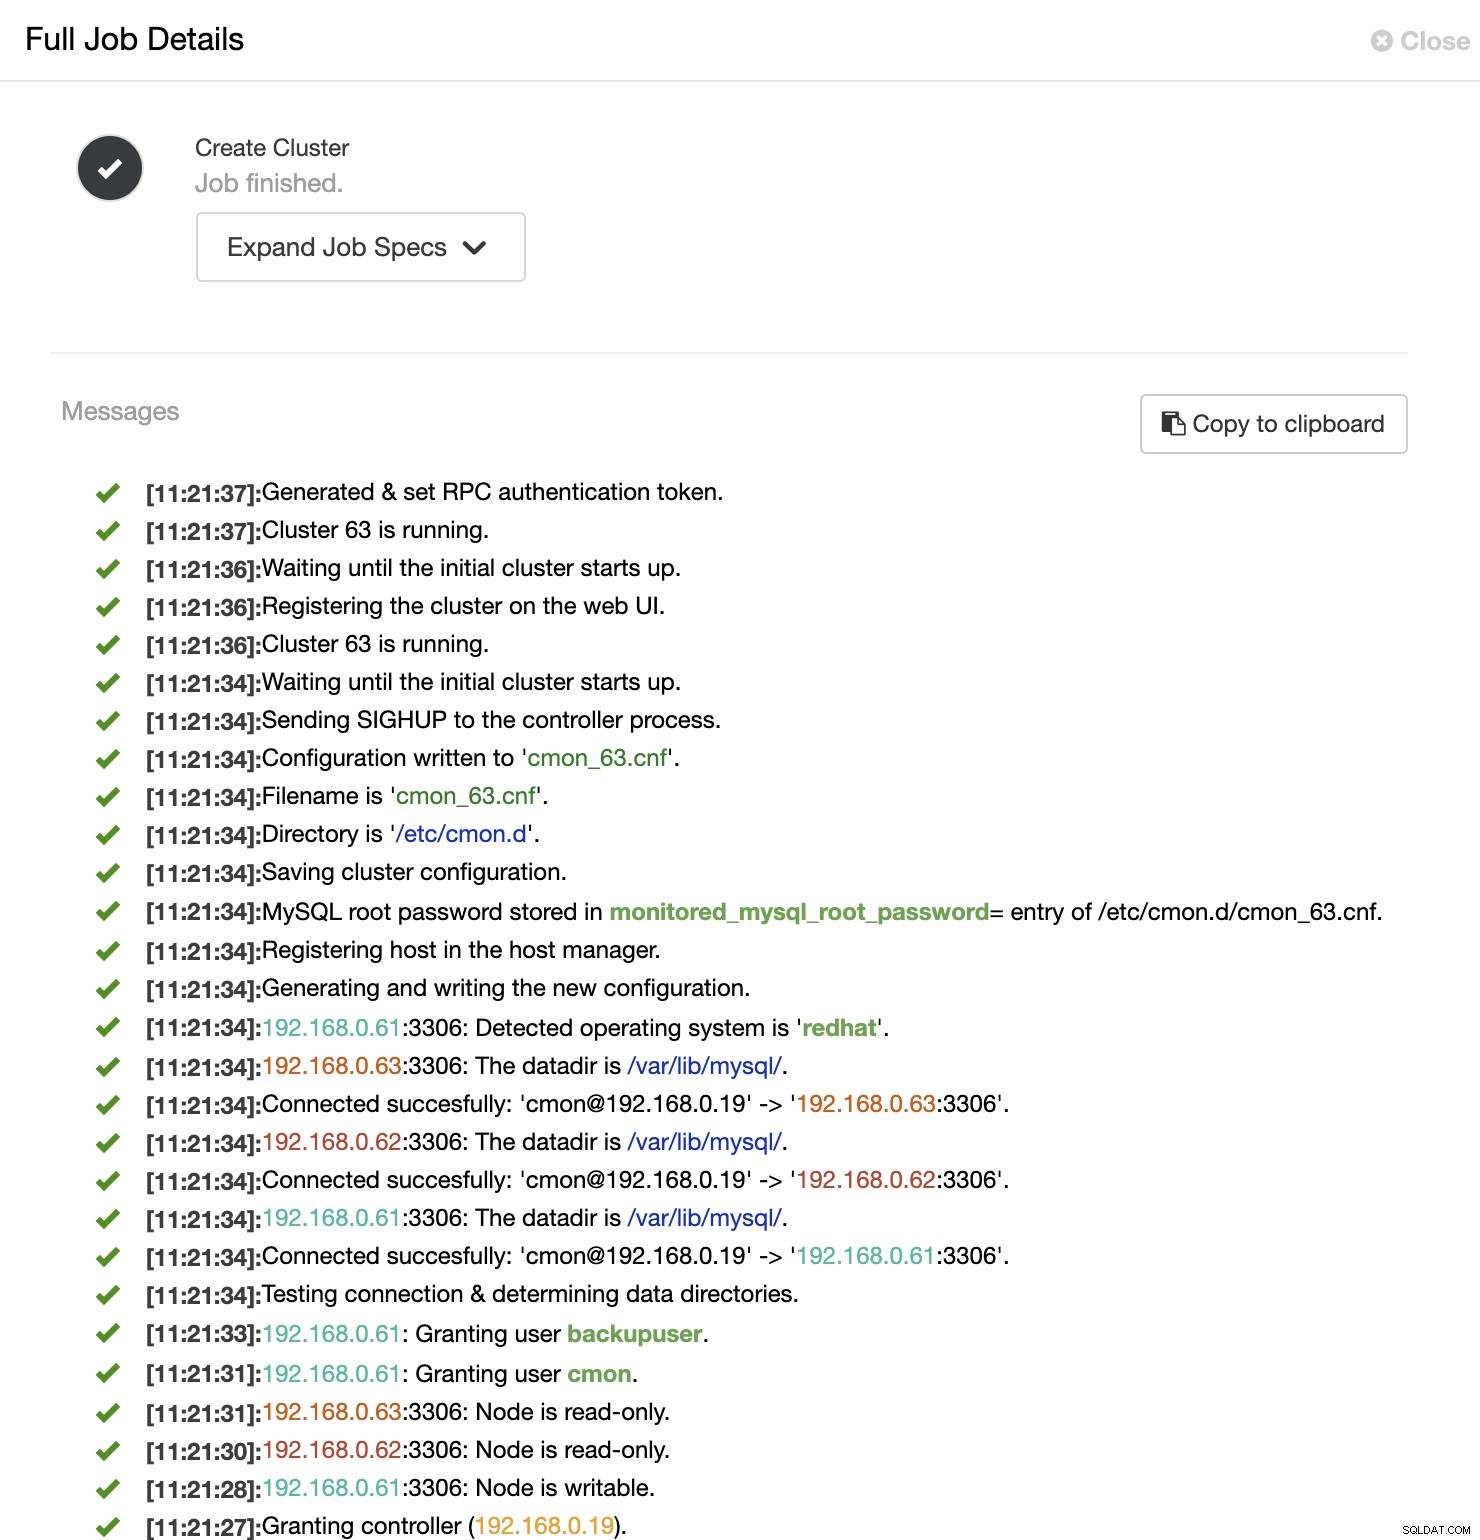
プロセスが完了すると、クラスターがダッシュボードに一覧表示されます。 :
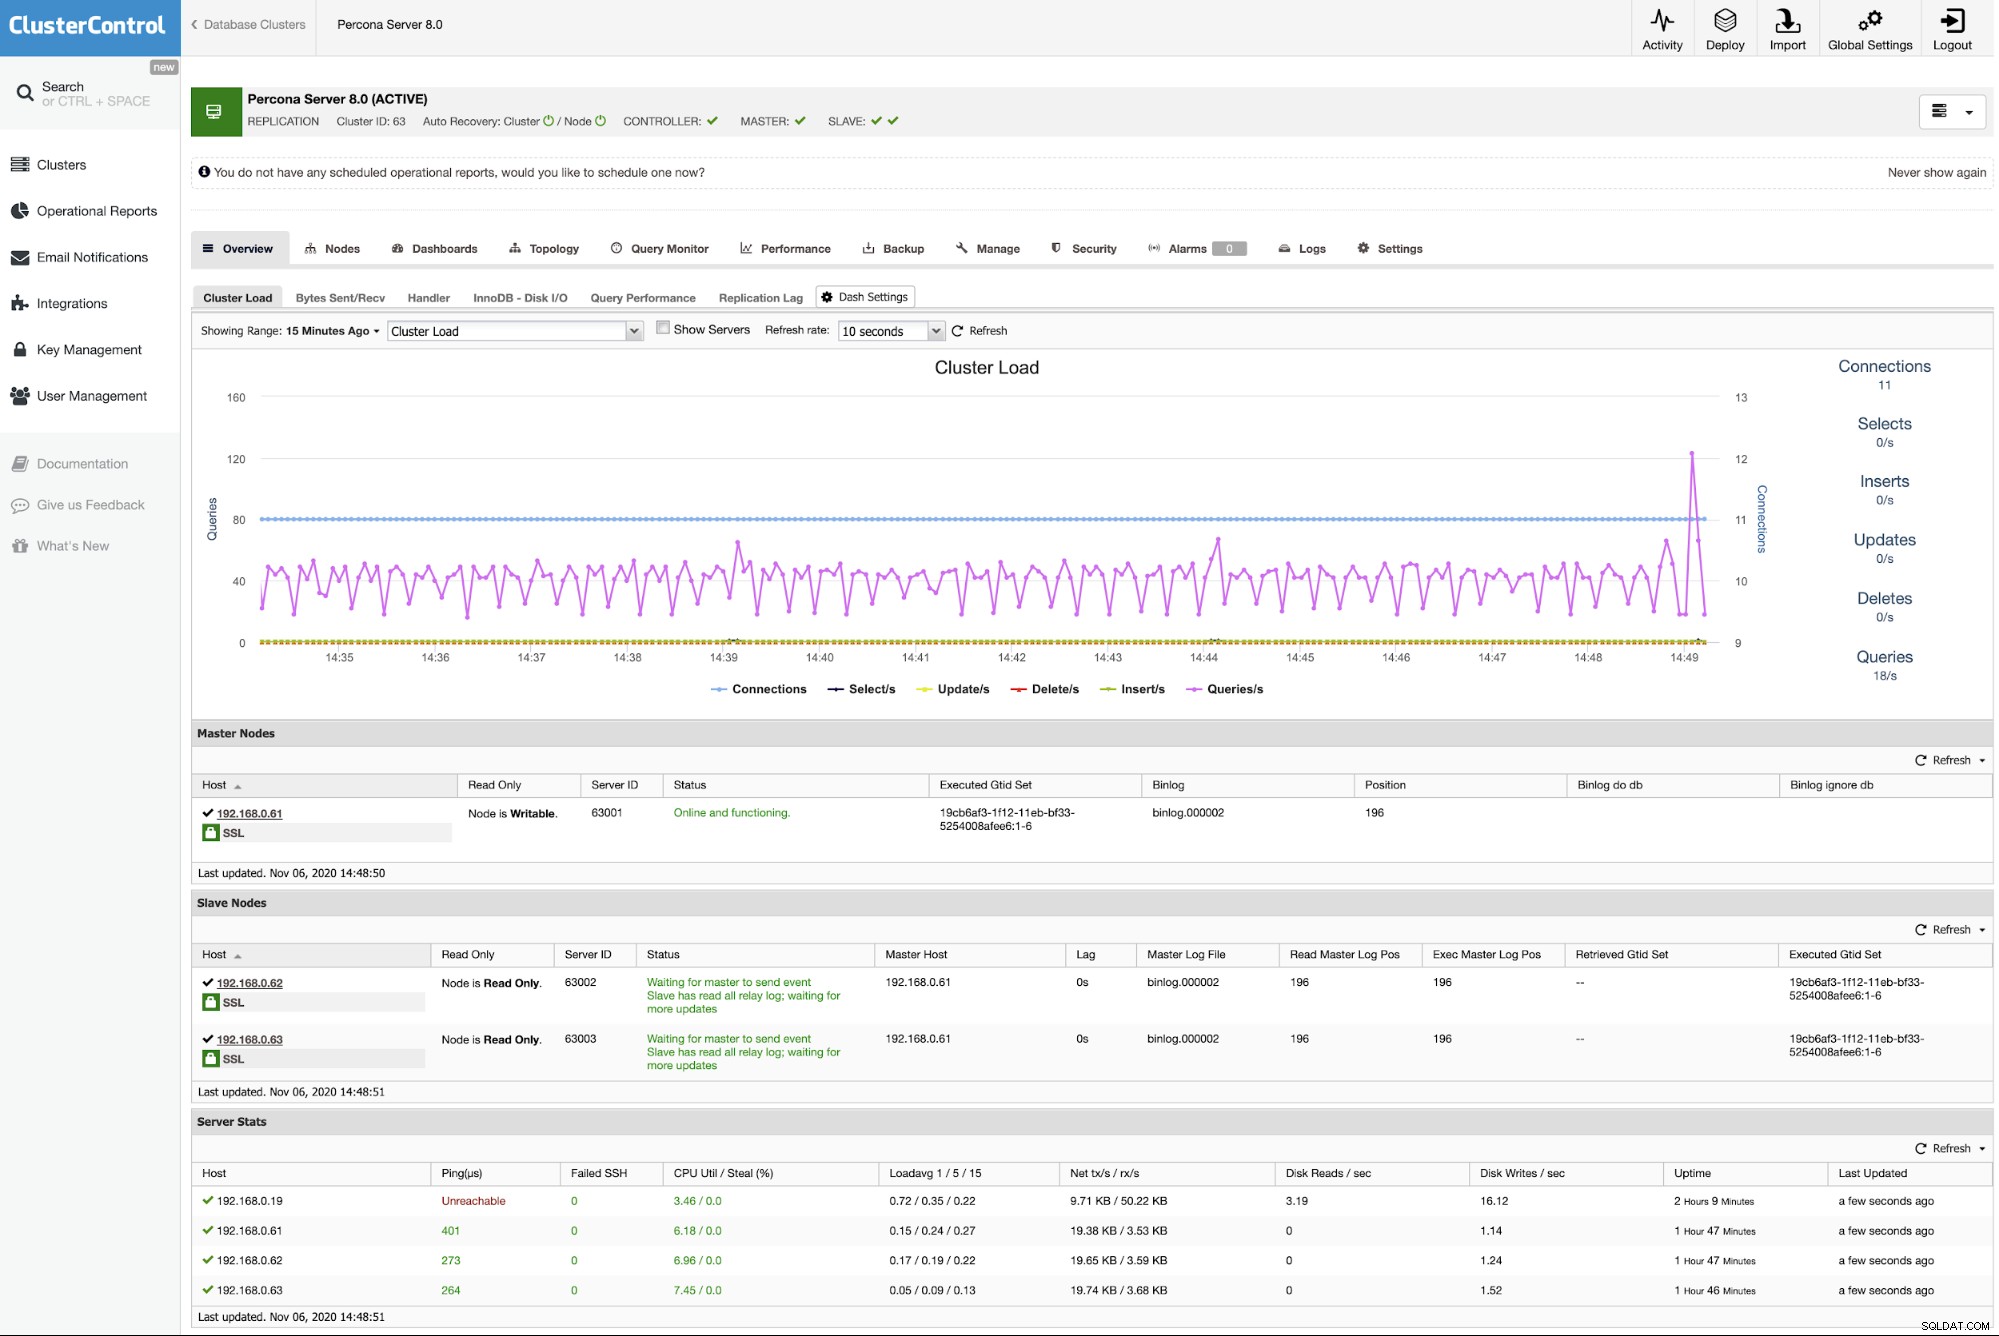
以上です。これで展開は完了です。