TableView コンポーネントは、JavaFXアプリケーション開発で頻繁に使用される用途の広いコンポーネントの1つです。これにより、データをすばやく視覚的に整理できます。閲覧者は、表形式で情報が意図する暗黙の情報もすばやく把握できます。この記事では、データ編成の観点からこのコンポーネントを検討し、Javaプログラミングでどのように効果的に使用できるかについて説明します。
TableView
TableView コントロールは、Swingの Jtableとほぼ同等の機能を提供します 成分。これは、列にセグメント化された無制限の数のデータ行を表すように設計されています。 JavaFXには、 ListViewと呼ばれる別のコンポーネントがあります。 、これは似ています。唯一の違いは、 TableView ListView に対して、複数の列をサポートします 単一の列があります。 TableViewの機能 コントロールは次のとおりです。
- テーブルは複数の列で構成されているため、各列は TableColumnで表されます。 クラス。このクラスは、列をより細かく制御します。このクラスのインスタンスは、その列のコンテンツを表示および変更する役割を果たします。したがって、調整可能なプロパティがいくつか含まれています。たとえば、
- widthプロパティ( minWidth、maxWidth、prefWidth、width )を使用してサイズを変更できます。 。
- 列の表示は表示で切り替えることができます プロパティ。
- 列ヘッダーとテキストのプロパティにはsetterメソッドとgetterメソッドがあります。
- ネストされた列を表示できます。
- ユーザーが右クリックして列ヘッダー領域に移動できるコンテキストメニューがあります。
- コンテンツは並べ替え可能です(コンパレータを使用) 、並べ替え可能 、 sortType 。
- ユーザーが列のサイズを変更したときのテーブルの状態を決定するテーブルのサイズ変更ポリシーがあります。
- 複数の列の並べ替えをサポートします。
TableViewの作成
TableViewの方法を示すサンプルアプリケーションを作成してみましょう JavaFXで使用できます。まず、JavaFX TableViewの基本を紹介します。 コードで。テーブルにはデータが表示されるため、データを保持するクラスを作成します。
package sample;

import javafx.beans.property.IntegerProperty;
import javafx.beans.property.SimpleIntegerProperty;
import javafx.beans.property.SimpleStringProperty;
import javafx.beans.property.StringProperty;
public class Employee {
   private StringProperty name;
   private StringProperty phone;
   private StringProperty email;
   private IntegerProperty salary;
   public Employee(String name, String phone, String email,
         Integer salary) {
      setName(name);
      setPhone(phone);
      setEmail(email);
      setSalary(salary);
   }
   public StringProperty nameProperty(){
      if(name == null)
      name = new SimpleStringProperty();
      return name;
   }
   public StringProperty phoneProperty() {
      if(phone == null)
      phone = new SimpleStringProperty();
      return phone;
   }
   public StringProperty emailProperty() {
      if(email == null)
      email = new SimpleStringProperty();
      return email;
   }
   public IntegerProperty salaryProperty() {
      if(salary == null)
      salary = new SimpleIntegerProperty();
      return salary;
   }
   public void setName(String name)
         { nameProperty().setValue(name);  }
   public String getName()
         { return nameProperty().get();  }
   public void setPhone(String phone)
         {phoneProperty().setValue(phone);}
   public String getPhone()
         { return phoneProperty().get(); }
   public void setEmail(String email)
         { emailProperty().setValue(email);}
   public String getEmail()
         { return emailProperty().get(); }
   public void setSalary(Integer salary)
         { salaryProperty().setValue(salary);}
   public Integer getSalary()
         { return salaryProperty().get(); }
}
次に、アプリケーションレイアウトを作成し、 TableViewを配置します。 シーンへの唯一のコンポーネントとして。
package sample;
import javafx.application.Application;
import javafx.collections.FXCollections;
import javafx.collections.ObservableList;
import javafx.scene.Scene;
import javafx.scene.control.TableColumn;
import javafx.scene.control.TableView;
import javafx.scene.control.cell.PropertyValueFactory;
import javafx.scene.layout.BorderPane;
import javafx.stage.Stage;
public class AppMain extends Application {
   @Override
   public void start(Stage primaryStage)
         throws Exception {
      BorderPane root = new BorderPane();
      root.setPrefSize(600,400);

      final TableView<Employee> employeeTableView =
         new TableView<>();
      employeeTableView.setPrefWidth(500);
      employeeTableView.setItems(dummyEmployees());
      TableColumn<Employee, String> nameCol =
         new TableColumn<>("Name");
      nameCol.setCellValueFactory(
         new PropertyValueFactory<Employee,
            String>("Name"));

      TableColumn<Employee, String> phoneCol =
         new TableColumn<>("Phone");
      phoneCol.setCellValueFactory(
         new PropertyValueFactory<Employee,
            String>("Phone"));

      TableColumn<Employee, String> emailCol =
         new TableColumn<>("Email");
      emailCol.setCellValueFactory(
         new PropertyValueFactory<Employee,
            String>("Email"));

      TableColumn<Employee, Integer> salaryCol =
         new TableColumn<>("Salary");
      salaryCol.setCellValueFactory(
         new PropertyValueFactory<Employee,
            Integer>("Salary"));

      employeeTableView.getColumns().addAll(nameCol,phoneCol,
         emailCol,salaryCol);
      root.setCenter(employeeTableView);
      Scene scene = new Scene(root);
      primaryStage.setScene(scene);
      primaryStage.setTitle("JavaFX TableView Demonstration");
      primaryStage.show();
   }

   private static ObservableList<Employee> dummyEmployees() {
      ObservableList<Employee> employees =
         FXCollections.observableArrayList();
      employees.add(new Employee("Arko Bannerjee",
         "9876543210","example@sqldat.com", 5600));
      employees.add(new Employee("Subir Sha",
         "8109276354","example@sqldat.com",7200));
      employees.add(new Employee("Karoline Bhatt",
         "638374642","example@sqldat.com",3600));
      employees.add(new Employee("Vikas Verma",
         "425637772","example@sqldat.com",7800));
      employees.add(new Employee("Gurmeet Singh",
         "9876543210","example@sqldat.com",8900));
      employees.add(new Employee("Partho Goel",
         "837743636","example@sqldat.com",5644));
      employees.add(new Employee("Hanish Jaiswal",
         "826355343","example@sqldat.com",6500));
      employees.add(new Employee("Preety Ahuja",
         "9298366454","example@sqldat.com",7800));
      employees.add(new Employee("Sandip Paul",
         "82773554536","example@sqldat.com",8600));
      employees.add(new Employee("Sudipto Sarkar",
         "73664552542","example@sqldat.com",8200));
      employees.add(new Employee("Bikash Panda",
         "6365344245","example@sqldat.com",8400));
      employees.add(new Employee("Abhronil Sahu",
         "7829293663","example@sqldat.com",8000));
      employees.add(new Employee("Dilip Das",
         "9283665455","example@sqldat.com",8100));
      return employees;
   }

   public static void main(String[] args) {
      launch(args);
   }
}
テーブルは次のコードで作成されます:
final TableView<Employee> employeeTableView =
   new TableView<>();
テーブルの内容は、追加された列で表されます。各列には、列の内容を視覚的に指定するためのヘッダーも必要です。この例では、4つの列を設定しました(従業員で定義されたプロパティで指定) クラス)。
TableColumn<Employee, String> nameCol =
      new TableColumn<>("Name");
   nameCol.setEditable(true);
   nameCol.setCellValueFactory(
      new PropertyValueFactory<Employee,
         String>("Name"));
出力
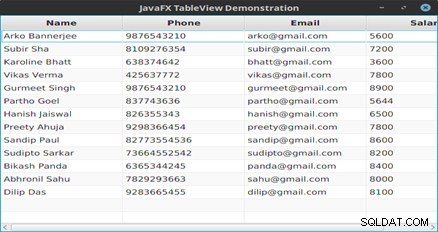
図1: テーブルの内容
次に、これをレイアウトの主要コンポーネントとして設定しました。 TableViewにコンテンツを表示するために必要なのはこれだけです。 。コンテンツの並べ替えなどの機能は、コンポーネントによってデフォルトの機能として提供されるため、特別な/追加の処理は必要ありません。また、キーボードからShiftキーを押しながらマウスクリックで列を選択することで、複数の並べ替えを実行できます。
テーブル内の編集可能な列
編集可能な列を持つテーブルを作成したい場合は、非常に簡単に作成できます。編集可能な列をダブルクリックすると、値を編集できるテキストボックスが表示されます。変更を永続的にするには、キーボードからEnterキーを押す必要があります。
編集可能な列を使用した別の例を次に示します。
package sample;
import javafx.beans.property.SimpleStringProperty;
import javafx.beans.property.StringProperty;
public class PhoneBook {
   private StringProperty name;
   private StringProperty phone;
   public PhoneBook(String name, String phone) {
      setName(name);
      setPhone(phone);
   }
   public StringProperty nameProperty(){
      if(name == null)
         name = new SimpleStringProperty();
      return name;
   }
   public StringProperty phoneProperty(){
      if(phone == null)
         phone = new SimpleStringProperty();
      return phone;
   }
   public void setName(String name)
      { nameProperty().setValue(name);  }
   public String getName()
      { return nameProperty().get();  }
   public void setPhone(String phone)
      { phoneProperty().setValue(phone);}
   public String getPhone()
      { return phoneProperty().get(); }
   @Override
   public String toString() {
      return getName()+" : "+getPhone();
   }
}

package sample;
import javafx.application.*;
import javafx.beans.value.*;
import javafx.collections.*;
import javafx.geometry.*;
import javafx.scene.Scene;
import javafx.scene.control.*;
import javafx.scene.control.cell.*;
import javafx.scene.layout.*;
import javafx.scene.text.*;
import javafx.stage.*;
public class PhoneBookTable extends Application {
   private TableView<PhoneBook> table;
   private ObservableList data;
   private Text txtStatus;
   @Override
   public void start(Stage primaryStage) {
      primaryStage.setTitle("Table View Demonstration.");
      HBox hb = new HBox();
      hb.setAlignment(Pos.CENTER);
      table = new TableView<>();
      data = dummyData();
      table.setItems(data);
      TableColumn<PhoneBook,String> nameCol = new
         TableColumn<>("Name");
      nameCol.setCellValueFactory(new
         PropertyValueFactory<>("name"));
      TableColumn<PhoneBook,String> phoneCol = new
         TableColumn("Phone");
      phoneCol.setCellValueFactory(new
         PropertyValueFactory<>("phone"));
      table.getColumns().setAll(nameCol, phoneCol);
      table.setPrefWidth(400);
      table.setPrefHeight(250);
      table.setColumnResizePolicy(TableView.
         CONSTRAINED_RESIZE_POLICY);
      table.getSelectionModel().selectedIndexProperty().
            addListener(
         new RowChangeHandler());
      table.setEditable(true);
      phoneCol.setCellFactory(TextFieldTableCell.
         forTableColumn());
      phoneCol.setOnEditCommit(event -> (event.getTableView().
         getItems().get(event.getTablePosition().getRow())).
         setPhone(event.getNewValue()));
      txtStatus = new Text();
      VBox vbox = new VBox(20);
      vbox.setPadding(new Insets(20, 20, 20, 20));;
      vbox.getChildren().addAll(hb, table, txtStatus);
      // W x H
      Scene scene = new Scene(vbox, 450, 375);
      primaryStage.setScene(scene);
      primaryStage.show();
      table.getSelectionModel().select(0);
      PhoneBook pb = table.getSelectionModel().
         getSelectedItem();
      txtStatus.setText(pb.toString());
   }
   private class RowChangeHandler implements
         ChangeListener {
      @Override
      public void changed(ObservableValue ov, Object oldVal,
            Object newVal) {
         int val = ((Number)newVal).intValue();
         if (data.size()<=0) {
            return;
         }
        PhoneBook pb= (PhoneBook) data.get(val);
        txtStatus.setText(pb.toString());
      }
   }
   public ObservableList<PhoneBook> dummyData() {
      ObservableList<PhoneBook> records =
         FXCollections.observableArrayList();
      records.add(new PhoneBook("Mickey Mouse",
         "7894561230"));
      records.add(new PhoneBook("Donald Duck",
         "1234567890"));
      records.add(new PhoneBook("Alladin",
         "7418529630"));
      records.add(new PhoneBook("Zairo",
         "9638527410"));
      records.add(new PhoneBook("Batman",
         "7894561230"));
      records.add(new PhoneBook("Spiderman",
         "852478930"));
      return records;
   }
   public static void main(String [] args) {
      Application.launch(args);
   }
}
出力
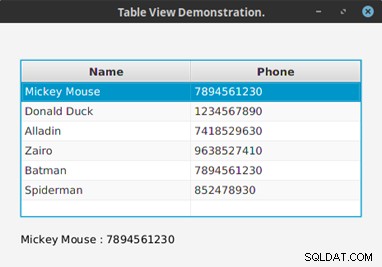
図2: テーブルから抽出された1つのレコード
結論
TableView コンポーネントは、特にデータベースプログラミングを行う場合に、UIデザインで非常に役立ちます。複雑な表形式の表現を実装する際にいくつかの不具合がありますが、JavaFXはこのコンポーネントを用途の広いものにしました。もちろん、ここに示されている使いやすさはほんの一例です。 TableView を使用すると、さらに多くのことが実現できます 、今後の記事で見るように。