MySQL は、オープンソースの無料のリレーショナルデータベース管理システム( RDBMS )です。 ) GNUでリリース (一般公衆利用許諾契約書 )。作成された各データベースへのマルチユーザーアクセスを提供することにより、単一のサーバーで複数のデータベースを実行するために使用されます。
この記事では、最新の MySQL 8.0をインストールおよび更新するプロセスについて説明します。 RHEL / CentOS 8/7/6 /のバージョン およびFedora MySQL Yumを使用する YUMユーティリティを介したリポジトリ。
ステップ1:MySQLYumリポジトリを追加する
1。 公式のMySQLYumを使用します ソフトウェアリポジトリ。RHEL/ CentOS8 / 7/6 / > およびFedora30-35 。
古いMySQLパッケージをアップグレードまたは交換する前に、MySQLデータベースのバックアップガイドを使用して、重要なデータベースのバックアップおよび構成ファイルをすべて取得することを忘れないでください。
2。 次に、次のMySQLYumリポジトリをダウンロードして追加します。 それぞれのLinuxディストリビューションシステムのリポジトリリストに移動して、最新バージョンのMySQL( 8.0 )をインストールします。 2018年7月27日にリリース 。
--------------- On RHEL/CentOS 8 ---------------
# wget https://repo.mysql.com/mysql80-community-release-el8-1.noarch.rpm
--------------- On RHEL/CentOS 7 ---------------
# wget https://repo.mysql.com/mysql80-community-release-el7-1.noarch.rpm
--------------- On RHEL/CentOS 6 ---------------
# wget https://dev.mysql.com/get/mysql80-community-release-el6-1.noarch.rpm
--------------- On Fedora 35 ---------------
# wget https://dev.mysql.com/get/mysql80-community-release-fc35-1.noarch.rpm
--------------- On Fedora 34 ---------------
# wget https://dev.mysql.com/get/mysql80-community-release-fc34-1.noarch.rpm
--------------- On Fedora 33 ---------------
# wget https://dev.mysql.com/get/mysql80-community-release-fc33-1.noarch.rpm
3。 Linuxプラットフォーム用のパッケージをダウンロードしたら、次のコマンドを使用してダウンロードしたパッケージをインストールします。
--------------- On RHEL/CentOS 8 ---------------
# yum localinstall mysql80-community-release-el8-1.noarch.rpm
--------------- On RHEL/CentOS 7 ---------------
# yum localinstall mysql80-community-release-el7-1.noarch.rpm
--------------- On RHEL/CentOS 6 ---------------
# yum localinstall mysql80-community-release-el6-1.noarch.rpm
--------------- On Fedora 35 ---------------
# dnf localinstall mysql80-community-release-fc35-1.noarch.rpm
--------------- On Fedora 34 ---------------
# dnf localinstall mysql80-community-release-fc34-1.noarch.rpm
--------------- On Fedora 33 ---------------
# yum localinstall mysql80-community-release-fc33-1.noarch.rpm
上記のインストールコマンドは、 MySQL Yumを追加します リポジトリをシステムのリポジトリリストに追加し、GnuPGキーをダウンロードして、パッケージの整合性を検証します。
4。 次のコマンドを使用して、MySQLYumリポジトリが正常に追加されたことを確認できます。
# yum repolist enabled | grep "mysql.*-community.*"
# dnf repolist enabled | grep "mysql.*-community.*"      [On Fedora versions]


ステップ2:最新のMySQLバージョンをインストールする
5。 MySQLの最新バージョンをインストールします (現在 8.0 )次のコマンドを使用します。
# yum install mysql-community-server
# dnf install mysql-community-server      [On Fedora versions]
上記のコマンドは、MySQLサーバー mysql-community-serverに必要なすべてのパッケージをインストールします 、 mysql-community-client 、 mysql-community-common およびmysql-community-libs 。
ステップ3:さまざまなMySQLリリースバージョンをインストールする
6。 MySQL Community Serverのさまざまなサブリポジトリを使用して、さまざまなバージョンのMySQLをインストールすることもできます。最近のMySQLシリーズ(現在は MySQL 8.0 )のサブリポジトリ )はデフォルトでアクティブ化され、他のすべてのバージョン(たとえば、MySQL 5.xシリーズ)のサブリポジトリはデフォルトで非アクティブ化されます。
特定のサブリポジトリから特定のバージョンをインストールするには、--enableを使用できます。 または--disable yum-config-managerを使用するオプション またはdnfconfig-manager 示されているように:
# yum-config-manager --disable mysql57-community
# yum-config-manager --enable mysql56-community
------------------ Fedora Versions ------------------
# dnf config-manager --disable mysql57-community
# dnf config-manager --enable mysql56-community
ステップ4:MySQLサーバーを起動する
7。 MySQLが正常にインストールされたら、次のコマンドを使用してMySQLサーバーを起動して有効にします。
# service mysqld start
# systemctl enable mysqld.service
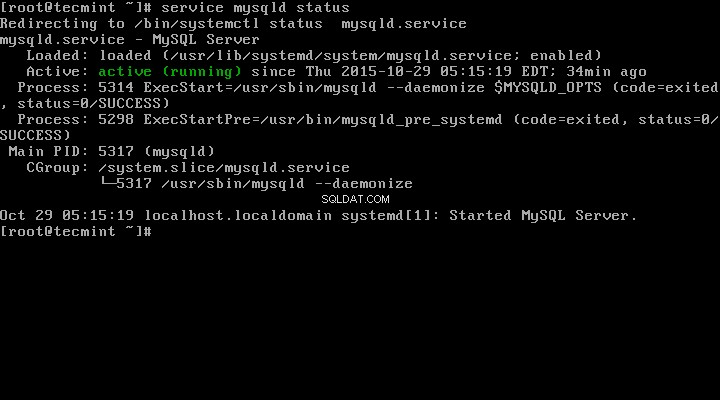
次のコマンドを使用して、MySQLサーバーのステータスを確認できます。
# systemctl status mysqld.service
OR
# service mysqld status
これは、CentOS7ボックスでMySQLを実行した場合の出力例です。
Redirecting to /bin/systemctl status  mysqld.service
mysqld.service - MySQL Server
   Loaded: loaded (/usr/lib/systemd/system/mysqld.service; enabled)
   Active: active (running) since Thu 2015-10-29 05:15:19 EDT; 4min 5s ago
  Process: 5314 ExecStart=/usr/sbin/mysqld --daemonize $MYSQLD_OPTS (code=exited, status=0/SUCCESS)
  Process: 5298 ExecStartPre=/usr/bin/mysqld_pre_systemd (code=exited, status=0/SUCCESS)
 Main PID: 5317 (mysqld)
   CGroup: /system.slice/mysqld.service
           └─5317 /usr/sbin/mysqld --daemonize

Oct 29 05:15:19 localhost.localdomain systemd[1]: Started MySQL Server.
8。 最後に、次のコマンドを使用して、インストールされているMySQLのバージョンを確認します。
# mysql --version

mysql  Ver 8.0.27 for Linux on x86_64 (MySQL Community Server - GPL)

ステップ5:MySQLインストールの保護
9。 コマンドmysql_secure_installation ルートパスワードの設定、匿名ユーザーの削除、ルートログインの削除などの重要な設定を実行することにより、MySQLのインストールを保護できます。
/var/log/mysqld.logに一時的なランダムパスワードを生成します インストール後。
以下のコマンドを使用して、MySQLセキュアコマンドを実行する前にパスワードを確認してください。
# grep 'temporary password' /var/log/mysqld.log
パスワードがわかったら、次のコマンドを実行してMySQLのインストールを保護できます。
# mysql_secure_installation
/var/log/mysqld.logからの一時パスワードを意味します 。
次に、画面の指示に注意深く従ってください。参考のために、以下の上記のコマンドの出力を参照してください。
サンプル出力
Securing the MySQL server deployment.

Enter password for user root: Enter New Root Password

VALIDATE PASSWORD PLUGIN can be used to test passwords
and improve security. It checks the strength of password
and allows the users to set only those passwords which are
secure enough. Would you like to setup VALIDATE PASSWORD plugin?

Press y|Y for Yes, any other key for No: y

There are three levels of password validation policy:

LOW    Length >= 8
MEDIUM Length >= 8, numeric, mixed case, and special characters
STRONG Length >= 8, numeric, mixed case, special characters and dictionary                  file

Please enter 0 = LOW, 1 = MEDIUM and 2 = STRONG: 2
Using existing password for root.

Estimated strength of the password: 50
Change the password for root ? ((Press y|Y for Yes, any other key for No) : y

New password: Set New MySQL Password

Re-enter new password: Re-enter New MySQL Password

Estimated strength of the password: 100
Do you wish to continue with the password provided?(Press y|Y for Yes, any other key for No) : y
By default, a MySQL installation has an anonymous user,
allowing anyone to log into MySQL without having to have
a user account created for them. This is intended only for
testing, and to make the installation go a bit smoother.
You should remove them before moving into a production
environment.

Remove anonymous users? (Press y|Y for Yes, any other key for No) : y
Success.


Normally, root should only be allowed to connect from
'localhost'. This ensures that someone cannot guess at
the root password from the network.

Disallow root login remotely? (Press y|Y for Yes, any other key for No) : y
Success.

By default, MySQL comes with a database named 'test' that
anyone can access. This is also intended only for testing,
and should be removed before moving into a production
environment.

Remove test database and access to it? (Press y|Y for Yes, any other key for No) : y
 - Dropping test database...
Success.

 - Removing privileges on test database...
Success.

Reloading the privilege tables will ensure that all changes
made so far will take effect immediately.

Reload privilege tables now? (Press y|Y for Yes, any other key for No) : y
Success.

All done!
ステップ6:MySQLサーバーへの接続
10。 ユーザー名とパスワードを入力して、新しくインストールしたMySQLサーバーに接続します。
# mysql -u root -p
サンプル出力:
Welcome to the MySQL monitor.  Commands end with ; or \g.
Your MySQL connection id is 11
Server version: 8.0.27 MySQL Community Server - GPL

Copyright (c) 2000, 2021, Oracle and/or its affiliates.

Oracle is a registered trademark of Oracle Corporation and/or its
affiliates. Other names may be trademarks of their respective
owners.

Type 'help;' or '\h' for help. Type '\c' to clear the current input statement.

mysql>
ステップ7:Yumを使用したMySQLの更新
11。 新規インストールに加えて、次のコマンドを使用してMySQL製品およびコンポーネントの更新を行うこともできます。
# yum update mysql-server
# dnf update mysql-server       [On Fedora versions]
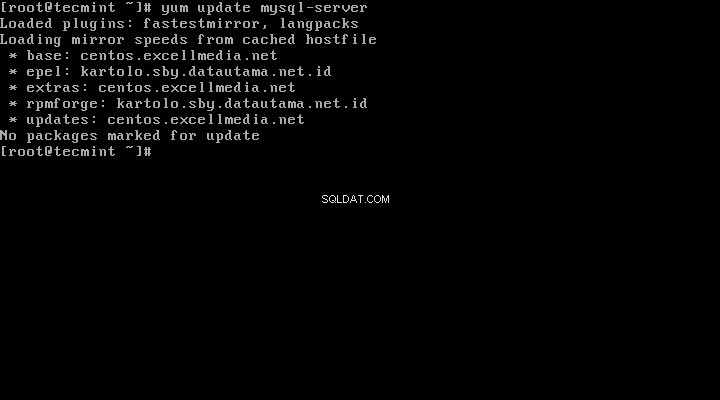
MySQLで新しい更新が利用可能になると、それらが自動インストールされます。利用できない場合は、更新のマークが付けられたパッケージはありませんというメッセージが表示されます。 。
これで、 MySQL 8.0が正常にインストールされました。 システム上で。インストールで問題が発生した場合は、コメントセクションを使用して解決策を確認してください。