Percona XtraDB Cluster 8.0は、Galera writesetReplicationAPIとGaleraReplicationLibraryが組み込まれたPerconaServerfor MySQL 8.0に基づいており、MySQLベースのデータベースサーバーで利用可能なマルチマスターレプリケーションを形成します。 Percona XtraDB ClusterにはXtraDBストレージエンジン(InnoDBのドロップイン置換)が付属しており、このビルドに固有のいくつかの追加の変数とステータスを使用して、アップストリームのOracle MySQLリリース(その中のすべてのバグ修正を含む)に非常に厳密に従います。
>このブログ投稿では、手動および自動の方法を使用して、高可用性を実現するためにPercona XtraDBCluster8.0を展開する方法を検討します。
展開手順を進める前に、Percona Server for MySQL 8.0(グループレプリケーションプラグインなし)とGalera4に基づくこのメジャーバージョンの注目すべき機能と大幅な改善について言及する価値があります。
- ストリーミングレプリケーション-これにより、ライトセットレプリケーションは、より小さく、より管理しやすいフラグメントで大きなデータトランザクションを処理し、データの競合を最小限に抑えることができます。
- アクション調整のための同期MySQL関数(wsrep_last_seen_gtid、wsrep_last_written_gtid、wsrep_sync_wait_upto_gtid)。
- 新しいGaleraシステムテーブル。「mysql」スキーマ(wsrep_cluster、wsrep_cluster_members、wsrep_streaming_log)の下でクラスターの状態を監視するのに役立ちます。
- Gcache暗号化。
- Galera 4のwsrepインフラストラクチャは、Galera 3のインフラストラクチャよりも堅牢です。コードの実行が高速で、状態処理、予測可能性、エラー処理が向上しています。
変更点の完全なリストについては、リリースノートを確認してください。
Percona XtraDBCluster8.0の手動展開
Percona XtraDBクラスターの場合、少なくとも3つのノードが必要です。
- db1(192.168.20.61)
- db2(192.168.20.62)
- db3(192.168.20.63)
このセクションで説明する手順は、CentOS 8で実行されているすべてのデータベースノード(db1、db2、およびdb3)で実行する必要があります。まず、SELinuxを無効にします(そうしないと、ISTプロセスが失敗します):
$ setenforce 0
$ sed -i 's/^SELINUX=.*/SELINUX=disabled/g' /etc/sysconfig/selinux
Perconaリポジトリパッケージをインストールします:
$ yum -y install https://repo.percona.com/yum/percona-release-latest.noarch.rpm$ percona-release setup pxc80
* Disabling all Percona Repositories
On RedHat 8 systems it is needed to disable dnf mysql module to install Percona-Server
Do you want to disable it? [y/N]「y」を選択して、mysqlDNFモジュールを無効にします。これは、MySQL関連パッケージのPerconaリポジトリに優先順位を付けるために必要です。
次に、最新のPerconaXtraDBクラスターとPerconaXtrabackupをインストールします。
$ dnf -y install percona-xtradb-cluster percona-xtrabackup-80現時点では、Percona XtraDBCluster8.0.0-11.3がインストールされているはずです。すべての依存関係パッケージは、shared-compat、shared、およびclientパッケージのようにインストールされます。その後、初期構成のためにMySQLサービスを開始できます。
$ systemctl start mysql$ cat /var/log/mysqld.log | grep 'temporary password'
2020-11-27T06:53:05.929661Z 6 [Note] [MY-010454] [Server] A temporary password is generated for [email protected]: <eqo+jXNw2lkご覧のとおり、生成されたパスワードは「
生成されたrootパスワードは、最初のrootログインの直後に期限切れになります。上記のヘルパースクリプトは、新しいMySQLルートパスワードの構成、パスワード検証ポリシーの設定、rootのリモートログインの無効化、テストデータベースと匿名ユーザーの削除、および特権テーブルの再読み込みに役立ちます。
デフォルトの構成ファイル(/etc/my.cnf)は、以下に示すように、wsrep_cluster_address変数の下に空のgcomm://接続文字列で構成されています。 上記の行には、クラスターに参加しているすべてのノードのIPアドレスのリストを設定する必要があります。この手順を実行しなかった場合、すべてのノードでサービスが開始された後、すべてのノード(3つの個別の1ノードクラスター)に新しいGaleraクラスターが作成されます。したがって、[mysqld]セクションで次の行を適宜変更する必要があります。 wsrep_cluster_addressはすべてのデータベースホストで同一であると期待してください。一方、wsrep_node_addressとwsrep_node_nameはすべてのデータベースホストで異なる必要があります。最後の行pxc-encrypt-cluster-traffic=OFFは、クラスタートラフィックの暗号化を無効にすることを意味します。これは、展開手順を簡素化するための意図的なものであることに注意してください。そうしないと、キー/証明書の管理手順を実行する必要があります。暗号化を有効にする場合は、こちらの記事をご覧ください。
クラスタのブートストラップに進む前に、残りのデータベースノードに対して上記の手順を繰り返します。
Galeraでは、残りのノードが参加してクラスターを形成する前に、参照ポイントとしてクラスター内のノードを開始する必要があります。このプロセスは、クラスターブートストラップと呼ばれます。ブートストラップは、データベースノードを主要コンポーネントとして導入するための最初のステップであり、他の人がデータベースノードをデータを同期するための参照ポイントと見なす前に行われます。
この例では、db1を参照ノードとして使用し、bootstrapコマンドで開始します(これはデータのない新しいクラスターであるため、他のノードも選択できます): 開始したら、標準の開始コマンド(一度に1つのノード)を使用して他のノード(db2およびdb3)を開始できます。 /var/log/mysqld.log内の次の行で確認できます: この時点で、Percona XtraDB Clusterサービスが開始され、手動展開が完了しました。 Percona XtraDB Clusterのブートストラッププロセスの詳細については、このブログ投稿「MySQLまたはMariaDBGaleraClusterをブートストラップする方法」を確認してください。
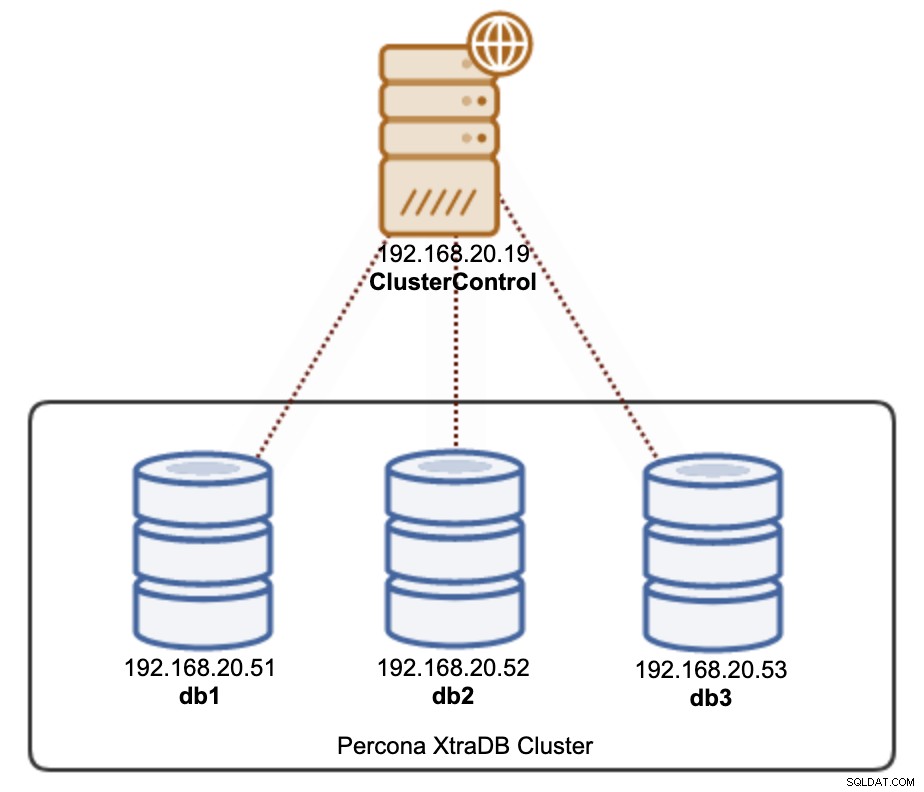
ClusterControlを使用してPerconaXtraDBCluster8.0をデプロイする方法は2つあります。 ClusterControl UI(WebベースのGUI)またはs9sと呼ばれるClusterControlCLIを使用できます。このセクションでは、両方の方法を紹介します。 ClusterControlは、データベースクラスターから離れた別のホストに存在する必要があります。したがって、私たちのアーキテクチャは次のように説明できます。
ClusterControlサーバーにSSHで接続し、次のコマンドを使用してClusterControlをインストールします。 インストールが完了するまで、インストールウィザードに従います。インストールが完了したら、Webブラウザーを開き、http://192.168.20.19/clustercontrolにアクセスします。管理者ユーザーを作成すると、ライセンスが自動的にインストールされます。すべての新規インストールには、エンタープライズエディションの30日間の試用ライセンスが付属しています。この試用ライセンスの有効期限が切れると、デフォルトでコミュニティエディションに戻り、永久に無料になります。
ClusterControlでは、ClusterControlサーバーからすべての管理対象ノードにパスワードなしのSSHを設定する必要があります。これを実現するには、最初にClusterControlサーバーでSSHキーを生成する必要があります。 SSHユーザーには、スーパーユーザー権限(sudoまたはroot)が必要です。この場合、rootユーザーを使用します:$ mysql_secure_installation
Securing the MySQL server deployment.
Enter password for user root:
The existing password for the user account root has expired. Please set a new password.
New password:
Re-enter new password:
VALIDATE PASSWORD COMPONENT can be used to test passwords
and improve security. It checks the strength of password
and allows the users to set only those passwords which are
secure enough. Would you like to setup VALIDATE PASSWORD component?
Press y|Y for Yes, any other key for No: y
There are three levels of password validation policy:
LOW Length >= 8
MEDIUM Length >= 8, numeric, mixed case, and special characters
STRONG Length >= 8, numeric, mixed case, special characters and dictionary file
Please enter 0 = LOW, 1 = MEDIUM and 2 = STRONG: 2
Using existing password for root.
Estimated strength of the password: 100
Change the password for root ? ((Press y|Y for Yes, any other key for No) : y
New password:
Re-enter new password:
Estimated strength of the password: 100
Do you wish to continue with the password provided?(Press y|Y for Yes, any other key for No) : y
By default, a MySQL installation has an anonymous user,
allowing anyone to log into MySQL without having to have
a user account created for them. This is intended only for
testing, and to make the installation go a bit smoother.
You should remove them before moving into a production
environment.
Remove anonymous users? (Press y|Y for Yes, any other key for No) : y
Success.
Normally, root should only be allowed to connect from
'localhost'. This ensures that someone cannot guess at
the root password from the network.
Disallow root login remotely? (Press y|Y for Yes, any other key for No) : y
Success.
By default, MySQL comes with a database named 'test' that
anyone can access. This is also intended only for testing,
and should be removed before moving into a production
environment.
Remove test database and access to it? (Press y|Y for Yes, any other key for No) : y
- Dropping test database...
Success.
- Removing privileges on test database...
Success.
Reloading the privilege tables will ensure that all changes
made so far will take effect immediately.
Reload privilege tables now? (Press y|Y for Yes, any other key for No) : y
Success.
All done!wsrep_cluster_address=gcomm://wsrep_cluster_address=gcomm://192.168.20.51,192.168.20.52,192.168.20.53
wsrep_node_address=192.168.20.51 # IP address of this DB host
wsrep_node_name=db1 # any name to identify this DB host
pxc-encrypt-cluster-traffic=OFF$ systemctl stop mysql
$ systemctl start [email protected]
$ systemctl status [email protected]$ systemctl stop mysql
$ systemctl start mysql2020-11-27T08:09:01.964152Z 2 [Note] [MY-000000] [WSREP] Synchronized with group, ready for connectionsClusterControlを使用した自動展開
ClusterControlのインストール
$ wget http://severalnines.com/downloads/cmon/install-cc
$ chmod 744 install-cc
$ ./install-cc$ whoami
root
$ ssh-keygen -t rsa # press Enter on all prompts次に、公開鍵を、展開および管理するすべてのデータベースノードにコピーします。この場合、3つのGaleraノードすべて:
$ ssh-copy-id [email protected]
$ ssh-copy-id [email protected]
$ ssh-copy-id [email protected]
プロンプトが表示されたら、それぞれのホストのルートパスワードを入力します。
次のコマンドでテストして、正しい応答が得られることを確認してください。
$ ssh [email protected] "ls /root"これで、次のセクションに示すように、ClusterControlUIまたはCLIを使用してクラスターをデプロイする準備が整いました。
ClusterControlUIを使用したPXCの展開
ClusterControlを使用してPerconaXtraDBクラスターを展開するのは実質的に簡単であり、デフォルトでは、ClusterControlはGalera暗号化を有効にしてクラスターを構成します。パスワードなしのSSHを構成した後、ClusterControl-> Deploy-> MySQL Galeraに移動し、必要な詳細を以下のように指定します。
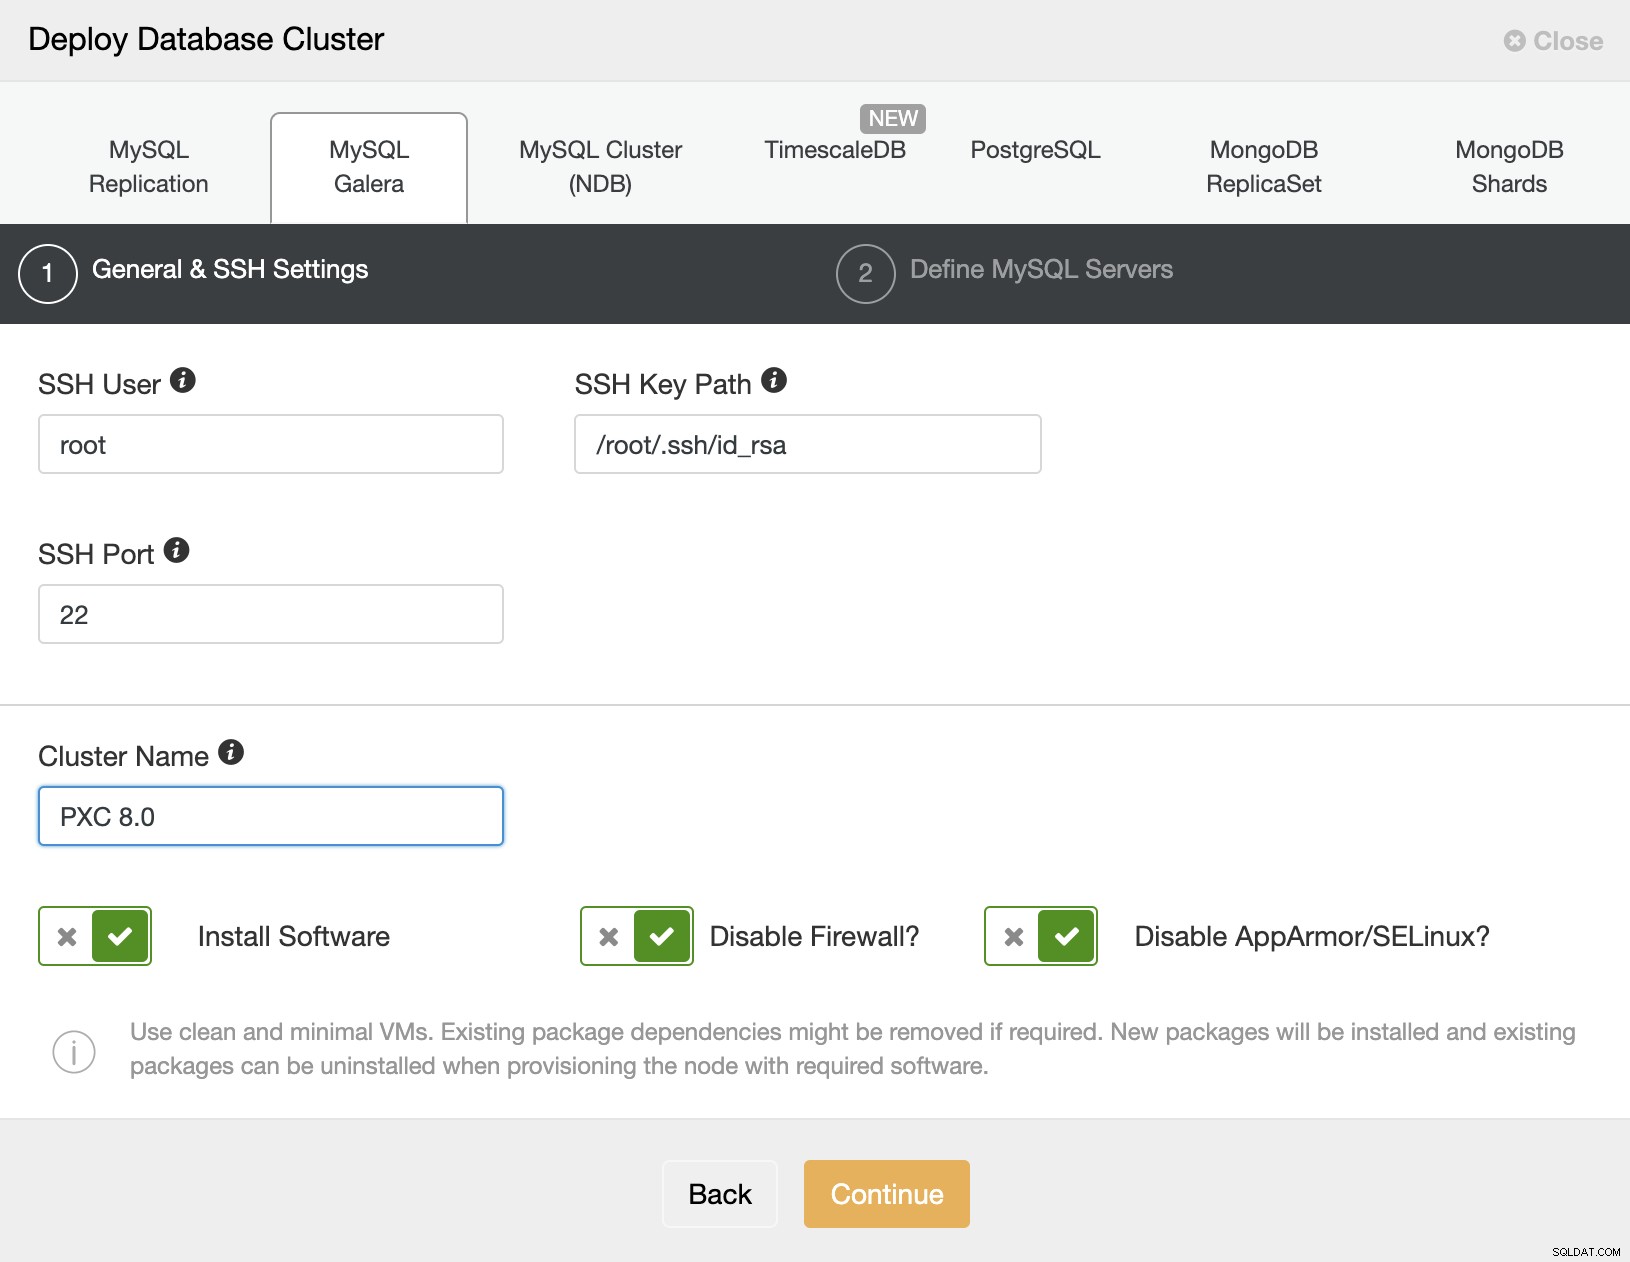
次に、[続行]をクリックして、構成する次のステップに進みますMySQL仕様:
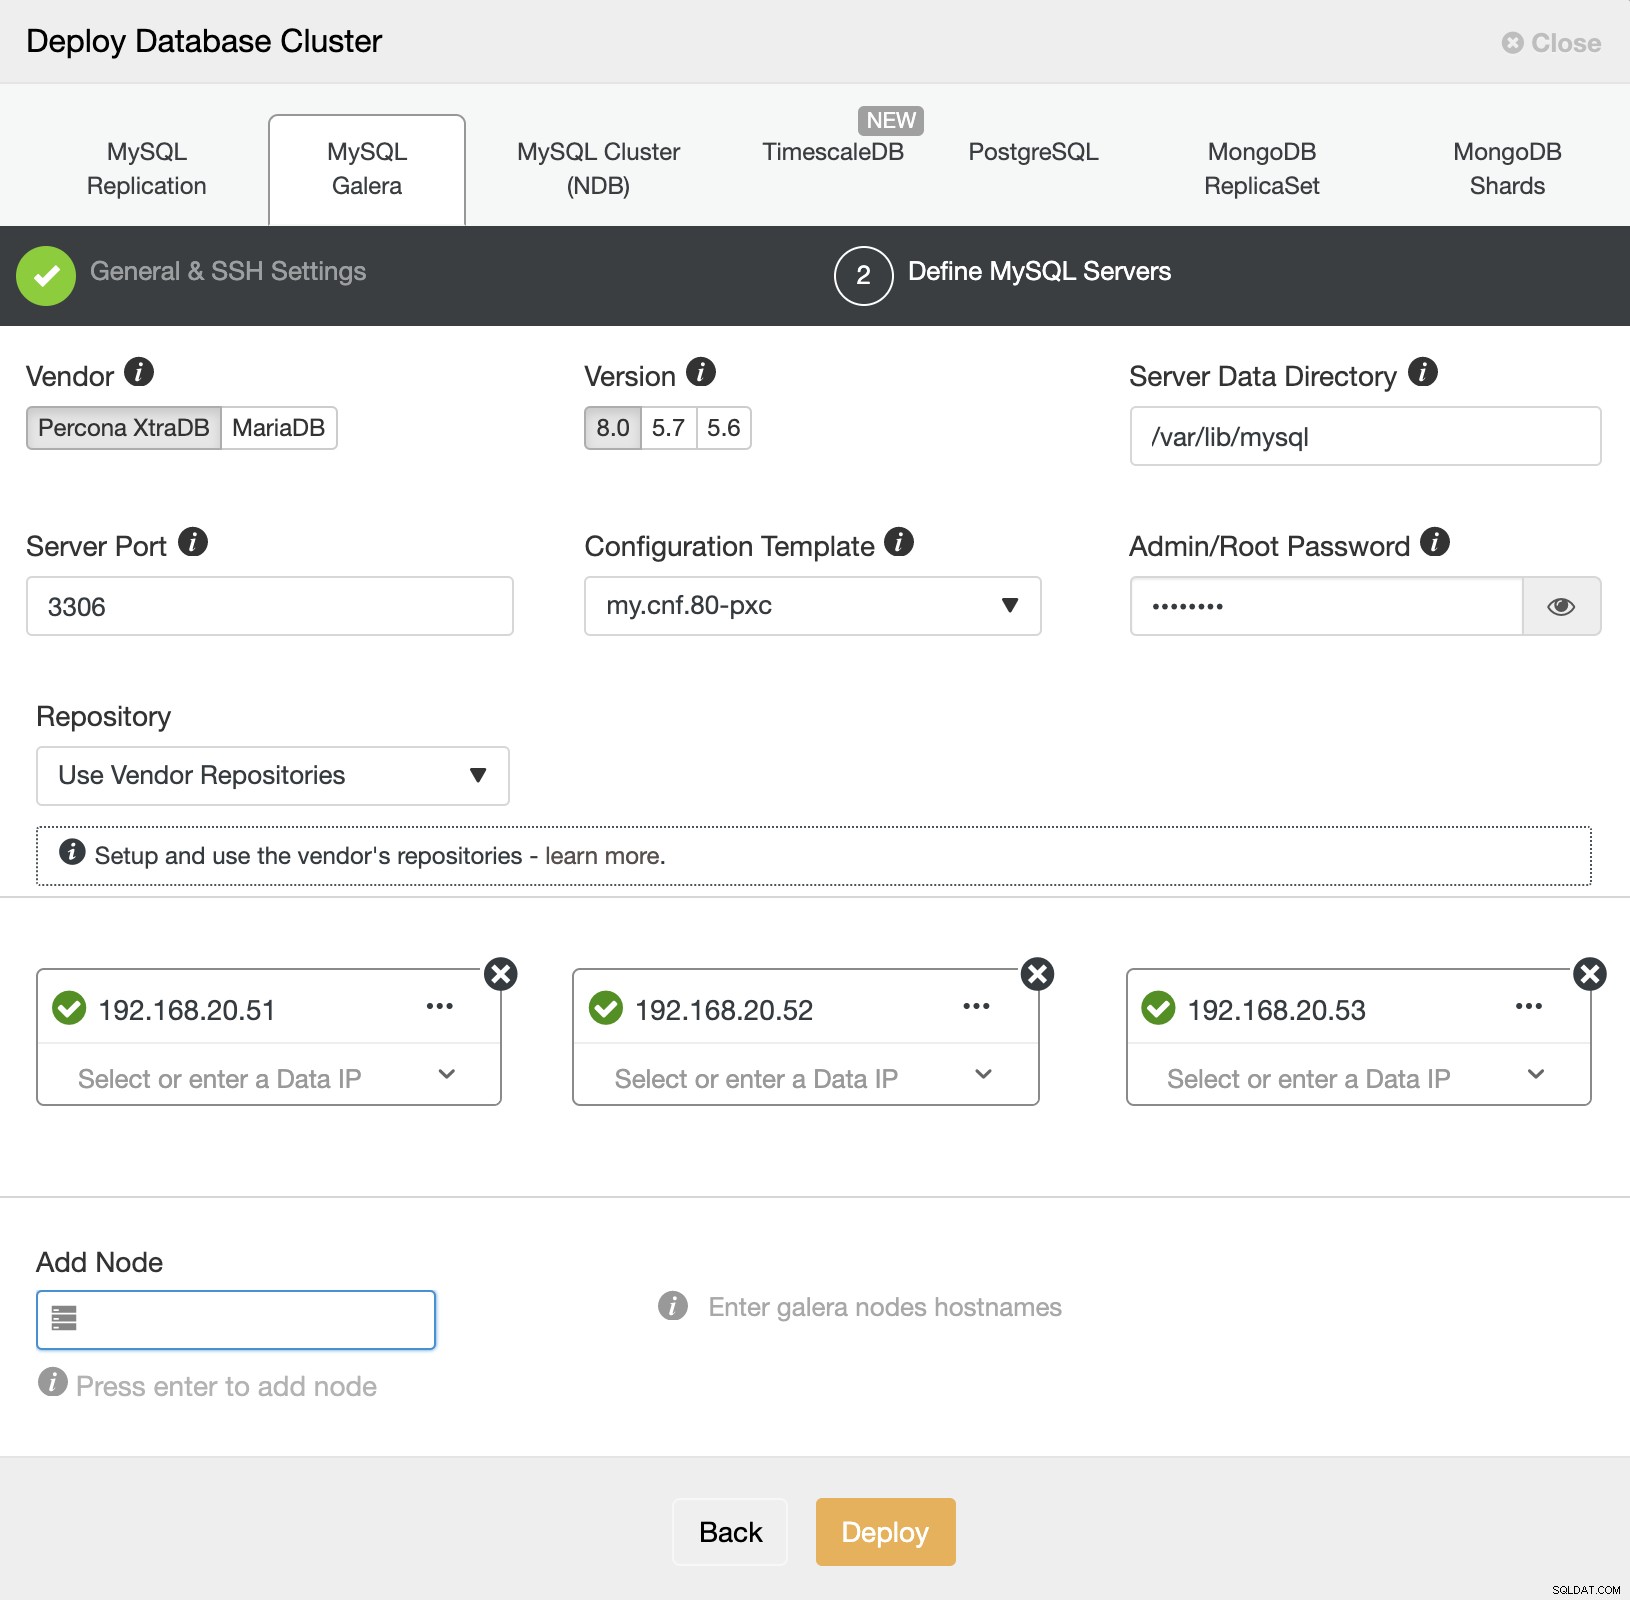
ベンダーには「Percona」を選択し、バージョンには8.0を選択します。残りはデフォルトのままにして、MySQLルートパスワードを入力します。データベースホストのIPアドレスまたはホスト名を1つずつ指定し、挿入するたびに緑色のチェックマークが表示されることを確認します。これは、ClusterControlが、手順1で定義された提供されたSSHユーザーとキーを使用してパスワードなしのSSH経由で対応するホストに到達できることを示します。[展開]ボタンをクリックして展開を開始します。
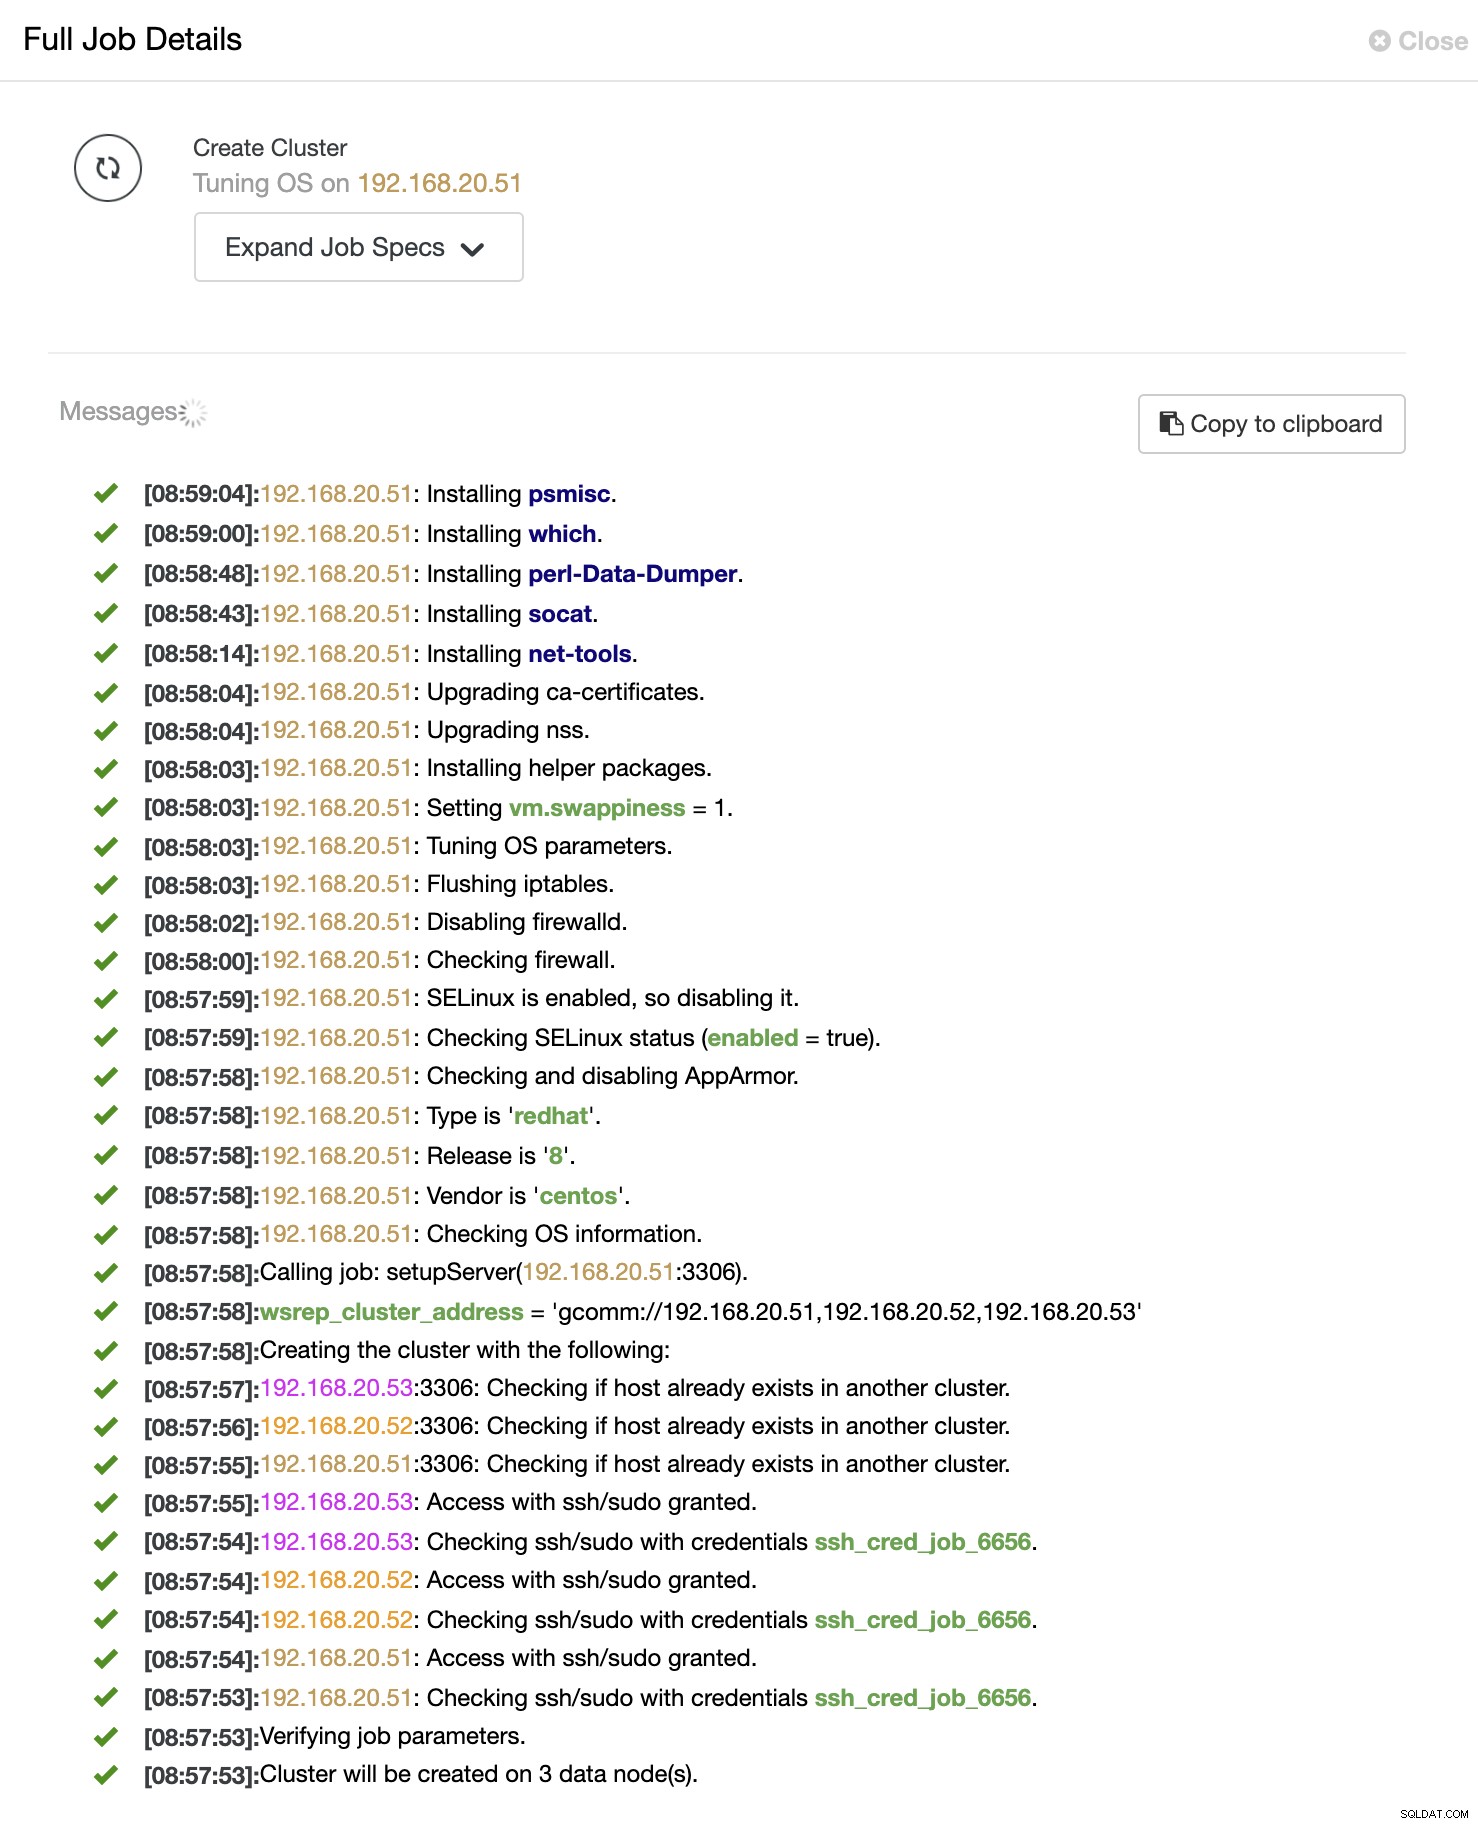
次に、ClusterControlは、次のスクリーンショットに示すように、ClusterControl-> Activity-> Jobs-> Create Cluster-> Full Job Detailsに移動して、デプロイメントの進行状況を監視できるデプロイメントジョブをトリガーします。
プロセスが完了すると、クラスターがダッシュボードに一覧表示されます。 :
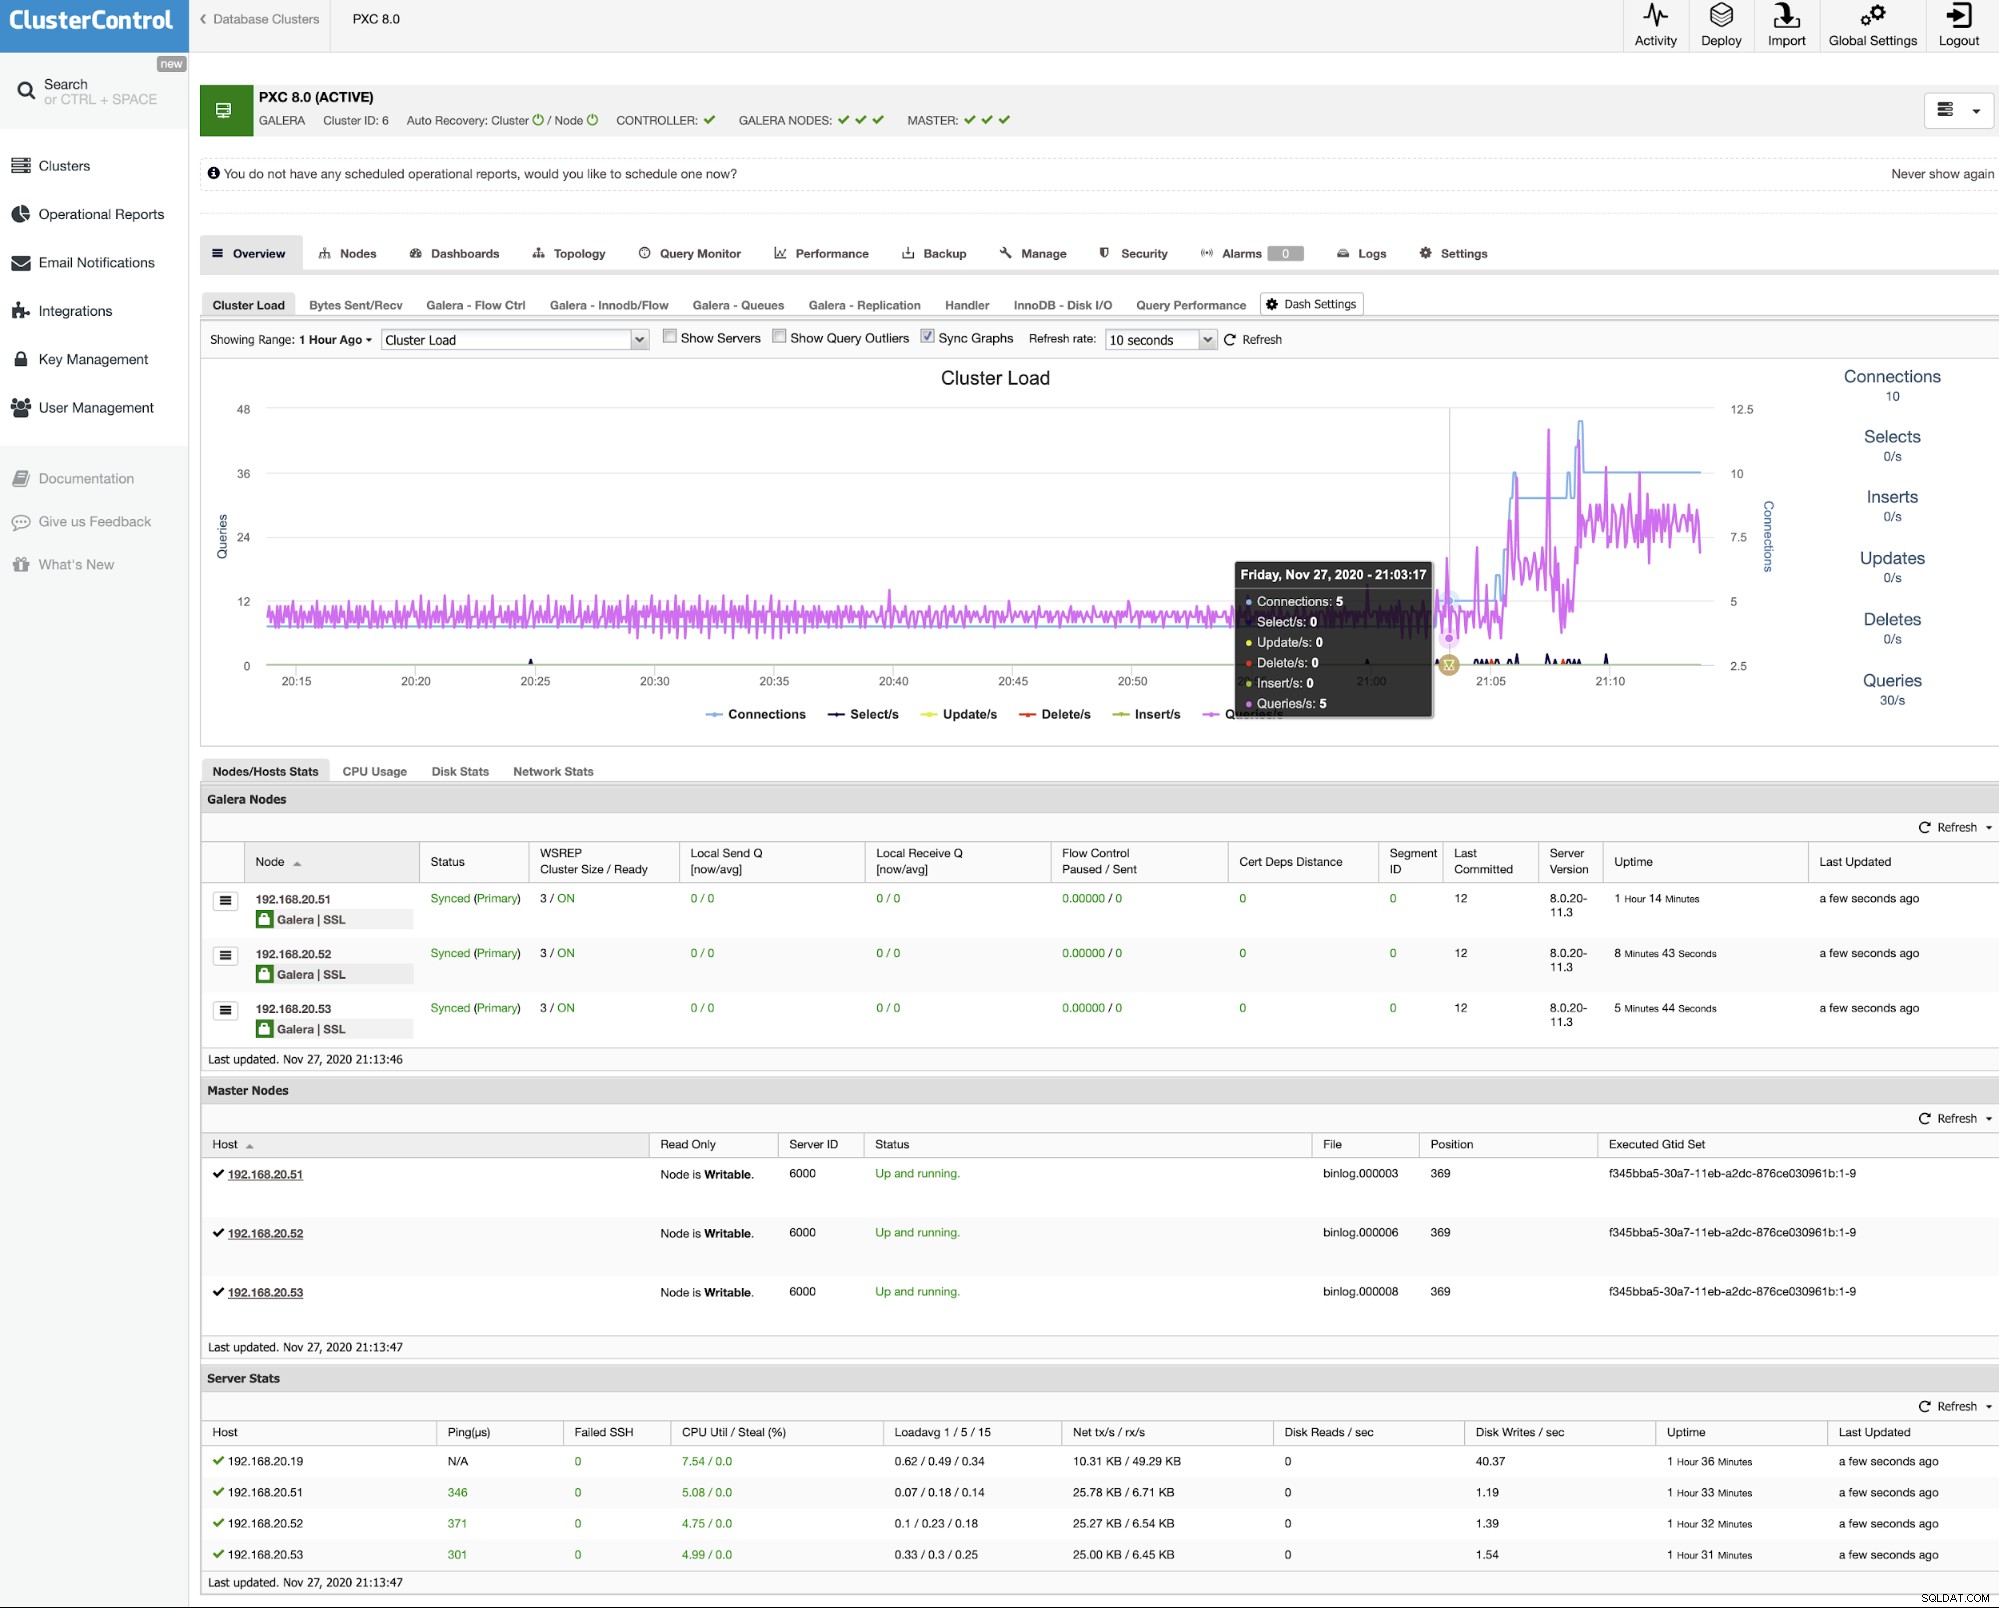
以上です。これで展開は完了です。
ClusterControlCLIを使用したPXCデプロイメント
コマンドラインを使用してクラスターをデプロイする場合は、「s9s」と呼ばれるClusterControlコマンドラインクライアントツールを使用できます。このツールは、展開ジョブをClusterControlコントローラーに送信し、クラスターを展開するために必要なすべての手順を実行します。
ClusterControlサーバーで次のコマンドを実行します。
$ s9s cluster --create \
--cluster-type=galera \
--nodes="192.168.20.51;192.168.20.52;192.168.20.53" \
--vendor=percona \
--provider-version=8.0 \
--db-admin-passwd='P4ssw0rdSecr3t' \
--os-user=root \
--os-key-file=/root/.ssh/id_rsa \
--cluster-name='My Percona XtraDB Cluster 8.0' \
--logジョブメッセージが表示され、そこで展開の進行状況を監視できます。また、ClusterControlUI->アクティビティ->ジョブからジョブの進行状況を監視することもできます。 。ジョブ完了通知が表示されるまで、15〜20分待ちます(インターネット接続によって異なります)。これで、Percona XtraDB Cluster 8.0がデプロイされ、ClusterControlUIに一覧表示されます。
