この記事では、LinuxにMicrosoftSQLまたはMSSQLをインストールする方法について説明します。口語的にMSSQLと呼ばれるMicrosoftSQLは、Microsoftによって作成されたリレーショナルデータベース管理システムです。オープンソースのMySQLとPostgreSQLは通常Linuxディストリビューションと同義ですが、LinuxでのMSSQLの操作もサポートされています。 MSSQLは、オープンソースの対応する機能にはないいくつかの機能を提供します。アプリケーションの要件によっては、RDBMSに適した選択肢となる場合があります。このチュートリアルでは、CentOS7とUbuntu16.04にMSSQLをインストールする方法について説明します。
飛行前チェック
- サーバーに2GB以上のメモリがあることを確認する必要があります
- これらの手順は、CentOS7サーバーとUbuntu16.04LTSサーバーでそれぞれrootユーザーとして実行されています
CentOS 7
ステップ1:MSSQL2019プレビューリポジトリを追加する
まず、ベストプラクティスとして、すべてのパッケージが最新であることを確認します。
root@centos ~]# yum update -y次に、適切なリポジトリを追加して、パッケージマネージャーyumにmssql-serverパッケージを探す場所を指示する必要があります。
root@centos ~]# curl -o /etc/yum.repos.d/mssql-server.repo https://packages.microsoft.com/config/rhel/7/mssql-server-preview.repoステップ2:SQLServerをインストールする
yumがMSSQLリポジトリを認識したので、yumを使用してパッケージをインストールできます。
root@centos ~]# yum install -y mssql-serverステップ3:MSSQLServerを構成する
次に、システム管理者パスワードを使用してSQLを構成し、使用するエディションを確認する必要があります。このチュートリアルでは、開発者版の選択肢2を無料で使用します:
root@centos ~]# /opt/mssql/bin/mssql-conf setup
usermod: no changes
Choose an edition of SQL Server:
  1) Evaluation (free, no production use rights, 180-day limit)
  2) Developer (free, no production use rights)
  3) Express (free)
  4) Web (PAID)
  5) Standard (PAID)
  6) Enterprise (PAID) - CPU Core utilization restricted to 20 physical/40 hyperthreaded
  7) Enterprise Core (PAID) - CPU Core utilization up to Operating System Maximum
  8) I bought a license through a retail sales channel and have a product key to enter.

Details about editions can be found at
https://go.microsoft.com/fwlink/?LinkId=852748&clcid=0x409

Use of PAID editions of this software requires separate licensing through a
Microsoft Volume Licensing program.
By choosing a PAID edition, you are verifying that you have the appropriate
number of licenses in place to install and run this software.

Enter your edition(1-8): 2
The license terms for this product can be found in
/usr/share/doc/mssql-server or downloaded from:
https://go.microsoft.com/fwlink/?LinkId=855862&clcid=0x409

The privacy statement can be viewed at:
https://go.microsoft.com/fwlink/?LinkId=853010&clcid=0x409

Do you accept the license terms? [Yes/No]:Yes

Enter the SQL Server system administrator password:
Confirm the SQL Server system administrator password:
Configuring SQL Server...

This is an evaluation version.  There are [116] days left in the evaluation period.
ForceFlush is enabled for this instance.
ForceFlush feature is enabled for log durability.
Created symlink from /etc/systemd/system/multi-user.target.wants/mssql-server.service to /usr/lib/systemd/system/mssql-server.service.
Setup has completed successfully. SQL Server is now starting.
その後、mssqlサービスが実行されていることを確認する必要があります。
root@centos ~]# systemctl status mssql-server出力は次のようになります。
mssql-server.service - Microsoft SQL Server Database Engine
   Loaded: loaded (/usr/lib/systemd/system/mssql-server.service; enabled; vendor preset: disabled)
   Active: active (running) since Wed 2019-10-23 20:18:03 EDT; 2min 45s ago
     Docs: https://docs.microsoft.com/en-us/sql/linux
 Main PID: 61529 (sqlservr)
   CGroup: /system.slice/mssql-server.service
           ├─61529 /opt/mssql/bin/sqlservr
           └─61549 /opt/mssql/bin/sqlservr
ステップ4(オプション):リモート接続を許可する
SQL Serverにリモートでアクセスできるようにする場合は、SQLServerポートを開く必要があります。
注 :注意して進めてください。サーバーへのアクセスを制限することでサーバーを安全に保つために、ファイアウォールが設置されています。 SQL Serverにリモートでアクセスする予定がない限り、このポートを開く必要はありません。
root@centos ~]# firewall-cmd --zone=public --add-port=1433/tcp --permanentルールを追加したら、ファイアウォールルールを再読み込みして、ポートが開いていることを確認する必要があります。
[root@centos ~]# firewall-cmd --reload
success
root@centos ~]# firewall-cmd --list-ports
1433/tcp
ステップ5:MicrosoftRedHatリポジトリを追加する
ここで、SQLサーバーと対話する方法が必要です。まず、別のリポジトリを追加して、yumを使用してSQLServerコマンドラインツールをインストールできるようにします
root@centos ~]# curl -o /etc/yum.repos.d/msprod.repo https://packages.microsoft.com/config/rhel/7/prod.repoステップ6:MSSQLServerコマンドラインツールのインストールとセットアップ
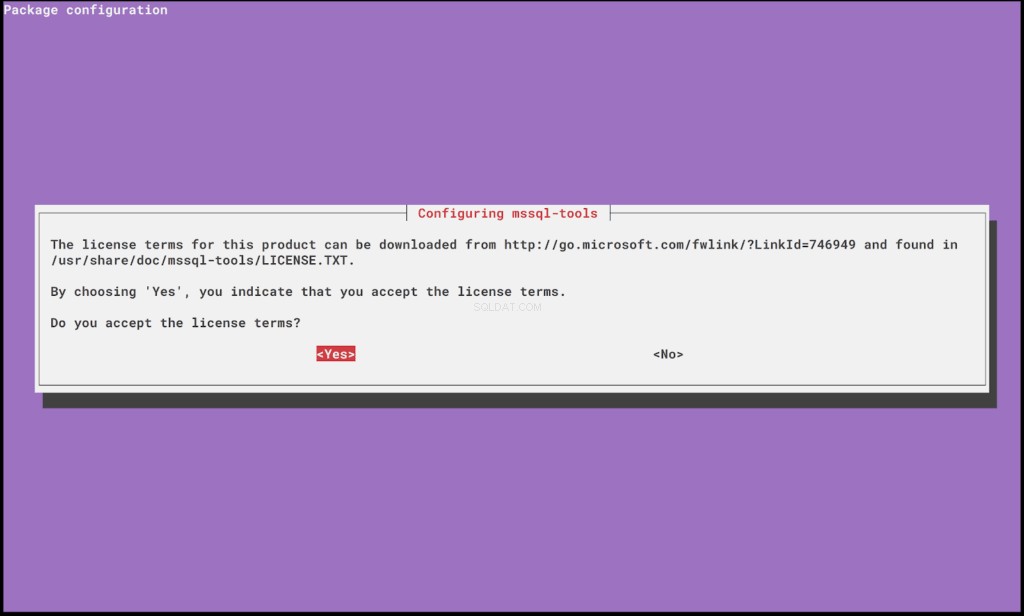
yumがインストールするパッケージを認識したので、それらをインストールする必要があります。これらのパッケージのインストール中に、ライセンス条項に同意するためのインタラクティブなプロンプトがいくつか表示されることに注意してください。
root@centos ~]# yum install -y mssql-tools unixODBC-devel使いやすくするために、パスを追加できます
/opt/mssql-tools/bin/ サーバー上の任意の場所からSQLコマンドを実行できるように、サーバー上のPATH変数に追加します。
root@centos ~]# echo 'export PATH="$PATH:/opt/mssql-tools/bin"' >> ~/.bash_profile

root@centos ~]# source ~/.bashrc
最後のステップは、SQLServerに接続できることを確認することです。
root@centos ~]# sqlcmd -S localhost -U SA
Password:
1>
Ubuntu 18.04 LTS
ステップ1:MSSQL ServerUbuntu2019プレビューリポジトリを追加する
まず、サーバーパッケージを更新しましょう:
root@ubuntu1604:~# apt-get update -yサーバーパッケージが更新されたら、追加するリポジトリのGPGキーを追加する必要があります。 GPGキーは、Linuxユーザーがファイルの有効性を検証し、それらが信頼できるソースからのものであることを確認するための方法です。
t@ubuntu1604:~# wget -qO- https://packages.microsoft.com/keys/microsoft.asc | apt-key add -GPGキーが配置されたので、リポジトリを追加できます:
root@ubuntu1604:~# add-apt-repository "$(wget -qO- https://packages.microsoft.com/config/ubuntu/16.04/mssql-server-preview.list)"追加したリポジトリにはHTTPS接続が必要です。 aptがリポジトリに接続できるようにするには、https:
を介して接続できることを確認する必要があります。root@ubuntu1604:~# apt-get install -y apt-transport-httpsステップ2:MSSQLServerをインストールする
MSSQL Serverパッケージを含むリポジトリが利用可能になったので、あとはaptが新しいリポジトリを認識していることを確認してMSSQLServerをインストールするだけです。
apt-get update -y
apt-get install -y mssql-server
ステップ3:MSSQLServerを構成する
設定手順は、CentOS7とUbuntu16.04の両方で同じです。構成プロセス中に、SQL Serverエディションを選択し、ライセンス条項に同意し、SQL管理者パスワードを入力するための対話型プロンプトが表示されます。
root@ubuntu1604:~# /opt/mssql/bin/mssql-conf setup
usermod: no changes
Choose an edition of SQL Server:
  1) Evaluation (free, no production use rights, 180-day limit)
  2) Developer (free, no production use rights)
  3) Express (free)
  4) Web (PAID)
  5) Standard (PAID)
  6) Enterprise (PAID) - CPU Core utilization restricted to 20 physical/40 hyperthreaded
  7) Enterprise Core (PAID) - CPU Core utilization up to Operating System Maximum
  8) I bought a license through a retail sales channel and have a product key to enter.

Details about editions can be found at
https://go.microsoft.com/fwlink/?LinkId=852748&clcid=0x409

Use of PAID editions of this software requires separate licensing through a
Microsoft Volume Licensing program.
By choosing a PAID edition, you are verifying that you have the appropriate
number of licenses in place to install and run this software.

Enter your edition(1-8): 2
The license terms for this product can be found in
/usr/share/doc/mssql-server or downloaded from:
https://go.microsoft.com/fwlink/?LinkId=855862&clcid=0x409

The privacy statement can be viewed at:
https://go.microsoft.com/fwlink/?LinkId=853010&clcid=0x409

Do you accept the license terms? [Yes/No]:Yes

Enter the SQL Server system administrator password:
Confirm the SQL Server system administrator password:
Configuring SQL Server...

This is an evaluation version.  There are [116] days left in the evaluation period.
ForceFlush is enabled for this instance.
ForceFlush feature is enabled for log durability.
Created symlink from /etc/systemd/system/multi-user.target.wants/mssql-server.service to /lib/systemd/system/mssql-server.service.
Setup has completed successfully. SQL Server is now starting.
これで、MSSQLServerが実行されて有効になっているはずです。これが実際に当てはまることを確認するために、次のコマンドを実行できます。
root@ubuntu1604:~# systemctl status mssql-server --no-pager
* mssql-server.service - Microsoft SQL Server Database Engine
   Loaded: loaded (/lib/systemd/system/mssql-server.service; enabled; vendor preset: enabled)
   Active: active (running) since Thu 2019-10-24 00:24:23 EDT; 3min 45s ago
     Docs: https://docs.microsoft.com/en-us/sql/linux
 Main PID: 19446 (sqlservr)
    Tasks: 135
   Memory: 548.5M
      CPU: 12.499s
   CGroup: /system.slice/mssql-server.service
           |-19446 /opt/mssql/bin/sqlservr
           `-19485 /opt/mssql/bin/sqlservr
ステップ4(オプション):リモート接続を許可する
新しいSQLServerへのリモート接続を利用する場合は、SQLServerポートを開く必要があります。
注 :再度注意して進めてください。サーバーへのアクセスを制限することでサーバーを安全に保つために、ファイアウォールが設置されています。 SQL Serverにリモートでアクセスする予定がない限り、このポートを開く必要はありません。
ファイアウォールの相互作用を簡潔に保つには、ufw(Uncomplicated Firewallとも呼ばれます)をインストールします。
root@ubuntu1604:~# apt-get install -y ufwインストールしたら、ufwを有効にする必要があります。 SSH接続が中断されている可能性があることを示す警告が表示されます。 SSHセッションが切断されている場合は、再度ログインして続行します。
root@ubuntu1604:~# ufw enable
Command may disrupt existing ssh connections. Proceed with operation (y|n)? y
firewall is active and enabled on system startup
ufwが配置されて有効になったら、ポート1433へのトラフィックを許可します。
root@ubuntu1604:~# ufw allow 1433
Rule added
Rule added (v6)
ステップ5:MSSQLServerコマンドラインツールのインストールとセットアップ
まず、以前と同様に、MSSQLコマンドラインツールを含むリポジトリ用にいくつかの新しいGPGキーを追加する必要があります。
root@ubuntu1604:~# curl https://packages.microsoft.com/keys/microsoft.asc | apt-key add -これでリポジトリを追加できます:
root@ubuntu1604:~# curl https://packages.microsoft.com/config/ubuntu/16.04/prod.list | tee /etc/apt/sources.list.d/msprod.listその後、aptを更新し、コマンドラインツールをインストールします。
root@ubuntu1604:~# apt-get update -y
t@ubuntu1604:~# apt-get install -y mssql-tools unixodbc-dev
インストール中に次のようなライセンスを受け入れるための1つまたは2つの対話型プロンプトが表示されるはずです。

サーバー上のどこでもsqlcmdを簡単に実行できるようにしましょう:
root@ubuntu1604:~# echo 'export PATH="$PATH:/opt/mssql-tools/bin"' >> ~/.bash_profile
root@ubuntu1604:~# echo 'export PATH="$PATH:/opt/mssql-tools/bin"' >> ~/.bashrc
root@ubuntu1604:~# source ~/.bashrc
最後に、MSSQLServerにローカルで接続できることを確認します。
root@ubuntu1604:~# sqlcmd -S localhost -U SA
Password:
1>
今日から始めましょう!
LinuxでMSSQLのような代替データベースシステムをセットアップする必要がありますか?既存のデータベースの構成または関連するトラブルシューティングの支援が必要な場合、イライラしましたか?私たちはLiquidWebで働いている業界で最高の頭脳を持っており、それを証明するのを待っているだけで、1日24時間、1年365日待機しています。私たちはいつでも介入して、問題を進めるために必要な支援を提供することができます。
