クエリを生成するアプリケーションに変更を加えることなく、クラスター全体で効率的なワークロード管理を行うために、クライアントノードにProxySQLをインストールすることを検討する必要があります。これは、PerconaXtraDBクラスターに推奨される高可用性ソリューションです。
ProxySQLの一般的な機能のいくつかは次のとおりです。
- 高性能
- 効率的なワークロード管理
- クエリキャッシュ
- クエリルーティング
- フェイルオーバーをサポート
- ダウンタイムが0の高度な構成
- アプリケーション層プロキシ
- クロスプラットフォーム
- 高度なトポロジサポート
- ファイアウォール
環境仕様:
192.168.56.115
centos
前提条件:
すべてのサーバーで以下のポートを開く必要があります
firewall-cmd --zone=public --add-service=mysql --permanent

firewall-cmd --zone=public --add-port=3306/tcp --permanent
firewall-cmd --zone=public --add-port=4567/tcp --permanent
firewall-cmd --zone=public --add-port=4568/tcp --permanent
firewall-cmd --zone=public --add-port=4444/tcp --permanent
firewall-cmd --zone=public --add-port=4567/udp --permanent
LinuxファイアウォールでProxySQLサービスポート6033/tcp(MySQLのデフォルトポート3306の逆)を許可します。
firewall-cmd --permanent --add-port=6033/tcp

firewall-cmd --reload
CentOS7へのPerconaXtraDBクラスター用のProxySQLロードバランサーのインストール
ProxySQLv2はPerconaXtraDBクラスターをネイティブにサポートしています。ProxySqlをインストールするには、perconaリポジトリからインストールしてください
sudo yum install proxysql2
ProxySQL管理インターフェースに接続するには、MySQLクライアントが必要です。
yum install Percona-XtraDB-Cluster-client-57
次に、proxysqlサービスを開始します
[example@sqldat.com ~]# systemctl start proxysql.service
クラスタノードのポートを確認するには、以下のクエリを使用します。
mysql -uroot -p -e "SHOW GLOBAL VARIABLES LIKE 'PORT'";
次に、ProxySQL管理パネルに接続し、ロードバランサーを構成します。
mysql -u admin -p123 -h 127.0.0.1 -P6032 --prompt='ProxySQL> '

INSERT INTO mysql_servers(hostgroup_id, hostname, port) VALUES (0,'192.168.56.110',3306);
INSERT INTO mysql_servers(hostgroup_id, hostname, port) VALUES (0,'192.168.56.113',3306);
INSERT INTO mysql_servers(hostgroup_id, hostname, port) VALUES (0,'192.168.56.114',3306);

ProxySQL> SELECT * FROM mysql_servers;
+--------------+----------------+------+-----------+--------+--------+-------------+-----------------+---------------------+---------+----------------+---------+
| hostgroup_id | hostname | port | gtid_port | status | weight | compression | max_connections | max_replication_lag | use_ssl | max_latency_ms | comment |
+--------------+----------------+------+-----------+--------+--------+-------------+-----------------+---------------------+---------+----------------+---------+
| 0 | 192.168.56.110 | 3306 | 0 | ONLINE | 1 | 0 | 1000 | 0 | 0 | 0 | |
| 0 | 192.168.56.113 | 3306 | 0 | ONLINE | 1 | 0 | 1000 | 0 | 0 | 0 | |
| 0 | 192.168.56.114 | 3306 | 0 | ONLINE | 1 | 0 | 1000 | 0 | 0 | 0 | |
+--------------+----------------+------+-----------+--------+--------+-------------+-----------------+---------------------+---------+----------------+---------+
3 rows in set (0.00 sec)
MySQLデータベースインスタンスにログインし、次のコマンドを実行して、USAGE権限を持つ監視ユーザーを作成します
パーコナノード:
CREATE USER 'proxysql'@'%' IDENTIFIED BY 'ProxySQL';
GRANT USAGE ON *.* TO 'proxysql'@'%';

mysql> CREATE USER 'proxysql'@'%' IDENTIFIED BY 'ProxySQL';
Query OK, 0 rows affected (0.01 sec)

mysql> GRANT USAGE ON *.* TO 'proxysql'@'%';
Query OK, 0 rows affected (0.02 sec)

UPDATE global_variables SET variable_value='proxysql' WHERE variable_name='mysql-monitor_username';

UPDATE global_variables SET variable_value='ProxySQL' WHERE variable_name='mysql-monitor_password';

LOAD MYSQL VARIABLES TO RUNTIME;

SAVE MYSQL VARIABLES TO DISK;

ProxySQL> UPDATE global_variables SET variable_value='proxysql' WHERE variable_name='mysql-monitor_username';
Query OK, 1 row affected (0.01 sec)

ProxySQL> UPDATE global_variables SET variable_value='ProxySQL' WHERE variable_name='mysql-monitor_password';
Query OK, 1 row affected (0.00 sec)

ProxySQL> LOAD MYSQL VARIABLES TO RUNTIME;
Query OK, 0 rows affected (0.00 sec)

ProxySQL> SAVE MYSQL VARIABLES TO DISK;
Query OK, 136 rows affected (0.01 sec)

ProxySQL> LOAD MYSQL SERVERS TO RUNTIME;
Query OK, 0 rows affected (0.01 sec)
ProxySQLクライアントユーザーの作成
Provide read/write access to the cluster for ProxySQL, add this user on one of the Percona XtraDB Cluster nodes:

CREATE USER 'lbuser'@'192.168.56.115' IDENTIFIED BY 'lbpass';

GRANT ALL ON *.* TO 'lbuser'@'192.168.56.115';
ProxySQLクライアントユーザーの作成:
ProxySQL> INSERT INTO mysql_users (username,password) VALUES ('lbuser','lbpass');
Query OK, 1 row affected (0.00 sec)
ProxySQL> LOAD MYSQL USERS TO RUNTIME;
Query OK, 0 rows affected (0.00 sec)
ProxySQL> SAVE MYSQL USERS TO DISK;
Query OK, 0 rows affected (0.02 sec)
ユーザーが正しく設定されていることを確認してください。ログインしてみてください:
[example@sqldat.com ~]# mysql -u lbuser -plbpass -h 127.0.0.1 -P 6033
mysql: [Warning] Using a password on the command line interface can be insecure.
Welcome to the MySQL monitor. Commands end with ; or \g.
Your MySQL connection id is 4
Server version: 5.5.30 (ProxySQL)

Copyright (c) 2009-2019 Percona LLC and/or its affiliates
Copyright (c) 2000, 2019, Oracle and/or its affiliates. All rights reserved.

Oracle is a registered trademark of Oracle Corporation and/or its
affiliates. Other names may be trademarks of their respective
owners.
Type 'help;' or '\h' for help. Type '\c' to clear the current input statement.
mysql>
クライアントがクラスターに接続するノードを確認しましょう。
[example@sqldat.com ~]# mysql -u lbuser -plbpass -h 127.0.0.1 -P 6033 -e "select @@hostname;";
mysql: [Warning] Using a password on the command line interface can be insecure.
+----------------------+
| @@hostname |
+----------------------+
| percona3.localdomain |
+----------------------+
プロキシサーバーがpercona3に接続されていることがわかります
別のパテセッションから試したところ、percona2に接続されました:
[example@sqldat.com ~]# mysql -u lbuser -plbpass -h 127.0.0.1 -P 6033 -e "select @@hostname;";
mysql: [Warning] Using a password on the command line interface can be insecure.
+----------------------+
| @@hostname |
+----------------------+
| percona2.localdomain |
+----------------------+
数回のセッションの後、percona1に接続されます:
[example@sqldat.com ~]# mysql -u lbuser -plbpass -h 127.0.0.1 -P 6033 -e "select @@hostname;";
mysql: [Warning] Using a password on the command line interface can be insecure.
+----------------------+
| @@hostname |
+----------------------+
| percona1.localdomain |
+----------------------+
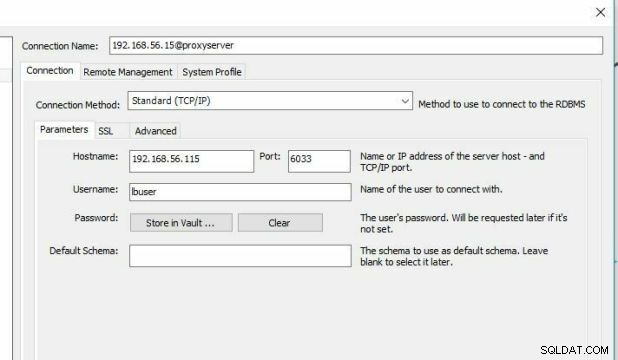
MySQL Workbenchからの接続:
以下は、MySQLワークベンチでのセッションの構成です。
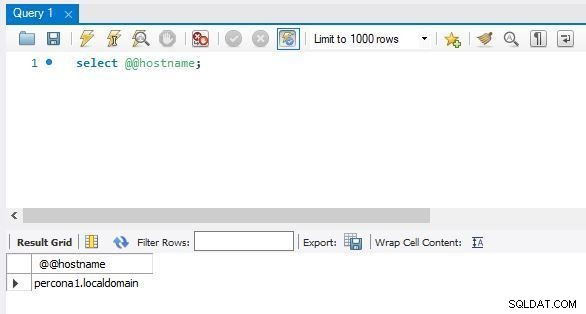
MySQLワークベンチから接続するノードを確認しようとしました
フェイルオーバー:
次に、これがフェイルオーバーをどのように実行するかを確認します
[example@sqldat.com mysql]# service mysql stop
Redirecting to /bin/systemctl stop mysql.service

ProxySQL> select hostgroup_id,hostname,port,status from runtime_mysql_servers;
+--------------+----------------+------+---------+
| hostgroup_id | hostname | port | status |
+--------------+----------------+------+---------+
| 0 | 192.168.56.110 | 3306 | ONLINE |
| 0 | 192.168.56.114 | 3306 | SHUNNED |
| 0 | 192.168.56.113 | 3306 | ONLINE |
+--------------+----------------+------+---------+
3 rows in set (0.01 sec)
次に、ノード3でmysqlを再度起動し、プロキシサーバーからクラスターのステータスを再度確認します
[example@sqldat.com mysql]#systemctl start mysql.service

ProxySQL> SELECT hostgroup_id hg,count(status) cnt from main.runtime_mysql_servers WHERE status = "ONLINE" GROUP BY hg having cnt ;
+----+-----+
| hg | cnt |
+----+-----+
| 0 | 3 |
+----+-----+
1 row in set (0.00 sec)

ProxySQL> select hostgroup_id,hostname,port,status from runtime_mysql_servers;
+--------------+----------------+------+--------+
| hostgroup_id | hostname | port | status |
+--------------+----------------+------+--------+
| 0 | 192.168.56.110 | 3306 | ONLINE |
| 0 | 192.168.56.114 | 3306 | ONLINE |
| 0 | 192.168.56.113 | 3306 | ONLINE |
+--------------+----------------+------+--------+
3 rows in set (0.00 sec)
注: ノードのステータスがSHUNNEDと表示されている場合 次に、複数回接続して、前回接続を試みたときのノードの最新のステータスをruntime_mysql_serversが保存するため、クライアントがクラスタの最新のステータスを取得できるようにします。
sysbenchを使用したクラスターのテスト:
yum install sysbench
sysbenchには、ProxySQLクライアントユーザーの作成で作成したProxySQLクライアントユーザーの資格情報(lbuser / lbpass)が必要です。
sysbench /usr/share/sysbench/oltp_read_only.lua --threads=4 --mysql-host=127.0.0.1
--mysql-user=lbuser --mysql-password=lbpass --mysql-port=6033 --tables=10 --table-size=10000 prepare

sysbench /usr/share/sysbench/oltp_read_only.lua --threads=4 --events=0 --time=300 --mysql-host=27.0.0.1
--mysql-user=lbuser --mysql-password=lbpass --mysql-port=6033 --tables=10
--table-size=10000 --range_selects=off --db-ps-mode=disable --report-interval=1 run
クラスタで実行されるコマンドの数を確認するには:
proxysql> SELECT * FROM stats_mysql_commands_counters;