プロジェクトの構築は、間違いなく、プログラミングを学ぶためのより親しみやすく効果的な方法の1つです。実際のプロジェクトでは、さまざまなコーディングスキルを適用する必要があります。また、開発プロセスで問題を解決するときにポップアップするトピックを調査することもお勧めします。このチュートリアルでは、Python、PyQt、SQLiteを使用してコンタクトブックアプリケーションを作成します。
このチュートリアルでは、次の方法を学習します。
- グラフィカルユーザーインターフェイス(GUI)を作成します PythonとPyQtを使用したコンタクトブックアプリケーション用
- アプリケーションをSQLiteデータベースに接続します PyQtのSQLサポートを使用する
- PyQtのModel-Viewアーキテクチャを使用して連絡先データを管理する
このプロジェクトの最後に、連絡先情報を保存および管理できる機能的な連絡帳アプリケーションが用意されます。
アプリケーションの完全なソースコードと、このチュートリアルで実行するすべてのステップのコードを入手するには、以下のリンクをクリックしてください。
デモ:Pythonのコンタクトブック
コンタクトブックは、便利で広く使用されている種類のアプリケーションです。彼らはいたるところにいます。あなたはおそらくあなたの電話とあなたのコンピュータに連絡帳を持っています。コンタクトブックを使用すると、家族、友人、同僚などの連絡先情報を保存および管理できます。
このチュートリアルでは、Python、SQLite、PyQtを使用してコンタクトブックのGUIアプリケーションをコーディングします。このチュートリアルの手順に従った後の連絡先帳の外観と動作のデモは次のとおりです。
コンタクトブックには、この種のアプリケーションに必要な最小限の機能セットが記載されています。連絡先リストの情報を表示、作成、更新、削除できるようになります。
プロジェクトの概要
コンタクトブックアプリケーションを構築するには、コードをモジュールとパッケージに整理し、プロジェクトに一貫した構造を与える必要があります。このチュートリアルでは、次のディレクトリとファイル構造を使用します。
rpcontacts_project/
│
├── rpcontacts/
│   ├── __init__.py
│   ├── views.py
│   ├── database.py
│   ├── main.py
│   └── model.py
│
├── requirements.txt
├── README.md
└── rpcontacts.py
プロジェクトディレクトリの内容の概要は次のとおりです。
-
rpcontacts_project/プロジェクトのルートディレクトリです。次のファイルが含まれます:-
requirements.txtプロジェクトの要件リストを提供します。 -
README.mdプロジェクトに関する一般的な情報を提供します。 -
rpcontacts.pyアプリケーションを実行するためのエントリポイントスクリプトを提供します。
-
-
rpcontacts/アプリケーションのメインパッケージを提供するサブディレクトリです。次のモジュールを提供します。-
__init__.py -
views.py -
database.py -
main.py -
model.py
-
このチュートリアルでは、これらの各ファイルについて段階的に説明します。各ファイルの名前は、アプリケーションでのその役割を示しています。たとえば、views.py ウィンドウとダイアログのGUIを生成するためのコードdatabase.pyが含まれます データベースを操作するためのコードとmain.pyが含まれます アプリケーション自体をホストします。最後に、model.py アプリケーションのデータベース内のデータを管理するためのモデルを実装します。
通常、アプリケーションには、連絡先を表示、追加、削除、および更新するためのメインウィンドウがあります。データベースに新しい連絡先を追加するためのダイアログもあります。
前提条件
このプロジェクトを最大限に活用するには、PythonとPyQtを使用したGUIプログラミングに関する以前の知識が役立ちます。この点で、次の方法の基本を知っておく必要があります。
- PyQtとPythonを使用してGUIアプリケーションを作成する
- PyQtを使用してGUIを構築およびレイアウトする
- PythonとPyQtを使用してSQLデータベースを管理する
- SQLiteデータベースを操作する
これらのトピックをブラッシュアップするには、次のリソースを確認してください。
- PythonとPyQt:GUIデスクトップ計算機の構築
- PythonとPyQt:メニュー、ツールバー、ステータスバーの作成
- PyQtレイアウト:プロフェッショナルな外観のGUIアプリケーションを作成する
- PyQtを使用したSQLデータベースの処理:基本
- PythonSQLライブラリの概要
- Python、SQLite、SQLAlchemyを使用したデータ管理
このチュートリアルを開始する前に、これらの分野の専門家でなくても心配しないでください。実際のプロジェクトで手を汚すプロセスを通して学びます。行き詰まった場合は、時間をかけて上記のリンク先のリソースを確認してください。その後、コードに戻ります。
このチュートリアルで作成するコンタクトブックアプリケーションには、PyQtという1つの外部依存関係があります。
注: このチュートリアルでは、PyQtバージョン5.15.2を使用して連絡先帳アプリケーションを作成します。プロジェクトをmacOSBigSurで動作させるには、バージョン5.15.2が必要です。
PyQtバージョン6.0は2021年1月4日にリリースされました。これは、Qtバージョン6にバインドするライブラリの最初のリリースです。ただし、このチュートリアルのプロジェクトはPyQt6.0でテストされていません。
この新しいバージョンのPyQtでプロジェクトを実行する必要があると感じた場合は、試してみてください。ヒントとして、pip install PyQt6を使用する必要があります 次に、インポートを更新してPyQt6を使用します PyQt5の代わりに 。
開発プロセスのベストプラクティスに従うには、まず仮想環境を作成してから、pipを使用してPyQtをインストールします。 。 PyQtをインストールすると、コーディングを開始する準備が整います。
ステップ1:PyQtを使用してコンタクトブックのスケルトンアプリを作成する
この最初のステップでは、最小限で機能的なPyQt GUIアプリケーションを作成して、コンタクトブックの作成を開始するための基盤を提供します。また、プロジェクトのメインパッケージや、アプリケーションを実行するためのエントリポイントスクリプトなど、必要最小限のプロジェクト構造を作成します。
このセクションでコンタクトブックプロジェクトに追加するすべてのコードとファイルは、source_code_step_1/の下に収集されます。 ディレクトリ。以下のリンクをクリックしてダウンロードできます:
このセクションの終わりまでに、コンタクトブックのスケルトンGUIアプリケーションを初めて実行できるようになります。
コンタクトブックプロジェクトの構築
アプリケーションのコーディングを開始するには、先に進み、rpcontacts_project/という名前の新しいディレクトリを作成します。 。これがプロジェクトのルートディレクトリになります。次に、rpcontacts/という名前の新しいサブディレクトリを作成します rpcontacts_project/内 。このサブディレクトリは、アプリケーションのメインパッケージを保持します。最後に、ルートディレクトリ内でコードエディタまたはIDEを起動します。
ディレクトリをパッケージに変換するには、Pythonに__init__.pyが必要です。 パッケージを初期化するモジュール。このファイルをrpcontacts/内に作成します 次のコードを追加します:
# -*- coding: utf-8 -*-

"""This module provides the rpcontacts package."""

__version__ = "0.1.0"
このファイルは、Pythonにrpcontacts パッケージです。パッケージまたはそのモジュールの一部をインポートすると、ファイル内のコードが実行されます。
__init__.pyにコードを入れる必要はありません パッケージを初期化するファイル。空の__init__.py ファイルがその仕事をします。ただし、この場合、__version__というモジュールレベルの定数を定義します。 アプリケーションのバージョン番号を保持します。
アプリケーションのメインウィンドウの作成
次に、連絡先帳のメインウィンドウを作成します。これを行うには、views.pyというモジュールを作成します rpcontactsで パッケージ。次に、次のコードをモジュールに追加して保存します。
# -*- coding: utf-8 -*-

"""This module provides views to manage the contacts table."""

from PyQt5.QtWidgets import (
    QHBoxLayout,
    QMainWindow,
    QWidget,
)

class Window(QMainWindow):
    """Main Window."""
    def __init__(self, parent=None):
        """Initializer."""
        super().__init__(parent)
        self.setWindowTitle("RP Contacts")
        self.resize(550, 250)
        self.centralWidget = QWidget()
        self.setCentralWidget(self.centralWidget)
        self.layout = QHBoxLayout()
        self.centralWidget.setLayout(self.layout)
まず、PyQt5.QtWidgetsから必要なクラスをインポートします 。次に、Windowを作成します 。このクラスはQMainWindowから継承します アプリケーションのメインウィンドウを生成するためのコードを提供します。イニシャライザメソッドでは、ウィンドウのタイトルを"RP Contacts"に設定します 、ウィンドウのサイズを550に変更します 250による ピクセル、QWidgetを使用して中央ウィジェットを定義および設定します 、最後に、水平ボックスレイアウトを使用して中央ウィジェットのレイアウトを定義します。
アプリケーションのコーディングと実行
コンタクトブックのメインウィンドウがすでにあるので、QApplicationを使用して機能的なPyQtアプリケーションを作成するためのコードを記述します。 。これを行うには、main.pyという新しいモジュールを作成します rpcontactsで パッケージ化して、次のコードを追加します:
# -*- coding: utf-8 -*-
# rpcontacts/main.py

"""This module provides RP Contacts application."""

import sys

from PyQt5.QtWidgets import QApplication

from .views import Window

def main():
    """RP Contacts main function."""
    # Create the application
    app = QApplication(sys.argv)
    # Create the main window
    win = Window()
    win.show()
    # Run the event loop
    sys.exit(app.exec())
このモジュールでは、sysをインポートします exit()にアクセスするには 、これにより、ユーザーがメインウィンドウを閉じたときにアプリケーションを正常に終了できます。次に、QApplicationをインポートします PyQt5.QtWidgetsから およびWindow viewsから 。最後のステップは、main()を定義することです。 アプリケーションの主な機能として。
main()の内部 、QApplicationをインスタンス化します およびWindow 。次に、.show()を呼び出します Windowで 、最後に、アプリケーションのメインループを実行します 、またはイベントループ 、.exec()を使用 。
次に、プロジェクトのルートディレクトリrpcontacts_project/に移動します。 rpcontacts.pyというファイルを作成します 。このファイルは、アプリケーションを実行するためのエントリポイントスクリプトを提供します。次のコードをファイルに追加して保存します:
#!/usr/bin/env python3
# -*- coding: utf-8 -*-
# rpcontacts_project/rpcontacts.py

"""This module provides RP Contacts entry point script."""

from rpcontacts.main import main

if __name__ == "__main__":
    main()
このファイルはmain()をインポートします main.pyから モジュール。次に、main()を呼び出す従来の条件ステートメントを実装します ユーザーがこのモジュールをPythonスクリプトとして実行する場合。次に、コマンドpython rpcontacts.pyを実行してアプリケーションを起動します。 Python環境で。画面に次のウィンドウが表示されます:
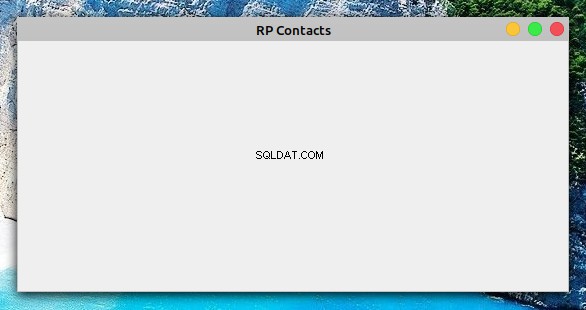
それでおしまい!連絡帳を作成するための開始点として使用できる、最小限で機能的なPyQtGUIアプリケーションを作成しました。この時点で、プロジェクトは次の構造になっているはずです。
./rpcontacts_project/
│
├── rpcontacts/
│   ├── __init__.py
│   ├── views.py
│   └── main.py
│
└── rpcontacts.py
このセクションでは、Pythonモジュールとパッケージを使用して、コンタクトブックプロジェクトに必要な最小限の構造を作成しました。アプリケーションのメインウィンドウを作成し、ボイラープレートコードをまとめて、PyQtGUIアプリケーションを作成しました。また、アプリケーションを初めて実行しました。次に、GUIに機能を追加し始めます。
ステップ2:Pythonを使用してコンタクトブックのGUIを構築する
コンタクトブックアプリケーションのスケルトンを作成したので、メインウィンドウのGUIのコーディングを開始できます。このセクションの最後で、PythonとPyQtを使用して連絡先帳のGUIを作成するために必要な手順を完了します。 GUIは次のようになります:
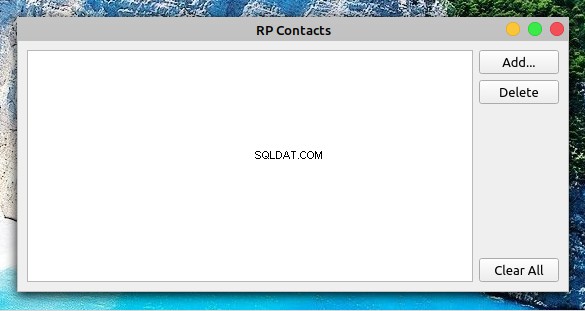
ウィンドウの中央には、連絡先リストを表示するためのテーブルビューがあります。フォームの右側には、次の3つのボタンがあります。
- 追加 リストに新しい連絡先を追加するには
- 削除 選択した連絡先をリストから削除するには
- すべてクリア リストからすべての連絡先を削除するには
このセクションで追加または変更するすべてのコードとファイルは、source_code_step_2/の下に収集されます。 ディレクトリ。以下のリンクをクリックしてダウンロードできます:
views.pyに戻ります モジュールを作成し、Windowのコードを更新します 上記のGUIを生成するには:
 1# -*- coding: utf-8 -*-
 2# rpcontacts/views.py
 3
 4"""This module provides views to manage the contacts table."""
 5
 6from PyQt5.QtWidgets import (
 7    QAbstractItemView,
 8    QHBoxLayout,
 9    QMainWindow,
10    QPushButton,
11    QTableView,
12    QVBoxLayout,
13    QWidget,
14)
15
16class Window(QMainWindow):
17    """Main Window."""
18    def __init__(self, parent=None):
19        """Initializer."""
20        # Snip...
21
22        self.setupUI()
23
24    def setupUI(self):
25        """Setup the main window's GUI."""
26        # Create the table view widget
27        self.table = QTableView()
28        self.table.setSelectionBehavior(QAbstractItemView.SelectRows)
29        self.table.resizeColumnsToContents()
30        # Create buttons
31        self.addButton = QPushButton("Add...")
32        self.deleteButton = QPushButton("Delete")
33        self.clearAllButton = QPushButton("Clear All")
34        # Lay out the GUI
35        layout = QVBoxLayout()
36        layout.addWidget(self.addButton)
37        layout.addWidget(self.deleteButton)
38        layout.addStretch()
39        layout.addWidget(self.clearAllButton)
40        self.layout.addWidget(self.table)
41        self.layout.addLayout(layout)
最初に、GUIで使用するいくつかの追加のPyQtクラスをインポートします。関連性の高いものをいくつか紹介します。
-
QPushButton追加を作成するには 、削除 、およびすべてクリア ボタン -
QTableView連絡先リストを表示するテーブルのようなビューを提供します -
QAbstractItemViewテーブルビュー選択動作ポリシーへのアクセスを提供するため
このコードでは、Windowへの最初の追加 .setupUI()の呼び出しです __init__()の最後に 。この呼び出しは、アプリケーションの実行時にメインウィンドウのGUIを生成します。
.setupUI()内のコードは次のとおりです。 する:
- 27行目
QTableViewを作成します 連絡先リストを表示するインスタンス。 - 28行目
.selectionBehaviorを設定しますQAbstractItemView.SelectRowsへのプロパティ 。これにより、ユーザーがテーブルビューのいずれかのセルをクリックすると、行全体が選択されます。テーブルビューの行には、連絡先リストの1つの連絡先に関連するすべての情報が含まれています。 - 31行目から33行目 GUIに3つのボタンを追加します:追加 、削除 、およびすべてクリア 。これらのボタンはまだアクションを実行していません。
- 35行目から41行目 GUI内のすべてのウィジェットに一貫したレイアウトを作成して設定します。
Windowへのこれらの追加 、アプリケーションを再度実行できます。画面上のウィンドウは、セクションの冒頭で見たウィンドウのようになります。
注: 上記のコードおよびこのチュートリアルの残りのコードサンプルの行番号は、説明を容易にすることを目的としています。最終的なモジュールまたはスクリプトの行の順序と一致しません。
このセクションでは、連絡先帳のメインウィンドウのGUIを作成するために必要なすべての手順を実行しました。これで、アプリケーションが連絡先データを管理および保存する方法に取り掛かる準備が整いました。
ステップ3:コンタクトブックのデータベースを設定する
この時点で、連絡先帳プロジェクトを構築するためのPyQtアプリケーションとそのメインウィンドウのGUIを作成しました。このセクションでは、アプリケーションが連絡先データベースに接続する方法を定義するコードを記述します。この手順を完了するには、SQLiteを使用してデータベースを処理し、PyQtのSQLサポートを使用してアプリケーションをデータベースに接続し、連絡先データを操作します。
このセクションで追加または変更するソースコードとファイルは、source_code_step_3/の下に保存されます。 ディレクトリ。以下のリンクをクリックしてダウンロードできます:
まず、main.pyに戻ります rpcontacts/で ディレクトリを作成し、コードを更新してデータベースへの接続を作成します。
# -*- coding: utf-8 -*-
# rpcontacts/main.py

"""This module provides RP Contacts application."""

import sys

from PyQt5.QtWidgets import QApplication

from .database import createConnection
from .views import Window

def main():
    """RP Contacts main function."""
    # Create the application
    app = QApplication(sys.argv)
    # Connect to the database before creating any window
    if not createConnection("contacts.sqlite"):
        sys.exit(1)
    # Create the main window if the connection succeeded
    win = Window()
    win.show()
    # Run the event loop
    sys.exit(app.exec_())
この場合、最初にcreateConnection()をインポートします database.pyから 。この関数には、連絡先データベースへの接続を作成して開くためのコードが含まれます。 database.pyを作成します createConnection()と書きます 次のセクションで。
main()の内部 、最初に強調表示されている行は、createConnection()を使用してデータベースへの接続を作成する試みです。 。何らかの理由でアプリケーションが接続を作成できない場合は、sys.exit(1)を呼び出します。 グラフィカル要素を作成せずにアプリケーションを閉じ、エラーが発生したことを示します。
アプリケーションはデータベースに依存して正しく動作するため、この方法で接続を処理する必要があります。機能的な接続がない場合、アプリケーションはまったく機能しません。
この方法により、エラーを処理し、問題が発生した場合にアプリケーションをクリーンに閉じることができます。また、データベースに接続しようとしたときにアプリケーションで発生したエラーに関する関連情報をユーザーに提示することもできます。
これらの追加が整ったら、createConnection()のコードに飛び込みましょう。 。
PyQtとSQLiteを使用したデータベースへの接続
コンタクトブックアプリケーションを関連するデータベースに接続することは、アプリケーションを開発するための基本的なステップです。これを行うには、createConnection()という関数をコーディングします 、データベースへの接続を作成して開きます。接続が成功すると、関数はTrueを返します。 。それ以外の場合は、接続障害の原因に関する情報を提供します。
rpcontacts/に戻ります ディレクトリを作成し、database.pyという新しいモジュールを作成します その中で。次に、そのモジュールに次のコードを追加します。
 1# -*- coding: utf-8 -*-
 2# rpcontacts/database.py
 3
 4"""This module provides a database connection."""
 5
 6from PyQt5.QtWidgets import QMessageBox
 7from PyQt5.QtSql import QSqlDatabase
 8
 9def createConnection(databaseName):
10    """Create and open a database connection."""
11    connection = QSqlDatabase.addDatabase("QSQLITE")
12    connection.setDatabaseName(databaseName)
13
14    if not connection.open():
15        QMessageBox.warning(
16            None,
17            "RP Contact",
18            f"Database Error: {connection.lastError().text()}",
19        )
20        return False
21
22    return True
ここでは、最初にいくつかの必要なPyQtクラスをインポートします。次に、createConnection()を定義します 。この関数は1つの引数を取ります: databaseName ファイルシステム内の物理SQLiteデータベースファイルへの名前またはパスを保持します。
createConnection()内のコードは次のとおりです。 する:
- 11行目
QSQLITEを使用してデータベース接続を作成します ドライバー。 - 行12 ファイル名またはデータベースへのパスを設定します。
- 行14 接続を開こうとします。
.open()の呼び出し中に問題が発生した場合 、次にifコードブロックはエラーメッセージを表示し、Falseを返します 接続の試行が失敗したことを示します。 - 22行目
Trueを返します 接続の試行が成功した場合。
すでにcreateConnection()をコーディングしています 。これで、コードを記述してcontactsを作成できます。 データベース内のテーブル。
contactsの作成 表
データベースへの接続を作成して開く関数を使用すると、ヘルパー関数のコーディングに進んでcontactsを作成できます。 テーブル。このテーブルを使用して、連絡先に関する情報を保存します。
_createContactsTable()を実装するコードは次のとおりです :
# -*- coding: utf-8 -*-
# rpcontacts/database.py

# Snip...
from PyQt5.QtSql import QSqlDatabase, QSqlQuery

def _createContactsTable():
    """Create the contacts table in the database."""
    createTableQuery = QSqlQuery()
    return createTableQuery.exec(
        """
        CREATE TABLE IF NOT EXISTS contacts (
            id INTEGER PRIMARY KEY AUTOINCREMENT UNIQUE NOT NULL,
            name VARCHAR(40) NOT NULL,
            job VARCHAR(50),
            email VARCHAR(40) NOT NULL
        )
        """
    )

def createConnection(databaseName):
    # Snip...
    _createContactsTable()
    return True
ここでは、最初に新しいインポートを追加します。 QSqlQueryをインポートします SQLステートメントを実行および操作します。
_createContactsTable()の内部 、QSqlQueryを作成します 実例。次に、.exec()を呼び出します 文字列ベースのSQLCREATE TABLEを使用したクエリオブジェクト 引数としてのステートメント。このステートメントは、contactsという新しいテーブルを作成します データベース内。テーブルには次の列があります:
| 列 | コンテンツ |
|---|---|
id | テーブルの主キーを持つ整数 |
name | 連絡先の名前の文字列 |
job | 連絡先の役職の文字列 |
email | 連絡先のメールアドレスを含む文字列 |
contacts データベースのテーブルには、連絡先に関する関連情報が保存されます。
database.pyのコーディングを完了するための最後のステップ _createContactsTable()への呼び出しを追加することです createConnection()の内部から 、最後のreturnの直前 声明。これにより、アプリケーションがcontactsを確実に作成します。 データベースで操作を行う前にテーブルを作成します。
contactsを作成したら 表では、データベースでいくつかのテストを実行し、さらにテストするためにいくつかのサンプルデータを追加することもできます。
コンタクトブックのデータベースのテスト
これで、コンタクトブックのデータベースへの接続を処理するために必要なコードの記述が完了しました。このセクションでは、このコードとデータベース自体が正しく機能することを確認するために、いくつかのテストを実行します。また、サンプルデータをデータベースに追加して、このチュートリアルの後半でさらにテストを実行します。
次に、ターミナルまたはコマンドラインを開き、プロジェクトのルートディレクトリrpcontacts_project/に移動します。 。そこで、Pythonインタラクティブセッションを起動し、次のコードを入力します。
>>> from rpcontacts.database import createConnection

>>> # Create a connection
>>> createConnection("contacts.sqlite")
True

>>> # Confirm that contacts table exists
>>> from PyQt5.QtSql import QSqlDatabase
>>> db = QSqlDatabase.database()
>>> db.tables()
['contacts', 'sqlite_sequence']
ここでは、最初にcreateConnection()をインポートします database.pyから モジュール。次に、この関数を呼び出して、連絡先データベースへの接続を作成して開きます。データベースのファイル名はcontacts.sqliteです。 。このファイルはプロジェクトのルートディレクトリに存在しないため、SQLiteが作成します。これは、現在のディレクトリを確認することで確認できます。
次に、データベースにcontactsというテーブルが含まれていることを確認します 。これを行うには、.database()を呼び出します。 QSqlDatabaseで 。このクラスメソッドは、現在のデータベース接続へのポインタを返します。この接続への参照を使用して、.tables()を呼び出すことができます データベース内のテーブルのリストを取得します。リストの最初のテーブルはcontactsであることに注意してください 、これで、すべてが正常に機能していることを確認できます。
これで、サンプルデータをcontactsに挿入するSQLクエリを準備できます。 テーブル:
>>> # Prepare a query to insert sample data
>>> from PyQt5.QtSql import QSqlQuery

>>> insertDataQuery = QSqlQuery()
>>> insertDataQuery.prepare(
...     """
...     INSERT INTO contacts (
...         name,
...         job,
...         email
...     )
...     VALUES (?, ?, ?)
...     """
... )
True
上記のクエリを使用すると、特定の値をnameに挿入できます。 、job 、およびemail 属性を作成し、それらの値をデータベースに保存します。これを行う方法の例を以下に示します。
>>> # Sample data
>>> data = [
...     ("Linda", "Technical Lead", "linda@example.com"),
...     ("Joe", "Senior Web Developer", "joe@example.com"),
...     ("Lara", "Project Manager", "lara@example.com"),
...     ("David", "Data Analyst", "david@example.com"),
...     ("Jane", "Senior Python Developer", "jane@example.com"),
... ]

>>> # Insert sample data
>>> for name, job, email in data:
...     insertDataQuery.addBindValue(name)
...     insertDataQuery.addBindValue(job)
...     insertDataQuery.addBindValue(email)
...     insertDataQuery.exec()
...
True
True
True
True
True
このコードでは、最初にdataを定義します 人々のリストの連絡先情報を保持します。次に、forを使用します .addBindValue()を呼び出してデータを挿入するループ 。次に、.exec()を呼び出します クエリオブジェクトに対して、データベースでSQLクエリを効果的に実行します。
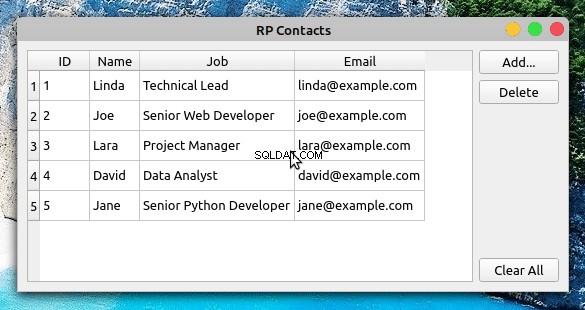
.exec()へのすべての呼び出し以降 Trueを返します 、データがデータベースに正常に挿入されたと結論付けることができます。これを確認したい場合は、次のコードを実行します。
>>> query = QSqlQuery()
>>> query.exec("SELECT name, job, email FROM contacts")
True

>>> while query.next():
...     print(query.value(0), query.value(1), query.value(2))
...
Linda Technical Lead linda@example.com
Joe Senior Web Developer joe@example.com
Lara Project Manager lara@example.com
David Data Analyst david@example.com
Jane Senior Python Developer jane@example.com
それでおしまい!データベースは正常に機能します。これで、アプリケーションをテストするためのサンプルデータがいくつかできました。これで、連絡先ブックのメインウィンドウに連絡先情報を読み込んで表示する方法に集中できます。
ステップ4:既存の連絡先の表示と更新
アプリケーションのメインウィンドウに連絡先データを表示するには、QTableViewを使用できます 。このクラスはPyQtのModel-Viewアーキテクチャの一部であり、PyQtモデルオブジェクトのアイテムを表示するための堅牢で効率的な方法を提供します。
このセクションで追加または変更するファイルとコードは、source_code_step_4/の下に保存されます。 ディレクトリ。それらをダウンロードするには、以下のリンクをクリックしてください:
この手順を完了すると、連絡先帳は次のようになります。
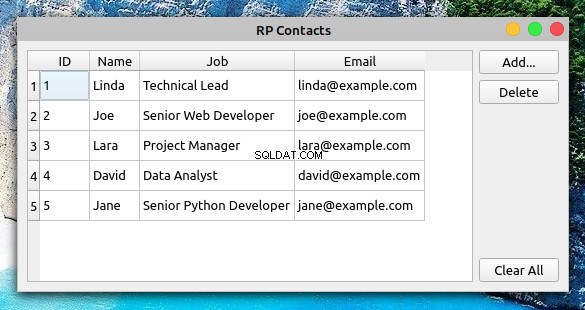
メインウィンドウのテーブルビューオブジェクトは、連絡先情報をすばやく変更および更新できるようにするために必要な機能を提供します。
たとえば、連絡先の名前を更新するには、名前を含むセルをダブルクリックして名前を更新し、
連絡先データを処理するためのモデルの作成
PyQtは、SQLデータベースを操作するための豊富なクラスのセットを提供します。コンタクトブックアプリケーションには、QSqlTableModelを使用します 、単一のデータベーステーブルの編集可能なデータモデルを提供します。データベースにはcontactsという単一のテーブルがあるため、この仕事に最適です。 。
コードエディタに戻り、model.pyという新しいモジュールを作成します rpcontacts/内 ディレクトリ。次のコードをファイルに追加して保存します:
 1# -*- coding: utf-8 -*-
 2# rpcontacts/model.py
 3
 4"""This module provides a model to manage the contacts table."""
 5
 6from PyQt5.QtCore import Qt
 7from PyQt5.QtSql import QSqlTableModel
 8
 9class ContactsModel:
10    def __init__(self):
11        self.model = self._createModel()
12
13    @staticmethod
14    def _createModel():
15        """Create and set up the model."""
16        tableModel = QSqlTableModel()
17        tableModel.setTable("contacts")
18        tableModel.setEditStrategy(QSqlTableModel.OnFieldChange)
19        tableModel.select()
20        headers = ("ID", "Name", "Job", "Email")
21        for columnIndex, header in enumerate(headers):
22            tableModel.setHeaderData(columnIndex, Qt.Horizontal, header)
23        return tableModel
このコードでは、最初にいくつかの必要なインポートを実行してから、ContactsModelを作成します 。クラス初期化子では、.modelというインスタンス属性を定義します データモデルを保持します。
次に、静的メソッドを追加して、モデルオブジェクトを作成および設定します。 Here’s what the code in ._createModel() does:
- Line 16 creates an instance of
QSqlTableModel()calledtableModel。 - Line 17 associates the model object with the
contactstable in your database. - Line 18 sets the
.editStrategyproperty of the model toQSqlTableModel.OnFieldChange。 With this, you ensure that the changes on the model get saved into the database immediately. - Line 19 loads the table into the model by calling
.select()。 - Lines 20 to 22 define and set user-friendly headers for the
contactstable’s columns. - Line 23 returns the newly created model.
At this point, you have your data model ready to use. Now you need to connect the table view widget to the model so you can present your users with the contact information.
Connecting the Model to the View
To display contact data in your contact book’s main window, you need to connect the table view with the data model. To perform this connection, you need to call .setModel() on the table view object and pass the model as an argument:
# -*- coding: utf-8 -*-
# rpcontacts/views.py

# Snip...
from .model import ContactsModel

class Window(QMainWindow):
    """Main Window."""
    def __init__(self, parent=None):
        # Snip...
        self.contactsModel = ContactsModel()
        self.setupUI()

    def setupUI(self):
        """Setup the main window's GUI."""
        # Create the table view widget
        self.table = QTableView()
        self.table.setModel(self.contactsModel.model)
        self.table.setSelectionBehavior(QAbstractItemView.SelectRows)
        # Snip...
In this code, you first import ContactsModel from model.py 。 This class provides the model that manages the data in your contact database.
In the initializer of Window , you create an instance of ContactsModel 。 Then inside .setupUI() , you call .setModel() on .table to connect the model with the table view. If you run the application after this update, then you’ll get the window you saw at the beginning of step 4.
Displaying and Updating Contacts
PyQt’s Model-View architecture provides a robust and user-friendly way to create GUI applications that manage databases. Models communicate with and access the data in the database. Any change in a model updates the database immediately. Views are responsible for displaying the data to the user and also for providing editable widgets to allow the user to modify the data directly in the view.
If the user modifies the data through the view, then the view internally communicates with and updates the model, which saves the changes to the physical database:
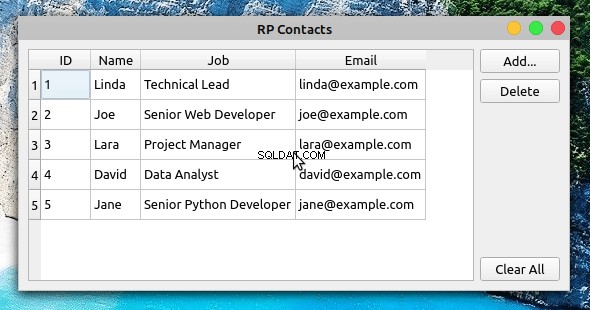
In this example, you double-click Joe’s Job 分野。 This gives you access to an editable widget that allows you to modify the value in the cell. Then you update the job description from Senior Web Developer to Web Developer 。 When you hit Enter , the table view communicates the change to the model, and the model saves the change to the database immediately.
To confirm that the changes were successfully saved into the database, you can close the application and run it again. The table view should reflect your updates.
Step 5:Creating New Contacts
At this step, your contact book application provides functionality to load, display, and update the information about your contacts. Even though you’re able to modify and update the contact information, you can neither add nor remove contacts from the list.
All the files and the code you’ll add or modify in this section are collected in the source_code_step_5/ ディレクトリ。 To download them, click the link below:
Get the Source Code: Click here to get the source code you’ll use to build a contact book with Python, PyQt, and SQLite in this tutorial.
In this section, you’ll provide the required functionality to add new contacts to the database, using a pop-up dialog to enter the new information. The first step is to create the Add Contact dialog.
Creating the Add Contact Dialog
Dialogs are small windows that you can use to communicate with your users. In this section, you’ll code the contact book’s Add Contact dialog to allow your users add new contacts to their current list of contacts.
To code the Add Contact dialog, you’ll subclass QDialog 。 This class provides a blueprint to build dialogs for your GUI applications.
Now open the views.py module and update the import section like this:
# -*- coding: utf-8 -*-
# rpcontacts/views.py

# Snip...
from PyQt5.QtCore import Qt
from PyQt5.QtWidgets import (
    QAbstractItemView,
    QDialog,
    QDialogButtonBox,
    QFormLayout,
    QHBoxLayout,
    QLineEdit,
    QMainWindow,
    QMessageBox,
    QPushButton,
    QTableView,
    QVBoxLayout,
    QWidget,
)
The highlighted lines in the above code import the required classes to build the Add Contact dialog. With these classes in your namespace, add the following class at the end of views.py :
 1# -*- coding: utf-8 -*-
 2# rpcontacts/views.py
 3
 4# Snip...
 5class AddDialog(QDialog):
 6    """Add Contact dialog."""
 7    def __init__(self, parent=None):
 8        """Initializer."""
 9        super().__init__(parent=parent)
10        self.setWindowTitle("Add Contact")
11        self.layout = QVBoxLayout()
12        self.setLayout(self.layout)
13        self.data = None
14
15        self.setupUI()
16
17    def setupUI(self):
18        """Setup the Add Contact dialog's GUI."""
19        # Create line edits for data fields
20        self.nameField = QLineEdit()
21        self.nameField.setObjectName("Name")
22        self.jobField = QLineEdit()
23        self.jobField.setObjectName("Job")
24        self.emailField = QLineEdit()
25        self.emailField.setObjectName("Email")
26        # Lay out the data fields
27        layout = QFormLayout()
28        layout.addRow("Name:", self.nameField)
29        layout.addRow("Job:", self.jobField)
30        layout.addRow("Email:", self.emailField)
31        self.layout.addLayout(layout)
32        # Add standard buttons to the dialog and connect them
33        self.buttonsBox = QDialogButtonBox(self)
34        self.buttonsBox.setOrientation(Qt.Horizontal)
35        self.buttonsBox.setStandardButtons(
36            QDialogButtonBox.Ok | QDialogButtonBox.Cancel
37        )
38        self.buttonsBox.accepted.connect(self.accept)
39        self.buttonsBox.rejected.connect(self.reject)
40        self.layout.addWidget(self.buttonsBox)
There are a lot of things happening in this code. Here’s a summary:
- Line 5 defines a new class that inherits from
QDialog。 - Lines 7 to 15 define the class initializer. In this case, the most relevant addition is
.data, which is an instance attribute that you’ll use to hold the data your users provide.
In .setupUI() , you define the dialog’s GUI:
- Lines 20 to 25 add three
QLineEditobjects:name,job, andemail。 You’ll use these line edits to take the user’s input for the name, job description, and email of the contact to add. They represent the corresponding fields in the database. - Lines 27 to 30 create a
QFormLayoutinstance that arranges the line edits in a form. This layout manager also provides user-friendly labels for each line edit or field. - Lines 33 to 37 add a
QDialogButtonBoxobject that provides two standard buttons:OK and Cancel 。 The OK button accepts the user’s input and the Cancel button rejects it. - Lines 38 and 39 connect the dialog’s built-in
.accepted()and.rejected()signals with the.accept()andreject()slots, respectively. In this case, you’ll rely on the dialog’s built-in.reject()slot, which closes the dialog without processing the input. Other than that, you just need to code the.accept()slot.
To code the dialog’s .accept() slot, you need to consider that any user input needs validation to make sure that it’s correct and safe. This is especially true when you’re working with SQL databases because of the risk of an SQL injection attack.
In this example, you’ll add a minimal validation rule just to make sure that the user provides data for each input field in the dialog. However, adding your own, more robust validation rules would be a good exercise.
Without further ado, get back to AddDialog and add the following code for its .accept() slot:
 1# -*- coding: utf-8 -*-
 2# rpcontacts/views.py
 3
 4# Snip...
 5class AddDialog(QDialog):
 6    def __init__(self, parent=None):
 7        # Snip...
 8
 9    def setupUI(self):
10        # Snip...
11
12    def accept(self):
13        """Accept the data provided through the dialog."""
14        self.data = []
15        for field in (self.nameField, self.jobField, self.emailField):
16            if not field.text():
17                QMessageBox.critical(
18                    self,
19                    "Error!",
20                    f"You must provide a contact's {field.objectName()}",
21                )
22                self.data = None  # Reset .data
23                return
24
25            self.data.append(field.text())
26
27        if not self.data:
28            return
29
30        super().accept()
The code within .accept() does the following:
- Line 14 initializes
.datato an empty list ([])。 This list will store the user’s input data. - Line 15 defines a
forloop that iterates over the three line edits, or fields, in the dialog. - Lines 16 to 23 define a conditional statement that checks if the user has provided data for each field in the dialog. If not, then the dialog shows an error message that warns the user about the missing data.
- Line 25 adds the user’s input for each field to
.data。 - Line 30 calls the superclass’s
.accept()slot to provide the standard behavior that closes the dialog after the user clicks OK 。
With this code, you’re ready to add a new slot to the contact book’s main window. This slot will launch the dialog, and if the user provides valid input, then the slot will use the model to save the newly added contact to the database.
Launching the Add Contact Dialog
Now that you’ve coded the Add Contact dialog, it’s time to add a new slot to Window so you can launch the dialog by clicking Add and process the user’s input once they click OK 。
Go to the definition of Window and add the following code:
 1# -*- coding: utf-8 -*-
 2# rpcontacts/views.py
 3
 4# Snip...
 5class Window(QMainWindow):
 6    # Snip...
 7
 8    def setupUI(self):
 9        # Snip...
10        self.addButton = QPushButton("Add...")
11        self.addButton.clicked.connect(self.openAddDialog)
12        # Snip...
13
14    def openAddDialog(self):
15        """Open the Add Contact dialog."""
16        dialog = AddDialog(self)
17        if dialog.exec() == QDialog.Accepted:
18            self.contactsModel.addContact(dialog.data)
19            self.table.resizeColumnsToContents()
Here’s a summary of what’s happening in the above code:
- Line 11 connects the
.clicked()signal of the Add button to the newly created slot,.openAddDialog()。 This way, a click on the button will automatically call the slot. - Line 14 defines the
.openAddDialog()slot. - Line 16 creates an instance of
AddDialog。 - Lines 17 to 19 define a conditional statement to check if the dialog was accepted. If so, then line 14 calls
.addContact()on the data model with the dialog’s.dataattribute as an argument. The final statement in theifcode block resizes the table view to fit the size of its updated content.
Now that you have a way to launch the Add Contact dialog and to process its data, you need to provide the code for .addContact() in your data model. That’s a topic for the next section.
Processing the Add Dialog’s Data in the Model
In this section, you’ll add a method called .addContact() to your data model, ContactsModel 。 Open model.py in your code editor, go to the definition of ContactsModel , and add the following code:
 1# -*- coding: utf-8 -*-
 2# rpcontacts/model.py
 3
 4# Snip...
 5class ContactsModel:
 6    # Snip...
 7
 8    def addContact(self, data):
 9        """Add a contact to the database."""
10        rows = self.model.rowCount()
11        self.model.insertRows(rows, 1)
12        for column, field in enumerate(data):
13            self.model.setData(self.model.index(rows, column + 1), field)
14        self.model.submitAll()
15        self.model.select()
Inside .addContact() , the code does the following:
- Line 10 gets the current number of rows in the data model.
- Line 11 inserts a new row at the end of the data model.
- Lines 12 and 13 run a
forloop that inserts every item indatainto the corresponding cell in the data model. To do this, line 9 calls.setData()on the model, with the index of the cell and the current datafieldas arguments. - Line 14 submits the changes to the database by calling
.submitAll()on the model. - Line 15 reloads the data from the database into the model.
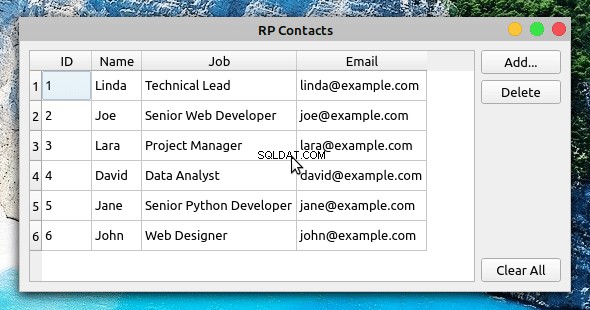
If you run the application with these new additions, then you’ll get the following behavior:
Now when you click Add , the Add Contact dialog appears on your screen. You can use the dialog to provide the required information for a new contact and to add the contact to the database by clicking OK 。
Step 6:Deleting Existing Contacts
The final feature you’ll add to the contact book application is the ability to remove contacts from the database using the GUI.
Again, you’ll find all the files and the code added or modified in this section under the source_code_step_6/ ディレクトリ。 You can download them by clicking the link below:
Get the Source Code: Click here to get the source code you’ll use to build a contact book with Python, PyQt, and SQLite in this tutorial.
In this section, you’ll first add the capability to delete a single contact at a time. Then you’ll add code to remove all the contacts from the database.
Deleting Selected Contacts
To remove a single contact from the contact database, you need to select the desired contact in the table view on the contact book’s main window. Once you’ve selected the contact, you can click Delete to perform the operation on the database.
Go to the model.py module and add the following code to implement .deleteContact() inside ContactsModel :
# -*- coding: utf-8 -*-
# rpcontacts/model.py

# Snip...
class ContactsModel:
    # Snip...

    def deleteContact(self, row):
        """Remove a contact from the database."""
        self.model.removeRow(row)
        self.model.submitAll()
        self.model.select()
This method has three lines of code. The first line removes the selected row 。 The second line submits the change to the database. Finally, the third line reloads the data into the model.
Next, get back to the views.py module and add the code behind the Delete button in Window :
# -*- coding: utf-8 -*-
# rpcontacts/views.py

# Snip...
class Window(QMainWindow):
    # Snip...

    def setupUI(self):
        """Setup the main window's GUI."""
        # Snip...
        self.deleteButton = QPushButton("Delete")
        self.deleteButton.clicked.connect(self.deleteContact)
        # Snip...

    def deleteContact(self):
        """Delete the selected contact from the database."""
        row = self.table.currentIndex().row()
        if row < 0:
            return

        messageBox = QMessageBox.warning(
            self,
            "Warning!",
            "Do you want to remove the selected contact?",
            QMessageBox.Ok | QMessageBox.Cancel,
        )

        if messageBox == QMessageBox.Ok:
            self.contactsModel.deleteContact(row)
In the first highlighted line, you connect the .clicked() signal of the Delete button to the .deleteContact() slot. This connection triggers a call to .deleteContact() every time the user clicks the button.
In .deleteContact() , you first get the index of the currently selected row in the table view. The if statement checks if the index is lower than 0 , which would mean that there are no contacts in the table view. If so, then the method returns immediately without performing any further actions.
Then the method shows a warning message confirming that the user wants to delete the selected contact. If the user accepts the operation, then .deleteContact(row) gets called. In this case, row represents the index of the currently selected row in the table.
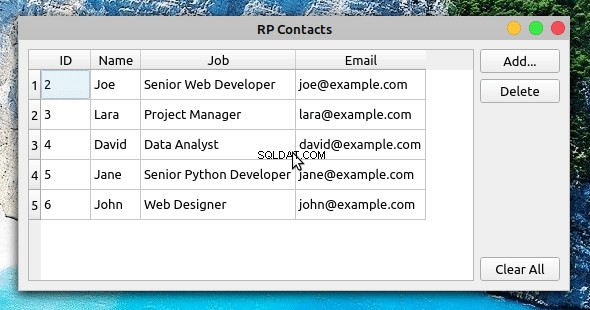
After these additions, you can run the application again to get the following behavior:
Now when you select a contact from the table view and click Delete , you’re presented with a warning message. If you click the message dialog’s OK button, then the application removes the selected contact from the database, updating the table view accordingly.
Clearing the Contact Database
To remove all the contacts from the database, you’ll start by adding a method called .clearContacts() to ContactsModel 。 Open your model.py module and add the following method at the end of the class:
 1# -*- coding: utf-8 -*-
 2# rpcontacts/model.py
 3
 4# Snip...
 5class ContactsModel:
 6    # Snip...
 7
 8    def clearContacts(self):
 9        """Remove all contacts in the database."""
10        self.model.setEditStrategy(QSqlTableModel.OnManualSubmit)
11        self.model.removeRows(0, self.model.rowCount())
12        self.model.submitAll()
13        self.model.setEditStrategy(QSqlTableModel.OnFieldChange)
14        self.model.select()
Here’s what each line of code does:
- Line 10 sets the data model’s
.editStrategyproperty toQSqlTableModel.OnManualSubmit。 This allows you to cache all the changes until you call.submitAll()later on. You need to do this because you’re changing several rows at the same time. - Line 11 removes all the rows from the model.
- Line 12 saves changes to the database.
- Line 13 resets the model’s
.editStrategyproperty to its original value,QSqlTableModel.OnFieldChange。 If you don’t reset this property to its original value, then you won’t be able to update the contacts directly in the table view. - Line 14 reloads the data into the model.
Once you’ve coded .clearContacts() , you can get back to the views.py file and update Window with the following code:
# -*- coding: utf-8 -*-
# rpcontacts/views.py

# Snip...
class Window(QMainWindow):
    # Snip...

    def setupUI(self):
        """Setup the main window's GUI."""
        # Snip...
        self.clearAllButton = QPushButton("Clear All")
        self.clearAllButton.clicked.connect(self.clearContacts)
        # Snip...

    def clearContacts(self):
        """Remove all contacts from the database."""
        messageBox = QMessageBox.warning(
            self,
            "Warning!",
            "Do you want to remove all your contacts?",
            QMessageBox.Ok | QMessageBox.Cancel,
        )

        if messageBox == QMessageBox.Ok:
            self.contactsModel.clearContacts()
The first highlighted line in this code connects the .clicked() signal of the Clear All button to the .clearContacts() slot below.
In .clearContacts() , you first create a message dialog, messageBox , to ask the user to confirm the removing operation. If the user confirms the operation by clicking OK , then .clearContacts() gets called on the model to remove all the contacts from the database:
それでおしまい! With this last piece of code, your contact book application is complete. The application provides features that allow your users to display, add, update, and remove contacts from the database.
Conclusion
Building a contact book GUI application with Python, PyQt, and SQLite is an excellent exercise for you to expand your skills with these tools and as a developer in general. Coding projects like this allows you to apply the knowledge and skills you already have and also pushes you to research and learn about new topics every time you encounter a new programming problem.
In this tutorial, you learned how to:
- Build the GUI for a contact book application using PyQt
- Use PyQt’s SQL support to connect the application to an SQLite database
- Use PyQt’s Model-View architecture to work with the application’s database
You can download the complete source code for the contact book application and also the code to complete each step in this tutorial by clicking the link below:
Get the Source Code: Click here to get the source code you’ll use to build a contact book with Python, PyQt, and SQLite in this tutorial.
Next Steps
At this point, you’ve completed a fully functional contact book project. The application provides minimal functionality, but it’s a good starting point to continue adding features and take your Python and PyQt skills to the next level. Here are some next step ideas that you can implement:
-
Add new data fields: Adding new data fields to store more information about your contacts would be great. For example, you can add the contact’s photo, phone number, web page, Twitter handle, and so on. To do this, you might need to create new tables and set up relations between them. PyQt provides the
QSqlRelationalTableModel, which defines an editable data model for a single table and provides foreign key support. -
Provide search capability: Giving your users a way to search for a contact in the database is arguably a must-have feature in this kind of application. To implement it, you can use PyQt’s
QSqlQueryandQSqlQueryModel。 -
Add back-up capability: Providing a way of backing up contact information is another interesting feature. Users might face problems with their computers and lose their data. You can provide options to upload the data to a cloud service or to back it up to an external disk.
These are just a few ideas for how you can continue adding features to your contact book. Take the challenge and build something amazing on top of this!