すべてのプログラムは何らかの形式でデータを処理し、多くのプログラムは、ある呼び出しから次の呼び出しまでそのデータを保存および取得できる必要があります。 Python、SQLite、およびSQLAlchemyは、プログラムにデータベース機能を提供し、データベースサーバーを必要とせずにデータを単一のファイルに保存できるようにします。
CSV、JSON、XML、さらにはカスタム形式など、さまざまな形式のフラットファイルを使用して同様の結果を得ることができます。フラットファイルは、多くの場合、人間が読めるテキストファイルですが、バイナリデータの場合もあり、コンピュータプログラムで解析できる構造になっています。以下では、データの保存と操作にSQLデータベースとフラットファイルを使用する方法を探り、プログラムに適したアプローチを決定する方法を学びます。
このチュートリアルでは、使用方法を学習します:
- フラットファイル データストレージ用
- SQL 永続データへのアクセスを改善するため
- SQLite データストレージ用
- SQLAlchemy Pythonオブジェクトとしてデータを操作する
以下のリンクをクリックすると、このチュートリアルに表示されるすべてのコードとデータを取得できます。
データストレージにフラットファイルを使用する
フラットファイル 内部階層がなく、通常は外部ファイルへの参照がないデータを含むファイルです。フラットファイルには人間が読める文字が含まれており、データの作成と読み取りに非常に役立ちます。フラットファイルは固定のフィールド幅を使用する必要がないため、プログラムがテキストを解析できるようにするために他の構造を使用することがよくあります。
たとえば、コンマ区切り値(CSV)ファイルは、コンマ文字でデータ要素を区切るプレーンテキストの行です。テキストの各行はデータの行を表し、コンマで区切られた各値はその行内のフィールドです。カンマ文字の区切り文字は、データ値間の境界を示します。
Pythonは、ファイルからの読み取りとファイルへの保存に優れています。 Pythonでデータファイルを読み取ることができるため、後で再実行するときにアプリケーションを有用な状態に復元できます。データをファイルに保存できるため、ユーザーとアプリケーションが実行されているサイト間でプログラムからの情報を共有できます。
プログラムがデータファイルを読み取る前に、プログラムはデータを理解できる必要があります。通常、これは、データファイルが、アプリケーションがファイル内のテキストを読み取って解析するために使用できる構造を持っている必要があることを意味します。
以下は、 author_book_publisher.csvという名前のCSVファイルです。 、このチュートリアルの最初のサンプルプログラムで使用されます:
first_name,last_name,title,publisher
Isaac,Asimov,Foundation,Random House
Pearl,Buck,The Good Earth,Random House
Pearl,Buck,The Good Earth,Simon & Schuster
Tom,Clancy,The Hunt For Red October,Berkley
Tom,Clancy,Patriot Games,Simon & Schuster
Stephen,King,It,Random House
Stephen,King,It,Penguin Random House
Stephen,King,Dead Zone,Random House
Stephen,King,The Shining,Penguin Random House
John,Le Carre,"Tinker, Tailor, Soldier, Spy: A George Smiley Novel",Berkley
Alex,Michaelides,The Silent Patient,Simon & Schuster
Carol,Shaben,Into The Abyss,Simon & Schuster
最初の行は、フィールドのコンマ区切りリストを提供します。これは、残りの行に続くデータの列名です。残りの行にはデータが含まれており、各行は1つのレコードを表しています。
注: 著者、本、出版社はすべて本物ですが、本と出版社の関係は架空のものであり、このチュートリアルの目的のために作成されました。
次に、上記のCSVのようなフラットファイルを使用してデータを操作することの長所と短所をいくつか見ていきます。
フラットファイルの利点
フラットファイル内のデータの操作は管理しやすく、実装が簡単です。人間が読める形式のデータを用意しておくと、テキストエディタでデータファイルを作成するだけでなく、データを調べたり、不整合や問題を探したりするのにも役立ちます。
多くのアプリケーションは、ファイルによって生成されたデータのフラットファイルバージョンをエクスポートできます。たとえば、ExcelはCSVファイルをスプレッドシートとの間でインポートまたはエクスポートできます。フラットファイルには、データを共有したい場合に自己完結型で転送可能であるという利点もあります。
ほとんどすべてのプログラミング言語には、CSVファイルの操作を容易にするツールとライブラリがあります。 Pythonにはcsvが組み込まれています モジュールと強力なパンダモジュールが利用可能であり、CSVファイルの操作が強力なソリューションになります。
フラットファイルのデメリット
フラットファイルを使用する利点は、データが大きくなるにつれて減少し始めます。大きなファイルは依然として人間が読める形式ですが、データを作成したり問題を探したりするためにそれらを編集することは、より困難な作業になります。アプリケーションがファイル内のデータを変更する場合、1つの解決策は、ファイル全体をメモリに読み込み、変更を加えて、データを別のファイルに書き出すことです。
フラットファイルを使用する場合のもう1つの問題は、ファイル構文内でデータの一部とアプリケーションプログラムの間の関係を明示的に作成して維持する必要があることです。さらに、これらの関係を使用するには、アプリケーションでコードを生成する必要があります。
最後の厄介な問題は、データファイルを共有したい人も、データで作成した構造と関係について知り、それに基づいて行動する必要があるということです。情報にアクセスするには、それらのユーザーはデータの構造だけでなく、データにアクセスするために必要なプログラミングツールも理解する必要があります。
フラットファイルの例
サンプルプログラムexamples/ example_1 / main.py author_book_publisher.csvを使用します その中のデータと関係を取得するためのファイル。このCSVファイルには、著者、出版した本、各本の出版社のリストが含まれています。
注: 例で使用されているデータファイルは、 project / dataにあります。 ディレクトリ。 project / build_dataにもプログラムファイルがあります データを生成するディレクトリ。このアプリケーションは、データを変更して既知の状態に戻したい場合に役立ちます。
このセクションおよびチュートリアル全体で使用されるデータファイルにアクセスするには、以下のリンクをクリックしてください。
上記のCSVファイルは、数人の著者、書籍、出版社のみを含む非常に小さなデータファイルです。データに関するいくつかの点にも注意する必要があります:
-
著者のスティーブンキングとトムクランシーは、出版した複数の本がデータに含まれているため、複数回登場します。
-
著者のスティーブンキングとパールバックは、複数の出版社から同じ本を出版しています。
これらの複製されたデータフィールドは、データの他の部分の間に関係を作成します。 1人の著者が多くの本を書くことができ、1人の出版社が複数の著者と協力することができます。著者と出版社は、個々の本との関係を共有しています。
author_book_publisher.csvの関係 ファイルは、データファイルの異なる行に複数回表示されるフィールドで表されます。このデータの冗長性のため、データは複数の2次元テーブルを表します。このファイルを使用してSQLiteデータベースファイルを作成すると、さらに多くのことがわかります。
サンプルプログラムexamples/ example_1 / main.py author_book_publisher.csvに埋め込まれた関係を使用します いくつかのデータを生成するファイル。最初に、著者のリストとそれぞれが書いた本の数を示します。次に、出版社のリストと、それぞれが本を出版した著者の数が表示されます。
treelibも使用します 著者、書籍、出版社のツリー階層を表示するモジュール。
最後に、データに新しい本を追加し、新しい本が配置された状態でツリー階層を再表示します。これがmain()です このプログラムのエントリポイント関数:
 1def main():
 2    """The main entry point of the program"""
 3    # Get the resources for the program
 4    with resources.path(
 5        "project.data", "author_book_publisher.csv"
 6    ) as filepath:
 7        data = get_data(filepath)
 8
 9    # Get the number of books printed by each publisher
10    books_by_publisher = get_books_by_publisher(data, ascending=False)
11    for publisher, total_books in books_by_publisher.items():
12        print(f"Publisher: {publisher}, total books: {total_books}")
13    print()
14
15    # Get the number of authors each publisher publishes
16    authors_by_publisher = get_authors_by_publisher(data, ascending=False)
17    for publisher, total_authors in authors_by_publisher.items():
18        print(f"Publisher: {publisher}, total authors: {total_authors}")
19    print()
20
21    # Output hierarchical authors data
22    output_author_hierarchy(data)
23
24    # Add a new book to the data structure
25    data = add_new_book(
26        data,
27        author_name="Stephen King",
28        book_title="The Stand",
29        publisher_name="Random House",
30    )
31
32    # Output the updated hierarchical authors data
33    output_author_hierarchy(data)
上記のPythonコードは、次の手順を実行します。
- 4行目から7行目
author_book_publisher.csvを読む pandasDataFrameにファイルします。 - 10行目から13行目 各出版社が出版した本の数を印刷します。
- 16行目から19行目 各出版社に関連付けられている著者の数を印刷します。
- 22行目 書籍データを著者別にソートされた階層として出力します。
- 25〜30行目 インメモリ構造に新しい本を追加します。
- 33行目 新しく追加された本を含め、著者によってソートされた階層として本のデータを出力します。
このプログラムを実行すると、次の出力が生成されます。
$ python main.py
Publisher: Simon & Schuster, total books: 4
Publisher: Random House, total books: 4
Publisher: Penguin Random House, total books: 2
Publisher: Berkley, total books: 2

Publisher: Simon & Schuster, total authors: 4
Publisher: Random House, total authors: 3
Publisher: Berkley, total authors: 2
Publisher: Penguin Random House, total authors: 1

Authors
├── Alex Michaelides
│   └── The Silent Patient
│       └── Simon & Schuster
├── Carol Shaben
│   └── Into The Abyss
│       └── Simon & Schuster
├── Isaac Asimov
│   └── Foundation
│       └── Random House
├── John Le Carre
│   └── Tinker, Tailor, Soldier, Spy: A George Smiley Novel
│       └── Berkley
├── Pearl Buck
│   └── The Good Earth
│       ├── Random House
│       └── Simon & Schuster
├── Stephen King
│   ├── Dead Zone
│   │   └── Random House
│   ├── It
│   │   ├── Penguin Random House
│   │   └── Random House
│   └── The Shining
│       └── Penguin Random House
└── Tom Clancy
    ├── Patriot Games
    │   └── Simon & Schuster
    └── The Hunt For Red October
        └── Berkley
上記の著者階層は、スティーブンキングの The Stand を追加して、出力に2回表示されます。 、ランダムハウス発行。上記の実際の出力は編集されており、スペースを節約するために最初の階層出力のみが表示されています。
main() 他の関数を呼び出して、作業の大部分を実行します。最初に呼び出す関数はget_data()です。 :
def get_data(filepath):
    """Get book data from the csv file"""
    return pd.read_csv(filepath)
この関数は、CSVファイルへのファイルパスを受け取り、パンダを使用してパンダDataFrameに読み込み、それを呼び出し元に返します。この関数の戻り値は、プログラムを構成する他の関数に渡されるデータ構造になります。
get_books_by_publisher() 各出版社が出版した本の数を計算します。結果のパンダシリーズは、パンダのGroupBy機能を使用してパブリッシャーごとにグループ化し、昇順に基づいて並べ替えます。 フラグ:
def get_books_by_publisher(data, ascending=True):
    """Return the number of books by each publisher as a pandas series"""
    return data.groupby("publisher").size().sort_values(ascending=ascending)
get_authors_by_publisher() 前の関数と基本的に同じことを行いますが、作成者向けです:
def get_authors_by_publisher(data, ascending=True):
    """Returns the number of authors by each publisher as a pandas series"""
    return (
        data.assign(name=data.first_name.str.cat(data.last_name, sep=" "))
        .groupby("publisher")
        .nunique()
        .loc[:, "name"]
        .sort_values(ascending=ascending)
    )
add_new_book() パンダのDataFrameに新しい本を作成します。コードは、著者、本、または出版社がすでに存在するかどうかを確認します。そうでない場合は、新しい本を作成し、パンダのDataFrameに追加します:
def add_new_book(data, author_name, book_title, publisher_name):
    """Adds a new book to the system"""
    # Does the book exist?
    first_name, _, last_name = author_name.partition(" ")
    if any(
        (data.first_name == first_name)
        & (data.last_name == last_name)
        & (data.title == book_title)
        & (data.publisher == publisher_name)
    ):
        return data
    # Add the new book
    return data.append(
        {
            "first_name": first_name,
            "last_name": last_name,
            "title": book_title,
            "publisher": publisher_name,
        },
        ignore_index=True,
    )
output_author_hierarchy() ネストされたforを使用します データ構造のレベルを反復処理するためのループ。次に、 treelibを使用します 著者、彼らが出版した本、およびそれらの本を出版した出版社の階層リストを出力するモジュール:
def output_author_hierarchy(data):
    """Output the data as a hierarchy list of authors"""
    authors = data.assign(
        name=data.first_name.str.cat(data.last_name, sep=" ")
    )
    authors_tree = Tree()
    authors_tree.create_node("Authors", "authors")
    for author, books in authors.groupby("name"):
        authors_tree.create_node(author, author, parent="authors")
        for book, publishers in books.groupby("title")["publisher"]:
            book_id = f"{author}:{book}"
            authors_tree.create_node(book, book_id, parent=author)
            for publisher in publishers:
                authors_tree.create_node(publisher, parent=book_id)

    # Output the hierarchical authors data
    authors_tree.show()
このアプリケーションはうまく機能し、パンダモジュールで利用できるパワーを示しています。このモジュールは、CSVファイルを読み取ってデータを操作するための優れた機能を提供します。
Python、著者と出版物のデータのSQLiteデータベースバージョン、およびそのデータと対話するためのSQLAlchemyを使用して、同じように機能するプログラムをプッシュして作成しましょう。
SQLiteを使用してデータを永続化する
前に見たように、 author_book_publisher.csvには冗長データがあります ファイル。たとえば、パールバックの大地に関するすべての情報 2つの異なる出版社が本を出版したため、2回リストされています。
このデータファイルに、著者の住所と電話番号、書籍の発行日とISBN、住所、電話番号、出版社の年間収益など、より関連性の高いデータが含まれていると想像してみてください。このデータは、著者、書籍、出版社などのルートデータアイテムごとに複製されます。
この方法でデータを作成することは可能ですが、非常に扱いにくいでしょう。このデータファイルを最新の状態に保つ問題について考えてください。スティーブンキングが彼の名前を変更したい場合はどうなりますか?彼の名前を含む複数のレコードを更新し、タイプミスがないことを確認する必要があります。
データの重複よりも悪いのは、データに他の関係を追加することの複雑さです。著者の電話番号を追加することにし、著者が自宅、職場、携帯電話などの電話番号を持っていた場合はどうなりますか?ルートアイテムに追加するすべての新しい関係は、レコードの数にその新しい関係のアイテムの数を掛けます。
この問題は、データベースシステムに関係が存在する理由の1つです。データベースエンジニアリングの重要なトピックは、データベースの正規化です。 、またはデータを分解して冗長性を減らし、整合性を高めるプロセス。データベース構造が新しいタイプのデータで拡張される場合、事前に正規化しておくと、既存の構造への変更が最小限に抑えられます。
SQLiteデータベースはPythonで利用でき、SQLiteホームページによると、他のすべてのデータベースシステムを組み合わせた場合よりも多く使用されています。単一のファイルで動作してすべてのデータベース機能を維持する、フル機能のリレーショナルデータベース管理システム(RDBMS)を提供します。
また、機能するために別のデータベースサーバーを必要としないという利点もあります。データベースファイル形式はクロスプラットフォームであり、SQLiteをサポートするすべてのプログラミング言語にアクセスできます。
これらはすべて興味深い情報ですが、データストレージにフラットファイルを使用することとどのように関連していますか?以下で確認できます!
データベース構造の作成
author_book_publisher.csvを取得するためのブルートフォースアプローチ SQLiteデータベースへのデータは、CSVファイルの構造に一致する単一のテーブルを作成することです。これを行うと、SQLiteの能力のかなりの部分が無視されます。
リレーショナルデータベース 構造化データをテーブルに格納し、それらのテーブル間の関係を確立する方法を提供します。彼らは通常、データと対話するための主要な方法として構造化照会言語(SQL)を使用します。これは、RDBMSが提供するものを過度に単純化したものですが、このチュートリアルの目的には十分です。
SQLiteデータベースは、SQLを使用したデータテーブルとの対話をサポートします。 SQLiteデータベースファイルにはデータが含まれているだけでなく、データを操作するための標準化された方法もあります。このサポートはファイルに埋め込まれています。つまり、SQLiteファイルを使用できるプログラミング言語であれば、SQLを使用してファイルを操作することもできます。
SQLを使用したデータベースとの対話
SQLは宣言型言語です データベースに含まれるデータの作成、管理、およびクエリに使用されます。宣言型言語は何を記述します 方法ではなく、達成する必要があります それは達成されるべきです。後でデータベーステーブルの作成に取り掛かるときに、SQLステートメントの例が表示されます。
SQLを使用したデータベースの構築
SQLの機能を活用するには、 author_book_publisher.csvのデータにデータベースの正規化を適用する必要があります。 ファイル。これを行うには、著者、書籍、出版社を別々のデータベーステーブルに分けます。
概念的には、データは2次元のテーブル構造でデータベースに格納されます。各テーブルは、レコードの行で構成されています 、および各レコードは列、またはフィールドで構成されます 、データを含みます。
フィールドに含まれるデータは、テキスト、整数、浮動小数点数など、事前定義されたタイプです。 CSVファイルは、すべてのフィールドがテキストであり、データ型を割り当てるためにプログラムで解析する必要があるため、異なります。
テーブルの各レコードには主キーがあります レコードに一意の識別子を与えるように定義されています。主キーは、Python辞書のキーに似ています。多くの場合、データベースエンジン自体が、データベーステーブルに挿入されたすべてのレコードの増分整数値として主キーを生成します。
主キーはデータベースエンジンによって自動的に生成されることがよくありますが、そうである必要はありません。フィールドに格納されているデータが、そのフィールドのテーブル内の他のすべてのデータ全体で一意である場合、それが主キーになる可能性があります。たとえば、本に関するデータを含むテーブルでは、本のISBNを主キーとして使用できます。
SQLを使用したテーブルの作成
SQLステートメントを使用してCSVファイルに著者、書籍、出版社を表す3つのテーブルを作成する方法は次のとおりです。
CREATE TABLE author (
    author_id INTEGER NOT NULL PRIMARY KEY,
    first_name VARCHAR,
    last_name VARCHAR
);

CREATE TABLE book (
    book_id INTEGER NOT NULL PRIMARY KEY,
    author_id INTEGER REFERENCES author,
    title VARCHAR
);

CREATE TABLE publisher (
    publisher_id INTEGER NOT NULL PRIMARY KEY,
    name VARCHAR
);
ファイル操作、作成された変数、およびそれらを保持する構造がないことに注意してください。ステートメントは、特定の属性を持つテーブルの作成という望ましい結果のみを記述します。データベースエンジンがこれを行う方法を決定します。
このテーブルを作成して、 author_book_publisher.csvの作成者データを入力したら ファイルの場合、SQLステートメントを使用してアクセスできます。次のステートメント(クエリとも呼ばれます) )ワイルドカード文字( * )を使用します ) authorのすべてのデータを取得します テーブルと出力:
SELECT * FROM author;
sqlite3を使用できます author_book_publisher.dbと対話するためのコマンドラインツール project / dataのデータベースファイル ディレクトリ:
$ sqlite3 author_book_publisher.db
データベースを開いた状態でSQLiteコマンドラインツールを実行すると、SQLコマンドを入力できます。上記のSQLコマンドとその出力の後に、 .qが続きます。 プログラムを終了するコマンド:
sqlite> SELECT * FROM author;
1|Isaac|Asimov
2|Pearl|Buck
3|Tom|Clancy
4|Stephen|King
5|John|Le Carre
6|Alex|Michaelides
7|Carol|Shaben

sqlite> .q
各作成者はテーブルに1回だけ存在することに注意してください。一部の作成者に複数のエントリが含まれていたCSVファイルとは異なり、ここでは、作成者ごとに1つの一意のレコードのみが必要です。
SQLを使用したデータベースの保守
SQLは、新しいデータを挿入し、既存のデータを更新または削除することにより、既存のデータベースおよびテーブルを操作する方法を提供します。これは、新しい作成者を authorに挿入するためのSQLステートメントの例です。 テーブル:
INSERT INTO author
    (first_name, last_name)
VALUES ('Paul', 'Mendez');
このSQLステートメントは、値‘ Paulを挿入します ‘および‘ Mendez ‘をそれぞれの列に first_name およびlast_name authorの テーブル。
author_idに注意してください 列が指定されていません。その列が主キーであるため、データベースエンジンは値を生成し、ステートメント実行の一部として挿入します。
データベーステーブルのレコードの更新は、単純なプロセスです。たとえば、スティーブンキングがペンネームのリチャードバックマンで知られることを望んでいたとします。データベースレコードを更新するためのSQLステートメントは次のとおりです。
UPDATE author
SET first_name = 'Richard', last_name = 'Bachman'
WHERE first_name = 'Stephen' AND last_name = 'King';
SQLステートメントは、'Stephen King'の単一のレコードを検索します 条件ステートメントを使用するWHEREfirst_name ='Stephen' AND last_name ='King' 次に、 first_nameを更新します およびlast_name 新しい値を持つフィールド。 SQLは等号を使用します( = )比較演算子と代入演算子の両方として。
データベースからレコードを削除することもできます。 authorからレコードを削除するSQLステートメントの例を次に示します。 テーブル:
DELETE FROM author
WHERE first_name = 'Paul'
AND last_name = 'Mendez';
このSQLステートメントは、 authorから1行を削除します first_nameが存在するテーブル 'Paul'と同じです およびlast_name 'Mendez'と同じです 。
レコードを削除するときは注意してください!設定する条件は、できるだけ具体的にする必要があります。条件が広すぎると、意図したよりも多くのレコードが削除される可能性があります。たとえば、条件が first_name ='Paul'の行のみに基づいている場合 、その後、Paulという名のすべての著者がデータベースから削除されます。
注: レコードの誤った削除を回避するために、多くのアプリケーションは削除をまったく許可していません。代わりに、レコードには、使用中かどうかを示す別の列があります。この列の名前はactiveの場合があります また、TrueまたはFalseのいずれかに評価される値が含まれ、データベースのクエリ時にレコードを含める必要があるかどうかを示します。
たとえば、以下のSQLクエリは、 some_table内のすべてのアクティブなレコードのすべての列を取得します。 :
SELECT
  *
FROM some_table
WHERE active = 1;
SQLiteにはブールデータ型がないため、 active 列は、値が 0の整数で表されます。 または1 レコードの状態を示します。他のデータベースシステムには、ネイティブのブールデータ型がある場合とない場合があります。
コード内で直接SQLステートメントを使用してPythonでデータベースアプリケーションを構築することは完全に可能です。そうすることで、データがリストのリストまたは辞書のリストとしてアプリケーションに返されます。
生のSQLを使用することは、データベースへのクエリによって返されるデータを処理するための完全に許容できる方法です。ただし、それを行うのではなく、SQLAlchemyを使用してデータベースを操作することに直接移行します。
関係の構築
データの永続性と取得よりもさらに強力で便利なデータベースシステムのもう1つの機能は、関係です。 。関係をサポートするデータベースを使用すると、データを複数のテーブルに分割し、それらの間の接続を確立できます。
author_book_publisher.csvのデータ fileは、データを複製することによってデータと関係を表します。データベースは、データを3つのテーブル( author )に分割することでこれを処理します 、 book 、およびパブリッシャー —そしてそれらの間の関係を確立します。
必要なすべてのデータをCSVファイルの1つの場所にまとめた後、なぜそれを複数のテーブルに分割したいのでしょうか。作成して元に戻すのはもっと手間がかかるのではないでしょうか。それはある程度真実ですが、SQLを使用してデータを分割し、元に戻すことの利点は、あなたに勝つ可能性があります!
1対多の関係
1対多 関係は、顧客がオンラインで商品を注文するようなものです。 1人の顧客は多くの注文を持つことができますが、各注文は1人の顧客に属します。 author_book_publisher.db データベースは、著者と本の形で1対多の関係にあります。各著者は多くの本を書くことができますが、各本は1人の著者によって書かれています。
上記のテーブル作成で見たように、これらの個別のエンティティの実装は、それぞれをデータベーステーブルに配置することです。1つは作成者用、もう1つは本用です。しかし、これら2つのテーブル間の1対多の関係はどのように実装されますか?
データベース内の各テーブルには、そのテーブルの主キーとして指定されたフィールドがあることに注意してください。上記の各テーブルには、次のパターンを使用して名前が付けられた主キーフィールドがあります:
上の図は、JetBrains DataGripアプリケーションで作成された単純な実体関連図(ERD)であり、テーブル
小さな黄色と青のキーアイコン テーブルの主キーと外部キーをそれぞれ示します。
著者と本に別々のテーブルがあるので、それらの間の関係をどのように使用しますか? SQLは、
以下のSQLクエリは
上記のSQLクエリは、著者と本の両方のテーブルの間に確立された関係を使用してテーブルを結合することにより、両者から情報を収集します。 SQL文字列の連結により、作成者のフルネームがエイリアス
SQLステートメントで注意すべき点がいくつかあります。まず、著者は1つの列にフルネームで表示され、ラストネームでソートされます。また、1対多の関係があるため、作成者は出力に複数回表示されます。著者の名前は、データベースに書いた本ごとに複製されます。
著者と本のために別々のテーブルを作成し、それらの間の関係を確立することにより、データの冗長性を減らしました。これで、作成者のデータを1か所で編集するだけで、その変更はデータにアクセスするすべてのSQLクエリに表示されます。
多対多 関係は
Handling this situation in the database is more involved than a one-to-many relationship because the relationship goes both ways. Many-to-many relationships are created by an association table acting as a bridge between the two related tables.
The association table contains at least two foreign key fields, which are the primary keys of each of the two associated tables. This SQL statement creates the association table relating the
The SQL statements create a new
Because the relationship is between two primary keys, there’s no need to create a primary key for the association table itself. The combination of the two related keys creates a unique identifier for a row of data.
As before, you use the
The
The statements above perform the following actions:
Line 1 starts a
Line 2 selects the first and last name from the
Line 3 selects the publisher’s name aliased to
Line 4 uses the
Line 5 is the first step of the process outlined above for connecting the
Line 6 is the second step in the two-step process mentioned above. It uses the alias
Line 7 sorts the data by the author’s last name in ascending alphabetical order and ends the SQL query.
Lines 8 to 17 are the output of the SQL query.
Note that the data in the source
The SQL query above demonstrates how to make use of a relationship using the SQL
Here’s another SQL query to show a little bit of the power of SQL and the database engine:
The SQL query above returns the list of authors and the number of books they’ve written. The list is sorted first by the number of books in descending order, then by the author’s name in alphabetical order:
Line 1 begins the SQL query with the
Line 2 selects the author’s first and last names, separated by a space character, and creates the alias
Line 3 counts the number of books written by each author, which will be used later by the
Line 4 selects the
Line 5 connects to the related
Line 6 generates the aggregated author and total number of books data by using the
Line 7 sorts the output first by number of books in descending order, then by the author’s last name in ascending alphabetical order.
Lines 8 to 14 are the output of the SQL query.
In the above example, you take advantage of SQL to perform aggregation calculations and sort the results into a useful order. Having the database perform calculations based on its built-in data organization ability is usually faster than performing the same kinds of calculations on raw data sets in Python. SQL offers the advantages of using set theory embedded in RDBMS databases.
An entity-relationship diagram (ERD) is a visual depiction of an entity-relationship model for a database or part of a database. The
This diagram presents the table structures in the database and the relationships between them. Each box represents a table and contains the fields defined in the table, with the primary key indicated first if it exists.
The arrows show the relationships between the tables connecting a foreign key field in one table to a field, often the primary key, in another table. The table
SQLAlchemy is a powerful database access tool kit for Python, with its object-relational mapper (ORM) being one of its most famous components, and the one discussed and used here.
When you’re working in an object-oriented language like Python, it’s often useful to think in terms of objects. It’s possible to map the results returned by SQL queries to objects, but doing so works against the grain of how the database works. Sticking with the scalar results provided by SQL works against the grain of how Python developers work. This problem is known as object-relational impedance mismatch.
The ORM provided by SQLAlchemy sits between the SQLite database and your Python program and transforms the data flow between the database engine and Python objects. SQLAlchemy allows you to think in terms of objects and still retain the powerful features of a database engine.
One of the fundamental elements to enable connecting SQLAlchemy to a database is creating a model 。 The model is a Python class defining the data mapping between the Python objects returned as a result of a database query and the underlying database tables.
The entity-relationship diagram displayed earlier shows boxes connected with arrows. The boxes are the tables built with the SQL commands and are what the Python classes will model. The arrows are the relationships between the tables.
The models are Python classes inheriting from an SQLAlchemy
Below is the
Here’s what’s going on in this module:
Line 1 imports the
Line 2 imports the
Line 3 imports the
Line 5 creates the
Lines 7 to 12 create the
Lines 14 to 19 create the
Lines 21 to 29 define the
Lines 31 to 38 define the
Lines 40 to 49 define the
The description above shows the mapping of the five tables in the
The SQLAlchemy
The rest of the parameters are instances of the
The SQLAlchemy
The statement above tells SQLAlchemy that there’s a column in the
Having both
Having a
The code above defines a parent-child collection. The
The first parameter to
SQLAlchemy recognizes that this is the
The other relationship in
Like
The
For example, if you executed the following Python code, then a
The existence of the
You can make a basic query like
The
At this point, the advantages of using SQLAlchemy instead of plain SQL might not be obvious, especially considering the setup required to create the models representing the database. The
The
Behind the scenes, SQLAlchemy turns the object and method calls into SQL statements to execute against the SQLite database engine. SQLAlchemy transforms the data returned by SQL queries into Python objects.
With SQLAlchemy, you can perform the more complex aggregation query shown earlier for the list of authors and the number of books they’ve written like this:
The query above gets the author’s first and last name, along with a count of the number of books that the author has written. The aggregating
The example program
This program is a modified version of
Lines 4 to 7 first initialize the
Line 8 creates the
Line 9 binds the
Line 10 creates the
The rest of the function is similar, except for the replacement of
Here’s what the new function,
Line 6 creates the
Lines 9 to 11 query the
Line 12 joins to the
Line 13 aggregates the book counts by the
Line 14 sorts the output by the book counts according to the operator defined by
Line 15 closes the object, executes the query, and returns the results to the caller.
All the above code expresses what is wanted rather than how it’s to be retrieved. Now instead of using SQL to describe what’s wanted, you’re using Python objects and methods. What’s returned is a list of Python objects instead of a list of tuples of data.
Like its previous version,
If the search query finds an exact match, then the function returns. If no book matches the exact search criteria, then it searches to see if the author has written a book using the passed in title. This code exists to prevent duplicate books from being created in the database.
If no matching book exists, and the author hasn’t written one with the same title, then a new book is created. The function then retrieves or creates an author and publisher. Once instances of the
The code above is relatively long. Let’s break the functionality down to manageable sections:
Lines 7 to 18 set the
Lines 20 and 21 determine if the book already exists and return if it does.
Lines 24 to 37 set the
Lines 40 to 52 set the
Lines 55 to 63 set the
Line 66 sets the
Line 67 adds the
Line 68 adds the
Line 71 commits all the creations and updates to the database.
There are a few things to take note of here. First, there’s is no mention of the
Second, all the creations and updates happen within the context of the
For example, if a new
When
To this point, you’ve seen how to use pandas, SQLite, and SQLAlchemy to access the same data in different ways. For the relatively straightforward use case of the author, book, and publisher data, it could still be a toss-up whether you should use a database.
One deciding factor when choosing between using a flat file or a database is data and relationship complexity. If the data for each entity is complicated and contains many relationships between the entities, then creating and maintaining it in a flat file might become more difficult.
Another factor to consider is whether you want to share the data between multiple users. The solution to this problem might be as simple as using a sneakernet to physically move data between users. Moving data files around this way has the advantage of ease of use, but the data can quickly get out of sync when changes are made.
The problem of keeping the data consistent for all users becomes even more difficult if the users are remote and want to access the data across networks. Even when you’re limited to a single language like Python and using pandas to access the data, network file locking isn’t sufficient to ensure the data doesn’t get corrupted.
Providing the data through a server application and a user interface alleviates this problem. The server is the only application that needs file-level access to the database. By using a database, the server can take advantage of SQL to access the data using a consistent interface no matter what programming language the server uses.
The last example program demonstrates this by providing a web application and user interface to the Chinook sample SQLite database. Peter Stark generously maintains the Chinook database as part of the SQLite Tutorial site. If you’d like to learn more about SQLite and SQL in general, then the site is a great resource.
The Chinook database provides artist, music, and playlist information along the lines of a simplified Spotify. The database is part of the example code project in the
The
Flask Blueprint is part of Flask and provides a good way to follow the separation of concerns design principle and create distinct modules to contain functionality.
Flask SQLAlchemy is an extension for Flask that adds support for SQLAlchemy in your web applications.
Flask_Bootstrap4 packages the Bootstrap front-end tool kit, integrating it with your Flask web applications.
Flask_WTF extends Flask with WTForms, giving your web applications a useful way to generate and validate web forms.
python_dotenv is a Python module that an application uses to read environment variables from a file and keep sensitive information out of program code.
Though not necessary for this example, a
The example application is fairly large, and only some of it is relevant to this tutorial. For this reason, examining and learning from the code is left as an exercise for the reader. That said, you can take a look at an animated screen capture of the application below, followed by the HTML that renders the home page and the Python Flask route that provides the dynamic data.
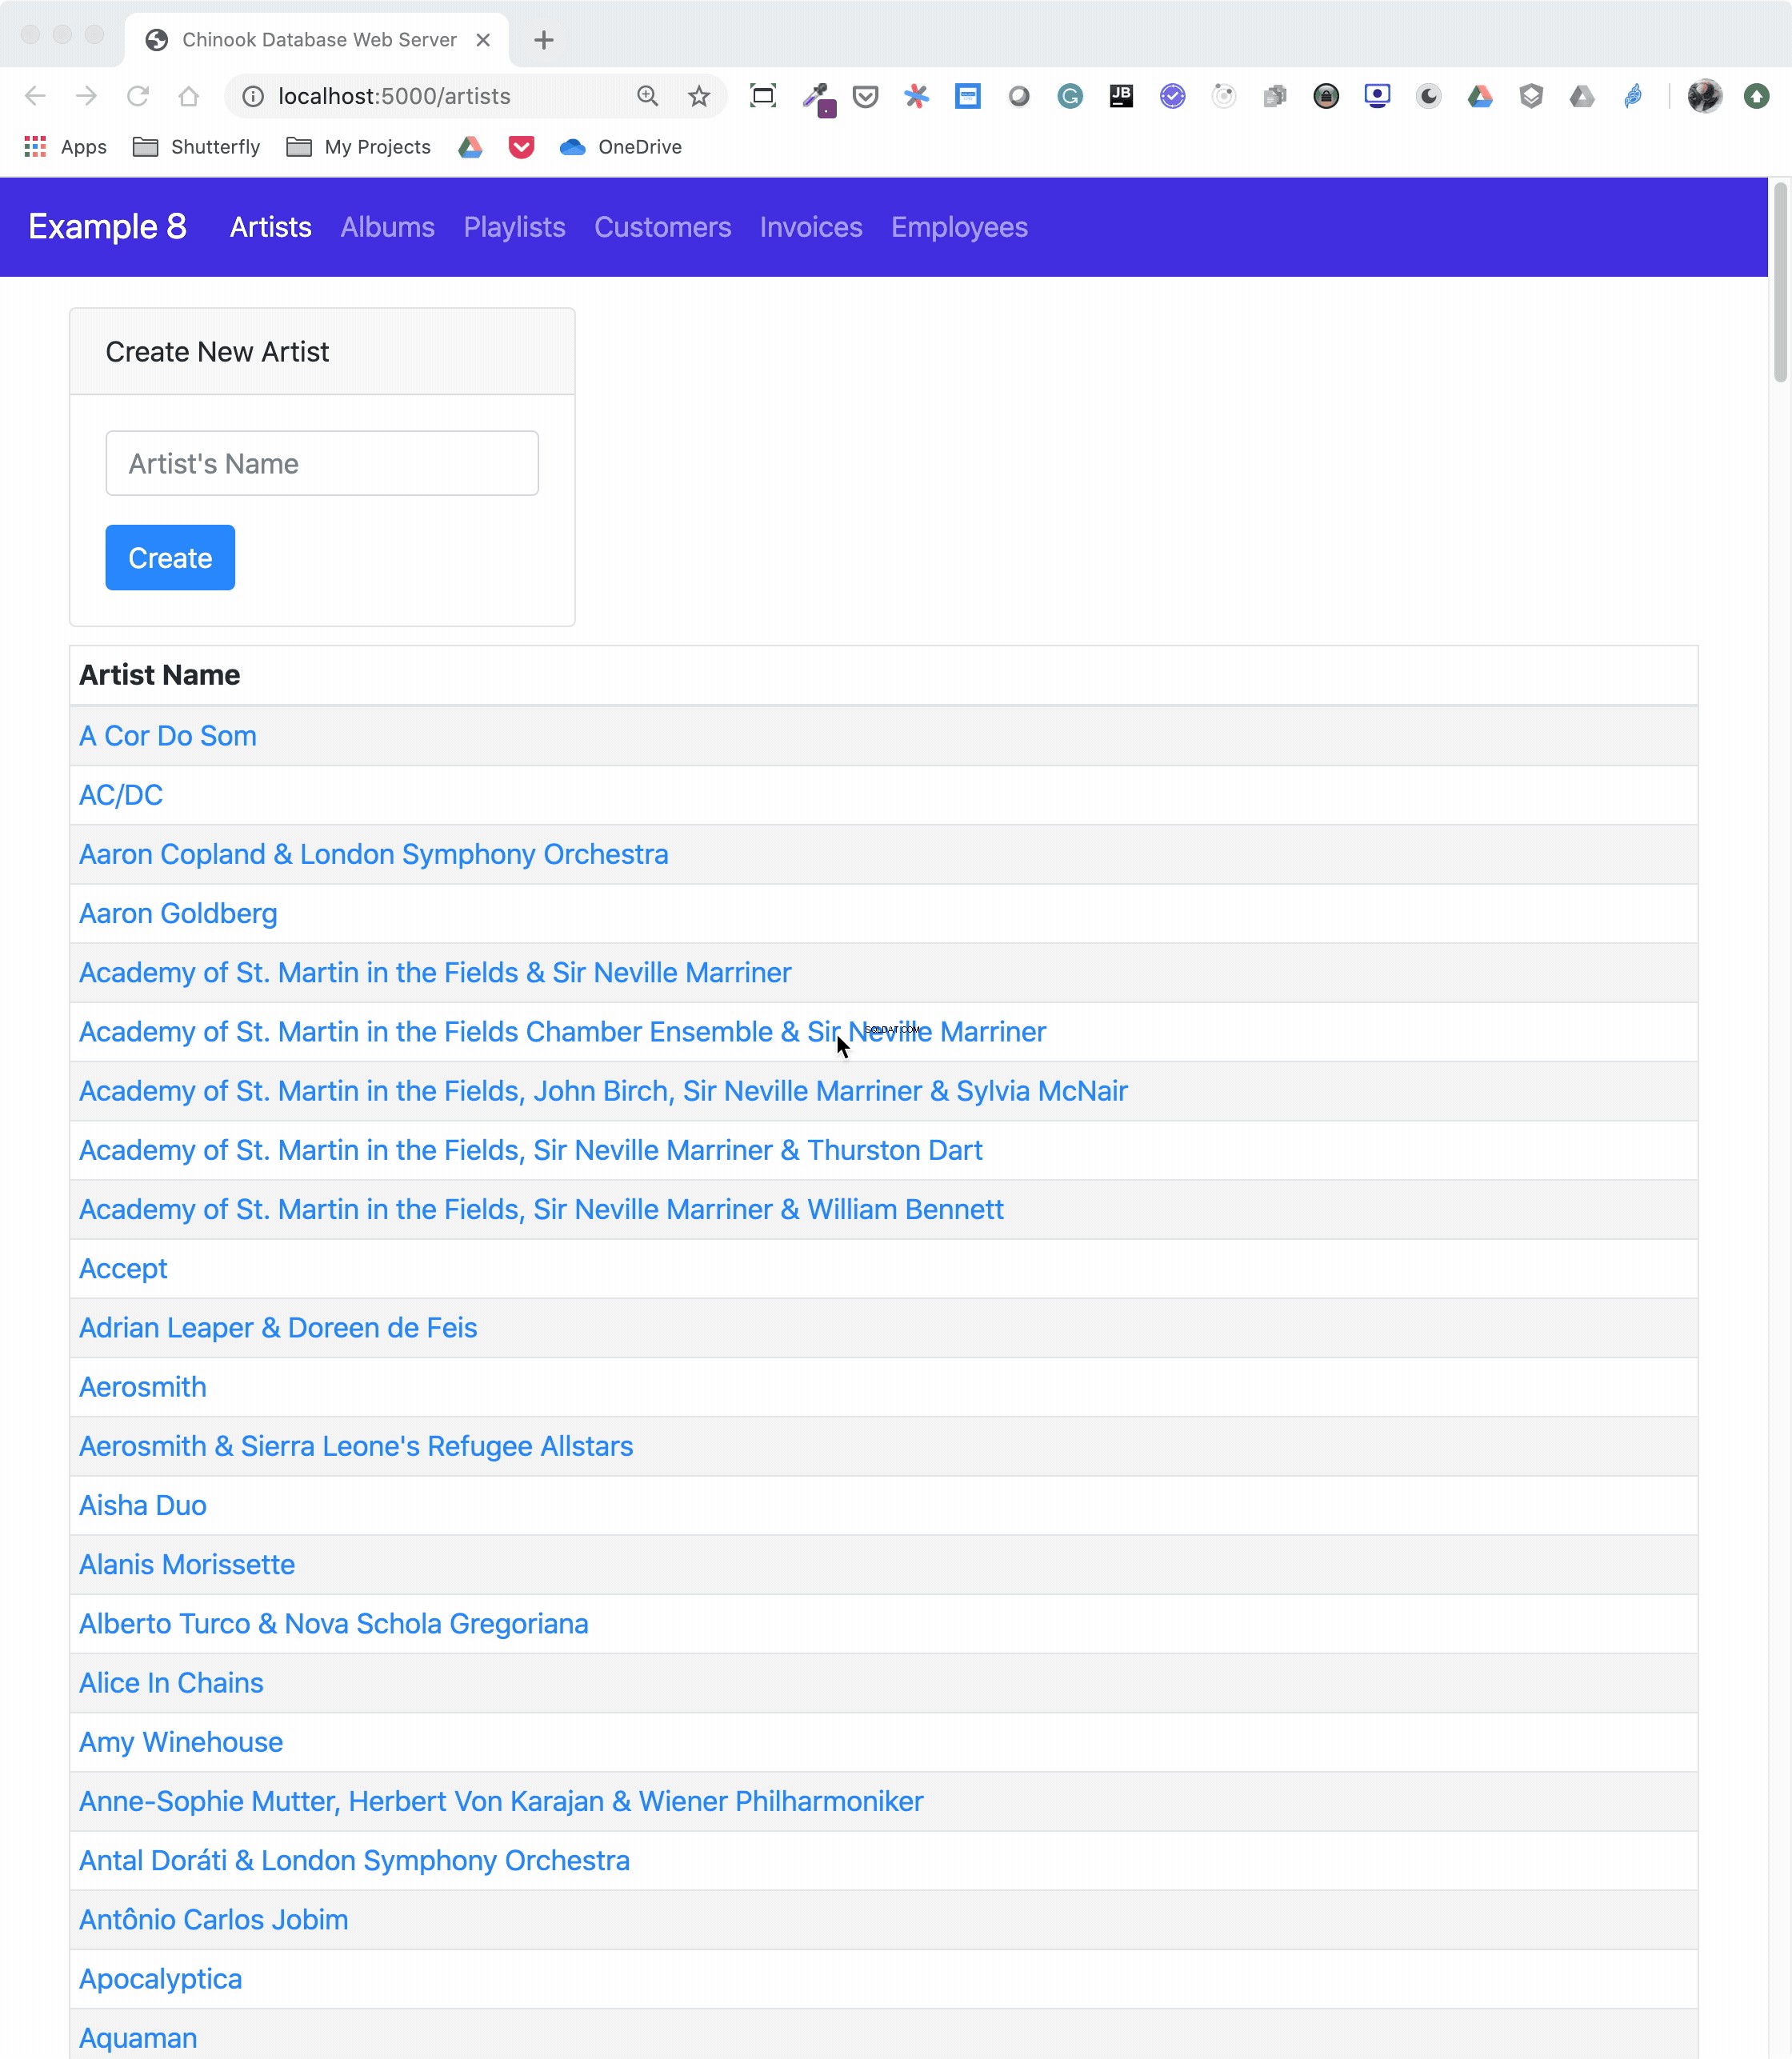
Here’s the application in action, navigating through various menus and features:
The animated screen capture starts on the application home page, styled using Bootstrap 4. The page displays the artists in the database, sorted in ascending order. The remainder of the screen capture presents the results of clicking on the displayed links or navigating around the application from the top-level menu.
Here’s the Jinja2 HTML template that generates the home page of the application:
Here’s what’s going on in this Jinja2 template code:
Line 1 uses Jinja2 template inheritance to build this template from the
Lines 3 to 37 contain the block content of the page, which is incorporated into the Jinja2 macro of the same name in the
Lines 9 to 13 render the form to create a new artist. This uses the features of Flask-WTF to generate the form.
Lines 24 to 32 create a
Lines 27 to 29 render the artist name as a link to the artist’s album page showing the songs associated with a particular artist.
Here’s the Python route that renders the page:
Let’s go over what the above code is doing:
Lines 1 to 6 import all the modules necessary to render the page and initialize forms with data from the database.
Lines 9 to 11 create the blueprint for the artists page.
Lines 13 to 20 create a custom validator function for the Flask-WTF forms to make sure a request to create a new artist doesn’t conflict with an already existing artist.
Lines 22 to 25 create the form class to handle the artist form rendered in the browser and provide validation of the form field inputs.
Lines 27 to 28 connect two routes to the
Line 30 creates an instance of the
Line 33 determines if the page was requested through the HTTP methods GET or POST (submit). If it was a POST, then it also validates the fields of the form and informs the user if the fields are invalid.
Lines 35 to 37 create a new artist object, add it to the SQLAlchemy session, and commit the artist object to the database, persisting it.
Line 38 redirects back to the artists page, which will be rerendered with the newly created artist.
Line 40 runs an SQLAlchemy query to get all the artists in the database and sort them by
Line 41 renders the artists page if the HTTP request method was a GET.
You can see that a great deal of functionality is created by a reasonably small amount of code.
You can also create a web server providing a REST API. This kind of server offers URL endpoints responding with data, often in JSON format. A server providing REST API endpoints can be used by JavaScript single-page web applications through the use of AJAX HTTP requests.
Flask is an excellent tool for creating REST applications. For a multi-part series of tutorials about using Flask, Connexion, and SQLAlchemy to create REST applications, check out Python REST APIs With Flask, Connexion, and SQLAlchemy.
If you’re a fan of Django and are interested in creating REST APIs, then check out Django Rest Framework – An Introduction and Create a Super Basic REST API with Django Tastypie.
注: It’s reasonable to ask if SQLite is the right choice as the database backend to a web application. The SQLite website states that SQLite is a good choice for sites that serve around 100,000 hits per day. If your site gets more daily hits, the first thing to say is congratulations!
Beyond that, if you’ve implemented your website with SQLAlchemy, then it’s possible to move the data from SQLite to another database such as MySQL or PostgreSQL. For a comparison of SQLite, MySQL, and PostgreSQL that will help you make decisions about which one will serve your application best, check out Introduction to Python SQL Libraries.
It’s well worth considering SQLite for your Python application, no matter what it is. Using a database gives your application versatility, and it might create surprising opportunities to add additional features.
You’ve covered a lot of ground in this tutorial about databases, SQLite, SQL, and SQLAlchemy! You’ve used these tools to move data contained in flat files to an SQLite database, access the data with SQL and SQLAlchemy, and provide that data through a web server.
In this tutorial, you’ve learned:
Working with databases is a powerful abstraction for working with data that adds significant functionality to your Python programs and allows you to ask interesting questions of your data.
You can get all of the code and data you saw in this tutorial at the link below:
Download the sample code: Click here to get the code you’ll use to learn about data management with SQLite and SQLAlchemy in this tutorial.
This tutorial is an introduction to using databases, SQL, and SQLAlchemy, but there’s much more to learn about these subjects. These are powerful, sophisticated tools that no single tutorial can cover adequately. Here are some resources for additional information to expand your skills:
If your application will expose the database to users, then avoiding SQL injection attacks is an important skill. For more information, check out Preventing SQL Injection Attacks With Python.
Providing web access to a database is common in web-based single-page applications. To learn how, check out Python REST APIs With Flask, Connexion, and SQLAlchemy – Part 2.
Preparing for data engineering job interviews gives you a leg up in your career. To get started, check out Data Engineer Interview Questions With Python.
Migrating data and being able to roll back using Flask with Postgres and SQLAlchemy is an integral part of the Software Development Life Cycle (SDLC). You can learn more about it by checking out Flask by Example – Setting up Postgres, SQLAlchemy, and Alembic. _id 。
本 上記の表には、フィールド author_idが含まれています 、 authorを参照します テーブル。 author_id フィールドは、次のような著者と本の間に1対多の関係を確立します。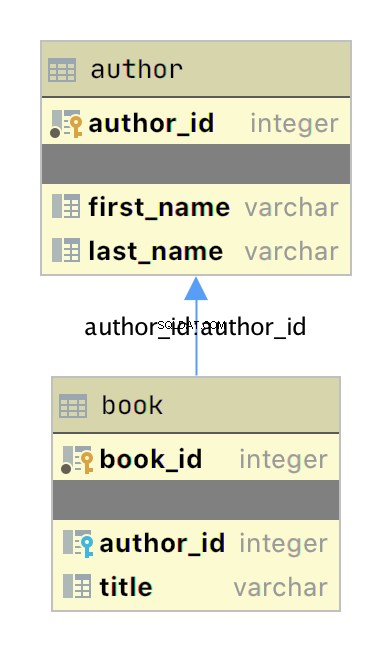
authorを示しています。 およびbook それぞれの主キーとデータフィールドを持つボックスとして。 2つのグラフィカルな項目により、関係に関する情報が追加されます。
本を結ぶ矢印 authorへ author_idに基づくテーブル間の関係を示します bookの外部キー テーブル。 bookに新しい本を追加するとき テーブルの場合、データには author_idが含まれます author内の既存の作成者の値 テーブル。このように、著者によって書かれたすべての本は、そのユニークな著者へのルックアップ関係を持っています。 JOINと呼ばれるものをサポートしています 2つ以上のテーブルを接続する方法をデータベースに指示するために使用できる操作。 authorに参加します およびbook SQLiteコマンドラインアプリケーションを使用して一緒にテーブル:sqlite> SELECT
...> a.first_name || ' ' || a.last_name AS author_name,
...> b.title AS book_title
...> FROM author a
...> JOIN book b ON b.author_id = a.author_id
...> ORDER BY a.last_name ASC;
Isaac Asimov|Foundation
Pearl Buck|The Good Earth
Tom Clancy|The Hunt For Red October
Tom Clancy|Patriot Games
Stephen King|It
Stephen King|Dead Zone
Stephen King|The Shining
John Le Carre|Tinker, Tailor, Soldier, Spy: A George Smiley Novel
Alex Michaelides|The Silent Patient
Carol Shaben|Into The Abyss
author_nameに割り当てられます。 。クエリによって収集されたデータは、 last_nameの昇順で並べ替えられます フィールド。
多対多の関係
author_book_publisher.dbに存在します 著者と出版社の間、および本と出版社の間のデータベース。 1人の著者は多くの出版社と協力でき、1人の出版社は多くの著者と協力できます。同様に、1冊の本を多くの出版社が出版でき、1冊の出版社が多くの本を出版できます。author and publisher tables:CREATE TABLE author_publisher (
author_id INTEGER REFERENCES author,
publisher_id INTEGER REFERENCES publisher
);
author_publisher table referencing the primary keys of the existing author and publisher テーブル。 The author_publisher table is an association table establishing relationships between an author and a publisher.JOIN keyword to connect two tables together. Connecting the author table to the publisher table is a two-step process:
JOIN the author table with the author_publisher テーブル。 JOIN the author_publisher table with the publisher table.author_publisher association table provides the bridge through which the JOIN connects the two tables. Here’s an example SQL query returning a list of authors and the publishers publishing their books: 1sqlite> SELECT
2 ...> a.first_name || ' ' || a.last_name AS author_name,
3 ...> p.name AS publisher_name
4 ...> FROM author a
5 ...> JOIN author_publisher ap ON ap.author_id = a.author_id
6 ...> JOIN publisher p ON p.publisher_id = ap.publisher_id
7 ...> ORDER BY a.last_name ASC;
8Isaac Asimov|Random House
9Pearl Buck|Random House
10Pearl Buck|Simon & Schuster
11Tom Clancy|Berkley
12Tom Clancy|Simon & Schuster
13Stephen King|Random House
14Stephen King|Penguin Random House
15John Le Carre|Berkley
16Alex Michaelides|Simon & Schuster
17Carol Shaben|Simon & Schuster
SELECT statement to get data from the database.author table using the a alias for the author table and concatenates them together with a space character.publisher_name 。author table as the first source from which to retrieve data and assigns it to the alias a 。author table to the publisher テーブル。 It uses the alias ap for the author_publisher association table and performs a JOIN operation to connect the ap.author_id foreign key reference to the a.author_id primary key in the author table.p for the publisher table and performs a JOIN operation to relate the ap.publisher_id foreign key reference to the p.publisher_id primary key in the publisher table.author and publisher tables are normalized, with no data duplication. Yet the returned results have duplicated data where necessary to answer the SQL query.JOIN keyword, but the resulting data is a partial re-creation of the author_book_publisher.csv CSV data. What’s the win for having done the work of creating a database to separate the data? 1sqlite> SELECT
2 ...> a.first_name || ' ' || a.last_name AS author_name,
3 ...> COUNT(b.title) AS total_books
4 ...> FROM author a
5 ...> JOIN book b ON b.author_id = a.author_id
6 ...> GROUP BY author_name
7 ...> ORDER BY total_books DESC, a.last_name ASC;
8Stephen King|3
9Tom Clancy|2
10Isaac Asimov|1
11Pearl Buck|1
12John Le Carre|1
13Alex Michaelides|1
14Carol Shaben|1
SELECT keyword.author_name 。ORDER BY clause to sort the list.author table to get data from and creates the a alias.book table through a JOIN to the author_id and creates the b alias for the book table.GROUP BY キーワード。 GROUP BY is what groups each author_name and controls what books are tallied by COUNT() for that author.
Entity Relationship Diagrams
author_book_publisher.db SQLite database is small enough that the entire database can be visualized by the diagram shown below: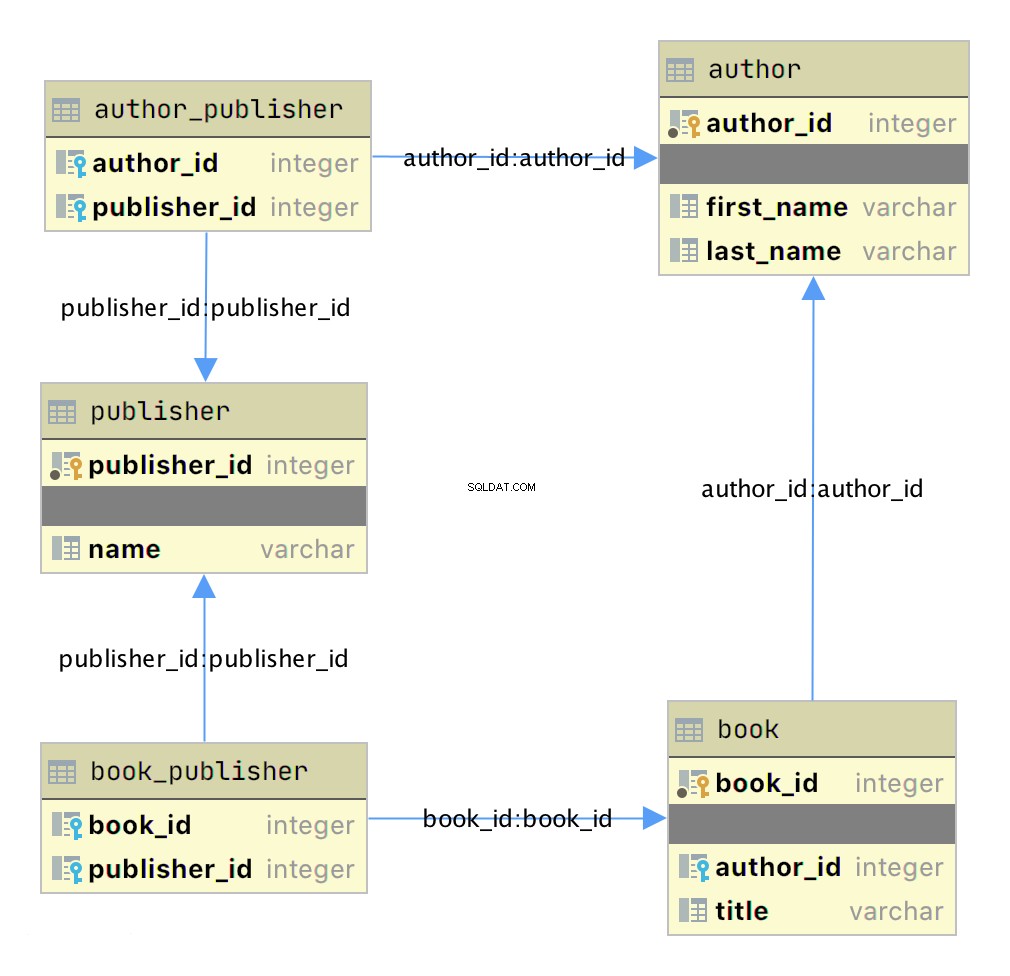
book_publisher has two arrows, one connecting it to the book table and another connecting it to the publisher テーブル。 The arrow indicates the many-to-many relationship between the book and publisher テーブル。 The author_publisher table provides the same relationship between author and publisher 。
Working With SQLAlchemy and Python Objects
The Model
Base クラス。 The Base class provides the interface operations between instances of the model and the database table.models.py file that creates the models to represent the author_book_publisher.db database: 1from sqlalchemy import Column, Integer, String, ForeignKey, Table
2from sqlalchemy.orm import relationship, backref
3from sqlalchemy.ext.declarative import declarative_base
4
5Base = declarative_base()
6
7author_publisher = Table(
8 "author_publisher",
9 Base.metadata,
10 Column("author_id", Integer, ForeignKey("author.author_id")),
11 Column("publisher_id", Integer, ForeignKey("publisher.publisher_id")),
12)
13
14book_publisher = Table(
15 "book_publisher",
16 Base.metadata,
17 Column("book_id", Integer, ForeignKey("book.book_id")),
18 Column("publisher_id", Integer, ForeignKey("publisher.publisher_id")),
19)
20
21class Author(Base):
22 __tablename__ = "author"
23 author_id = Column(Integer, primary_key=True)
24 first_name = Column(String)
25 last_name = Column(String)
26 books = relationship("Book", backref=backref("author"))
27 publishers = relationship(
28 "Publisher", secondary=author_publisher, back_populates="authors"
29 )
30
31class Book(Base):
32 __tablename__ = "book"
33 book_id = Column(Integer, primary_key=True)
34 author_id = Column(Integer, ForeignKey("author.author_id"))
35 title = Column(String)
36 publishers = relationship(
37 "Publisher", secondary=book_publisher, back_populates="books"
38 )
39
40class Publisher(Base):
41 __tablename__ = "publisher"
42 publisher_id = Column(Integer, primary_key=True)
43 name = Column(String)
44 authors = relationship(
45 "Author", secondary=author_publisher, back_populates="publishers"
46 )
47 books = relationship(
48 "Book", secondary=book_publisher, back_populates="publishers"
49 )
Column , Integer , String , ForeignKey , and Table classes from SQLAlchemy, which are used to help define the model attributes.relationship() and backref objects, which are used to create the relationships between objects.declarative_base object, which connects the database engine to the SQLAlchemy functionality of the models.Base class, which is what all models inherit from and how they get SQLAlchemy ORM functionality.author_publisher association table model.book_publisher association table model.Author class model to the author database table.Book class model to the book database table.Publisher class model to the publisher database table.author_book_publisher.db データベース。 But it glosses over some SQLAlchemy ORM features, including Table , ForeignKey , relationship() , and backref 。 Let’s get into those now.
Table Creates Associationsauthor_publisher and book_publisher are both instances of the Table class that create the many-to-many association tables used between the author and publisher tables and the book and publisher tables, respectively. Table class creates a unique instance of an ORM mapped table within the database. The first parameter is the table name as defined in the database, and the second is Base.metadata , which provides the connection between the SQLAlchemy functionality and the database engine. Column class defining the table fields by name, their type, and in the example above, an instance of a ForeignKey 。
ForeignKey Creates a ConnectionForeignKey class defines a dependency between two Column fields in different tables. A ForeignKey is how you make SQLAlchemy aware of the relationships between tables. For example, this line from the author_publisher instance creation establishes a foreign key relationship:Column("author_id", Integer, ForeignKey("author.author_id"))
author_publisher table named author_id 。 The type of that column is Integer , and author_id is a foreign key related to the primary key in the author table.author_id and publisher_id defined in the author_publisher Table instance creates the connection from the author table to the publisher table and vice versa, establishing a many-to-many relationship.
relationship() Establishes a CollectionForeignKey defines the existence of the relationship between tables but not the collection of books an author can have. Take a look at this line in the Author class definition:books = relationship("Book", backref=backref("author"))
books attribute being plural (which is not a requirement, just a convention) is an indication that it’s a collection. relationship() , the class name Book (which is not the table name book ), is the class to which the books attribute is related. The relationship informs SQLAlchemy that there’s a relationship between the Author and Book クラス。 SQLAlchemy will find the relationship in the Book class definition:author_id = Column(Integer, ForeignKey("author.author_id"))
ForeignKey connection point between the two classes. You’ll get to the backref parameter in relationship() in a moment.Author is to the Publisher クラス。 This is created with the following statement in the Author class definition:publishers = relationship(
"Publisher", secondary=author_publisher, back_populates="authors"
)
books , the attribute publishers indicates a collection of publishers associated with an author. The first parameter, "Publisher" , informs SQLAlchemy what the related class is. The second and third parameters are secondary=author_publisher and back_populates="authors" :
secondary tells SQLAlchemy that the relationship to the Publisher class is through a secondary table, which is the author_publisher association table created earlier in models.py 。 The secondary parameter makes SQLAlchemy find the publisher_id ForeignKey defined in the author_publisher association table.back_populates is a convenience configuration telling SQLAlchemy that there’s a complementary collection in the Publisher class called authors 。
backref Mirrors Attributesbackref parameter of the books collection relationship() creates an author attribute for each Book 実例。 This attribute refers to the parent Author that the Book instance is related to.Book instance would be returned from the SQLAlchemy query. The Book instance has attributes that can be used to print out information about the book:book = session.query(Book).filter_by(Book.title == "The Stand").one_or_none()
print(f"Authors name: {book.author.first_name} {book.author.last_name}")
author attribute in the Book above is because of the backref 意味。 A backref can be very handy to have when you need to refer to the parent and all you have is a child instance.
Queries Answer Questions
SELECT * FROM author; in SQLAlchemy like this:results = session.query(Author).all()
session is an SQLAlchemy object used to communicate with SQLite in the Python example programs. Here, you tell the session you want to execute a query against the Author model and return all records.results returned by the query is where the magic happens. Instead of getting back a list of lists of scalar data, you’ll get back a list of instances of Author objects with attributes matching the column names you defined.books and publishers collections maintained by SQLAlchemy create a hierarchical list of authors and the books they’ve written as well as the publishers who’ve published them.author_book_totals = (
session.query(
Author.first_name,
Author.last_name,
func.count(Book.title).label("book_total")
)
.join(Book)
.group_by(Author.last_name)
.order_by(desc("book_total"))
.all()
)
count used by the group_by clause is based on the author’s last name. Finally, the results are sorted in descending order based on the aggregated and aliased book_total 。
Example Program
examples/example_2/main.py has the same functionality as examples/example_1/main.py but uses SQLAlchemy exclusively to interface with the author_book_publisher.db SQLite database. The program is broken up into the main() function and the functions it calls: 1def main():
2 """Main entry point of program"""
3 # Connect to the database using SQLAlchemy
4 with resources.path(
5 "project.data", "author_book_publisher.db"
6 ) as sqlite_filepath:
7 engine = create_engine(f"sqlite:///{sqlite_filepath}")
8 Session = sessionmaker()
9 Session.configure(bind=engine)
10 session = Session()
11
12 # Get the number of books printed by each publisher
13 books_by_publisher = get_books_by_publishers(session, ascending=False)
14 for row in books_by_publisher:
15 print(f"Publisher: {row.name}, total books: {row.total_books}")
16 print()
17
18 # Get the number of authors each publisher publishes
19 authors_by_publisher = get_authors_by_publishers(session)
20 for row in authors_by_publisher:
21 print(f"Publisher: {row.name}, total authors: {row.total_authors}")
22 print()
23
24 # Output hierarchical author data
25 authors = get_authors(session)
26 output_author_hierarchy(authors)
27
28 # Add a new book
29 add_new_book(
30 session,
31 author_name="Stephen King",
32 book_title="The Stand",
33 publisher_name="Random House",
34 )
35 # Output the updated hierarchical author data
36 authors = get_authors(session)
37 output_author_hierarchy(authors)
examples/example_1/main.py 。 Let’s go over the differences:
sqlite_filepath variable to the database file path. Then they create the engine variable to communicate with SQLite and the author_book_publisher.db database file, which is SQLAlchemy’s access point to the database.Session class from the SQLAlchemy’s sessionmaker() 。Session to the engine created in line 8.session instance, which is used by the program to communicate with SQLAlchemy.data with session as the first parameter to all the functions called by main() 。get_books_by_publisher() has been refactored to use SQLAlchemy and the models you defined earlier to get the data requested: 1def get_books_by_publishers(session, ascending=True):
2 """Get a list of publishers and the number of books they've published"""
3 if not isinstance(ascending, bool):
4 raise ValueError(f"Sorting value invalid: {ascending}")
5
6 direction = asc if ascending else desc
7
8 return (
9 session.query(
10 Publisher.name, func.count(Book.title).label("total_books")
11 )
12 .join(Publisher.books)
13 .group_by(Publisher.name)
14 .order_by(direction("total_books"))
15 )
get_books_by_publishers() , is doing:
direction variable and sets it equal to the SQLAlchemy desc or asc function depending on the value of the ascending パラメータ。Publisher table for data to return, which in this case are Publisher.name and the aggregate total of Book objects associated with an author, aliased to total_books 。Publisher.books collection.Publisher.name attribute.direction 。get_authors_by_publisher() has also been modified to work exclusively with SQLAlchemy. Its functionality is very similar to the previous function, so a function description is omitted:def get_authors_by_publishers(session, ascending=True):
"""Get a list of publishers and the number of authors they've published"""
if not isinstance(ascending, bool):
raise ValueError(f"Sorting value invalid: {ascending}")
direction = asc if ascending else desc
return (
session.query(
Publisher.name,
func.count(Author.first_name).label("total_authors"),
)
.join(Publisher.authors)
.group_by(Publisher.name)
.order_by(direction("total_authors"))
)
get_authors() has been added to get a list of authors sorted by their last names. The result of this query is a list of Author objects containing a collection of books. The Author objects already contain hierarchical data, so the results don’t have to be reformatted:def get_authors(session):
"""Get a list of author objects sorted by last name"""
return session.query(Author).order_by(Author.last_name).all()
add_new_book() is relatively complex but straightforward to understand. It determines if a book with the same title, author, and publisher exists in the database already. Book , Author and Publisher exist, the relationships between them are created, and the resulting information is saved to the database: 1def add_new_book(session, author_name, book_title, publisher_name):
2 """Adds a new book to the system"""
3 # Get the author's first and last names
4 first_name, _, last_name = author_name.partition(" ")
5
6 # Check if book exists
7 book = (
8 session.query(Book)
9 .join(Author)
10 .filter(Book.title == book_title)
11 .filter(
12 and_(
13 Author.first_name == first_name, Author.last_name == last_name
14 )
15 )
16 .filter(Book.publishers.any(Publisher.name == publisher_name))
17 .one_or_none()
18 )
19 # Does the book by the author and publisher already exist?
20 if book is not None:
21 return
22
23 # Get the book by the author
24 book = (
25 session.query(Book)
26 .join(Author)
27 .filter(Book.title == book_title)
28 .filter(
29 and_(
30 Author.first_name == first_name, Author.last_name == last_name
31 )
32 )
33 .one_or_none()
34 )
35 # Create the new book if needed
36 if book is None:
37 book = Book(title=book_title)
38
39 # Get the author
40 author = (
41 session.query(Author)
42 .filter(
43 and_(
44 Author.first_name == first_name, Author.last_name == last_name
45 )
46 )
47 .one_or_none()
48 )
49 # Do we need to create the author?
50 if author is None:
51 author = Author(first_name=first_name, last_name=last_name)
52 session.add(author)
53
54 # Get the publisher
55 publisher = (
56 session.query(Publisher)
57 .filter(Publisher.name == publisher_name)
58 .one_or_none()
59 )
60 # Do we need to create the publisher?
61 if publisher is None:
62 publisher = Publisher(name=publisher_name)
63 session.add(publisher)
64
65 # Initialize the book relationships
66 book.author = author
67 book.publishers.append(publisher)
68 session.add(book)
69
70 # Commit to the database
71 session.commit()
book variable to an instance of a Book if a book with the same title, author, and publisher is found. Otherwise, they set book to None 。book variable to an instance of a Book if a book with the same title and author is found. Otherwise, they create a new Book instance.author variable to an existing author, if found, or create a new Author instance based on the passed-in author name.publisher variable to an existing publisher, if found, or create a new Publisher instance based on the passed-in publisher name.book.author instance to the author 実例。 This creates the relationship between the author and the book, which SQLAlchemy will create in the database when the session is committed.publisher instance to the book.publishers コレクション。 This creates the many-to-many relationship between the book and publisher テーブル。 SQLAlchemy will create references in the tables as well as in the book_publisher association table that connects the two.Book instance to the session, making it part of the session’s unit of work.author_publisher or book_publisher association tables in either the queries or the creations and updates. Because of the work you did in models.py setting up the relationships, SQLAlchemy can handle connecting objects together and keeping those tables in sync during creations and updates.session 物体。 None of that activity is touching the database. Only when the session.commit() statement executes does the session then go through its unit of work and commit that work to the database.Book instance is created (as in line 37 above), then the book has its attributes initialized except for the book_id primary key and author_id 外部キー。 Because no database activity has happened yet, the book_id is unknown, and nothing was done in the instantiation of book to give it an author_id 。session.commit() is executed, one of the things it will do is insert book into the database, at which point the database will create the book_id 主キー。 The session will then initialize the book.book_id value with the primary key value created by the database engine.session.commit() is also aware of the insertion of the Book instance in the author.books コレクション。 The author object’s author_id primary key will be added to the Book instance appended to the author.books collection as the author_id foreign key.
Providing Access to Multiple Users
project/data folder.
Using Flask With Python, SQLite, and SQLAlchemy
examples/example_3/chinook_server.py program creates a Flask application that you can interact with using a browser. The application makes use of the following technologies:
.env file holds the environment variables for the application. The .env file exists to contain sensitive information like passwords, which you should keep out of your code files. However, the content of the project .env file is shown below since it doesn’t contain any sensitive data:SECRET_KEY = "you-will-never-guess"
SQLALCHEMY_TRACK_MODIFICATIONS = False
SQLAlCHEMY_ECHO = False
DEBUG = True
1{% extends "base.html" %}
2
3{% block content %}
4<div class="container-fluid">
5 <div class="m-4">
6 <div class="card" style="width: 18rem;">
7 <div class="card-header">Create New Artist</div>
8 <div class="card-body">
9 <form method="POST" action="{{url_for('artists_bp.artists')}}">
10 {{ form.csrf_token }}
11 {{ render_field(form.name, placeholder=form.name.label.text) }}
12 <button type="submit" class="btn btn-primary">Create</button>
13 </form>
14 </div>
15 </div>
16 <table class="table table-striped table-bordered table-hover table-sm">
17 <caption>List of Artists</caption>
18 <thead>
19 <tr>
20 <th>Artist Name</th>
21 </tr>
22 </thead>
23 <tbody>
24 {% for artist in artists %}
25 <tr>
26 <td>
27 <a href="{{url_for('albums_bp.albums', artist_id=artist.artist_id)}}">
28 {{ artist.name }}
29 </a>
30 </td>
31 </tr>
32 {% endfor %}
33 </tbody>
34 </table>
35 </div>
36</div>
37{% endblock %}
base.html レンプレート。 The base.html template contains all the HTML5 boilerplate code as well as the Bootstrap navigation bar consistent across all pages of the site.base.html base template.for loop that renders the table of artist names. 1from flask import Blueprint, render_template, redirect, url_for
2from flask_wtf import FlaskForm
3from wtforms import StringField
4from wtforms.validators import InputRequired, ValidationError
5from app import db
6from app.models import Artist
7
8# Set up the blueprint
9artists_bp = Blueprint(
10 "artists_bp", __name__, template_folder="templates", static_folder="static"
11)
12
13def does_artist_exist(form, field):
14 artist = (
15 db.session.query(Artist)
16 .filter(Artist.name == field.data)
17 .one_or_none()
18 )
19 if artist is not None:
20 raise ValidationError("Artist already exists", field.data)
21
22class CreateArtistForm(FlaskForm):
23 name = StringField(
24 label="Artist's Name", validators=[InputRequired(), does_artist_exist]
25 )
26
27@artists_bp.route("/")
28@artists_bp.route("/artists", methods=["GET", "POST"])
29def artists():
30 form = CreateArtistForm()
31
32 # Is the form valid?
33 if form.validate_on_submit():
34 # Create new artist
35 artist = Artist(name=form.name.data)
36 db.session.add(artist)
37 db.session.commit()
38 return redirect(url_for("artists_bp.artists"))
39
40 artists = db.session.query(Artist).order_by(Artist.name).all()
41 return render_template("artists.html", artists=artists, form=form,)
artists() function they decorate.CreateArtistForm() class.Artist.name 。
Creating a REST API Server
Conclusion
Further Reading