はじめに
このチュートリアルには、私が職業生活の中で収集したSQL(DDL、DML)に関する情報が含まれています。これは、データベースを操作するときに知っておく必要のある最低限のことです。複雑なSQL構造を使用する必要がある場合は、通常、インターネットで簡単に見つけることができるMSDNライブラリを閲覧します。私の考えでは、すべてを頭の中に保つことは非常に困難であり、ちなみに、これは必要ありません。 Oracle、MySQL、Firebirdなどのほとんどのリレーショナルデータベースで使用されているすべての主要な構造を知っておく必要があります。それでも、データ型が異なる場合があります。たとえば、オブジェクト(テーブル、制約、インデックスなど)を作成するには、統合開発環境(IDE)を使用してデータベースを操作するだけで、特定のデータベースタイプ(MS SQL、Oracle)のビジュアルツールを調べる必要はありません。 、MySQL、Firebirdなど)。これは、テキスト全体を表示でき、インデックスや制約などを作成するために多数のタブを調べる必要がないため、便利です。データベースを常に使用している場合は、スクリプトを使用してオブジェクトを作成、変更、特に再構築する方が、ビジュアルモードよりもはるかに高速です。その上、私の意見では、スクリプトモード(かなりの精度で)では、オブジェクトに名前を付けるためのルールを指定および制御する方が簡単です。さらに、データベースの変更をテストデータベースから本番データベースに転送する必要がある場合は、スクリプトを使用すると便利です。
SQLはいくつかの部分に分かれています。私の記事では、最も重要なものを確認します:
DDL –データ定義言語
DML –データ操作言語。これには次の構造が含まれます。
- SELECT –データの選択
- INSERT –新しいデータの挿入
- 更新–データの更新
- DELETE –データの削除
- MERGE –データのマージ
ケーススタディのすべての構造について説明します。さらに、プログラミング言語、特にSQLは、理解を深めるために実際に研究する必要があると思います。
これはステップバイステップのチュートリアルであり、読みながら例を実行する必要があります。ただし、コマンドを詳細に知る必要がある場合は、MSDNなどのインターネットを閲覧してください。
このチュートリアルを作成するときは、MS SQL Serverデータベース、バージョン2014、およびMS SQL Server Management Studio(SSMS)を使用してスクリプトを実行しました。
簡単に説明します MS SQL Server Management Studio(SSMS)
SQL Server Management Studio(SSMS)は、データベースコンポーネントを構成、管理、および管理するためのMicrosoftSQLServerユーティリティです。これには、サーバーオブジェクトと設定を操作するスクリプトエディターとグラフィックプログラムが含まれています。 SQL Server Management Studioのメインツールはオブジェクトエクスプローラーです。これにより、ユーザーはサーバーオブジェクトを表示、取得、および管理できます。 このテキストの一部はウィキペディアから引用しています。
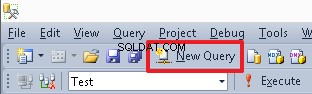
新しいスクリプトエディタを作成するには、[新しいクエリ]ボタンを使用します。
現在のデータベースから切り替えるには、ドロップダウンメニューを使用できます:

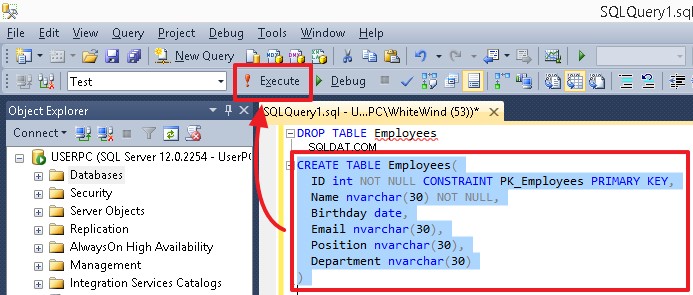
特定のコマンドまたは一連のコマンドを実行するには、それを強調表示して、[実行]ボタンまたはF5を押します。エディターにコマンドが1つしかない場合、またはすべてのコマンドを実行する必要がある場合は、何も強調表示しないでください。
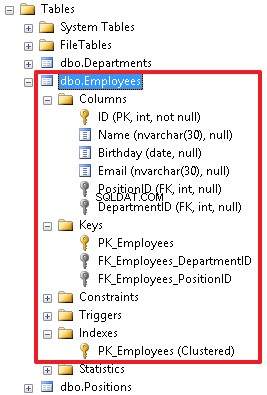
オブジェクト(テーブル、列、インデックス)を作成するスクリプトを実行した後、対応するオブジェクト(たとえば、テーブルまたは列)を選択し、ショートカットメニューの[更新]をクリックして変更を確認します。

実際、ここで提供されている例を実行するために知っておく必要があるのはこれだけです。
理論
リレーショナルデータベースは、相互にリンクされたテーブルのセットです。一般に、データベースは構造化データを格納するファイルです。
データベース管理システム(DBMS)は、特定のデータベースタイプ(MS SQL、Oracle、MySQL、Firebirdなど)を操作するためのツールのセットです。
注: 私たちの日常生活のように、「Oracle DB」または単に「Oracle」は実際には「OracleDBMS」を意味します。このチュートリアルでは、「データベース」という用語を使用します。
テーブルは列のセットです。多くの場合、これらの用語の次の定義を聞くことができます:フィールド、行、およびレコード。これは同じ意味です。
テーブルは、リレーショナルデータベースのメインオブジェクトです。すべてのデータは、テーブルの列に行ごとに保存されます。
各テーブルとその列について、必要なアイテムを見つけることができる名前を指定する必要があります。
オブジェクト、テーブル、列、およびインデックスの名前の最小長は128シンボルです。
注: Oracleデータベースでは、オブジェクト名の最小の長さは30シンボルです。したがって、特定のデータベースでは、オブジェクト名のカスタムルールを作成する必要があります。
SQLは、DBMSを介してデータベースでクエリを実行できるようにする言語です。特定のDBMSでは、SQL言語に独自の方言がある場合があります。
DDLおよびDML– SQLサブ言語:
- DDL言語は、データベース構造の作成と変更(テーブルとリンクの削除)に役立ちます。
- DML言語を使用すると、テーブルデータとその行を操作できます。また、テーブルからのデータの選択、新しいデータの追加、現在のデータの更新と削除にも役立ちます。
SQLでは2種類のコメント(1行と区切り)を使用できます。
-- single-line comment
および
/* delimited comment */
理論は以上です。
DDL –データ定義言語
プログラマーではない人に馴染みのある方法で表された従業員に関するデータを含むサンプルテーブルを考えてみましょう。
| 従業員ID | 氏名 | 生年月日 | メール | 位置 | 部門 |
| 1000 | 19.02.1955 | example@sqldat.com | |||
| 1001 | 1983年12月3日 | example@sqldat.com | |||
| 1002 | 1976年6月7日 | example@sqldat.com | |||
| 1003 | 1982年4月17日 | example@sqldat.com |
この場合、列のタイトルは、従業員ID、氏名、生年月日、電子メール、役職、および部門です。
このテーブルの各列は、データ型ごとに説明できます。
- 従業員ID–整数
- フルネーム–文字列
- 生年月日–日付
- 電子メール–文字列
- 位置–文字列
- 部門–文字列
列タイプは、各列に格納できるデータ型を指定するプロパティです。
まず、MSSQLで使用される主なデータ型を覚えておく必要があります。
| 定義 | 指定 で MS SQL | 説明 |
| varchar(N) および nvarchar(N) | N番号を使用して、特定の列に可能な最大の文字列長を指定できます。たとえば、[フルネーム]列の値に(最大で)30個の記号を含めることができると言いたい場合は、nvarchar(30)のタイプを指定する必要があります。
varcharとnvarcharの違いは、varcharでは文字列をASCII形式で保存できるのに対し、nvarcharでは文字列をUnicode形式で保存できるため、各記号は2バイトかかります。 | |
| char(N) および nchar(N) | このタイプは、次の点で可変長文字列とは異なります。文字列の長さがN記号未満の場合、右側のNの長さに常にスペースが追加されます。したがって、データベースでは、正確にN個のシンボルを取ります。ここで、1つのシンボルはcharに1バイト、ncharに2バイトを取ります。私の練習では、このタイプはあまり使用されません。それでも、誰かがそれを使用する場合、通常、このタイプはchar(1)形式になります。つまり、フィールドが1つのシンボルで定義されている場合です。 | |
| int | このタイプでは、列で整数(正と負の両方)のみを使用できます。注:このタイプの番号範囲は次のとおりです:2 147483648から2147483647。通常、これは識別子を実行するために使用される主なタイプです。 | |
| 列に日付(日付、月、年)のみを格納するために使用されます。たとえば、2014年2月15日。このタイプは、次の列に使用できます:受領日、生年月日など、日付のみを指定する必要がある場合、または時刻が重要ではなく、削除できる場合。 | ||
| 時間、分、秒、ミリ秒を保存する必要がある場合は、このタイプを使用できます。たとえば、17:38:31.3231603がある場合、またはフライトの出発時刻を追加する必要があるとします。 | ||
| このタイプを使用すると、ユーザーは日付と時刻の両方を保存できます。たとえば、2014年2月15日17:38:31.323にイベントがあります。 | ||
| このタイプを使用して、「はい」/「いいえ」などの値を格納できます。「はい」は1、「いいえ」は0です。 |
また、禁止されていない限り、フィールド値を指定する必要はありません。この場合、NULLを使用できます。
例を実行するために、「Test」という名前のテストデータベースを作成します。
追加のプロパティを使用せずに単純なデータベースを作成するには、次のコマンドを実行します。
CREATE DATABASE Test
データベースを削除するには、次のコマンドを実行します。
DROP DATABASE Test
データベースに切り替えるには、次のコマンドを使用します:
USE Test
または、SSMSメニュー領域のドロップダウンメニューからテストデータベースを選択することもできます。
これで、説明、スペース、キリル文字を使用してデータベースにテーブルを作成できます。
CREATE TABLE [Employees](
[EmployeeID] int,
[FullName] nvarchar(30),
[Birthdate] date,
[E-mail] nvarchar(30),
[Position] nvarchar(30),
[Department] nvarchar(30)
)
この場合、名前を角かっこで囲む必要があります[…]。
それでも、すべてのオブジェクト名をラテン語で指定し、名前にスペースを使用しないことをお勧めします。この場合、すべての単語は大文字で始まります。たとえば、「EmployeeID」フィールドには、PersonnelNumber名を指定できます。名前に数字を使用することもできます(例:PhoneNumber1)。
注: 一部のDBMSでは、次の名前形式«PHONE_NUMBER»を使用する方が便利です。たとえば、この形式はORACLEデータベースで確認できます。また、フィールド名は、DBMSで使用されるキーワードと一致しないようにする必要があります。
このため、角かっこ構文を忘れて、Employeesテーブルを削除できます。
DROP TABLE [Employees]
たとえば、employeesを含むテーブルに「Employees」という名前を付け、そのフィールドに次の名前を設定できます。
- ID
- 名前
- 誕生日
- メール
- 位置
- 部門
多くの場合、識別子フィールドには「ID」を使用します。
それでは、テーブルを作成しましょう:
CREATE TABLE Employees(
ID int,
Name nvarchar(30),
Birthday date,
Email nvarchar(30),
Position nvarchar(30),
Department nvarchar(30)
)
必須列を設定するには、NOTNULLオプションを使用できます。
現在のテーブルでは、次のコマンドを使用してフィールドを再定義できます。
-- ID field update

ALTER TABLE Employees ALTER COLUMN ID int NOT NULL

-- Name field update

ALTER TABLE Employees ALTER COLUMN Name nvarchar(30) NOT NULL
注: ほとんどのDBMSのSQL言語の一般的な概念は同じです(私自身の経験から)。異なるDBMSのDDLの違いは、主にデータ型にあります(名前だけでなく、特定の実装によっても異なる場合があります)。さらに、特定のSQL実装(コマンド)は同じですが、方言にわずかな違いがある場合があります。 SQLの基本を知っていると、あるDBMSから別のDBMSに簡単に切り替えることができます。この場合、新しいDBMSにコマンドを実装する方法の詳細を理解するだけで済みます。
ORACLEDBMSの同じコマンドを比較します。
-- create table
CREATE TABLE Employees(
ID int, -- In ORACLE the int type is a value for number(38)
Name nvarchar2(30), -- in ORACLE nvarchar2 is identical to nvarchar in MS SQL Birthday date,
Email nvarchar2(30),
Position nvarchar2(30),
Department nvarchar2(30)
);

-- ID and Name field update (here we use MODIFY(…) instead of ALTER COLUMN
ALTER TABLE Employees MODIFY(ID int NOT NULL,Name nvarchar2(30) NOT NULL);
-- add PK (in this case the construction is the same as in the MS SQL)
ALTER TABLE Employees ADD CONSTRAINT PK_Employees PRIMARY KEY(ID);
ORACLEは、varchar2タイプの実装が異なります。その形式はDB設定によって異なり、たとえばUTF-8でテキストを保存できます。さらに、フィールド長をバイトとシンボルの両方で指定できます。これを行うには、BYTE値とCHAR値の後に、長さフィールドを使用する必要があります。例:
NAME varchar2(30 BYTE) – field capacity equals 30 bytes
NAME varchar2(30 CHAR) -- field capacity equals 30 symbols
ORACLEでvarchar2(30)を指定するだけの場合にデフォルトで使用される値(BYTEまたはCHAR)は、DB設定によって異なります。多くの場合、あなたは簡単に混乱する可能性があります。したがって、ORACLEでvarchar2タイプ(たとえば、UTF-8を使用)を使用する場合は、CHARを明示的に指定することをお勧めします(文字列の長さを記号で読み取る方が便利なため)。
ただし、この場合、テーブルにデータがある場合、コマンドを正常に実行するには、すべてのテーブル行のIDフィールドとNameフィールドに入力する必要があります。
特定の例で示します。
次のスクリプトを使用して、ID、Position、Departmentの各フィールドにデータを挿入しましょう。
INSERT Employees(ID,Position,Department) VALUES
(1000,’CEO,N'Administration'),
(1001,N'Programmer',N'IT'),
(1002,N'Accountant',N'Accounts dept'),
(1003,N'Senior Programmer',N'IT')
この場合、INSERTコマンドもエラーを返します。これは、必須フィールドNameの値を指定していないために発生します。
元のテーブルにデータがある場合、「ALTER TABLE Employees ALTER COLUMN ID int NOT NULL」コマンドは機能しますが、「ALTER TABLE Employees ALTER COLUMN Name int NOT NULL」コマンドは、Nameフィールドにあるエラーを返します。 NULL値。
[名前]フィールドに値を追加しましょう:
INSERT Employees(ID,Position,Department,Name) VALUES (1000,N'CEO',N'Administration',N'John'),
(1001,N'Programmer',N'IT',N'Daniel'),
(1002,N'Accountant',N'Accounts dept',N'Mike'),
(1003,N'Senior Programmer',N'IT',N'Jordan’)
さらに、CREATETABLEステートメントを使用して新しいテーブルを作成するときにNOTNULLを使用できます。
まず、テーブルを削除しましょう:
DROP TABLE Employees
次に、IDと名前の必須フィールドを使用してテーブルを作成します。
CREATE TABLE Employees( ID int NOT NULL, Name nvarchar(30) NOT NULL, Birthday date, Email nvarchar(30), Position nvarchar(30), Department nvarchar(30) )
また、NULL値が許可されることを意味する列名の後にNULLを指定できます。このオプションはデフォルトで設定されているため、これは必須ではありません。
現在の列を必須ではないようにする必要がある場合は、次の構文を使用してください。
ALTER TABLE Employees ALTER COLUMN Name nvarchar(30) NULL
または、次のコマンドを使用できます:
ALTER TABLE Employees ALTER COLUMN Name nvarchar(30)
さらに、このコマンドを使用して、フィールドタイプを別の互換性のあるタイプに変更するか、その長さを変更することができます。たとえば、[名前]フィールドを50個の記号に拡張してみましょう。
ALTER TABLE Employees ALTER COLUMN Name nvarchar(50)
主キー
テーブルを作成するときは、各行に固有の列または列のセットを指定する必要があります。この一意の値を使用して、レコードを識別できます。この値は主キーと呼ばれます。 ID列(«従業員の個人番号»が含まれています。この場合、これは各従業員の一意の値であり、複製できません)は、Employeesテーブルの主キーになります。
次のコマンドを使用して、テーブルの主キーを作成できます。
ALTER TABLE Employees ADD CONSTRAINT PK_Employees PRIMARY KEY(ID)
「PK_Employees」は、主キーを定義する制約名です。通常、主キーの名前は「PK_」プレフィックスとテーブル名で構成されます。
主キーに複数のフィールドが含まれている場合は、これらのフィールドをカンマで区切って括弧で囲む必要があります。
ALTER TABLE table_name ADD CONSTRAINT constraint_name PRIMARY KEY(field1,field2,…)
MS SQLでは、主キーのすべてのフィールドがNULLであってはならないことに注意してください。
さらに、テーブルを作成するときに主キーを定義できます。テーブルを削除しましょう:
DROP TABLE Employees
次に、次の構文を使用してテーブルを作成します。
CREATE TABLE Employees( ID int NOT NULL, Name nvarchar(30) NOT NULL, Birthday date, Email nvarchar(30), Position nvarchar(30), Department nvarchar(30), CONSTRAINT PK_Employees PRIMARY KEY(ID) – describe PK after all the fileds as a constraint )
テーブルにデータを追加します:
INSERT Employees(ID,Position,Department,Name) VALUES (1000,N'CEO',N'Administration',N'John'),
(1001,N'Programmer',N'IT',N'Daniel'),
(1002,N'Accountant',N'Accounts dept',N'Mike'),
(1003,N'Senior Programmer',N'IT',N'Jordan’)
実際には、制約名を指定する必要はありません。この場合、システム名が割り当てられます。例:«PK__Employee__3214EC278DA42077»:
CREATE TABLE Employees(
ID int NOT NULL,
Name nvarchar(30) NOT NULL,
Birthday date,
Email nvarchar(30),
Position nvarchar(30),
Department nvarchar(30),
PRIMARY KEY(ID) )
>
または
CREATE TABLE Employees( ID int NOT NULL PRIMARY KEY, Name nvarchar(30) NOT NULL, Birthday date, Email nvarchar(30), Position nvarchar(30), Department nvarchar(30) )
個人的には、永続テーブルの制約名を明示的に指定することをお勧めします。これは、将来、明示的に定義された明確な値を操作または削除する方が簡単だからです。例:
ALTER TABLE Employees DROP CONSTRAINT PK_Employees
それでも、一時データベーステーブルを作成するときに制約名なしでこの短い構文を適用する方が快適です(一時テーブルの名前は#または##で始まります。
概要:
次のコマンドはすでに分析済みです。
- テーブルを作成 table_name(フィールドとそのタイプ、および制約のリスト)–現在のデータベースに新しいテーブルを作成するために使用されます。
- ドロップテーブル table_name –現在のデータベースからテーブルを削除するために使用されます。
- 代替テーブル table_name ALTER COLUMN column_name…–列タイプを更新したり、その設定を変更したりするために使用されます(たとえば、NULLまたはNOT NULLを設定する必要がある場合)。
- 代替テーブル table_name制約の追加 制約名主キー (field1、field2、…)–現在のテーブルに主キーを追加するために使用されます。
- 代替テーブル table_name DROP CONSTRAINT 制約名–テーブルから制約を削除するために使用されます。
一時的なテーブル
MSDNからの要約。 MS SQL Serverには、ローカル(#)とグローバル(##)の2種類の一時テーブルがあります。ローカル一時テーブルは、SQL Serverのインスタンスが切断される前は、作成者にのみ表示されます。ユーザーがSQLServerのインスタンスから切断されると、これらは自動的に削除されます。グローバル一時テーブルは、これらのテーブルを作成した後の接続セッション中にすべてのユーザーに表示されます。ユーザーがSQLServerのインスタンスから切断されると、これらのテーブルは削除されます。
一時テーブルはtempdbシステムデータベースに作成されます。つまり、メインデータベースがフラッディングすることはありません。さらに、DROPTABLEコマンドを使用してそれらを削除できます。多くの場合、ローカル(#)一時テーブルが使用されます。
一時テーブルを作成するには、CREATETABLEコマンドを使用できます。
CREATE TABLE #Temp( ID int, Name nvarchar(30) )
DROP TABLEコマンドを使用して一時テーブルを削除できます:
DROP TABLE #Temp
さらに、一時テーブルを作成し、SELECT…INTO構文を使用してデータを入力できます:
SELECT ID,Name INTO #Temp FROM Employees
注: 異なるDBMSでは、一時データベースの実装は異なる場合があります。たとえば、ORACLEおよびFirebird DBMSでは、一時テーブルの構造は、CREATE GLOBALTEMPORARYTABLEコマンドによって事前に定義する必要があります。また、データの保存方法を指定する必要があります。この後、ユーザーはそれを一般的なテーブルの中で見て、従来のテーブルと同じように操作します。
データベースの正規化:サブテーブル(参照テーブル)に分割し、テーブルの関係を定義する
現在の従業員テーブルには欠点があります。ユーザーは[位置]フィールドと[部門]フィールドに任意のテキストを入力できるため、間違いが返される可能性があります。ある従業員は部門として「IT」を指定でき、別の従業員は「IT」を指定できます。デパートメント"。その結果、これらの従業員が同じ部門で働いているのか、スペルミスがあり、2つの異なる部門があるのか、ユーザーが何を意味しているのかが不明確になります。さらに、この場合、各部門の従業員数を表示する必要があるレポートのデータを正しくグループ化することはできません。
もう1つの欠点は、ストレージボリュームとその重複です。つまり、従業員ごとに部門のフルネームを指定する必要があります。これには、部門名の各シンボルを格納するためのデータベース内のスペースが必要です。
3番目の欠点は、プログラマーからジュニアプログラマーまで、任意のポジションの名前を変更する必要がある場合にフィールドデータを更新するのが複雑になることです。この場合、Positionが「Programmer」であるすべてのテーブル行に新しいデータを追加する必要があります。
このような状況を回避するには、データベースの正規化(サブテーブルへの分割)、参照テーブルを使用することをお勧めします。
2つの参照テーブル「Positions」と「Departments」を作成しましょう:
CREATE TABLE Positions( ID int IDENTITY(1,1) NOT NULL CONSTRAINT PK_Positions PRIMARY KEY, Name nvarchar(30) NOT NULL ) CREATE TABLE Departments( ID int IDENTITY(1,1) NOT NULL CONSTRAINT PK_Departments PRIMARY KEY, Name nvarchar(30) NOT NULL )
ここでは、新しいプロパティIDENTITYを使用していることに注意してください。これは、ID列のデータが1から自動的にリストされることを意味します。したがって、新しいレコードを追加すると、値1、2、3などが順番に割り当てられます。通常、これらのフィールドは自動インクリメントフィールドと呼ばれます。 IDENTITYプロパティを持つ1つのフィールドのみを、テーブルの主キーとして定義できます。常にではありませんが、通常、このようなフィールドはテーブルの主キーです。
注: 異なるDBMSでは、インクリメント機能を使用したフィールドの実装が異なる場合があります。たとえば、MySQLでは、このようなフィールドはAUTO_INCREMENTプロパティによって定義されます。 ORACLEとFirebirdでは、この機能をシーケンス(SEQUENCE)でエミュレートできます。しかし、私が知る限り、GENERATEDASIDENTITYプロパティがORACLEに追加されました。
EmployeesテーブルのPositionフィールドとDepartmentフィールドの現在のデータに基づいて、これらのテーブルに自動的に入力してみましょう。
-- fill in the Name field of the Positions table with unique values from the Position field of the Employees table
 INSERT Positions(Name) SELECT DISTINCT Position FROM Employees WHERE Position IS NOT NULL – drop records where a position is not specified
Departmentsテーブルに対して同じ手順を実行する必要があります:
INSERT Departments(Name) SELECT DISTINCT Department FROM Employees WHERE Department IS NOT NULL
ここで、PositionsテーブルとDepartmentsテーブルを開くと、IDフィールドに値の番号付きリストが表示されます。
SELECT * FROM Positions
| ID | 名前 |
| 1 | |
| 2 | |
| 3 | |
| 4 |
SELECT * FROM Departments
| ID | 名前 |
| 1 | |
| 2 | |
| 3 |
これらのテーブルは、ポジションと部門を定義するための参照テーブルになります。ここで、役職と部門の識別子を参照します。まず、識別子を格納するためにEmployeesテーブルに新しいフィールドを作成しましょう:
-- add a field for the ID position
ALTER TABLE Employees ADD PositionID int
-- add a field for the ID department
ALTER TABLE Employees ADD DepartmentID int
参照フィールドのタイプは、参照テーブルと同じである必要があります。この場合は、intです。
さらに、1つのコマンドを使用して、フィールドをコンマで区切ってリストすることにより、複数のフィールドを追加できます。
ALTER TABLE Employees ADD PositionID int, DepartmentID int
次に、これらのフィールドに参照制約(FOREIGN KEY)を追加して、ユーザーが参照テーブルのID値以外の値を追加できないようにします。
ALTER TABLE Employees ADD CONSTRAINT FK_Employees_PositionID FOREIGN KEY(PositionID) REFERENCES Positions(ID)
2番目のフィールドについても同じ手順を実行する必要があります:
ALTER TABLE Employees ADD CONSTRAINT FK_Employees_DepartmentID FOREIGN KEY(DepartmentID) REFERENCES Departments(ID)
現在、ユーザーはこれらのフィールドに対応する参照テーブルのID値のみを挿入できます。したがって、新しい部門または役職を使用するには、ユーザーは対応する参照テーブルに新しいレコードを追加する必要があります。役職と部門は1つのコピーで参照テーブルに保存されるため、名前を変更するには、参照テーブルでのみ変更する必要があります。
参照制約の名前は通常、複合です。これは、プレフィックス«FK»の後に、参照テーブル識別子を参照するテーブル名とフィールド名が続くもので構成されます。
識別子(ID)は通常、リンクにのみ使用される内部値です。それがどんな価値を持っているかは問題ではありません。したがって、参照テーブルからレコードを削除する場合など、テーブルを操作するときに表示される値のシーケンスのギャップを取り除こうとしないでください。
場合によっては、いくつかのフィールドから参照を作成することが可能です:
ALTER TABLE table ADD CONSTRAINT constraint_name FOREIGN KEY(field1,field2,…) REFERENCES reference table(field1,field2,…)
この場合、主キーはテーブル「reference_table」のいくつかのフィールド(field1、field2、…)のセットで表されます。
それでは、PositionIDフィールドとDepartmentIDフィールドを参照テーブルのID値で更新しましょう。
これを行うには、UPDATEコマンドを使用します:
UPDATE e SET PositionID=(SELECT ID FROM Positions WHERE Name=e.Position), DepartmentID=(SELECT ID FROM Departments WHERE Name=e.Department) FROM Employees e
次のクエリを実行します:
SELECT * FROM Employees
| ID | 名前 | 誕生日 | メール | 位置 | 部門 | PositionID | DepartmentID |
| 1000 | NULL | 2 | 1 | ||||
| 1001 | NULL | 3 | 3 | ||||
| 1002 | NULL | 1 | 2 | ||||
| 1003 | NULL | 4 | 3 |
ご覧のとおり、PositionIDフィールドとDepartmentIDフィールドはポジションと部門と一致しています。したがって、次のコマンドを実行して、EmployeesテーブルのPositionフィールドとDepartmentフィールドを削除できます。
ALTER TABLE Employees DROP COLUMN Position,Department
次に、次のステートメントを実行します:
SELECT * FROM Employees
| ID | 名前 | 誕生日 | メール | PositionID | DepartmentID |
| 1000 | NULL | NULL | 2 | 1 | |
| 1001 | NULL | NULL | 3 | 3 | |
| 1002 | NULL | NULL | 1 | 2 | |
| 1003 | NULL | NULL | 4 | 3 |
Therefore, we do not have information overload. We can define the names of positions and departments by their identifiers using the values in the reference tables:
SELECT e.ID,e.Name,p.Name PositionName,d.Name DepartmentName FROM Employees e LEFT JOIN Departments d ON d.ID=e.DepartmentID LEFT JOIN Positions p ON p.ID=e.PositionID
| ID | Name | PositionName | DepartmentName |
| 1000 | John | CEO | Administration |
| 1001 | Daniel | Programmer | IT |
| 1002 | Mike | Accountant | Accounts dept |
| 1003 | Jordan | Senior programmer | IT |
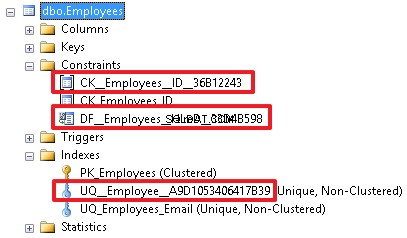
In the object inspector, we can see all the objects created for this table. Here we can also manipulate these objects in different ways, for example, rename or delete the objects.
In addition, it should be noted that it is possible to create a recursive reference.
Let’s consider this particular example.
Let’s add the ManagerID field to the table with employees. This new field will define an employee to whom this employee is subordinated.
ALTER TABLE Employees ADD ManagerID int
This field permits the NULL value as well.
Now, we will create a FOREIGN KEY for the Employees table:
ALTER TABLE Employees ADD CONSTRAINT FK_Employees_ManagerID FOREIGN KEY (ManagerID) REFERENCES Employees(ID)
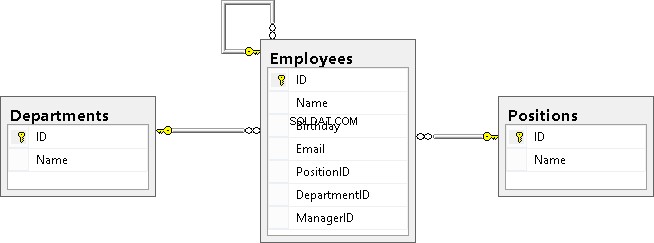
Then create a diagram and check how our tables are linked:
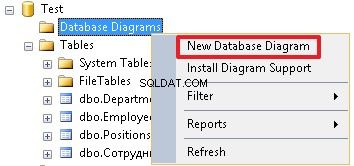
As you can see, the Employees table is linked with the Positions and Departments tables and is a recursive reference.
Finally, I would like to note that reference keys can include additional properties such as ON DELETE CASCADE and ON UPDATE CASCADE. They define the behavior when deleting or updating a record that is referenced from the reference table. If these properties are not specified, then we cannot change the ID of the record in the reference table referenced from the other table. Also, we cannot delete this record from the reference table until we remove all the rows that refer to this record or update the references to another value in these rows.
For example, let’s re-create the table and specify the ON DELETE CASCADE property for FK_Employees_DepartmentID:
DROP TABLE Employees CREATE TABLE Employees( ID int NOT NULL, Name nvarchar(30), Birthday date, Email nvarchar(30), PositionID int, DepartmentID int, ManagerID int, CONSTRAINT PK_Employees PRIMARY KEY (ID), CONSTRAINT FK_Employees_DepartmentID FOREIGN KEY(DepartmentID) REFERENCES Departments(ID) ON DELETE CASCADE, CONSTRAINT FK_Employees_PositionID FOREIGN KEY(PositionID) REFERENCES Positions(ID), CONSTRAINT FK_Employees_ManagerID FOREIGN KEY (ManagerID) REFERENCES Employees(ID) ) INSERT Employees (ID,Name,Birthday,PositionID,DepartmentID,ManagerID)VALUES (1000,N'John','19550219',2,1,NULL), (1001,N'Daniel','19831203',3,3,1003), (1002,N'Mike','19760607',1,2,1000), (1003,N'Jordan','19820417',4,3,1000)
Let’s delete the department with identifier ‘3’ from the Departments table:
DELETE Departments WHERE ID=3
Let’s view the data in table Employees:
SELECT * FROM Employees
| ID | Name | Birthday | PositionID | DepartmentID | ManagerID | |
| 1000 | John | 1955-02-19 | NULL | 2 | 1 | NULL |
| 1002 | Mike | 1976-06-07 | NULL | 1 | 2 | 1000 |
As you can see, data of Department ‘3’ has been deleted from the Employees table as well.
The ON UPDATE CASCADE property has similar behavior, but it works when updating the ID value in the reference table. For example, if we change the position ID in the Positions reference table, then DepartmentID in the Employees table will receive a new value, which we have specified in the reference table. But in this case this cannot be demonstrated, because the ID column in the Departments table has the IDENTITY property, which will not allow us to execute the following query (change the department identifier from 3 to 30):
UPDATE Departments SET ID=30 WHERE ID=3
The main point is to understand the essence of these 2 options ON DELETE CASCADE and ON UPDATE CASCADE. I apply these options very rarely, and I recommend that you think carefully before you specify them in the reference constraint, because If an entry is accidentally deleted from the reference table, this can lead to big problems and create a chain reaction.
Let’s restore department ‘3’:
-- we permit to add or modify the IDENTITY value
SET IDENTITY_INSERT Departments ON
INSERT Departments(ID,Name) VALUES(3,N'IT')
-- we prohibit to add or modify the IDENTITY value
SET IDENTITY_INSERT Departments OFF
We completely clear the Employees table using the TRUNCATE TABLE command:
TRUNCATE TABLE Employees
Again, we will add data using the INSERT command:
INSERT Employees (ID,Name,Birthday,PositionID,DepartmentID,ManagerID)VALUES (1000,N'John','19550219',2,1,NULL),
(1001,N'Daniel','19831203',3,3,1003),
(1002,N'Mike','19760607',1,2,1000),
(1003,N'Jordan','19820417',4,3,1000)
Summary:
We have described the following DDL commands:
• Adding the IDENTITY property to a field allows to make this field automatically populated (count field) for the table;
• ALTER TABLE table_name ADD field_list with_features – allows you to add new fields to the table;
• ALTER TABLE table_name DROP COLUMN field_list – allows you to delete fields from the table;
• ALTER TABLE table_name ADD CONSTRAINT constraint_name FOREIGN KEY (fields) REFERENCES reference_table – allows you to determine the relationship between a table and a reference table.
Other constraints – UNIQUE, DEFAULT, CHECK
Using the UNIQUE constraint, you can say that the values for each row in a given field or in a set of fields must be unique. In the case of the Employees table, we can apply this restriction to the Email field. Let’s first fill the Email values, if they are not yet defined:
UPDATE Employees SET Email='example@sqldat.com' WHERE ID=1000 UPDATE Employees SET Email='example@sqldat.com' WHERE ID=1001 UPDATE Employees SET Email='example@sqldat.com' WHERE ID=1002 UPDATE Employees SET Email='example@sqldat.com' WHERE ID=1003
Now, you can impose the UNIQUE constraint on this field:
ALTER TABLE Employees ADD CONSTRAINT UQ_Employees_Email UNIQUE(Email)
Thus, a user will not be able to enter the same email for several employees.
The UNIQUE constraint has the following structure:the «UQ» prefix followed by the table name and a field name (after the underscore), to which the restriction applies.
When you need to add the UNIQUE constraint for the set of fields, we will list them separated by commas:
ALTER TABLE table_name ADD CONSTRAINT constraint_name UNIQUE(field1,field2,…)
By adding a DEFAULT constraint to a field, we can specify a default value that will be inserted if, when inserting a new record, this field is not listed in the list of fields in the INSERT command. You can set this restriction when creating a table.
Let’s add the HireDate field to the Employees table and set the current date as a default value:
ALTER TABLE Employees ADD HireDate date NOT NULL DEFAULT SYSDATETIME()
If the HireDate column already exists, then we can use the following syntax:
ALTER TABLE Employees ADD DEFAULT SYSDATETIME() FOR HireDate
To specify the default value, execute the following command:
ALTER TABLE Employees ADD CONSTRAINT DF_Employees_HireDate DEFAULT SYSDATETIME() FOR HireDate
As there was no such column before, then when adding it, the current date will be inserted into each entry of the HireDate field.
When creating a new record, the current date will be also automatically added, unless we explicitly specify it, i.e. specify in the list of columns. Let’s demonstrate this with an example, where we will not specify the HireDate field in the list of the values added:
INSERT Employees(ID,Name,Email)VALUES(1004,N'Ostin',' example@sqldat.com')
To check the result, run the command:
SELECT * FROM Employees
| ID | Name | Birthday | PositionID | DepartmentID | ManagerID | HireDate | |
| 1000 | John | 1955-02-19 | example@sqldat.com | 2 | 1 | NULL | 2015-04-08 |
| 1001 | Daniel | 1983-12-03 | example@sqldat.com | 3 | 4 | 1003 | 2015-04-08 |
| 1002 | Mike | 1976-06-07 | example@sqldat.com | 1 | 2 | 1000 | 2015-04-08 |
| 1003 | Jordan | 1982-04-17 | example@sqldat.com | 4 | 3 | 1000 | 2015-04-08 |
| 1004 | Ostin | NULL | example@sqldat.com | NULL | NULL | NULL | 2015-04-08 |
The CHECK constraint is used when it is necessary to check the values being inserted in the fields. For example, let’s impose this constraint on the identification number field, which is an employee ID (ID). Let’s limit the identification numbers to be in the range from 1000 to 1999:
ALTER TABLE Employees ADD CONSTRAINT CK_Employees_ID CHECK(ID BETWEEN 1000 AND 1999)
The constraint name is usually as follows:the «CK_» prefix first followed by the table name and a field name, for which constraint is imposed.
Let’s add an invalid record to check if the constraint is working properly (we will get the corresponding error):
INSERT Employees(ID,Email) VALUES(2000,'example@sqldat.com')
Now, let’s change the value being inserted to 1500 and make sure that the record is inserted:
INSERT Employees(ID,Email) VALUES(1500,'example@sqldat.com')
We can also create UNIQUE and CHECK constraints without specifying a name:
ALTER TABLE Employees ADD UNIQUE(Email)
ALTER TABLE Employees ADD CHECK(ID BETWEEN 1000 AND 1999)
Still, this is a bad practice and it is desirable to explicitly specify the constraint name so that users can see what each object defines:
A good name gives us more information about the constraint. And, accordingly, all these restrictions can be specified when creating a table, if it does not exist yet.
Let’s delete the table:
DROP TABLE Employees
Let’s re-create the table with all the specified constraints using the CREATE TABLE command:
CREATE TABLE Employees( ID int NOT NULL, Name nvarchar(30), Birthday date, Email nvarchar(30), PositionID int, DepartmentID int, HireDate date NOT NULL DEFAULT SYSDATETIME(),
-- I have an exception for DEFAULT
CONSTRAINT PK_Employees PRIMARY KEY (ID), CONSTRAINT FK_Employees_DepartmentID FOREIGN KEY(DepartmentID) REFERENCES Departments(ID), CONSTRAINT FK_Employees_PositionID FOREIGN KEY(PositionID) REFERENCES Positions(ID), CONSTRAINT UQ_Employees_Email UNIQUE (Email), CONSTRAINT CK_Employees_ID CHECK (ID BETWEEN 1000 AND 1999) )
Finally, let’s insert our employees in the table:
INSERT Employees (ID,Name,Birthday,Email,PositionID,DepartmentID)VALUES
(1000,N'John','19550219',' example@sqldat.com ',2,1),
(1001,N'Daniel','19831203',' example@sqldat.com ',3,3),
(1002,N'Mike','19760607',' example@sqldat.com ',1,2),
(1003,N'Jordan','19820417',' example@sqldat.com',4,3)
Some words about the indexes created with the PRIMARY KEY and UNIQUE constraints
When creating the PRIMARY KEY and UNIQUE constraints, the indexes with the same names (PK_Employees and UQ_Employees_Email) are automatically created. By default, the index for the primary key is defined as CLUSTERED, and for other indexes, it is set as NONCLUSTERED.
It should be noted that the clustered index is not used in all DBMSs. A table can have only one clustered (CLUSTERED) index. It means that the records of the table will be ordered by this index. In addition, we can say that this index has direct access to all the data in the table. This is the main index of the table. A clustered index can help with the optimization of queries. If we want to set the clustered index for another index, then when creating the primary key, we should specify the NONCLUSTERED property:
ALTER TABLE table_name ADD CONSTRAINT constraint_name PRIMARY KEY NONCLUSTERED(field1,field2,…)
Let’s specify the PK_Employees constraint index as nonclustered, while the UQ_Employees_Email constraint index – as clustered. At first, delete these constraints:
ALTER TABLE Employees DROP CONSTRAINT PK_Employees ALTER TABLE Employees DROP CONSTRAINT UQ_Employees_Email
Now, create them with the CLUSTERED and NONCLUSTERED indexes:
ALTER TABLE Employees ADD CONSTRAINT PK_Employees PRIMARY KEY NONCLUSTERED (ID) ALTER TABLE Employees ADD CONSTRAINT UQ_Employees_Email UNIQUE CLUSTERED (Email)
Once it is done, you can see that records have been sorted by the UQ_Employees_Email clustered index:
SELECT * FROM Employees
| ID | Name | Birthday | PositionID | DepartmentID | HireDate | |
| 1003 | Jordan | 1982-04-17 | example@sqldat.com | 4 | 3 | 2015-04-08 |
| 1000 | John | 1955-02-19 | example@sqldat.com | 2 | 1 | 2015-04-08 |
| 1001 | Daniel | 1983-12-03 | example@sqldat.com | 3 | 3 | 2015-04-08 |
| 1002 | Mike | 1976-06-07 | example@sqldat.com | 1 | 2 | 2015-04-08 |
For reference tables, it is better when a clustered index is built on the primary key, as in queries we often refer to the identifier of the reference table to obtain a name (Position, Department). The clustered index has direct access to the rows of the table, and hence it follows that we can get the value of any column without additional overhead.
It is recommended that the clustered index should be applied to the fields that you use for selection very often.
Sometimes in tables, a key is created by the stubbed field. In this case, it is a good idea to specify the CLUSTERED index for an appropriate index and specify the NONCLUSTERED index when creating the stubbed field.
Summary:
We have analyzed all the constraint types that are created with the «ALTER TABLE table_name ADD CONSTRAINT constraint_name …» command:
- PRIMARY KEY;
- FOREIGN KEY controls links and data referential integrity;
- UNIQUE – serves for setting a unique value;
- CHECK – allows monitoring the correctness of added data;
- DEFAULT – allows specifying a default value;
- The «ALTER TABLE table_name DROP CONSTRAINT constraint_name» command allows deleting all the constraints.
Additionally, we have reviewed the indexes:CLUSTERED and UNCLUSTERED.
Creating unique indexes
I am going to analyze indexes created not for the PRIMARY KEY or UNIQUE constraints.
It is possible to set indexes by a field or a set of fields using the following command:
CREATE INDEX IDX_Employees_Name ON Employees(Name)
Also, you can add the CLUSTERED, NONCLUSTERED, and UNIQUE properties as well as specify the order:ASC (by default) or DESC.
CREATE UNIQUE NONCLUSTERED INDEX UQ_Employees_EmailDesc ON Employees(Email DESC)
When creating the nonclustered index, the NONCLUSTERED property can be dropped as it is set by default.
To delete the index, use the command:
DROP INDEX IDX_Employees_Name ON Employees
You can create simple indexes and constraints with the CREATE TABLE command.
At first, delete the table:
DROP TABLE Employees
Then, create the table with all the constraints and indexes using the CREATE TABLE command:
CREATE TABLE Employees( ID int NOT NULL, Name nvarchar(30), Birthday date, Email nvarchar(30), PositionID int, DepartmentID int, HireDate date NOT NULL CONSTRAINT DF_Employees_HireDate DEFAULT SYSDATETIME(), ManagerID int, CONSTRAINT PK_Employees PRIMARY KEY (ID), CONSTRAINT FK_Employees_DepartmentID FOREIGN KEY(DepartmentID) REFERENCES Departments(ID), CONSTRAINT FK_Employees_PositionID FOREIGN KEY(PositionID) REFERENCES Positions(ID), CONSTRAINT FK_Employees_ManagerID FOREIGN KEY (ManagerID) REFERENCES Employees(ID), CONSTRAINT UQ_Employees_Email UNIQUE(Email), CONSTRAINT CK_Employees_ID CHECK(ID BETWEEN 1000 AND 1999), INDEX IDX_Employees_Name(Name) )
Finally, add information about our employees:
INSERT Employees (ID,Name,Birthday,Email,PositionID,DepartmentID,ManagerID)VALUES (1000,N'John','19550219',' example@sqldat.com ',2,1,NULL),
(1001,N'Daniel','19831203',' example@sqldat.com ',3,3,1003),
(1002,N'Mike','19760607',' example@sqldat.com ',1,2,1000),
(1003,N'Jordan','19820417',' example@sqldat.com',4,3,1000)
Keep in mind that it is possible to add values with the INCLUDE command in the nonclustered index. Thus, in this case, the INCLUDE index is a clustered index where the necessary values are linked to the index, rather than to the table. These indexes can improve the SELECT query performance if there are all the required fields in the index. However, it may lead to increasing the index size, as field values are duplicated in the index.
Abstract from MSDN. Here is how the syntax of the command to create indexes looks:
CREATE [ UNIQUE ] [ CLUSTERED | NONCLUSTERED ] INDEX index_name ON <object> ( column [ ASC | DESC ] [ ,...n ] ) [ INCLUDE ( column_name [ ,...n ] ) ]
Summary
Indexes can simultaneously improve the SELECT query performance and lead to poor speed for modifying table data. This happens, as you need to rebuild all the indexes for a particular table after each system modification.
The strategy on creating indexes may depend on many factors such as frequency of data modifications in the table.
Conclusion
As you can see, the DDL language is not as difficult as it may seem. I have provided almost all the main constructions. I wish you good luck with studying the SQL language.