システムエンジニアリングでは、コミュニケーションはあらゆるプロジェクトで成功を収めるための重要な要素です。これは、開発のサイクル全体にとって重要だからです。要件の収集から、実行可能な最小限の製品の提供まで。
分散バージョン管理システム(Gitなどの業界標準)を使用して、開発者は小さなコードを送信し、それを中心に構築されたBitbucketなどのサービスと連携できます。 Bitbucketをホストすることは、PostgreSQLのように、ユーザーによって生成されたデータにデータベースが残っている場合に可能ですが、両方を統合するには、異なるマシンで実行するための追加の構成が必要です。
ローカルエリアネットワークは、ユーザーがどこにいるかに応じて、外部ネットワークに情報を公開することなく、プログラム間で情報を渡すことができます。
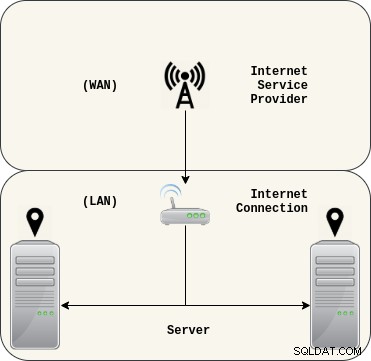 1.1。ローカルエリアネットワーク(LAN)。
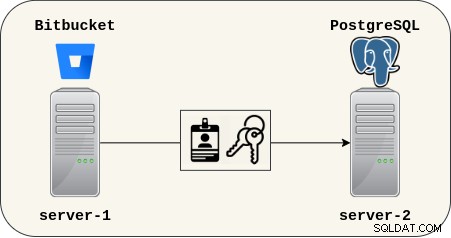 1.2。 BitbucketがPostgreSQLにアクセスします。
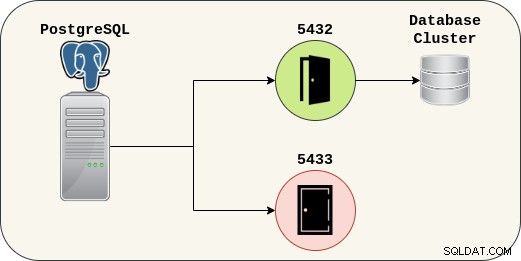 1.3。 PostgreSQLデータソース。
 これは非常に単純なプロセスであるため、言うことはあまりありません。 PostgreSQLは、Bitbucketの準備ができた新しいユーザーとデータベースでセットアップする必要があります。
PostgreSQL
# Part 1: Preparing the database.

$ pg_lsclusters

$ sudo systemctl -a | grep postgres

$ sudo -u postgres psql -c "\du" -c "\l"
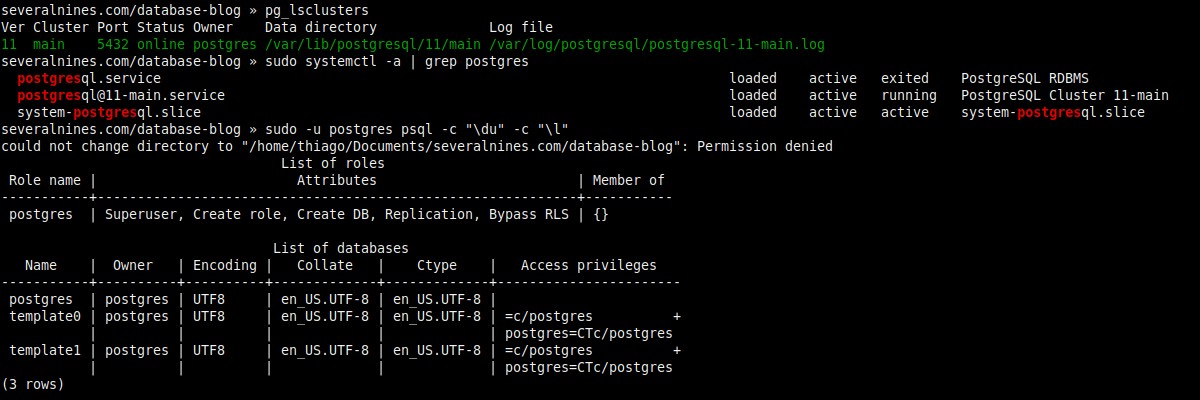 2.1。すでに実行中のクラスターがあるかどうかを確認します。
# Part 2: Creating a new user (role) and database.

$ sudo -u postgres psql -c "create role thiago with createdb login password 'Th14g0_P4ssw0rd'"

$ psql -d postgres -c "create database bitbucket_db"

$ psql -d bitbucket_db -c "\du" -c "\l"
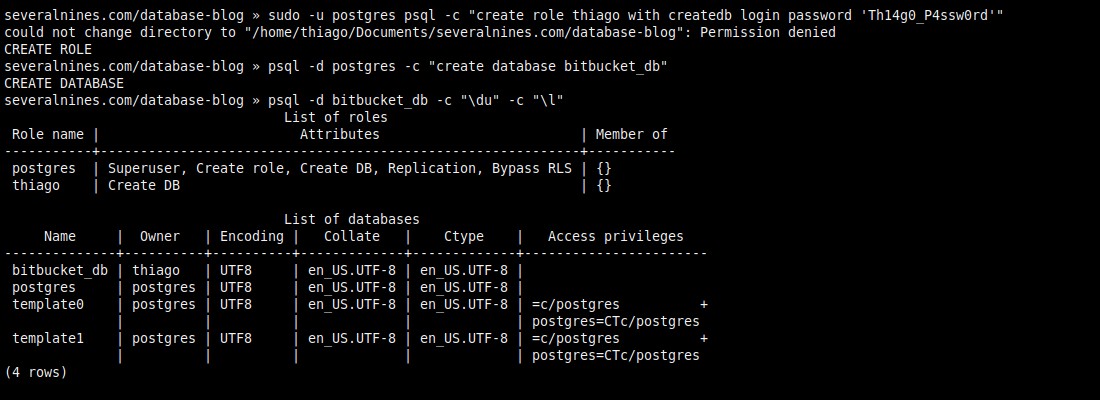 2.2。データベースの所有者はスーパーユーザーpostgresではありません。
# Part 3: Changing the cluster configuration (postgresql.conf).

$ sudo -u postgres psql -c "show config_file"

$ sudo cat /etc/postgresql/11/main/postgresql.conf | grep listen_addresses

$ sudo sed -i "s|#listen_addresses = 'localhost'|listen_addresses = '\*'\t|" /etc/postgresql/11/main/postgresql.conf

$ sudo cat /etc/postgresql/11/main/postgresql.conf | grep listen_addresses
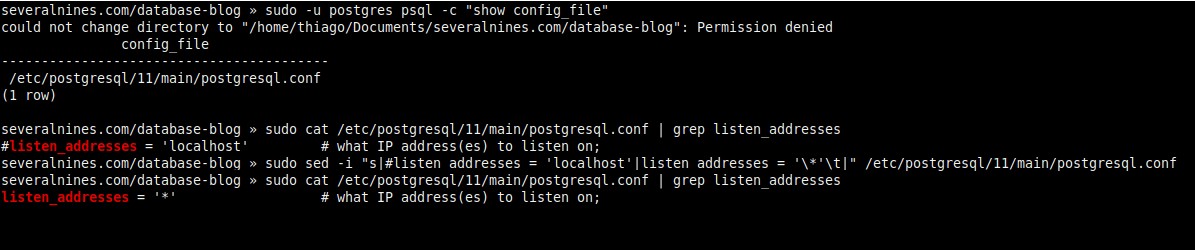 2.3。リモート接続の許可(postgresql.conf)。
# Part 4: Changing the cluster configuration (pg_hba.conf).

$ sudo wc -l /etc/postgresql/11/main/pg_hba.conf

$ sudo tail -3 /etc/postgresql/11/main/pg_hba.conf

$ sudo sed -i "$ a # Allow remote connections (listen_addresses = '*') with authentication" /etc/postgresql/11/main/pg_hba.conf

$ sudo sed -i "$ a host\tall\t\tall\t\t192.168.0.0/16\t\tmd5" /etc/postgresql/11/main/pg_hba.conf

$ sudo sed -i "$ a host\tall\t\tall\t\t::/0\t\t\tmd5" /etc/postgresql/11/main/pg_hba.conf

$ sudo wc -l /etc/postgresql/11/main/pg_hba.conf

$ sudo tail -3 /etc/postgresql/11/main/pg_hba.conf
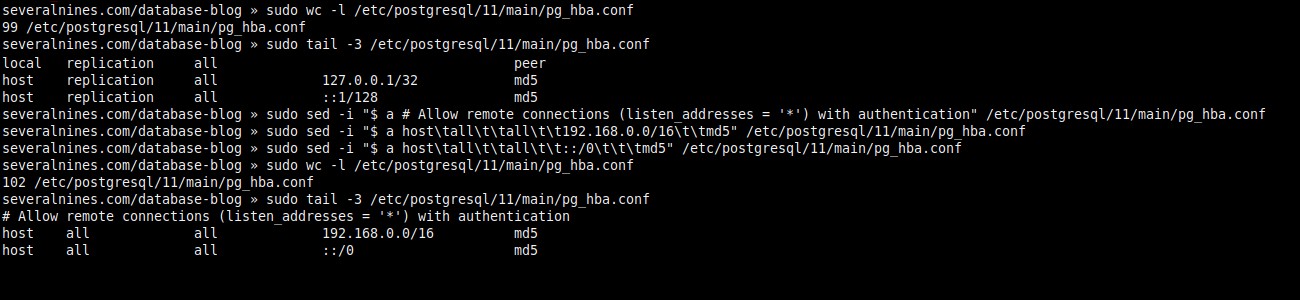 2.4。アクセス許可の変更(pg_hba.conf)。
# Part 5: Restarting the cluster.

$ sudo -u postgres psql -c "show listen_addresses"

$ ss -nlp | grep 5432

$ sudo systemctl restart example@sqldat.com

$ sudo -u postgres psql -c "show listen_addresses"

$ ss -nlp | grep 5432
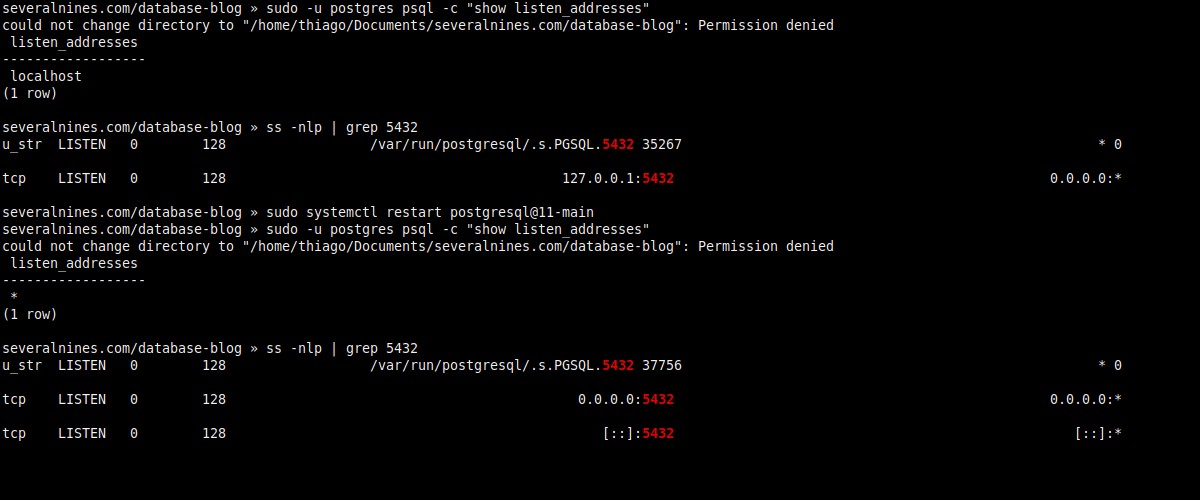 2.5。変更を適用します。
# Part 6: Opening the door.

$ sudo ufw status

$ sudo ufw allow 5432/tcp

$ sudo ufw status

$ ip addr show
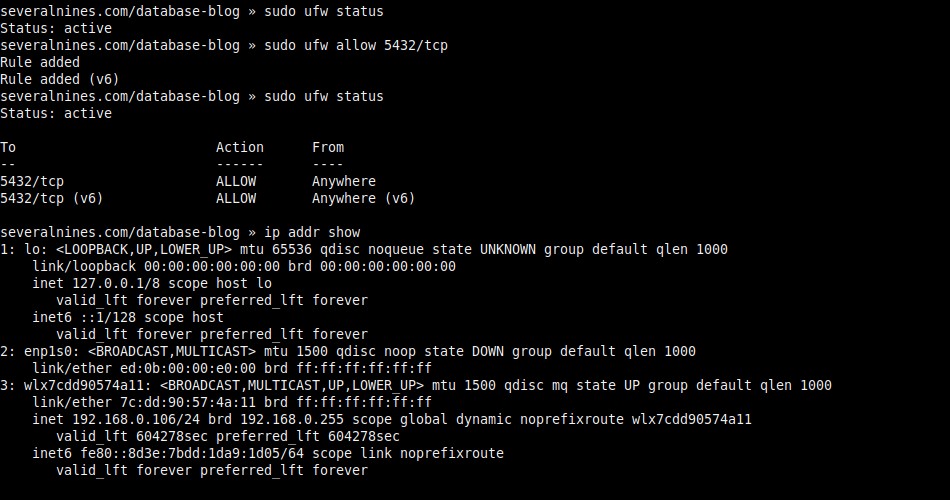 2.6。ファイアウォールの構成とIPアドレスの表示。
# Part 7: Set a password for the superuser role.

$ sudo -u postgres psql -c "\password"
 2.7。管理者パスワードの変更。
 # Part 1: Verifying if the earlier set up was correct. $ telnet 192.168.0.106 5432 # (Optional) Using psql. $ sudo -u postgres psql -h 192.168.0.106 -p 5432 -d bitbucket_db -U thiago -c "\conninfo"
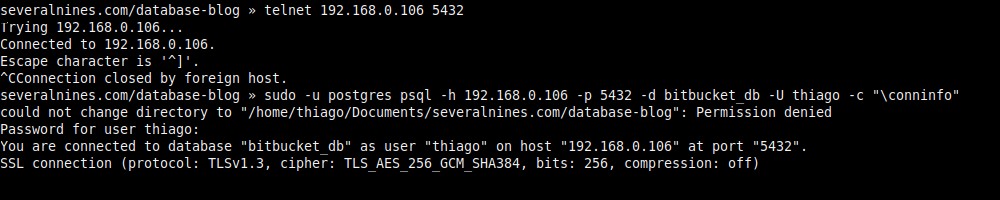 3.1。リモートでデータベースにアクセスします。
# Part 2: Extracting the Bitbucket Server.

$ ls

$ tar xzf atlassian-bitbucket-6.10.0

$ ls

$ du -sh atlassian-bitbucket-6.10.0

$ tree -L 1 atlassian-bitbucket-6.10.0

$ tree -L 1 atlassian-bitbucket-6.10.0/bin
 3.2。 LinuxおよびWindows用のスクリプト。
# Part 3: Modifying the script (set-bitbucket-home.sh).

$ mkdir bitbucket-home

$ echo $(pwd)/bitbucket-home

$ cat atlassian-bitbucket-6.10.0/bin/set-bitbucket-home.sh | grep BITBUCKET_HOME=$

$ sed -i 's|BITBUCKET_HOME=$|BITBUCKET_HOME=/home/thiago/Documents/severalnines.com/database-blog/bitbucket-home|' atlassian-bitbucket-6.10.0/bin/set-bitbucket-home.sh

$ cat atlassian-bitbucket-6.10.0/bin/set-bitbucket-home.sh | grep BITBUCKET_HOME=/
 3.3。 BITBUCKET_HOMEの構成。
# Part 4: Modifying the script (set-jre-home.sh).

$ readlink -f $(which java)

$ cat atlassian-bitbucket-6.10.0/bin/set-jre-home.sh | grep JRE_HOME=$

$ sed -i 's|JRE_HOME=$|JRE_HOME=/usr/lib/jvm/java-11-openjdk-amd64|' atlassian-bitbucket-6.10.0/bin/set-jre-home.sh

$ cat atlassian-bitbucket-6.10.0/bin/set-jre-home.sh | grep JRE_HOME=/
 3.4。 JRE_HOME(Java)の構成。
# Part 5: Checking the hardware.

$ cat /proc/cpuinfo | grep processor | wc -l

$ free -h
 3.5。起動時のCPUコアとRAM。
# Part 6: Running the Bitbucket Server with Elasticsearch.

$ ./atlassian-bitbucket/bin/start-bitbucket.sh

$ free -h
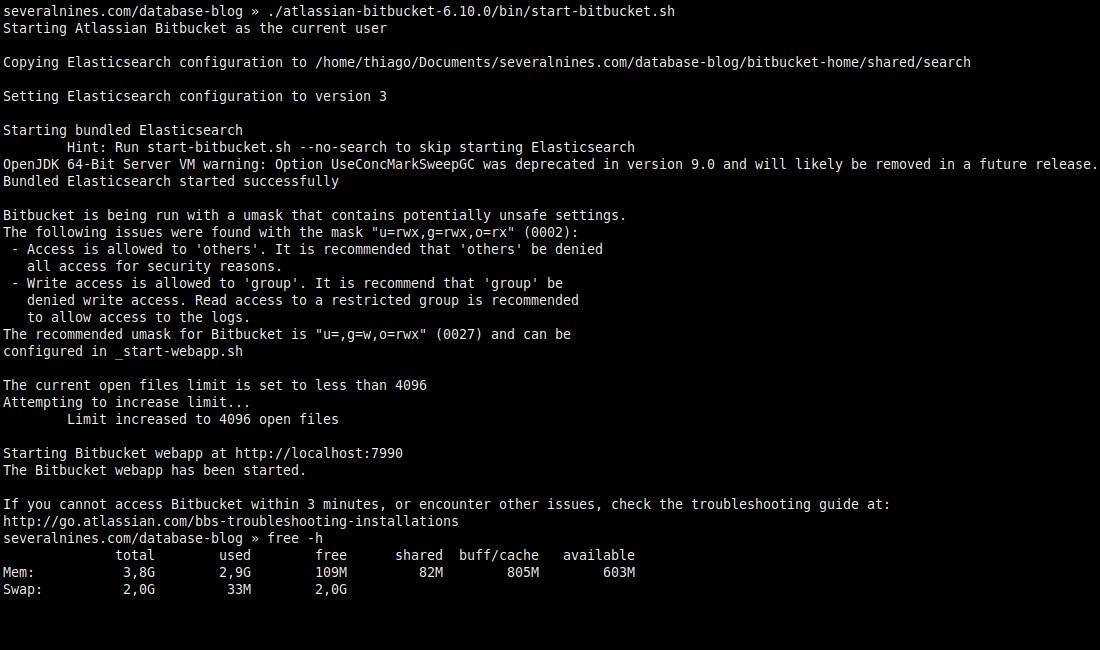 3.6。 Elasticsearchで実行(デフォルト)。
# Part 7: Running the Bitbucket Server without Elasticsearch.

$ ./atlassian-bitbucket/bin/start-bitbucket.sh --no-search

$ free -h
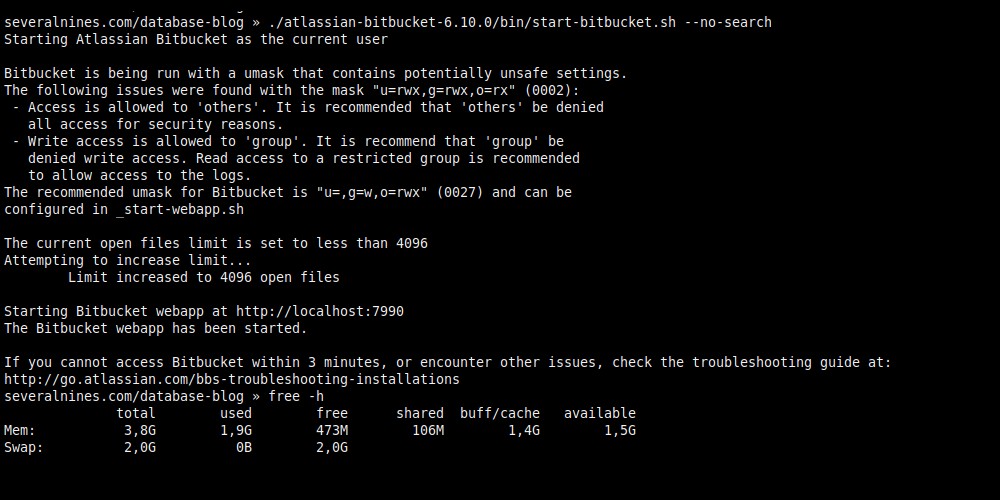 3.7。 Elasticsearchなしで実行(1 GBのRAMを節約)
# Part 8: Quick look at BITBUCKET_HOME.

$ du -sh bitbucket-home

$ tree -L 1 bitbucket-home
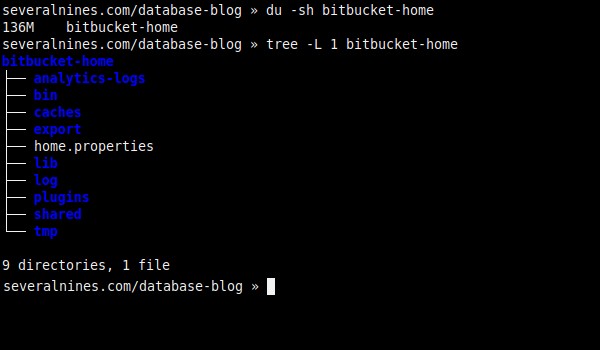 3.8。 BITBUCKET_HOMEの内部。
 PostgreSQLとBitbucketの統合
PostgreSQLとBitbucketを構成した後、それらの統合はブラウザー(http:// localhost:7990 /)を介して実行する必要があります。
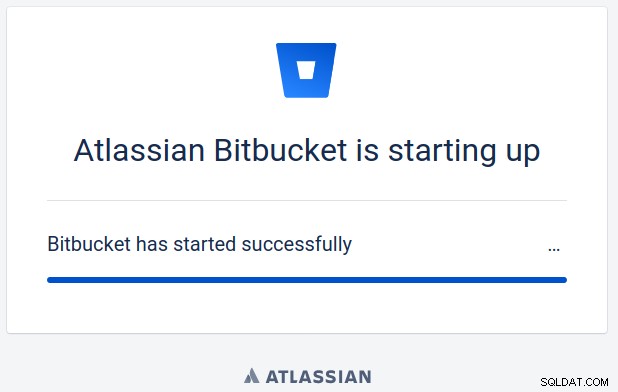 4.1。 Bitbucketが起動しています。
# Displaying tables

$ psql -h 192.168.0.106 -d bitbucket_db -c "\dt"
 4.2。現在のデータベーステーブルの一覧表示。
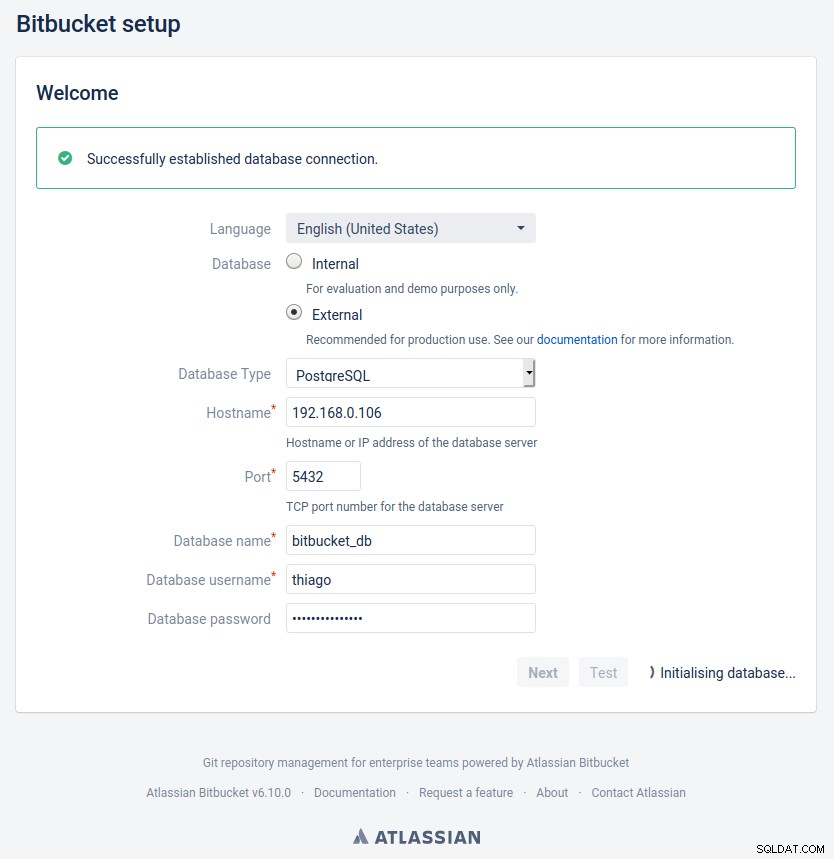 4.3。データソースの構成。
# Displaying tables (again)

$ psql -h 192.168.0.106 -d bitbucket_db -c "\dt"
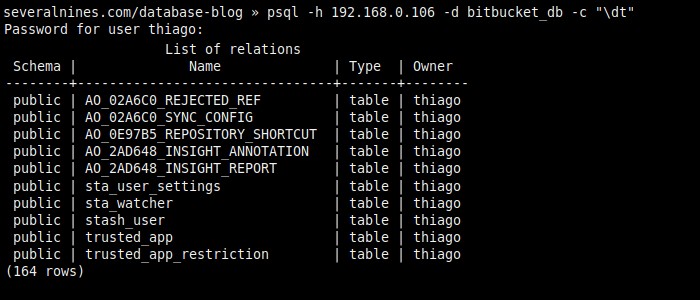 4.4。もう一度リストし、164行のうち10行を表示します。
# Verifying the connection pool.

$ psql -h 192.168.0.106 -d bitbucket_db -c "select pid,usename,application_name,state from pg_stat_activity where datname = 'bitbucket_db'"
 4.5。接続プールを表示しています。
 ネットワークでDHCPを使用している場合は、ルーターでIPアドレスを静的に構成することをお勧めします。そうしないと、Bitbucketが後でPostgreSQLを見つけようとして失敗する可能性があります。
このブログのほとんどは、テキストエディターを開かずに構成ファイルを変更するために正規表現を使用していますが、デバッグ目的でWebブラウザーでも使用できます。エラーメッセージ「できませんでした」を検索してみてください。ディレクトリを「?:アクセスが拒否されました」に二重引用符で囲むか、その他の問題が発生した場合は、コンピュータ固有のパスをワイルドカード「?」に置き換えてください。