SQLデータベースを使用するアプリケーションの構築は、かなり一般的なプログラミングタスクです。 SQLデータベースはどこにでもあり、Pythonで優れたサポートを提供しています。 GUIプログラミングでは、PyQtは堅牢でクロスプラットフォームのSQLデータベースサポートを提供し、データベースを一貫して作成、接続、および管理できるようにします。
PyQtのSQLサポートは、Model-Viewアーキテクチャと完全に統合されており、データベースアプリケーションの構築プロセスを支援します。
このチュートリアルでは、次の方法を学習します。
- PyQtのSQLサポートを使用する データベースに確実に接続するため
- SQLクエリを実行 PyQtを使用したデータベースで
- PyQtのモデルビューアーキテクチャを使用する データベースアプリケーションで
- さまざまなPyQtウィジェットを使用してデータを表示および編集します
このチュートリアルの例では、SQL言語、特にSQLiteデータベース管理システムの基本的な知識が必要です。 PythonとPyQtを使用したGUIプログラミングに関する以前の知識も役立ちます。
PyQtをSQLデータベースに接続する
アプリケーションをリレーショナルデータベースに接続し、そのデータベースに格納されているデータをアプリケーションに作成、読み取り、更新、および削除させることは、プログラミングの一般的なタスクです。リレーショナルデータベースは通常、一連のテーブルに編成されます。 、または関係 。テーブル内の特定の行は、レコードと呼ばれます またはタプル 、および列は属性と呼ばれます 。
注: フィールドという用語 通常、テーブル内の特定のレコードのセルに格納されている単一のデータを識別するために使用されます。一方、フィールド名という用語は 列の名前を識別するために使用されます。
各列には、名前、日付、番号などの特定の種類の情報が格納されます。各行は密接に関連するデータのセットを表し、すべての行は同じ一般構造を持っています。たとえば、会社の従業員に関するデータを格納するデータベースでは、特定の行が個々の従業員を表します。
ほとんどのリレーショナルデータベースシステムは、データベースに保持されているデータのクエリ、操作、および保守にSQL(構造化クエリ言語)を使用します。 SQLは、データベースとの通信用に特別に設計された宣言型のドメイン固有プログラミング言語です。
リレーショナルデータベースシステムとSQLは、今日広く使用されています。 SQLite、PostgreSQL、MySQL、MariaDBなど、いくつかの異なるデータベース管理システムがあります。専用のPythonSQLライブラリを使用して、Pythonをこれらのデータベースシステムのいずれかに接続できます。
注: PyQtの組み込みSQLサポートはPyQtでSQLデータベースを管理するための推奨オプションですが、他のライブラリを使用してデータベース接続を処理することもできます。これらのライブラリには、SQLAlchemy、pandas、SQLiteなどが含まれます。
ただし、データベースを管理するために別のライブラリを使用することには、いくつかの欠点があります。 PyQtのSQLクラスとModel-Viewアーキテクチャの統合を利用することはできません。さらに、アプリケーションに依存関係を追加します。
PythonとPyQtを使用したGUIプログラミングに関しては、PyQtはSQLデータベースを操作するための堅牢なクラスのセットを提供します。このクラスのセットは、アプリケーションをSQLデータベースに接続する必要がある場合に最適です。
注: 残念ながら、PyQt5の公式ドキュメントには不完全なセクションがいくつかあります。これを回避するには、PyQt4のドキュメント、Qt For Pythonのドキュメント、または元のQtのドキュメントを確認してください。このチュートリアルでは、いくつかのリンクから元のQtドキュメントにアクセスできます。これは、ほとんどの場合、より適切な情報源です。
このチュートリアルでは、PyQtのSQLサポートを使用して、リレーショナルデータベースと確実に対話し、データの読み取り、書き込み、削除、表示を行うGUIアプリケーションを作成する方法の基本を学びます。
データベース接続の作成
アプリケーションを物理SQLデータベースに接続することは、PyQtを使用してデータベースアプリケーションを開発するプロセスの重要なステップです。この手順を正常に実行するには、データベースの設定方法に関する一般的な情報が必要です。
たとえば、データベースが構築されているデータベース管理システムを知る必要があります。また、ユーザー名、パスワード、ホスト名なども必要になる場合があります。
このチュートリアルでは、SQLite 3を使用します。これは、すべてのプラットフォームでサポートされ、最小限の構成要件を備えた、十分にテストされたデータベースシステムです。 SQLiteを使用すると、個別のサーバープロセスを必要とせずに、ローカルディスク内のデータベースの読み取りと書き込みを直接行うことができます。これにより、データベースアプリケーション開発を学習するためのユーザーフレンドリーなオプションになります。
SQLiteを使用するもう1つの利点は、ライブラリがPythonとPyQtに付属しているため、作業を開始するために他に何もインストールする必要がないことです。
PyQtでは、 QSqlDatabaseを使用してデータベース接続を作成できます。 クラス。このクラスは接続を表し、データベースにアクセスするためのインターフェースを提供します。接続を作成するには、 .addDatabase()を呼び出すだけです。 QSqlDatabaseで 。この静的メソッドは、SQLドライバーとオプションの接続名を引数として取り、データベース接続を返します。
QSqlDatabase.addDatabase(
    driver, connectionName=QSqlDatabase.defaultConnection
)
最初の引数、 driver は、PyQtでサポートされているSQLドライバーの名前を含む文字列を保持する必須の引数です。 2番目の引数connectionName 、は、接続の名前を持つ文字列を保持するオプションの引数です。 connectionName デフォルトはQSqlDatabase.defaultConnection 、通常は文字列 "qt_sql_default_connection"を保持します 。
connectionNameという接続がすでにある場合 、次にその接続が削除され、新しい接続に置き換えられ、 .addDatabase() 新しく追加されたデータベース接続を呼び出し元に返します。
.addDatabase()の呼び出し 使用可能な接続のリストにデータベース接続を追加します。このリストはグローバルレジストリです そのPyQtは、アプリケーションで利用可能な接続を追跡するために舞台裏で維持します。意味のあるconnectionNameで接続を登録する データベースアプリケーションで複数の接続を管理できるようになります。
接続を作成したら、いくつかの属性を設定する必要がある場合があります。特定の属性セットは、使用しているドライバーによって異なります。通常、データベースにアクセスするには、データベース名、ユーザー名、パスワードなどの属性を設定する必要があります。
データベース接続でより一般的に使用される属性またはプロパティを設定するために使用できるsetterメソッドの概要は次のとおりです。
| メソッド | 説明 |
|---|---|
.setDatabaseName(name) | データベース名をnameに設定します 、これは有効なデータベース名を表す文字列です |
.setHostName(host) | ホスト名をhostに設定します 、これは有効なホスト名を表す文字列です |
.setUserName(username) | ユーザー名をusernameに設定します 、これは有効なユーザー名を表す文字列です |
.setPassword(password) | パスワードをpasswordに設定します 、これは有効なパスワードを表す文字列です |
.setPassword()に引数として渡すパスワードに注意してください プレーンテキストで保存され、後で .password()を呼び出すことで取得できます。 。これは深刻なセキュリティリスクです データベースアプリケーションに導入することは避けてください。このチュートリアルの後半の「データベース接続を開く」セクションで、より安全なアプローチを学習します。
QSqlDatabaseを使用してSQLiteデータベースへの接続を作成するには 、Pythonインタラクティブセッションを開き、次のコードを入力します。
>>> from PyQt5.QtSql import QSqlDatabase

>>> con = QSqlDatabase.addDatabase("QSQLITE")
>>> con.setDatabaseName("contacts.sqlite")

>>> con
<PyQt5.QtSql.QSqlDatabase object at 0x7f0facec0c10>

>>> con.databaseName()
'contacts.sqlite'

>>> con.connectionName()
'qt_sql_default_connection'
このコードは、 "QSQLITE"を使用してデータベース接続オブジェクトを作成します 接続のドライバーおよび"contacts.sqlite"として 接続のデータベース名として。 .addDatabase()に接続名を渡さないため 、新しく作成された接続がデフォルトの接続になります。名前は "qt_sql_default_connection"です。 。
SQLiteデータベースの場合、データベース名は通常、ファイル名またはデータベースファイル名を含むパスです。特別な名前":memory:"を使用することもできます インメモリデータベースの場合。
複数の接続の処理
単一のデータベースへの複数の接続を使用する必要がある場合があります。たとえば、ユーザーごとに特定の接続を使用して、データベースとのユーザーのやり取りをログに記録したい場合があります。
他の状況では、アプリケーションを複数のデータベースに接続する必要がある場合があります。たとえば、データを収集してローカルデータベースにデータを入力または更新するために、複数のリモートデータベースに接続したい場合があります。
これらの状況を処理するために、さまざまな接続に特定の名前を指定し、その名前で各接続を参照できます。データベース接続に名前を付ける場合は、その名前を2番目の引数として .addDatabase()に渡します。 :
>>> from PyQt5.QtSql import QSqlDatabase

>>> # First connection
>>> con1 = QSqlDatabase.addDatabase("QSQLITE", "con1")
>>> con1.setDatabaseName("contacts.sqlite")

>>> # Second connection
>>> con2 = QSqlDatabase.addDatabase("QSQLITE", "con2")
>>> con2.setDatabaseName("contacts.sqlite")

>>> con1
<PyQt5.QtSql.QSqlDatabase object at 0x7f367f5fbf90>
>>> con2
<PyQt5.QtSql.QSqlDatabase object at 0x7f3686dd7510>

>>> con1.databaseName()
'contacts.sqlite'
>>> con2.databaseName()
'contacts.sqlite'

>>> con1.connectionName()
'con1'
>>> con2.connectionName()
'con2'
ここでは、同じデータベース contacts.sqliteへの2つの異なる接続を作成します 。各接続には独自の接続名があります。接続名を使用して、必要に応じてコードの後半でいつでも特定の接続への参照を取得できます。これを行うには、 .database()を呼び出すことができます 接続名:
>>> from PyQt5.QtSql import QSqlDatabase

>>> db = QSqlDatabase.database("con1", open=False)

>>> db.databaseName()
'contacts.sqlite'
>>> db.connectionName()
'con1'
この例では、 .database()であることがわかります。 2つの引数を取ります:
-
connectionName使用する必要のある接続名を保持します。接続名を渡さない場合は、デフォルトの接続が使用されます。 オープン.database()に通知するブール値を保持します 接続を自動的に開くかどうか。openの場合Trueです (デフォルト)接続が開かれていない場合、接続は自動的に開かれます。
.database()の戻り値 connectionNameと呼ばれる接続オブジェクトへの参照です 。さまざまな接続名を使用して特定の接続オブジェクトへの参照を取得し、それらを使用してデータベースを管理できます。
さまざまなSQLダイバーの使用
これまで、SQLiteドライバーを使用してデータベース接続を作成する方法を学習しました。 。 PyQtで利用できるドライバーはこれだけではありません。ライブラリは、特定のニーズに応じてさまざまなタイプのデータベース管理システムを使用できるようにする豊富なSQLドライバーのセットを提供します。
| QDB2 | IBM Db2(バージョン7.1以降) |
| QMYSQL / MARIADB | |
| QOCI | |
| QODBC | |
| QPSQL | |
| QSQLITE2 | SQLite 2(Qt 5.14以降廃止) |
| QSQLITE | SQLite 3 |
| QTDS | Sybase Adaptive Server(Qt 4.7以降廃止) |
[ドライバー名]列には、識別子の文字列が含まれます .addDatabase()に渡す必要があること 関連するドライバーを使用する最初の引数として。 SQLiteドライバーとは異なり、別のドライバーを使用する場合は、 databaseNameなどのいくつかの属性を設定する必要がある場合があります。 、 hostName 、 userName 、および password 、接続が正しく機能するため。
データベースドライバーはQSqlDriverから派生しています 。 QSqlDriver をサブクラス化することで、独自のデータベースドライバーを作成できます。 、しかし、そのトピックはこのチュートリアルの範囲を超えています。独自のデータベースドライバを作成することに興味がある場合は、詳細について「独自のデータベースドライバを作成する方法」を確認してください。
データベース接続を開く
データベース接続を確立したら、データベースと対話できるようにその接続を開く必要があります。これを行うには、 .open()を呼び出します。 接続オブジェクト上。 .open() 次の2つのバリエーションがあります:
-
.open()現在の接続値を使用してデータベース接続を開きます。 -
.open(username、password)提供されたusernameを使用してデータベース接続を開きます およびpassword。
どちらのバリエーションもTrueを返します 接続が成功した場合。それ以外の場合は、 Falseを返します。 。接続を確立できない場合は、 .lastError()を呼び出すことができます 何が起こったのかについての情報を得るために。この関数は、データベースによって報告された最後のエラーに関する情報を返します。
注: 前に学んだように、 .setPassword(password) パスワードをプレーンテキストとして保存しますが、これはセキュリティ上のリスクです。一方、 .open() パスワードはまったく保存されません。接続を開くときに、パスワードをドライバーに直接渡します。その後、パスワードを破棄します。したがって、 .open()を使用します セキュリティの問題を防ぎたい場合は、パスワードを管理するのが最善の方法です。
.open()の最初のバリエーションを使用してSQLiteデータベース接続を開く方法の例を次に示します。 :
>>> from PyQt5.QtSql import QSqlDatabase

>>> # Create the connection
>>> con = QSqlDatabase.addDatabase("QSQLITE")
>>> con.setDatabaseName("contacts.sqlite")

>>> # Open the connection
>>> con.open()
True
>>> con.isOpen()
True
上記の例では、最初にSQLiteデータベースへの接続を作成し、 .open()を使用してその接続を開きます。 。 .open()以降 Trueを返します 、接続は成功しました。この時点で、 .isOpen()を使用して接続を確認できます。 、 Trueを返します 接続が開いていて、 Falseの場合 それ以外の場合。
注: .open()を呼び出す場合 SQLiteドライバーを使用する接続で、データベースファイルが存在しない場合、新しい空のデータベースファイルが自動的に作成されます。
実際のアプリケーションでは、データに対して操作を実行する前に、データベースへの有効な接続があることを確認する必要があります。そうしないと、アプリケーションが故障して失敗する可能性があります。たとえば、そのデータベースファイルを作成しようとしているディレクトリに対する書き込み権限がない場合はどうなりますか?接続を開くときに発生する可能性のあるエラーを処理していることを確認する必要があります。
.open()を呼び出す一般的な方法 条件文でラップすることです。これにより、接続を開くときに発生する可能性のあるエラーを処理できます。
>>> import sys
>>> from PyQt5.QtSql import QSqlDatabase

>>> # Create the connection
>>> con = QSqlDatabase.addDatabase("QSQLITE")
>>> con.setDatabaseName("contacts.sqlite")

>>> # Open the connection and handle errors
>>> if not con.open():
...     print("Unable to connect to the database")
...     sys.exit(1)
.open()への呼び出しをラップします 条件文では、接続を開いたときに発生するエラーを処理できます。このようにして、アプリケーションを実行する前に、問題についてユーザーに通知できます。アプリケーションは1の終了ステータスで終了することに注意してください。 、これは通常、プログラムの失敗を示すために使用されます。
上記の例では、 .open()を使用します インタラクティブセッションでは、 print()を使用します ユーザーにエラーメッセージを表示します。ただし、GUIアプリケーションでは、 print()を使用する代わりに 、通常は QMessageBoxを使用します 物体。 QMessageBoxを使用 、ユーザーに情報を表示するための小さなダイアログを作成できます。
接続エラーを処理する方法を示すサンプルGUIアプリケーションは次のとおりです。
 1import sys
 2
 3from PyQt5.QtSql import QSqlDatabase
 4from PyQt5.QtWidgets import QApplication, QMessageBox, QLabel
 5
 6# Create the connection
 7con = QSqlDatabase.addDatabase("QSQLITE")
 8con.setDatabaseName("/home/contacts.sqlite")
 9
10# Create the application
11app = QApplication(sys.argv)
12
13# Try to open the connection and handle possible errors
14if not con.open():
15    QMessageBox.critical(
16        None,
17        "App Name - Error!",
18        "Database Error: %s" % con.lastError().databaseText(),
19    )
20    sys.exit(1)
21
22# Create the application's window
23win = QLabel("Connection Successfully Opened!")
24win.setWindowTitle("App Name")
25win.resize(200, 100)
26win.show()
27sys.exit(app.exec_())
if 14行目のステートメントは、接続が失敗したかどうかを確認します。 / home /の場合 ディレクトリが存在しないか、ディレクトリに書き込む権限がない場合は、 .open()を呼び出します。 データベースファイルを作成できないため、失敗します。この状況では、実行の流れ ifを入力します ステートメントコードがブロックされ、画面にメッセージが表示されます。
書き込み可能な他のディレクトリへのパスを変更した場合は、 .open()を呼び出します。 成功すると、接続が正常に開かれました!というメッセージを表示するウィンドウが表示されます。 contacts.sqliteという新しいデータベースファイルもあります 選択したディレクトリにあります。
Noneを渡すことに注意してください メッセージの親として メッセージを表示する時点ではまだウィンドウを作成していないため、メッセージボックスの実行可能な親がありません。
PyQtを使用したSQLクエリの実行
完全に機能するデータベース接続があれば、データベースの操作を開始する準備が整います。これを行うには、文字列ベースのSQLクエリと QSqlQueryを使用できます。 オブジェクト。 QSqlQuery データベースであらゆる種類のSQLクエリを実行できます。 QSqlQueryを使用 、 SELECT などのデータ操作言語(DML)ステートメントを実行できます 、 INSERT 、 UPDATE 、および DELETE 、および CREATE TABLE などのデータ定義言語(DDL)ステートメント など。
QSqlQueryのコンストラクター にはいくつかのバリエーションがありますが、このチュートリアルでは、そのうちの2つについて学習します。
-
QSqlQuery(query、connection)文字列ベースのSQLqueryを使用してクエリオブジェクトを構築します およびデータベースのconnection。接続を指定しない場合、または指定された接続が無効な場合は、デフォルトのデータベース接続が使用されます。queryの場合 空の文字列ではない場合は、すぐに実行されます。 -
QSqlQuery(connection)connectionを使用してクエリオブジェクトを作成します 。connectionの場合 が無効な場合、デフォルトの接続が使用されます。
QSqlQueryを作成することもできます コンストラクターに引数を渡さずにオブジェクト。その場合、クエリはデフォルトのデータベース接続を使用します(存在する場合)。
クエリを実行するには、 .exec()を呼び出す必要があります クエリオブジェクト。 .exec()を使用できます 2つの異なる方法で:
-
.exec(query)queryに含まれる文字列ベースのSQLクエリを実行します 。Trueを返します クエリが成功した場合、それ以外の場合はFalseを返します 。 -
.exec()以前に準備されたSQLクエリを実行します。Trueを返します クエリが成功した場合、それ以外の場合はFalseを返します 。
注: PyQtは、 QSqlQuery.exec()のバリエーションも実装しています。 .exec _()という名前で 。これらは、 execが含まれる古いバージョンのPythonとの下位互換性を提供します。 言語のキーワードでした。
これで、 QSqlQueryの使用の基本がわかりました。 SQLクエリを作成して実行するために、知識を実践する方法を学ぶ準備ができています。
静的SQLクエリの実行
PyQtを使用してクエリの作成と実行を開始するには、お気に入りのコードエディタまたはIDEを起動して、 queries.pyというPythonスクリプトを作成します。 。スクリプトを保存し、次のコードを追加します。
 1import sys
 2
 3from PyQt5.QtSql import QSqlDatabase, QSqlQuery
 4
 5# Create the connection
 6con = QSqlDatabase.addDatabase("QSQLITE")
 7con.setDatabaseName("contacts.sqlite")
 8
 9# Open the connection
10if not con.open():
11    print("Database Error: %s" % con.lastError().databaseText())
12    sys.exit(1)
13
14# Create a query and execute it right away using .exec()
15createTableQuery = QSqlQuery()
16createTableQuery.exec(
17    """
18    CREATE TABLE contacts (
19        id INTEGER PRIMARY KEY AUTOINCREMENT UNIQUE NOT NULL,
20        name VARCHAR(40) NOT NULL,
21        job VARCHAR(50),
22        email VARCHAR(40) NOT NULL
23    )
24    """
25)
26
27print(con.tables())
このスクリプトでは、操作するモジュールとクラスをインポートすることから始めます。次に、 .addDatabase()を使用してデータベース接続を作成します SQLiteドライバーを使用します。データベース名を"contacts.sqlite"に設定します 接続を開きます。
最初のクエリを作成するには、 QSqlQueryをインスタンス化します。 引数なし。クエリオブジェクトを配置したら、 .exec()を呼び出します。 、文字列ベースのSQLクエリを引数として渡します。この種のクエリは、静的クエリと呼ばれます。 クエリの外部からパラメータを取得しないためです。
上記のSQLクエリは、 contactsという新しいテーブルを作成します データベース内。そのテーブルには、次の4つの列があります。
| 列 | コンテンツ |
|---|---|
id | テーブルの主キーを持つ整数 |
名前 | 連絡先の名前の文字列 |
ジョブ | 連絡先の役職の文字列 |
メール | 連絡先のメールアドレスを含む文字列 |
上記のスクリプトの最後の行は、データベースに含まれているテーブルのリストを出力します。スクリプトを実行すると、 contacts.sqliteという新しいデータベースファイルが表示されます。 現在のディレクトリに作成されます。 ['contacts'、'sqlite_sequence']のようなものも取得します 画面に印刷されます。このリストには、データベース内のテーブルの名前が含まれています。
注: 文字列ベースのSQLクエリでは、クエリを実行する特定のSQLデータベースに応じた適切な構文を使用する必要があります。構文が間違っている場合は、 .exec() クエリを無視し、 Falseを返します 。
SQLiteの場合、クエリには一度に1つのステートメントしか含めることができません。
.exec()を呼び出す QSqlQueryで オブジェクトは、データベースで文字列ベースのSQLクエリをすぐに実行する一般的な方法ですが、後で実行するためにクエリを事前に準備したい場合はどうでしょうか。それが次のセクションのトピックです。
動的クエリの実行:文字列の書式設定
これまで、データベースで静的クエリを実行する方法を学習しました。静的クエリは、パラメータを受け入れないクエリです。 、したがって、クエリはそのまま実行されます。これらのクエリはかなり便利ですが、特定の入力パラメータに応答してデータを取得するクエリを作成する必要がある場合があります。
実行時にパラメータを受け入れるクエリは、動的クエリと呼ばれます。 。パラメータを使用すると、特定のパラメータ値に応じてクエリを微調整し、データを取得できます。値が異なると、結果も異なります。次の2つのアプローチのいずれかを使用して、クエリで入力パラメータを取得できます。
- 文字列フォーマットを使用してパラメータ値を補間し、クエリを動的に構築します。
- プレースホルダーパラメーターを使用してクエリを準備してから、特定の値をパラメーターにバインドします。
最初のアプローチでは、動的クエリをすばやく作成できます。ただし、このアプローチを安全に使用するには、パラメーター値が信頼できるソースからのものであることを確認する必要があります。そうしないと、SQLインジェクション攻撃に直面する可能性があります。
文字列フォーマットを使用してPyQtで動的クエリを作成する方法の例を次に示します。
>>>>>> from PyQt5.QtSql import QSqlQuery, QSqlDatabase
>>> con = QSqlDatabase.addDatabase("QSQLITE")
>>> con.setDatabaseName("contacts.sqlite")
>>> con.open()
True
>>> name = "Linda"
>>> job = "Technical Lead"
>>> email = "linda@example.com"
>>> query = QSqlQuery()
>>> query.exec(
... f"""INSERT INTO contacts (name, job, email)
... VALUES ('{name}', '{job}', '{email}')"""
... )
True
この例では、f-stringを使用して、特定の値を文字列ベースのSQLクエリに補間することにより、動的クエリを作成します。最後のクエリは、連絡先にデータを挿入します テーブル。Lindaに関するデータが含まれています。 。
注: このチュートリアルの後半で、データベースに保存されているデータを取得してナビゲートする方法を説明します。
この種の動的クエリが機能するには、挿入する値が正しいデータ型であることを確認する必要があることに注意してください。したがって、これらの値は文字列である必要があるため、f文字列のプレースホルダーを一重引用符で囲みます。
動的クエリの実行:プレースホルダーパラメータ
動的クエリを実行するための2番目のアプローチでは、プレースホルダーを含むテンプレートを使用して、事前にクエリを準備する必要があります。 パラメータ用。 PyQtは、2つのパラメータープレースホルダースタイルをサポートしています。
- Oracleスタイル
:nameなどの名前付きプレースホルダーを使用します または:email。 - ODBCスタイル 疑問符を使用します(
?)位置プレースホルダーとして。
これらのスタイルを同じクエリに混在させることはできないことに注意してください。プレースホルダーの使用方法に関する追加の例については、値をバインドするためのアプローチを確認してください。
注: ODBCはOpenDatabaseConnectivityの略です。
PyQtでこの種の動的クエリを作成するには、最初に各クエリパラメータのプレースホルダーを使用してテンプレートを作成し、次にそのテンプレートを引数として .prepare()に渡します。 、実行用のクエリテンプレートを解析、コンパイル、および準備します。テンプレートにSQL構文エラーなどの問題がある場合は、 .prepare() テンプレートのコンパイルに失敗し、 Falseを返します 。
準備プロセスが成功した場合は、 prepare() Trueを返します 。その後、 .bindValue()を使用して、各パラメーターに特定の値を渡すことができます。 名前付きまたは位置パラメータを使用するか、 .addBindValue()を使用します 位置パラメータを使用します。 .bindValue() 次の2つのバリエーションがあります:
-
.bindValue(placeholder、val) -
.bindValue(pos、val)
最初のバリエーションでは、プレースホルダー Oracleスタイルのプレースホルダーを表します。 2番目のバリエーションでは、 pos クエリ内のパラメータの位置を持つゼロベースの整数を表します。どちらのバリエーションでも、 val 特定のパラメータにバインドされる値を保持します。
.addBindValue() 位置バインドを使用して、プレースホルダーのリストに値を追加します。これは、 .addBindValue()への呼び出しの順序を意味します 準備されたクエリの各プレースホルダーパラメータにバインドされる値を決定します。
準備されたクエリの使用を開始するには、 INSERT INTOを準備できます。 データベースにサンプルデータを入力するSQLステートメント。 「静的SQLクエリの実行」セクションで作成したスクリプトに戻り、 print()を呼び出した直後に次のコードを追加します。 :
28# Creating a query for later execution using .prepare()
29insertDataQuery = QSqlQuery()
30insertDataQuery.prepare(
31    """
32    INSERT INTO contacts (
33        name,
34        job,
35        email
36    )
37    VALUES (?, ?, ?)
38    """
39)
40
41# Sample data
42data = [
43    ("Joe", "Senior Web Developer", "joe@example.com"),
44    ("Lara", "Project Manager", "lara@example.com"),
45    ("David", "Data Analyst", "david@example.com"),
46    ("Jane", "Senior Python Developer", "jane@example.com"),
47]
48
49# Use .addBindValue() to insert data
50for name, job, email in data:
51    insertDataQuery.addBindValue(name)
52    insertDataQuery.addBindValue(job)
53    insertDataQuery.addBindValue(email)
54    insertDataQuery.exec()
最初のステップは、 QSqlQueryを作成することです 物体。次に、 .prepare()を呼び出します クエリオブジェクト。この場合、プレースホルダーにはODBCスタイルを使用します。クエリは連絡先のnameの値を取ります 、 job 、および email 、したがって、3つのプレースホルダーが必要です。 id以降 列は自動インクリメントされた整数であるため、値を指定する必要はありません。
次に、サンプルデータを作成してデータベースにデータを入力します。 データ タプルのリストを保持し、各タプルには、各連絡先の名前、仕事、および電子メールの3つの項目が含まれています。
The final step is to bind the values that you want to pass to each placeholder and then call .exec() to execute the query. To do that, you use a for loop. The loop header unpacks each tuple in data into three separate variables with convenient names. Then you call .addBindValue() on the query object to bind the values to the placeholders.
Note that you’re using positional placeholders , so the order in which you call .addBindValue() will define the order in which each value is passed to the corresponding placeholder.
This approach for creating dynamic queries is handy when you want to customize your queries using values that come from your user’s input. Anytime you take the user’s input to complete a query on a database, you face the security risk of SQL injection.
In PyQt, combining .prepare() , .bindValue() , and .addBindValue() fully protects you against SQL injection attacks, so this is the way to go when you’re taking untrusted input to complete your queries.
Navigating the Records in a Query
If you execute a SELECT statement, then your QSqlQuery object will retrieve zero or more records from one or more tables in your database. The query will hold records containing data that matches the query’s criteria. If no data matches the criteria, then your query will be empty.
QSqlQuery provides a set of navigation methods that you can use to move throughout the records in a query result:
| Method | Retrieves |
|---|---|
.next() | The next record |
.previous() | The previous record |
.first() | The first record |
.last() | The last record |
.seek(index, relative=False) | The record at position index |
All these methods position the query object on the retrieved record if that record is available. Most of these methods have specific rules that apply when using them. With these methods, you can move forward, backward, or arbitrarily through the records in a query result. Since they all return either True or False , you can use them in a while loop to navigate all the records in one go.
These methods work with active queries 。 A query is active when you’ve successfully run .exec() on it, but the query isn’t finished yet. Once an active query is on a valid record, you can retrieve data from that record using .value(index) 。 This method takes a zero-based integer number, index , and returns the value at that index (column) in the current record.
Note: If you execute a SELECT * type of query, then the columns in the result won’t follow a known order. This might cause problems when you use .value() to retrieve the value at a given column because there’s no way of knowing if you’re using the right column index.
You’ll look at a few examples of how to use some of the navigation methods to move throughout a query below. But first, you need to create a connection to your database:
>>>>>> from PyQt5.QtSql import QSqlDatabase, QSqlQuery
>>> con = QSqlDatabase.addDatabase("QSQLITE")
>>> con.setDatabaseName("contacts.sqlite")
>>> con.open()
True
Here, you create and open a new connection to contacts.sqlite 。 If you’ve been following along with this tutorial so far, then this database already contains some sample data. Now you can create a QSqlQuery object and execute it on that data:
>>> # Create and execute a query
>>> query = QSqlQuery()
>>> query.exec("SELECT name, job, email FROM contacts")
True
This query retrieves data about the name , job , and email of all the contacts stored in the contacts table. Since .exec() returned True , the query was successful and is now an active query. You can navigate the records in this query using any of the navigation methods you saw before. You can also retrieve the data at any column in a record using .value() :
>>> # First record
>>> query.first()
True

>>> # Named indices for readability
>>> name, job, email = range(3)

>>> # Retrieve data from the first record
>>> query.value(name)
'Linda'

>>> # Next record
>>> query.next()
True
>>> query.value(job)
'Senior Web Developer'

>>> # Last record
>>> query.last()
True
>>> query.value(email)
'jane@example.com'
With the navigation methods, you can move around the query result. With .value() , you can retrieve the data at any column in a given record.
You can also iterate through all the records in your query using a while loop along with .next() :
>>> query.exec()
True

>>> while query.next():
...     print(query.value(name), query.value(job), query.value(email))
...
Linda Technical Lead linda@example.com
Joe Senior Web Developer joe@example.com
...
With .next() , you navigate all the records in a query result. .next() works similar to the iterator protocol in Python. Once you’ve iterated over the records in a query result, .next() starts returning False until you run .exec() また。 A call to .exec() retrieves data from a database and places the query object’s internal pointer one position before the first record, so when you call .next() , you get the first record again.
You can also loop in reverse order using .previous() :
>>> while query.previous():
...     print(query.value(name), query.value(job), query.value(email))
...
Jane Senior Python Developer jane@example.com
David Data Analyst david@example.com
...
.previous() works similar to .next() , but the iteration is done in reverse order. In other words, the loop goes from the query pointer’s position back to the first record.
Sometimes you might want to get the index that identifies a given column in a table by using the name of that column. To do that, you can call .indexOf() on the return value of .record() :
>>> query.first()
True

>>> # Get the index of name
>>> name = query.record().indexOf("name")

>>> query.value(name)
'Linda'

>>> # Finish the query object if unneeded
>>> query.finish()
>>> query.isActive()
False
The call to .indexOf() on the result of .record() returns the index of the "name" 桁。 If "name" doesn’t exist, then .indexOf() returns -1 。 This is handy when you use a SELECT * statement in which the order of columns is unknown. Finally, if you’re done with a query object, then you can turn it inactive by calling .finish() 。 This will free the system memory associated with the query object at hand.
Closing and Removing Database Connections
In practice, some of your PyQt applications will depend on a database, and others won’t. An application that depends on a database often creates and opens a database connection just before creating any window or graphical component and keeps the connection open until the application is closed.
On the other hand, applications that don’t depend on a database but use a database to provide some of their functionalities typically connect to that database only when needed, if at all. In these cases, you can close the connection after use and free the resources associated with that connection, such as system memory.
To close a connection in PyQt, you call .close() on the connection. This method closes the connection and frees any acquired resources. It also invalidates any associated QSqlQuery objects because they can’t work properly without an active connection.
Here’s an example of how to close an active database connection using .close() :
>>> from PyQt5.QtSql import QSqlDatabase

>>> con = QSqlDatabase.addDatabase("QSQLITE")
>>> con.setDatabaseName("contacts.sqlite")

>>> con.open()
True
>>> con.isOpen()
True

>>> con.close()
>>> con.isOpen()
False
You can call .close() on a connection to close it and free all its associated resources. To make sure that a connection is closed, you call .isOpen() 。
Note that QSqlQuery objects remain in memory after closing their associated connection, so you must make your queries inactive by calling .finish() or .clear() , or by deleting the QSqlQuery object before closing the connection. Otherwise, residual memory is left out in your query object.
You can reopen and reuse any previously closed connection. That’s because .close() doesn’t remove connections from the list of available connections, so they remain usable.
You can also completely remove your database connections using .removeDatabase() 。 To do this safely, first finish your queries using .finish() , then close the database using .close() , and finally remove the connection. You can use .removeDatabase(connectionName) to remove the database connection called connectionName from the list of available connections. Removed connections are no longer available for use in the application at hand.
To remove the default database connection, you can call .connectionName() on the object returned by .database() and pass the result to .removeDatabase() :
>>> # The connection is closed but still in the list of connections
>>> QSqlDatabase.connectionNames()
['qt_sql_default_connection']

>>> # Remove the default connection
>>> QSqlDatabase.removeDatabase(QSqlDatabase.database().connectionName())

>>> # The connection is no longer in the list of connections
>>> QSqlDatabase.connectionNames()
[]

>>> # Try to open a removed connection
>>> con.open()
False
Here, the call to .connectionNames() returns the list of available connections. In this case, you have only one connection, the default. Then you remove the connection using .removeDatabase() 。
Note: Before closing and removing a database connection, you need to make sure that everything that uses the connection is deleted or set to use a different data source. Otherwise, you can have a resource leak 。
Since you need a connection name to use .removeDatabase() , you call .connectionName() on the result of .database() to get the name of the default connection. Finally, you call .connectionNames() again to make sure that the connection is no longer in the list of available connections. Trying to open a removed connection will return False because the connection no longer exists.
Displaying and Editing Data With PyQt
A common requirement in GUI applications that use databases is the ability to load, display, and edit data from the database using different widgets. Table, list, and tree widgets are commonly used in GUIs to manage data.
PyQt provides two different kind of widgets for managing data:
- Standard widgets include internal containers for storing data.
- View widgets don’t maintain internal data containers but use models to access data.
For small GUI applications that manage small databases, you can use the first approach. The second approach is handy when you’re building complex GUI applications that manage large databases.
The second approach takes advantage of PyQt’s Model-View programming. With this approach, you have widgets that represent views such as tables, lists, and trees on one hand and model classes that communicate with your data on the other hand.
Understanding PyQt’s Model-View Architecture
The Model-View-Controller (MVC) design pattern is a general software pattern intended to divide an application’s code into three general layers, each with a different role.
The model takes care of the business logic of the application, the view provides on-screen representations, and the controller connects the model and the view to make the application work.
Qt provides a custom variation of MVC. They call it the Model-View architecture, and it’s available for PyQt as well. The pattern also separates the logic into three components:
-
Models communicate with and access the data. They also define an interface that’s used by views and delegates to access the data. All models are based on
QAbstractItemModel。 Some commonly used models includeQStandardItemModel,QFileSystemModel, and SQL-related models. -
Views are responsible for displaying the data to the user. They also have similar functionality to the controller in the MVC pattern. All views are based on
QAbstractItemView。 Some commonly used views areQListView,QTableView, andQTreeView。 -
Delegates paint view items and provide editor widgets for modifying items. They also communicate back with the model if an item has been modified. The base class is
QAbstractItemDelegate。
Separating classes into these three components implies that changes on models will be reflected on associated views or widgets automatically, and changes on views or widgets through delegates will update the underlying model automatically.
In addition, you can display the same data in different views without the need for multiple models.
Using Standard Widget Classes
PyQt provides a bunch of standard widgets for displaying and editing data in your GUI applications. These standard widgets provide views such as tables, trees, and lists. They also provide an internal container for storing data and convenient delegates for editing the data. All these features are grouped into a single class.
Here are three of these standard classes:
| Standard Class | Displays |
|---|---|
QListWidget | A list of items |
QTreeWidget | A hierarchical tree of items |
QTableWidget | A table of items |
QTableWidget is arguably the most popular widget when it comes to displaying and editing data. It creates a 2D array of QTableWidgetItem objects. Each item holds an individual value as a string. All these values are displayed and organized in a table of rows and columns.
You can perform at least the following operations on a QTableWidget object:
- Editing the content of its items using delegate objects
- Adding new items using
.setItem() - Setting the number of rows and columns using
.setRowCount()and.setColumnCount() - Adding vertical and horizontal header labels using
setHorizontalHeaderLabels()and.setVerticalHeaderLabels
Here’s a sample application that shows how to use a QTableWidget object to display data in a GUI. The application uses the database you created and populated in previous sections, so if you want to run it, then you need to save the code into the same directory in which you have the contacts.sqlite database:
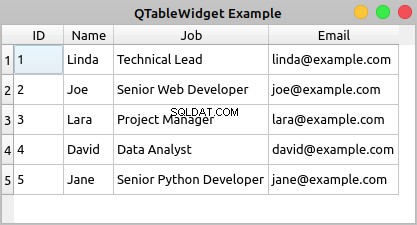
If you double-click any cell of the table, then you’ll be able to edit the content of the cell. However, your changes won’t be saved to your database.
Here’s the code for your application:
 1import sys
 2
 3from PyQt5.QtSql import QSqlDatabase, QSqlQuery
 4from PyQt5.QtWidgets import (
 5    QApplication,
 6    QMainWindow,
 7    QMessageBox,
 8    QTableWidget,
 9    QTableWidgetItem,
10)
11
12class Contacts(QMainWindow):
13    def __init__(self, parent=None):
14        super().__init__(parent)
15        self.setWindowTitle("QTableView Example")
16        self.resize(450, 250)
17        # Set up the view and load the data
18        self.view = QTableWidget()
19        self.view.setColumnCount(4)
20        self.view.setHorizontalHeaderLabels(["ID", "Name", "Job", "Email"])
21        query = QSqlQuery("SELECT id, name, job, email FROM contacts")
22        while query.next():
23            rows = self.view.rowCount()
24            self.view.setRowCount(rows + 1)
25            self.view.setItem(rows, 0, QTableWidgetItem(str(query.value(0))))
26            self.view.setItem(rows, 1, QTableWidgetItem(query.value(1)))
27            self.view.setItem(rows, 2, QTableWidgetItem(query.value(2)))
28            self.view.setItem(rows, 3, QTableWidgetItem(query.value(3)))
29        self.view.resizeColumnsToContents()
30        self.setCentralWidget(self.view)
31
32def createConnection():
33    con = QSqlDatabase.addDatabase("QSQLITE")
34    con.setDatabaseName("contacts.sqlite")
35    if not con.open():
36        QMessageBox.critical(
37            None,
38            "QTableView Example - Error!",
39            "Database Error: %s" % con.lastError().databaseText(),
40        )
41        return False
42    return True
43
44app = QApplication(sys.argv)
45if not createConnection():
46    sys.exit(1)
47win = Contacts()
48win.show()
49sys.exit(app.exec_())
Here’s what’s happening in this example:
- Lines 18 to 20 create a
QTableWidgetobject, set the number of columns to4, and set user-friendly labels for each column’s header. - Line 21 creates and executes a
SELECTSQL query on your database to get all the data in thecontactstable. - Line 22 starts a
whileloop to navigate the records in the query result using.next()。 - Line 24 increments the number of rows in the table by
1using.setRowCount()。 - Lines 25 to 28 add items of data to your table using
.setItem()。 Note that since the values in theidcolumns are integer numbers, you need to convert them into strings to be able to store them in aQTableWidgetItemobject.
.setItem() takes three arguments:
rowholds a zero-based integer that represents the index of a given row in the table.columnholds a zero-based integer that represents the index of a given column in the table.itemholds theQTableWidgetItemobject that you need to place at a given cell in the table.
Finally, you call .resizeColumnsToContents() on your view to adjust the size of the columns to their content and provide a better rendering of the data.
Displaying and editing database tables using standard widgets can become a challenging task. That’s because you’ll have two copies of the same data. In other words you’ll have a copy of the data in two locations:
- Outside the widget, in your database
- Inside the widget, in the widget’s internal containers
You’re responsible for synchronizing both copies of your data manually, which can be an annoying and error-prone operation. Luckily, you can use PyQt’s Model-View architecture to avoid most of these problems, as you’ll see in the following section.
Using View and Model Classes
PyQt’s Model-View classes eliminate the problems of data duplication and synchronization that may occur when you use standard widget classes to build database applications. The Model-View architecture allows you to use several views to display the same data because you can pass one model to many views.
Model classes provide an application programming interface (API) that you can use to manipulate data. View classes provide convenient delegate objects that you can use to edit data in the view directly. To connect a view with a given module, you need to call .setModel() on the view object.
PyQt offers a set of view classes that support the Model-View architecture:
| View Class | Displays |
|---|---|
QListView | A list of items that take values directly from a model class |
QTreeView | A hierarchical tree of items that take values directly from a model class |
QTableView | A table of items that take values directly from a model class |
You can use these view classes along with model classes to create your database applications. This will make your applications more robust, faster to code, and less error-prone.
Here are some of the model classes that PyQt provides for working with SQL databases:
| Model Class | 説明 |
|---|---|
QSqlQueryModel | A read-only data model for SQL queries |
QSqlTableModel | An editable data model for reading and writing records in a single table |
QSqlRelationalTableModel | An editable data model for reading and writing records in a relational table |
Once you’ve connected one of these models to a physical database table or query, you can use them to populate your views. Views provide delegate objects that allow you to modify the data directly in the view. The model connected to the view will update the data in your database to reflect any change in the view. Note that you don’t have to update the data in the database manually. The model will do that for you.
Here’s an example that shows the basics of how to use a QTableView object and a QSqlTableModel object together to build a database application using PyQt’s Model-View architecture:
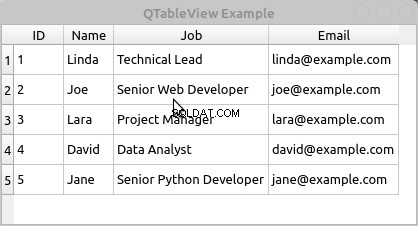
To edit the data in a cell of the table, you can double-click the cell. A convenient delegate widget will show in the cell, allowing you to edit its content. Then you can hit Enter to save the changes.
The ability to automatically handle and save changes in the data is one of the more important advantages of using PyQt’s Model-View classes. The Model-View architecture will improve your productivity and reduce the errors that can appear when you have to write data manipulation code by yourself.
Here’s the code to create the application:
 1import sys
 2
 3from PyQt5.QtCore import Qt
 4from PyQt5.QtSql import QSqlDatabase, QSqlTableModel
 5from PyQt5.QtWidgets import (
 6    QApplication,
 7    QMainWindow,
 8    QMessageBox,
 9    QTableView,
10)
11
12class Contacts(QMainWindow):
13    def __init__(self, parent=None):
14        super().__init__(parent)
15        self.setWindowTitle("QTableView Example")
16        self.resize(415, 200)
17        # Set up the model
18        self.model = QSqlTableModel(self)
19        self.model.setTable("contacts")
20        self.model.setEditStrategy(QSqlTableModel.OnFieldChange)
21        self.model.setHeaderData(0, Qt.Horizontal, "ID")
22        self.model.setHeaderData(1, Qt.Horizontal, "Name")
23        self.model.setHeaderData(2, Qt.Horizontal, "Job")
24        self.model.setHeaderData(3, Qt.Horizontal, "Email")
25        self.model.select()
26        # Set up the view
27        self.view = QTableView()
28        self.view.setModel(self.model)
29        self.view.resizeColumnsToContents()
30        self.setCentralWidget(self.view)
31
32def createConnection():
33    con = QSqlDatabase.addDatabase("QSQLITE")
34    con.setDatabaseName("contacts.sqlite")
35    if not con.open():
36        QMessageBox.critical(
37            None,
38            "QTableView Example - Error!",
39            "Database Error: %s" % con.lastError().databaseText(),
40        )
41        return False
42    return True
43
44app = QApplication(sys.argv)
45if not createConnection():
46    sys.exit(1)
47win = Contacts()
48win.show()
49sys.exit(app.exec_())
Here’s what’s happening in this code:
- Line 18 creates an editable
QSqlTableModelobject. - Line 19 connects your model with the
contactstable in your database using.setTable()。 - Line 20 sets the edit strategy of the model to
OnFieldChange。 This strategy allows the model to automatically update the data in your database if the user modifies any of the data directly in the view. - Lines 21 to 24 set some user-friendly labels to the horizontal headers of the model using
.setHeaderData()。 - Line 25 loads the data from your database and populates the model by calling
.select()。 - Line 27 creates the table view object to display the data contained in the model.
- Line 28 connects the view with the model by calling
.setModel()on the view with your data model as an argument. - Line 29 calls
.resizeColumnsToContents()on the view object to adjust the table to its content.
That’s it! You now have a fully-functional database application.
Using SQL Databases in PyQt:Best Practices
When it comes to using PyQt’s SQL support effectively, there are some best practices that you might want to use in your applications:
-
Favor PyQt’s SQL support over Python standard library or third-party libraries to take advantage of the natural integration of these classes with the rest of PyQt’s classes and infrastructure, mostly with the Model-View architecture.
-
Use previously prepared dynamic queries with placeholders for parameters and bind values to those parameters using
.addBindValue()and.bindValue()。 This will help prevent SQL injection attacks. -
Handle errors that can occur when opening a database connection to avoid unexpected behaviors and application crashes.
-
Close and remove unneeded database connections and queries to free any acquired system resources.
-
Minimize the use of
SELECT *queries to avoid problems when retrieving data with.value()。 -
Pass your passwords to
.open()instead of to.setPassword()to avoid the risk of compromising your security. -
Take advantage of PyQt’s Model-View architecture and its integration with PyQt’s SQL support to make your applications more robust.
This list isn’t complete, but it’ll help you make better use of PyQt’s SQL support when developing your database applications.
Conclusion
Using PyQt’s built-in support to work with SQL databases is an important skill for any Python developer who’s creating PyQt GUI applications and needs to connect them to a database. PyQt provides a consistent set of classes for managing SQL databases.
These classes fully integrate with PyQt’s Model-View architecture, allowing you to develop GUI applications that can manage databases in a user-friendly way.
In this tutorial, you’ve learned how to:
- Use PyQt’s SQL support to connect to a database
- Execute SQL queries on a database with PyQt
- Build database applications using PyQt’s Model-View architecture
- Display and edit data from a database using PyQt widgets
With this knowledge, you can improve your productivity when creating nontrivial database applications and make your GUI applications more robust.