このシリーズのパート2では、REST APIを介して行われた変更をSQLAlchemyを使用してデータベースに保存する機能を追加し、Marshmallowを使用してRESTAPI用にそのデータをシリアル化する方法を学習しました。アプリケーションが既存のデータに変更を加えたり、新しいデータを作成したりできるように、REST APIをデータベースに接続することは素晴らしいことであり、アプリケーションをはるかに便利で堅牢なものにします。
ただし、これはデータベースが提供する能力の一部にすぎません。さらに強力な機能はRです RDBMSの一部 システム:関係 。データベースでは、リレーションシップとは、2つ以上のテーブルを意味のある方法で接続する機能です。この記事では、関係を実装し、 Personを変える方法を学びます。 データベースをミニブログWebアプリケーションに変換します。
この記事では、次のことを学びます。
- データベース内の複数のテーブルが有用で重要な理由
- テーブルの相互関係
- SQLAlchemyが関係の管理にどのように役立つか
- リレーションシップがミニブログアプリケーションの構築にどのように役立つか
この記事の対象者
このシリーズのパート1では、REST APIの構築について説明し、パート2では、そのRESTAPIをデータベースに接続する方法を説明しました。
この記事では、プログラミングツールベルトをさらに拡張します。 SQLAlchemyによって1対多の関係として表される階層データ構造を作成する方法を学習します。さらに、作成済みのREST APIを拡張して、この階層構造の要素にCRUD(作成、読み取り、更新、削除)のサポートを提供します。
パート2で紹介するWebアプリケーションでは、HTMLファイルとJavaScriptファイルが主要な方法で変更され、より完全に機能するミニブログアプリケーションが作成されます。その記事のGitHubリポジトリにあるパート2のコードの最終バージョンを確認できます。
関係とミニブログアプリケーションの作成を開始するときは、しばらくお待ちください。
追加の依存関係
パート2の記事に必要なもの以外に新しいPythonの依存関係はありません。ただし、Webアプリケーションで2つの新しいJavaScriptモジュールを使用して、作業をより簡単で一貫性のあるものにします。 2つのモジュールは次のとおりです。
- Handlebars.js はJavaScript用のテンプレートエンジンであり、Flask用のJinja2によく似ています。
- Moment.js UTCタイムスタンプの表示を容易にする日時解析およびフォーマットモジュールです。
すでにjQueryモジュールで行っているように、WebアプリケーションはCloudflare CDN(コンテンツ配信ネットワーク)から直接取得するため、これらのいずれかをダウンロードする必要はありません。
ブログ用に拡張されたユーザーデータ
パート2では、 People データはbuild_database.pyに辞書として存在していました Pythonコード。これは、データベースに初期データを入力するために使用したものです。 Peopleを変更します 各人に関連付けられたメモのリストを提供するためのデータ構造。新しいPeople データ構造は次のようになります:
# Data to initialize database with
PEOPLE = [
    {
        "fname": "Doug",
        "lname": "Farrell",
        "notes": [
            ("Cool, a mini-blogging application!", "2019-01-06 22:17:54"),
            ("This could be useful", "2019-01-08 22:17:54"),
            ("Well, sort of useful", "2019-03-06 22:17:54"),
        ],
    },
    {
        "fname": "Kent",
        "lname": "Brockman",
        "notes": [
            (
                "I'm going to make really profound observations",
                "2019-01-07 22:17:54",
            ),
            (
                "Maybe they'll be more obvious than I thought",
                "2019-02-06 22:17:54",
            ),
        ],
    },
    {
        "fname": "Bunny",
        "lname": "Easter",
        "notes": [
            ("Has anyone seen my Easter eggs?", "2019-01-07 22:47:54"),
            ("I'm really late delivering these!", "2019-04-06 22:17:54"),
        ],
    },
]
Peopleの各人 辞書にnotesというキーが含まれるようになりました 、データのタプルを含むリストに関連付けられています。 notesの各タプル リストは単一のメモを表します コンテンツとタイムスタンプが含まれています。タイムスタンプは(動的に作成されるのではなく)初期化され、後でRESTAPIで順序付けを示すために使用されます。
各単一の人は複数のノートに関連付けられており、各単一のノートは1人の人にのみ関連付けられています。このデータの階層は1対多の関係として知られており、単一の親オブジェクトが多くの子オブジェクトに関連付けられています。この1対多の関係がSQLAlchemyを使用してデータベースでどのように管理されているかがわかります。
ブルートフォースアプローチ
構築したデータベースはデータをテーブルに格納し、テーブルは行と列の2次元配列です。 People はできますか 上記の辞書は、行と列の単一のテーブルで表されますか?次のように、 personに含めることができます。 データベーステーブル。残念ながら、例に実際のデータをすべて含めると、以下に示すように、テーブルのスクロールバーが作成されます。
person_id | lname | fname | タイムスタンプ | コンテンツ | note_timestamp |
|---|---|---|---|---|---|
| 1 | ファレル | ダグ | 2018-08-08 21:16:01 | かっこいい、ミニブログアプリケーション! | 2019-01-06 22:17:54 |
| 2 | ファレル | ダグ | 2018-08-08 21:16:01 | これは便利かもしれません | 2019-01-08 22:17:54 |
| 3 | ファレル | ダグ | 2018-08-08 21:16:01 | まあ、ちょっと便利 | 2019-03-06 22:17:54 |
| 4 | ブロックマン | ケント | 2018-08-08 21:16:01 | 私は本当に深い観察をするつもりです | 2019-01-07 22:17:54 |
| 5 | ブロックマン | ケント | 2018-08-08 21:16:01 | 多分彼らは私が思っていたよりも明白になるでしょう | 2019-02-06 22:17:54 |
| 6 | イースター | バニー | 2018-08-08 21:16:01 | 誰かが私のイースターエッグを見たことがありますか? | 2019-01-07 22:47:54 |
| 7 | イースター | バニー | 2018-08-08 21:16:01 | これらの配信は本当に遅れています! | 2019-04-06 22:17:54 |
上記の表は実際に機能します。すべてのデータが表示され、1人の人物がさまざまなメモのコレクションに関連付けられます。
利点
概念的には、上記のテーブル構造には、比較的理解しやすいという利点があります。データをデータベースではなくフラットファイルに永続化できると主張することもできます。
2次元のテーブル構造により、このデータをスプレッドシートに保存して使用できます。スプレッドシートは、データストレージとしてかなり使用されています。
デメリット
上記のテーブル構造は機能しますが、いくつかの実際の欠点があります。
メモのコレクションを表すために、各個人のすべてのデータが一意のメモごとに繰り返されるため、個人データは冗長になります。列がそれほど多くないため、これは個人データにとってそれほど大きな問題ではありません。しかし、人がもっと多くの列を持っていると想像してみてください。大容量のディスクドライブを使用している場合でも、数百万行のデータを処理している場合、これはストレージの問題になる可能性があります。
このような冗長データがあると、時間が経つにつれてメンテナンスの問題が発生する可能性があります。たとえば、イースターバニーが名前の変更を決定した場合はどうでしょうか。これを行うには、データの一貫性を保つために、イースターバニーの名前を含むすべてのレコードを更新する必要があります。データベースに対するこの種の作業は、特にSQLクエリを手動で実行している人が作業を行う場合、データの不整合につながる可能性があります。
列の命名は厄介になります。上記の表には、タイムスタンプがあります。 テーブル内の人の作成時間と更新時間を追跡するために使用される列。また、メモの作成時間と更新時間についても同様の機能が必要ですが、これは timestamp はすでに使用されており、 note_timestampという不自然な名前です。 使用されます。
personに1対多の関係を追加したい場合はどうなりますか テーブル?たとえば、人の子供や電話番号を含めるため。各人は複数の子供と複数の電話番号を持つことができます。これは、Pythonの Peopleに対して比較的簡単に実行できます。 childrenを追加して上記の辞書 およびphone_numbers データを含む新しいリストを持つキー。
ただし、 personでこれらの新しい1対多の関係を表す 上記のデータベーステーブルは非常に難しくなります。新しい1対多の関係はすべて、子データのすべてのエントリに対してそれを表すために必要な行数を劇的に増やします。さらに、データの冗長性に関連する問題は大きくなり、処理が難しくなります。
最後に、上記のテーブル構造から取得するデータは、Pythonicではなく、リストの大きなリストにすぎません。関係がないため、SQLAlchemyはあまり役に立ちません。
リレーショナルデータベースアプローチ
上記の内容に基づいて、1つのテーブルで適度に複雑なデータセットを表現しようとすると、すぐに管理できなくなることが明らかになります。それを考えると、データベースはどのような代替手段を提供しますか?ここがR RDBMSの一部 データベースが登場します。関係を表すことで、上記の欠点がなくなります。
階層データを単一のテーブルで表現しようとする代わりに、データは複数のテーブルに分割され、それらを相互に関連付けるメカニズムが使用されます。テーブルはコレクションラインに沿って分割されているため、 People 上記の辞書では、これは人を表すテーブルとメモを表す別のテーブルがあることを意味します。これにより、元の person が復活します 次のようなテーブル:
person_id | lname | fname | タイムスタンプ |
|---|---|---|---|
| 1 | ファレル | ダグ | 2018-08-08 21:16:01.888444 |
| 2 | ブロックマン | ケント | 2018-08-08 21:16:01.889060 |
| 3 | イースター | バニー | 2018-08-08 21:16:01.886834 |
新しいメモ情報を表すために、 noteという新しいテーブルを作成します 。 (単数のテーブル命名規則を覚えておいてください。)テーブルは次のようになります:
note_id | person_id | コンテンツ | タイムスタンプ |
|---|---|---|---|
| 1 | 1 | かっこいい、ミニブログアプリケーション! | 2019-01-06 22:17:54 |
| 2 | 1 | これは便利かもしれません | 2019-01-08 22:17:54 |
| 3 | 1 | まあ、ちょっと便利 | 2019-03-06 22:17:54 |
| 4 | 2 | 私は本当に深い観察をするつもりです | 2019-01-07 22:17:54 |
| 5 | 2 | 多分彼らは私が思っていたよりも明白になるでしょう | 2019-02-06 22:17:54 |
| 6 | 3 | 誰かが私のイースターエッグを見たことがありますか? | 2019-01-07 22:47:54 |
| 7 | 3 | これらの配信は本当に遅れています! | 2019-04-06 22:17:54 |
personのように注意してください テーブル、 note テーブルには、 note_idという一意の識別子があります 、 noteの主キーです テーブル。明らかでないことの1つは、 person_idが含まれていることです。 表の値。それは何のために使われますか?これがpersonとの関係を作成するものです テーブル。一方、 note_id テーブルの主キーperson_id これは外部キーと呼ばれるものです。
外部キーは、 noteの各エントリを示します テーブルpersonの主キー 関連付けられている記録。これを使用して、SQLAlchemyは、 person.person_id に接続することにより、各個人に関連付けられたすべてのメモを収集できます。 note.person_idの主キー 外部キー、関係の作成。
利点
データセットを2つのテーブルに分割し、外部キーの概念を導入することで、データの考え方が少し複雑になり、単一のテーブル表現の欠点が解決されました。 SQLAlchemyは、複雑さの増大をかなり簡単にエンコードするのに役立ちます。
データはデータベース内で冗長ではなくなりました。データベースに保存する個人ごとに1つの個人エントリのみがあります。これにより、ストレージの問題が即座に解決され、メンテナンスの問題が大幅に簡素化されます。
それでもイースターバニーが名前を変更したい場合は、 personの1行を変更するだけで済みます。 テーブル、およびその行に関連するその他のもの( note など) 表)はすぐに変更を利用します。
列の命名はより一貫性があり、意味があります。人とメモのデータは別々のテーブルに存在するため、テーブル間で名前の競合がないため、作成と更新のタイムスタンプは両方のテーブルで一貫して名前を付けることができます。
さらに、表現したい新しい1対多の関係のために、各行の順列を作成する必要がなくなりました。 子供を連れて行く およびphone_numbers 以前の例。これを実装するには、 childが必要になります およびphone_number テーブル。各テーブルには、 person_idの外部キーが含まれます。 それをpersonに関連付けます テーブル。
SQLAlchemyを使用すると、上記のテーブルから取得するデータは、各人の行のオブジェクトであるため、すぐに役立ちます。そのオブジェクトには、テーブルの列と同等の名前付き属性があります。それらの属性の1つは、関連するメモオブジェクトを含むPythonリストです。
デメリット
総当たり攻撃のアプローチが理解しやすい場合、外部キーと関係の概念により、データについての考え方がやや抽象的になります。この抽象化は、テーブル間で確立するすべての関係について考慮する必要があります。
関係を利用するということは、データベースシステムを使用することを約束することを意味します。これは、実際にデータを使用するアプリケーションを超えて、インストール、学習、および保守を行うためのもう1つのツールです。
SQLAlchemyモデル
上記の2つのテーブルとそれらの間の関係を使用するには、両方のテーブルとそれらの間の関係を認識するSQLAlchemyモデルを作成する必要があります。これがSQLAlchemyのPersonです。 パート2のモデルを更新して、 notesのコレクションとの関係を追加しました :
 1class Person(db.Model):
 2    __tablename__ = 'person'
 3    person_id = db.Column(db.Integer, primary_key=True)
 4    lname = db.Column(db.String(32))
 5    fname = db.Column(db.String(32))
 6    timestamp = db.Column(
 7        db.DateTime, default=datetime.utcnow, onupdate=datetime.utcnow
 8    )
 9    notes = db.relationship(
10        'Note',
11        backref='person',
12        cascade='all, delete, delete-orphan',
13        single_parent=True,
14        order_by='desc(Note.timestamp)'
15    )
上記のPythonクラスの1行目から8行目は、パート2で前に作成したものとまったく同じです。9行目から16行目は、 Personに新しい属性を作成します。 notesというクラス 。この新しいnotes 属性は、次のコード行で定義されています。
-
9行目: クラスの他の属性と同様に、この行は
notesと呼ばれる新しい属性を作成しますdb.relationshipというオブジェクトのインスタンスと同じに設定します 。このオブジェクトは、Personに追加する関係を作成します クラスであり、次の行で定義されているすべてのパラメータを使用して作成されます。 -
10行目: 文字列パラメータ
'Note'Personが持つSQLAlchemyクラスを定義します クラスはに関連します。メモ クラスはまだ定義されていないため、ここでは文字列になっています。これは前方参照であり、コードの後半まで定義されていない何かが必要になったときに、定義の順序によって発生する可能性のある問題を処理するのに役立ちます。'Note'文字列はPersonを許可しますNoteを見つけるためのクラス 実行時のクラス。これは、両方のPersonの後にあります。 およびNote定義されています。 -
11行目:
backref ='person'パラメータはトリッキーです。Noteで後方参照と呼ばれるものを作成します オブジェクト。Noteの各インスタンス オブジェクトには、personという属性が含まれます 。person属性は、特定のNoteの親オブジェクトを参照します インスタンスはに関連付けられています。親オブジェクト(person)への参照を持つ この場合)子では、コードがメモを繰り返し処理し、親に関する情報を含める必要がある場合に非常に役立ちます。これは、ディスプレイレンダリングコードで驚くほど頻繁に発生します。 -
12行目:
cascade ='all、delete、delete-orphan'パラメータは、親のPersonに変更が加えられたときにノートオブジェクトインスタンスを処理する方法を決定します 実例。たとえば、Personオブジェクトが削除されると、SQLAlchemyはPersonを削除するために必要なSQLを作成します データベースから。さらに、このパラメータは、すべてのNoteも削除するように指示します。 それに関連付けられたインスタンス。これらのオプションの詳細については、SQLAlchemyのドキュメントをご覧ください。 -
13行目:
single_parent =Truedelete-orphanの場合、パラメータが必要です 以前のcascadeの一部です パラメータ。これは、孤立したNoteを許可しないようにSQLAlchemyに指示します インスタンス(注親なしPersonオブジェクト)各Noteが存在するため、 ひとり親がいます。 -
14行目:
order_by ='desc(Note.timestamp)'パラメータはSQLAlchemyにNoteをソートする方法を指示しますPersonに関連付けられたインスタンス 。Personオブジェクトが取得されます。デフォルトでは、notes属性リストにはNoteが含まれます 順序が不明なオブジェクト。 SQLAlchemydesc(...)関数は、ノートを新しいものから古いものへと降順でソートします。この行が代わりにorder_by='Note.timestamp'だった場合 、SQLAlchemyはデフォルトでasc(...)を使用します 機能し、ノートを古いものから新しいものへと昇順で並べ替えます。
これで、 Person モデルには新しいnotesがあります 属性であり、これは Noteとの1対多の関係を表します オブジェクトの場合、 NoteのSQLAlchemyモデルを定義する必要があります :
 1class Note(db.Model):
 2    __tablename__ = 'note'
 3    note_id = db.Column(db.Integer, primary_key=True)
 4    person_id = db.Column(db.Integer, db.ForeignKey('person.person_id'))
 5    content = db.Column(db.String, nullable=False)
 6    timestamp = db.Column(
 7        db.DateTime, default=datetime.utcnow, onupdate=datetime.utcnow
 8    )
メモ クラスは、サンプルの note に見られるように、メモを構成する属性を定義します。 上からのデータベーステーブル。属性はここで定義されます:
-
1行目
Noteを作成します クラス、db.Modelから継承 、Personを作成する前とまったく同じです クラス。 -
2行目
Noteを格納するために使用するデータベーステーブルをクラスに指示します オブジェクト。 -
3行目
note_idを作成します 属性、整数値、およびNoteの主キーとして定義します オブジェクト。 -
4行目
person_idを作成します 属性であり、Noteに関連する外部キーとして定義します。Personへのクラスperson.person_idを使用するクラス 主キー。これとPerson.notes属性は、SQLAlchemyがPersonと対話するときに何をすべきかを知る方法です。 およびNoteオブジェクト。 -
5行目
contentを作成します メモの実際のテキストを含む属性。nullable =Falseパラメータは、コンテンツのない新しいメモを作成しても問題がないことを示します。 -
6行目
タイムスタンプを作成します 属性であり、Personとまったく同じです クラス。これには、特定のNoteの作成時間または更新時間が含まれます。 インスタンス。
データベースを初期化する
これで、 Personが更新されました Noteを作成しました モデルの場合は、それらを使用してテストデータベース people.dbを再構築します 。これを行うには、 build_database.pyを更新します パート2のコードは次のようになります。
 1import os
 2from datetime import datetime
 3from config import db
 4from models import Person, Note
 5
 6# Data to initialize database with
 7PEOPLE = [
 8    {
 9        "fname": "Doug",
10        "lname": "Farrell",
11        "notes": [
12            ("Cool, a mini-blogging application!", "2019-01-06 22:17:54"),
13            ("This could be useful", "2019-01-08 22:17:54"),
14            ("Well, sort of useful", "2019-03-06 22:17:54"),
15        ],
16    },
17    {
18        "fname": "Kent",
19        "lname": "Brockman",
20        "notes": [
21            (
22                "I'm going to make really profound observations",
23                "2019-01-07 22:17:54",
24            ),
25            (
26                "Maybe they'll be more obvious than I thought",
27                "2019-02-06 22:17:54",
28            ),
29        ],
30    },
31    {
32        "fname": "Bunny",
33        "lname": "Easter",
34        "notes": [
35            ("Has anyone seen my Easter eggs?", "2019-01-07 22:47:54"),
36            ("I'm really late delivering these!", "2019-04-06 22:17:54"),
37        ],
38    },
39]
40
41# Delete database file if it exists currently
42if os.path.exists("people.db"):
43    os.remove("people.db")
44
45# Create the database
46db.create_all()
47
48# Iterate over the PEOPLE structure and populate the database
49for person in PEOPLE:
50    p = Person(lname=person.get("lname"), fname=person.get("fname"))
51
52    # Add the notes for the person
53    for note in person.get("notes"):
54        content, timestamp = note
55        p.notes.append(
56            Note(
57                content=content,
58                timestamp=datetime.strptime(timestamp, "%Y-%m-%d %H:%M:%S"),
59            )
60        )
61    db.session.add(p)
62
63db.session.commit()
上記のコードはパート2からのものですが、 Person間に1対多の関係を作成するためにいくつかの変更が加えられています。 およびNote 。コードに追加された更新行または新しい行は次のとおりです。
-
4行目
Noteをインポートするように更新されました 以前に定義されたクラス。 -
7行目から39行目 更新された
PEOPLEが含まれています 各個人に関連付けられたメモのリストとともに、個人データを含む辞書。このデータはデータベースに挿入されます。 -
49行目から61行目
PEOPLEを繰り返し処理します 辞書、各personを取得 次に、それを使用してPersonを作成します 物体。 -
53行目
person.notesを繰り返します リスト、各noteを取得 順番に。 -
54行目
contentを解凍します およびtimestamp各noteから タプル。 -
55行目から60行目
Noteを作成します オブジェクトを作成し、p.notes.append()を使用してpersonnotesコレクションに追加します 。 -
61行目
Personを追加します オブジェクトpデータベースセッションへ。 -
63行目 セッション内のすべてのアクティビティをデータベースにコミットします。この時点で、すべてのデータが
personに書き込まれます。 およびnotepeople.dbのテーブル データベースファイル。
notesで作業していることがわかります Personのコレクション オブジェクトインスタンスp Pythonで他のリストを操作するのと同じです。 db.session.commit()の場合、SQLAlchemyは基礎となる1対多の関係情報を処理します 電話がかけられます。
たとえば、 Personのように インスタンスには、主キーフィールド person_idがあります データベースにコミットされるときにSQLAlchemyによって初期化され、 Noteのインスタンス 主キーフィールドが初期化されます。さらに、注 外部キーperson_id Personの主キー値でも初期化されます 関連付けられているインスタンス。
これがPersonのインスタンスの例です db.session.commit()の前のオブジェクト 一種の擬似コード:
Person (
    person_id = None
    lname = 'Farrell'
    fname = 'Doug'
    timestamp = None
    notes = [
        Note (
            note_id = None
            person_id = None
            content = 'Cool, a mini-blogging application!'
            timestamp = '2019-01-06 22:17:54'
        ),
        Note (
            note_id = None
            person_id = None
            content = 'This could be useful'
            timestamp = '2019-01-08 22:17:54'
        ),
        Note (
            note_id = None
            person_id = None
            content = 'Well, sort of useful'
            timestamp = '2019-03-06 22:17:54'
        )
    ]
)
これがPersonの例です db.session.commit()の後のオブジェクト :
Person (
    person_id = 1
    lname = 'Farrell'
    fname = 'Doug'
    timestamp = '2019-02-02 21:27:10.336'
    notes = [
        Note (
            note_id = 1
            person_id = 1
            content = 'Cool, a mini-blogging application!'
            timestamp = '2019-01-06 22:17:54'
        ),
        Note (
            note_id = 2
            person_id = 1
            content = 'This could be useful'
            timestamp = '2019-01-08 22:17:54'
        ),
        Note (
            note_id = 3
            person_id = 1
            content = 'Well, sort of useful'
            timestamp = '2019-03-06 22:17:54'
        )
    ]
)
2つの重要な違いは、 Personの主キーです。 およびNote オブジェクトが初期化されました。パート2で説明した主キーの自動インクリメント機能のためにオブジェクトが作成されたため、データベースエンジンがこれを処理しました。
さらに、 person_id すべてのNoteの外部キー インスタンスは、その親を参照するように初期化されています。これは、 Personの順序が原因で発生します およびNote オブジェクトはデータベースに作成されます。
SQLAlchemyは、 Person間の関係を認識しています。 およびNote オブジェクト。 Person オブジェクトはpersonにコミットされます データベーステーブル、SQLAlchemyは person_idを取得します 主キーの値。その値は、 person_idの外部キー値を初期化するために使用されます 注で データベースにコミットする前のオブジェクト。
Person.notes のときに渡された情報により、SQLAlchemyがこのデータベースのハウスキーピング作業を処理します。 属性はdb.relationship(...)で初期化されました オブジェクト。
さらに、 Person.timestamp 属性は現在のタイムスタンプで初期化されています。
build_database.pyの実行 コマンドラインからプログラムを実行します(仮想環境では、新しい追加機能を使用してデータベースを再作成し、Webアプリケーションで使用できるようにします。このコマンドラインはデータベースを再構築します:
$ python build_database.py
build_database.py ユーティリティプログラムは、正常に実行された場合、メッセージを出力しません。例外がスローされると、エラーが画面に出力されます。
RESTAPIを更新
SQLAlchemyモデルを更新し、それらを使用して people.dbを更新しました。 データベース。次に、REST APIを更新して、新しいメモ情報へのアクセスを提供します。パート2で作成したRESTAPIは次のとおりです。
| アクション | HTTP動詞 | URLパス | 説明 |
|---|---|---|---|
| 作成 | POST | / api / people | 新しい人を作成するためのURL |
| 読む | GET | / api / people | 人々のコレクションを読むためのURL |
| 読む | GET | / api / people / {person_id} | person_idで1人の人物を読み取るためのURL |
| 更新 | PUT | / api / people / {person_id} | person_idによって既存の人物を更新するためのURL |
| 削除 | DELETE | / api / people / {person_id} | person_idによって既存の人を削除するためのURL |
上記のRESTAPIは、モノのコレクションおよびモノ自体へのHTTPURLパスを提供します。人のリストを取得したり、その人のリストから1人の人とやり取りしたりできます。このパススタイルは、左から右に返されるものを洗練し、進むにつれてよりきめ細かくなります。
この左から右へのパターンを続けて、よりきめ細かくし、ノートコレクションにアクセスします。ミニブログWebアプリケーションにメモを提供するために作成する拡張RESTAPIは次のとおりです。
| アクション | HTTP動詞 | URLパス | 説明 |
|---|---|---|---|
| 作成 | POST | / api / people / {person_id} / notes | 新しいメモを作成するためのURL |
| 読む | GET | / api / people / {person_id} / notes / {note_id} | 1人の1つのメモを読むためのURL |
| 更新 | PUT | api / people / {person_id} / notes / {note_id} | 1人の1つのメモを更新するためのURL |
| 削除 | DELETE | api / people / {person_id} / notes / {note_id} | 1人の1つのメモを削除するためのURL |
| 読む | GET | / api / notes | URLを使用して、すべての人のすべてのメモを note.timestampで並べ替えます |
notesには2つのバリエーションがあります peopleで使用される規則と比較したRESTAPIの一部 セクション:
-
すべての
notesを取得するために定義されたURLはありません 人に関連付けられ、単一のメモを取得するためのURLのみ。これにより、ある意味でREST APIが完成しますが、後で作成するWebアプリケーションにはこの機能は必要ありません。 Therefore, it’s been left out. -
There is the inclusion of the last URL
/api/notes。 This is a convenience method created for the web application. It will be used in the mini-blog on the home page to show all the notes in the system. There isn’t a way to get this information readily using the REST API pathing style as designed, so this shortcut has been added.
As in Part 2, the REST API is configured in the swagger.yml file.
注:
The idea of designing a REST API with a path that gets more and more granular as you move from left to right is very useful. Thinking this way can help clarify the relationships between different parts of a database. Just be aware that there are realistic limits to how far down a hierarchical structure this kind of design should be taken.
For example, what if the Note object had a collection of its own, something like comments on the notes. Using the current design ideas, this would lead to a URL that went something like this:/api/people/{person_id}/notes/{note_id}/comments/{comment_id}
There is no practical limit to this kind of design, but there is one for usefulness. In actual use in real applications, a long, multilevel URL like that one is hardly ever needed. A more common pattern is to get a list of intervening objects (like notes) and then use a separate API entry point to get a single comment for an application use case.
Implement the API
With the updated REST API defined in the swagger.yml file, you’ll need to update the implementation provided by the Python modules. This means updating existing module files, like models.py and people.py , and creating a new module file called notes.py to implement support for Notes in the extended REST API.
Update Response JSON
The purpose of the REST API is to get useful JSON data out of the database. Now that you’ve updated the SQLAlchemy Person and created the Note models, you’ll need to update the Marshmallow schema models as well. As you may recall from Part 2, Marshmallow is the module that translates the SQLAlchemy objects into Python objects suitable for creating JSON strings.
The updated and newly created Marshmallow schemas are in the models.py module, which are explained below, and look like this:
 1class PersonSchema(ma.ModelSchema):
 2    class Meta:
 3        model = Person
 4        sqla_session = db.session
 5    notes = fields.Nested('PersonNoteSchema', default=[], many=True)
 6
 7class PersonNoteSchema(ma.ModelSchema):
 8    """
 9    This class exists to get around a recursion issue
10    """
11    note_id = fields.Int()
12    person_id = fields.Int()
13    content = fields.Str()
14    timestamp = fields.Str()
15
16class NoteSchema(ma.ModelSchema):
17    class Meta:
18        model = Note
19        sqla_session = db.session
20    person = fields.Nested('NotePersonSchema', default=None)
21
22class NotePersonSchema(ma.ModelSchema):
23    """
24    This class exists to get around a recursion issue
25    """
26    person_id = fields.Int()
27    lname = fields.Str()
28    fname = fields.Str()
29    timestamp = fields.Str()
There are some interesting things going on in the above definitions. The PersonSchema class has one new entry:the notes attribute defined in line 5. This defines it as a nested relationship to the PersonNoteSchema 。 It will default to an empty list if nothing is present in the SQLAlchemy notes 関係。 The many=True parameter indicates that this is a one-to-many relationship, so Marshmallow will serialize all the related notes 。
The PersonNoteSchema class defines what a Note object looks like as Marshmallow serializes the notes list. The NoteSchema defines what a SQLAlchemy Note object looks like in terms of Marshmallow. Notice that it has a person 属性。 This attribute comes from the SQLAlchemy db.relationship(...) definition parameter backref='person' 。 The person Marshmallow definition is nested, but because it doesn’t have the many=True parameter, there is only a single person connected.
The NotePersonSchema class defines what is nested in the NoteSchema.person attribute.
注:
You might be wondering why the PersonSchema class has its own unique PersonNoteSchema class to define the notes collection attribute. By the same token, the NoteSchema class has its own unique NotePersonSchema class to define the person 属性。 You may be wondering whether the PersonSchema class could be defined this way:
class PersonSchema(ma.ModelSchema):
    class Meta:
        model = Person
        sqla_session = db.session
    notes = fields.Nested('NoteSchema', default=[], many=True)
Additionally, couldn’t the NoteSchema class be defined using the PersonSchema to define the person attribute? A class definition like this would each refer to the other, and this causes a recursion error in Marshmallow as it will cycle from PersonSchema to NoteSchema until it runs out of stack space. Using the unique schema references breaks the recursion and allows this kind of nesting to work.
People
Now that you’ve got the schemas in place to work with the one-to-many relationship between Person and Note , you need to update the person.py and create the note.py modules in order to implement a working REST API.
The people.py module needs two changes. The first is to import the Note class, along with the Person class at the top of the module. Then only read_one(person_id) needs to change in order to handle the relationship. That function will look like this:
 1def read_one(person_id):
 2    """
 3    This function responds to a request for /api/people/{person_id}
 4    with one matching person from people
 5
 6    :param person_id:   Id of person to find
 7    :return:            person matching id
 8    """
 9    # Build the initial query
10    person = (
11        Person.query.filter(Person.person_id == person_id)
12        .outerjoin(Note)
13        .one_or_none()
14    )
15
16    # Did we find a person?
17    if person is not None:
18
19        # Serialize the data for the response
20        person_schema = PersonSchema()
21        data = person_schema.dump(person).data
22        return data
23
24    # Otherwise, nope, didn't find that person
25    else:
26        abort(404, f"Person not found for Id: {person_id}")
The only difference is line 12:.outerjoin(Note) 。 An outer join (left outer join in SQL terms) is necessary for the case where a user of the application has created a new person object, which has no notes related to it. The outer join ensures that the SQL query will return a person object, even if there are no note rows to join with.
At the start of this article, you saw how person and note data could be represented in a single, flat table, and all of the disadvantages of that approach. You also saw the advantages of breaking that data up into two tables, person and note , with a relationship between them.
Until now, we’ve been working with the data as two distinct, but related, items in the database. But now that you’re actually going to use the data, what we essentially want is for the data to be joined back together. This is what a database join does. It combines data from two tables together using the primary key to foreign key relationship.
A join is kind of a boolean and operation because it only returns data if there is data in both tables to combine. If, for example, a person row exists but has no related note row, then there is nothing to join, so nothing is returned. This isn’t what you want for read_one(person_id) 。
This is where the outer join comes in handy. It’s a kind of boolean or 手術。 It returns person data even if there is no associated note data to combine with. This is the behavior you want for read_one(person_id) to handle the case of a newly created Person object that has no notes yet.
You can see the complete people.py in the article repository.
Notes
You’ll create a notes.py module to implement all the Python code associated with the new note related REST API definitions. In many ways, it works like the people.py module, except it must handle both a person_id and a note_id as defined in the swagger.yml configuration file. As an example, here is read_one(person_id, note_id) :
 1def read_one(person_id, note_id):
 2    """
 3    This function responds to a request for
 4    /api/people/{person_id}/notes/{note_id}
 5    with one matching note for the associated person
 6
 7    :param person_id:       Id of person the note is related to
 8    :param note_id:         Id of the note
 9    :return:                json string of note contents
10    """
11    # Query the database for the note
12    note = (
13        Note.query.join(Person, Person.person_id == Note.person_id)
14        .filter(Person.person_id == person_id)
15        .filter(Note.note_id == note_id)
16        .one_or_none()
17    )
18
19    # Was a note found?
20    if note is not None:
21        note_schema = NoteSchema()
22        data = note_schema.dump(note).data
23        return data
24
25    # Otherwise, nope, didn't find that note
26    else:
27        abort(404, f"Note not found for Id: {note_id}")
The interesting parts of the above code are lines 12 to 17:
- Line 13 begins a query against the
NoteSQLAlchemy objects and joins to the relatedPersonSQLAlchemy object comparingperson_idfrom bothPersonandNote. - Line 14 filters the result down to the
Noteobjects that has aPerson.person_idequal to the passed inperson_idparameter. - Line 15 filters the result further to the
Noteobject that has aNote.note_idequal to the passed innote_idparameter. - Line 16 returns the
Noteobject if found, orNoneif nothing matching the parameters is found.
You can check out the complete notes.py 。
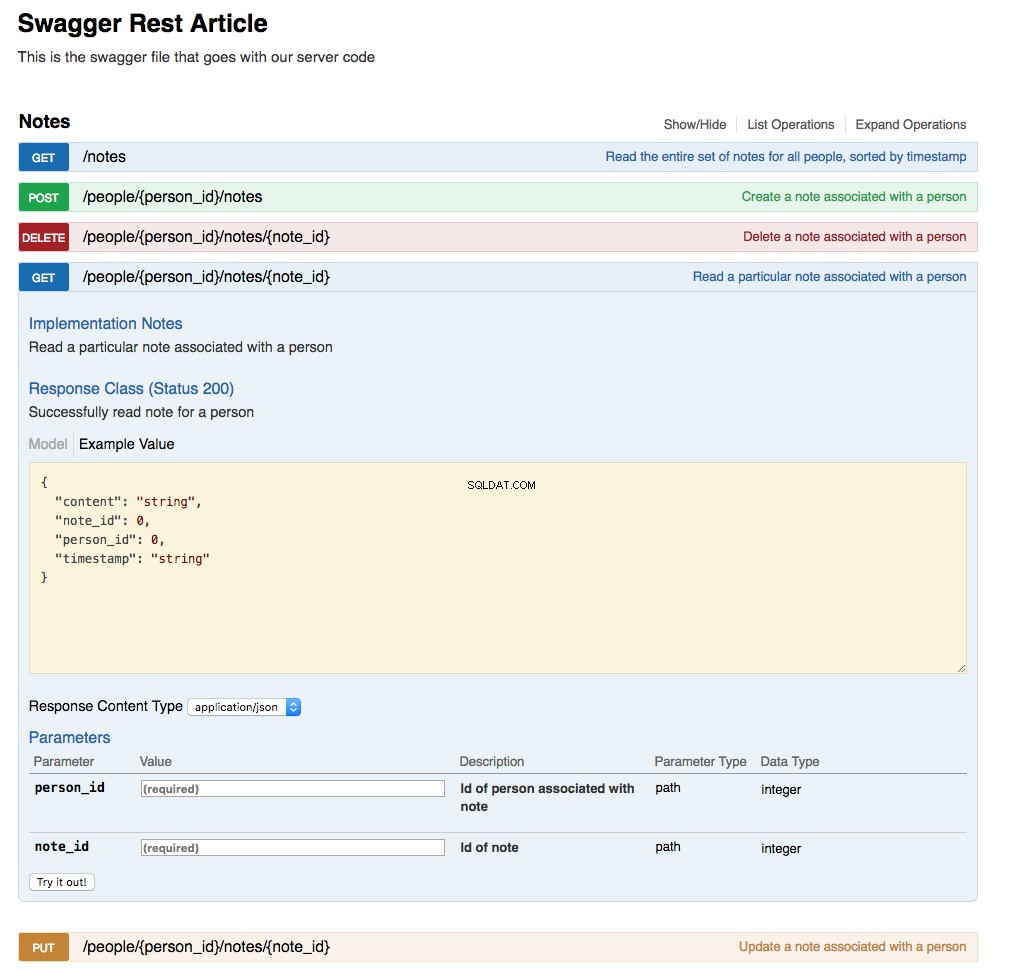
Updated Swagger UI
The Swagger UI has been updated by the action of updating the swagger.yml file and creating the URL endpoint implementations. Below is a screenshot of the updated UI showing the Notes section with the GET /api/people/{person_id}/notes/{note_id} expanded:
Mini-Blogging Web Application
The web application has been substantially changed to show its new purpose as a mini-blogging application. It has three pages:
-
The home page (
localhost:5000/) , which shows all of the blog messages (notes) sorted from newest to oldest -
The people page (
localhost:5000/people) , which shows all the people in the system, sorted by last name, and also allows the user to create a new person and update or delete an existing one -
The notes page (
localhost:5000/people/{person_id}/notes) , which shows all the notes associated with a person, sorted from newest to oldest, and also allows the user to create a new note and update or delete an existing one
Navigation
There are two buttons on every page of the application:
- The Home button will navigate to the home screen.
- The People button navigates to the
/peoplescreen, showing all people in the database.
These two buttons are present on every screen in the application as a way to get back to a starting point.
Home Page
Below is a screenshot of the home page showing the initialized database contents:
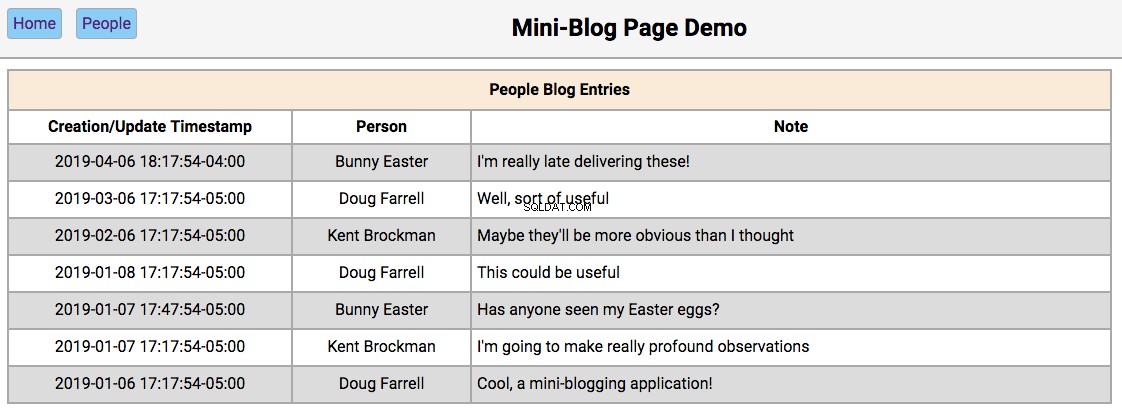
The functionality of this page works like this:
-
Double-clicking on a person’s name will take the user to the
/people/{person_id}page, with the editor section filled in with the person’s first and last names and the update and reset buttons enabled. -
Double-clicking on a person’s note will take the user to the
/people/{person_id}/notes/{note_id}page, with the editor section filled in with the note’s contents and the Update and Reset buttons enabled.
People Page
Below is a screenshot of the people page showing the people in the initialized database:
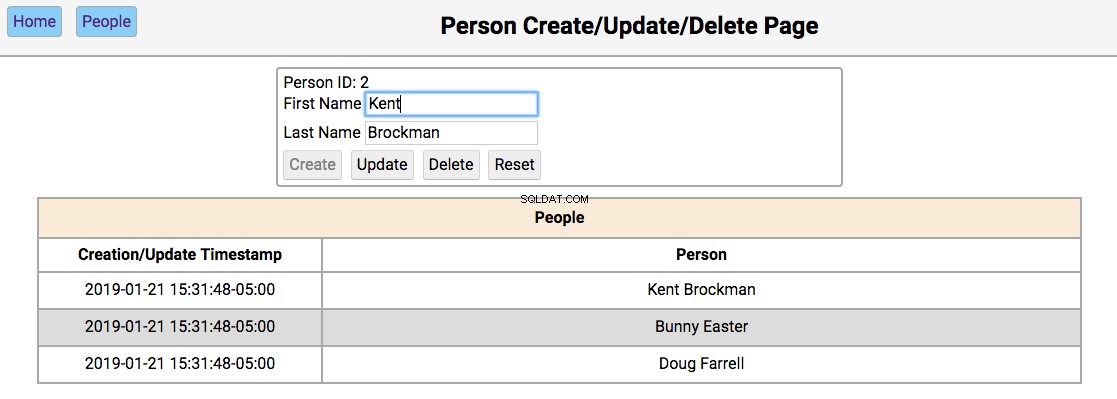
The functionality of this page works like this:
-
Single-clicking on a person’s name will populate the editor section of the page with the person’s first and last name, disabling the Create button, and enabling the Update and Delete buttons.
-
Double clicking on a person’s name will navigate to the notes pages for that person.
The functionality of the editor works like this:
-
If the first and last name fields are empty, the Create and Reset buttons are enabled. Entering a new name in the fields and clicking Create will create a new person and update the database and re-render the table below the editor. Clicking Reset will clear the editor fields.
-
If the first and last name fields have data, the user navigated here by double-clicking the person’s name from the home screen. In this case, the Update , Delete , and Reset buttons are enabled. Changing the first or last name and clicking Update will update the database and re-render the table below the editor. Clicking Delete will remove the person from the database and re-render the table.
Notes Page
Below is a screenshot of the notes page showing the notes for a person in the initialized database:
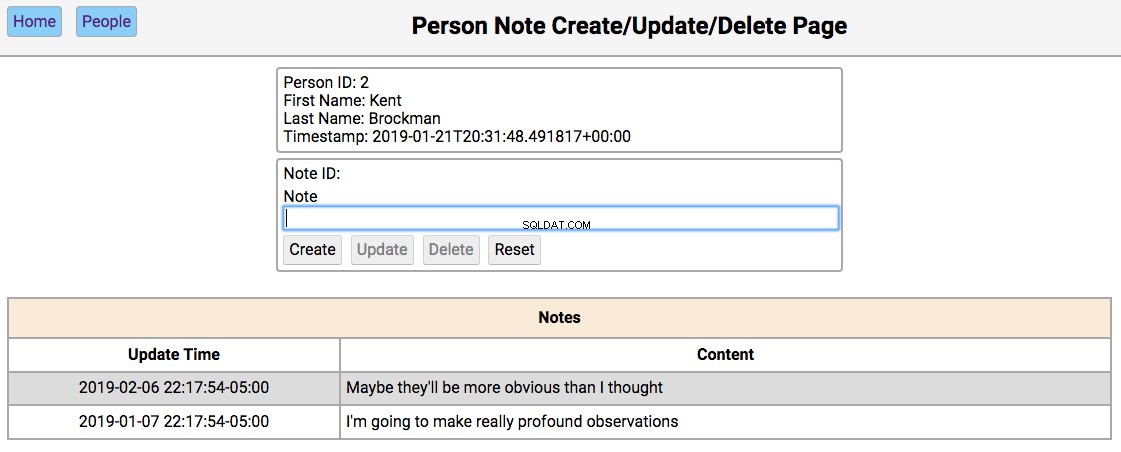
The functionality of this page works like this:
-
Single-clicking on a note will populate the editor section of the page with the notes content, disabling the Create button, and enabling the Update and Delete buttons.
-
All other functionality of this page is in the editor section.
The functionality of the editor works like this:
-
If the note content field is empty, then the Create and Reset buttons are enabled. Entering a new note in the field and clicking Create will create a new note and update the database and re-render the table below the editor. Clicking Reset will clear the editor fields.
-
If the note field has data, the user navigated here by double-clicking the person’s note from the home screen. In this case, the Update , Delete , and Reset buttons are enabled. Changing the note and clicking Update will update the database and re-render the table below the editor. Clicking Delete will remove the note from the database and re-render the table.
Web Application
This article is primarily focused on how to use SQLAlchemy to create relationships in the database, and how to extend the REST API to take advantage of those relationships. As such, the code for the web application didn’t get much attention. When you look at the web application code, keep an eye out for the following features:
-
Each page of the application is a fully formed single page web application.
-
Each page of the application is driven by JavaScript following an MVC (Model/View/Controller) style of responsibility delegation.
-
The HTML that creates the pages takes advantage of the Jinja2 inheritance functionality.
-
The hardcoded JavaScript table creation has been replaced by using the Handlebars.js templating engine.
-
The timestamp formating in all of the tables is provided by Moment.js.
You can find the following code in the repository for this article:
- The HTML for the web application
- The CSS for the web application
- The JavaScript for the web application
All of the example code for this article is available in the GitHub repository for this article. This contains all of the code related to this article, including all of the web application code.
Conclusion
Congratulations are in order for what you’ve learned in this article! Knowing how to build and use database relationships gives you a powerful tool to solve many difficult problems. There are other relationship besides the one-to-many example from this article. Other common ones are one-to-one, many-to-many, and many-to-one. All of them have a place in your toolbelt, and SQLAlchemy can help you tackle them all!
For more information about databases, you can check out these tutorials. You can also set up Flask to use SQLAlchemy. You can check out Model-View-Controller (MVC) more information about the pattern used in the web application JavaScript code.
In Part 4 of this series, you’ll focus on the HTML, CSS, and JavaScript files used to create the web application.
« Part 2:Database PersistencePart 3:Database RelationshipsPart 4:Simple Web Applications »