このシリーズのパート1では、FlaskとConnexionを使用して、PEOPLEと呼ばれる単純なメモリ内構造にCRUD操作を提供するRESTAPIを作成しました。 。これは、Connexionモジュールがインタラクティブなドキュメントとともに優れたRESTAPIを構築するのにどのように役立つかを示すために機能しました。
パート1のコメントに記載されているように、PEOPLE 構造は、アプリケーションが再起動されるたびに再初期化されます。 この記事では、PEOPLEを保存する方法を学習します 構造、およびAPIがSQLAlchemyとMarshmallowを使用してデータベースに提供するアクション。
SQLAlchemyは、Pythonオブジェクトをオブジェクトのデータのデータベース表現に格納するオブジェクトリレーショナルモデル(ORM)を提供します。これにより、Pythonの方法で考え続けることができ、オブジェクトデータがデータベースでどのように表されるかを気にする必要がなくなります。
Marshmallowは、PythonオブジェクトがJSONベースのREST APIに出入りするときに、Pythonオブジェクトをシリアル化および逆シリアル化する機能を提供します。 Marshmallowは、PythonクラスインスタンスをJSONに変換できるオブジェクトに変換します。
この記事のPythonコードはここにあります。
無料ボーナス: ここをクリックして「RESTAPIの例」ガイドのコピーをダウンロードし、実用的な例を含むPython +RESTAPIの原則の実践的な紹介を入手してください。
この記事の対象者
このシリーズのパート1を楽しんだ場合は、この記事でツールベルトをさらに拡張します。 SQLAlchemyを使用して、ストレートSQLよりもPythonicな方法でデータベースにアクセスします。また、Marshmallowを使用して、RESTAPIによって管理されるデータをシリアル化および逆シリアル化します。これを行うには、Pythonで利用可能な基本的なオブジェクト指向プログラミング機能を利用します。
また、SQLAlchemyを使用してデータベースを作成し、データベースを操作します。これは、RESTAPIをPEOPLEで稼働させるために必要です。 パート1で使用されたデータ。
パート1で紹介するWebアプリケーションでは、変更をサポートするために、HTMLファイルとJavaScriptファイルがマイナーな方法で変更されます。ここでパート1のコードの最終バージョンを確認できます。
追加の依存関係
この新しい機能の構築を開始する前に、パート1コードを実行するために作成したvirtualenvを更新するか、このプロジェクト用に新しいコードを作成する必要があります。 virtualenvをアクティブにした後でこれを行う最も簡単な方法は、次のコマンドを実行することです。
$ pip install Flask-SQLAlchemy flask-marshmallow marshmallow-sqlalchemy marshmallow
これにより、virtualenvに機能が追加されます:
-
Flask-SQLAlchemySQLAlchemyを追加し、Flaskにいくつかのタイアップを追加して、プログラムがデータベースにアクセスできるようにします。 -
flask-marshmallowマシュマロのFlask部分を追加します。これにより、プログラムはPythonオブジェクトをシリアル化可能な構造との間で変換できます。 -
marshmallow-sqlalchemyいくつかのMarshmallowフックをSQLAlchemyに追加して、プログラムがSQLAlchemyによって生成されたPythonオブジェクトをシリアル化および逆シリアル化できるようにします。 -
marshmallowマシュマロ機能の大部分を追加します。
人のデータ
上記のように、PEOPLE 前の記事のデータ構造は、メモリ内のPythonディクショナリです。その辞書では、その人の名前をルックアップキーとして使用しました。コードでは、データ構造は次のようになっています。
# Data to serve with our API
PEOPLE = {
    "Farrell": {
        "fname": "Doug",
        "lname": "Farrell",
        "timestamp": get_timestamp()
    },
    "Brockman": {
        "fname": "Kent",
        "lname": "Brockman",
        "timestamp": get_timestamp()
    },
    "Easter": {
        "fname": "Bunny",
        "lname": "Easter",
        "timestamp": get_timestamp()
    }
}
プログラムに加える変更により、すべてのデータがデータベーステーブルに移動します。これは、データがディスクに保存され、server.pyの実行の間に存在することを意味します プログラム。
姓は辞書のキーであるため、コードは人の名前の変更を制限していました。変更できるのは名のみでした。さらに、データベースに移動すると、人の検索キーとして使用されなくなるため、名前を変更できます。
概念的には、データベーステーブルは、行がレコードであり、列がそれらのレコードのフィールドである2次元配列と考えることができます。
データベーステーブルには通常、行のルックアップキーとして自動インクリメントの整数値があります。これは主キーと呼ばれます。テーブル内の各レコードには、テーブル全体で一意の値を持つ主キーがあります。テーブルに格納されているデータから独立した主キーを使用すると、行の他のフィールドを自由に変更できます。
注:
自動インクリメントの主キーは、データベースが次のことを処理することを意味します。
- 新しいレコードがテーブルに挿入されるたびに、既存の最大の主キーフィールドをインクリメントします
- その値を新しく挿入されたデータの主キーとして使用する
これにより、テーブルが大きくなるにつれて一意の主キーが保証されます。
テーブルに単数の名前を付けるというデータベースの規則に従うため、テーブルはpersonと呼ばれます。 。 PEOPLEの翻訳 上記の構造をpersonという名前のデータベーステーブルに変換します これを提供します:
| person_id | lname | fname | タイムスタンプ |
|---|---|---|---|
| 1 | ファレル | ダグ | 2018-08-08 21:16:01.888444 |
| 2 | ブロックマン | ケント | 2018-08-08 21:16:01.889060 |
| 3 | イースター | バニー | 2018-08-08 21:16:01.886834 |
表の各列には、次のようなフィールド名があります。
-
person_id: 各人の主キーフィールド -
lname: 人の名前 -
fname: 人の名 timestamp: 挿入/更新アクションに関連付けられたタイムスタンプ
データベースの相互作用
PEOPLEを格納するデータベースエンジンとしてSQLiteを使用します データ。 SQLiteは、世界で最も広く分散されているデータベースであり、Pythonが無料で付属しています。高速で、ファイルを使用してすべての作業を実行し、非常に多くのプロジェクトに適しています。これは、多くのデータベースシステムの言語であるSQLを含む完全なRDBMS(リレーショナルデータベース管理システム)です。
今のところ、personを想像してみてください テーブルはSQLiteデータベースにすでに存在します。 RDBMSの使用経験がある場合は、SQLをご存知でしょう。これは、ほとんどのRDBMSがデータベースとのやり取りに使用する構造化クエリ言語です。
Pythonのようなプログラミング言語とは異なり、SQLは方法を定義しません。 データを取得するには:何を記述します 方法を残して、データが必要です データベースエンジンまで。
personのすべてのデータを取得するSQLクエリ 姓でソートされたテーブルは、次のようになります:
SELECT * FROM person ORDER BY 'lname';
このクエリは、データベースエンジンに、personテーブルからすべてのフィールドを取得し、lnameを使用してデフォルトの昇順で並べ替えるように指示します。 分野。
personを含むSQLiteデータベースに対してこのクエリを実行する場合 テーブルの場合、結果はテーブル内のすべての行を含むレコードのセットになり、各行には行を構成するすべてのフィールドからのデータが含まれます。以下は、personに対して上記のクエリを実行するSQLiteコマンドラインツールを使用した例です。 データベーステーブル:
sqlite> SELECT * FROM person ORDER BY lname;
2|Brockman|Kent|2018-08-08 21:16:01.888444
3|Easter|Bunny|2018-08-08 21:16:01.889060
1|Farrell|Doug|2018-08-08 21:16:01.886834
上記の出力は、personのすべての行のリストです。 行のフィールドを区切るパイプ文字(‘|’)を含むデータベーステーブル。これは、SQLiteによって表示目的で実行されます。
Pythonは、多くのデータベースエンジンとのインターフェースを取り、上記のSQLクエリを実行することができます。結果はおそらくタプルのリストになります。外側のリストには、personのすべてのレコードが含まれています テーブル。個々の内部タプルには、テーブル行に定義された各フィールドを表すすべてのデータが含まれます。
この方法でデータを取得することは、それほどPythonicではありません。レコードのリストは問題ありませんが、個々のレコードはデータのタプルにすぎません。特定のフィールドを取得するために各フィールドのインデックスを知るのはプログラム次第です。次のPythonコードは、SQLiteを使用して、上記のクエリを実行してデータを表示する方法を示しています。
 1import sqlite3
 2
 3conn = sqlite3.connect('people.db')
 4cur = conn.cursor()
 5cur.execute('SELECT * FROM person ORDER BY lname')
 6people = cur.fetchall()
 7for person in people:
 8    print(f'{person[2]} {person[1]}')
上記のプログラムは次のことを行います:
-
1行目
sqlite3をインポートします モジュール。 -
3行目 データベースファイルへの接続を作成します。
-
4行目 接続からカーソルを作成します。
-
5行目 カーソルを使用して
SQLを実行します 文字列として表現されたクエリ。 -
6行目
SQLによって返されるすべてのレコードを取得します クエリを実行して、それらをpeopleに割り当てます 変数。 -
7行目と8行目
peopleを繰り返します 変数をリストし、各人の名前と名前を出力します。
people 6行目の変数 上記はPythonでは次のようになります:
people = [
    (2, 'Brockman', 'Kent', '2018-08-08 21:16:01.888444'),
    (3, 'Easter', 'Bunny', '2018-08-08 21:16:01.889060'),
    (1, 'Farrell', 'Doug', '2018-08-08 21:16:01.886834')
]
上記のプログラムの出力は次のようになります:
Kent Brockman
Bunny Easter
Doug Farrell
上記のプログラムでは、人の名がインデックス2にあることを知っている必要があります 、および人の名前はインデックス1にあります 。さらに悪いことに、personの内部構造 反復変数personを渡すときは常に知っている必要があります 関数またはメソッドへのパラメーターとして。
personのために戻ってきたものがあれば、はるかに良いでしょう。 Pythonオブジェクトであり、各フィールドはオブジェクトの属性です。これはSQLAlchemyが行うことの1つです。
リトルボビーテーブル
上記のプログラムでは、SQLステートメントはデータベースに直接渡されて実行される単純な文字列です。この場合、SQLは完全にプログラムの制御下にある文字列リテラルであるため、これは問題ではありません。ただし、REST APIのユースケースでは、Webアプリケーションからユーザー入力を受け取り、それを使用してSQLクエリを作成します。これにより、アプリケーションが攻撃を受ける可能性があります。
パート1から、RESTAPIが1人のpersonを取得することを思い出してください。 PEOPLEから データは次のようになりました:
GET /api/people/{lname}
これは、APIが変数lnameを予期していることを意味します 、URLエンドポイントパスで、単一のpersonを検索するために使用します 。これを行うためにPythonSQLiteコードを上から変更すると、次のようになります。
 1lname = 'Farrell'
 2cur.execute('SELECT * FROM person WHERE lname = \'{}\''.format(lname))
上記のコードスニペットは次のことを行います:
-
1行目
lnameを設定します'Farrell'への変数 。これは、RESTAPIURLエンドポイントパスから取得されます。 -
2行目 Python文字列フォーマットを使用してSQL文字列を作成し、実行します。
簡単にするために、上記のコードはlnameを設定します 変数は定数ですが、実際にはAPI URLエンドポイントパスから取得され、ユーザーが指定したものであれば何でもかまいません。文字列のフォーマットによって生成されるSQLは次のようになります:
SELECT * FROM person WHERE lname = 'Farrell'
このSQLがデータベースによって実行されると、personが検索されます。 姓が'Farrell'と等しいレコードのテーブル 。これは意図されたものですが、ユーザー入力を受け入れるプログラムは悪意のあるユーザーにも開かれています。上記のプログラムでは、lname 変数はユーザー指定の入力によって設定されます。これにより、プログラムはSQLインジェクション攻撃と呼ばれるものにさらされます。これは、愛情を込めてリトルボビーテーブルとして知られているものです:

たとえば、次のようにRESTAPIと呼ばれる悪意のあるユーザーを想像してみてください。
GET /api/people/Farrell');DROP TABLE person;
上記のRESTAPIリクエストは、lnameを設定します 'Farrell');DROP TABLE person;'への変数 、上記のコードでは、次のSQLステートメントが生成されます。
SELECT * FROM person WHERE lname = 'Farrell');DROP TABLE person;
上記のSQLステートメントは有効であり、データベースによって実行されると、lnameのレコードが1つ見つかります。 'Farrell'に一致します 。次に、SQLステートメントの区切り文字;を検索します。 すぐに進み、テーブル全体をドロップします。これは本質的にアプリケーションを破壊します。
アプリケーションのユーザーから取得したすべてのデータをサニタイズすることで、プログラムを保護できます。このコンテキストでデータをサニタイズするということは、プログラムにユーザーが提供したデータを調べさせ、プログラムに危険なものが含まれていないことを確認することを意味します。これを正しく行うのは難しい場合があり、ユーザーデータがデータベースとやり取りするすべての場所で行う必要があります。
はるかに簡単な別の方法があります。SQLAlchemyを使用することです。 SQLステートメントを作成する前にユーザーデータをサニタイズします。データベースを操作するときにSQLAlchemyを使用することは、もう1つの大きな利点と理由です。
SQLAlchemyを使用したデータのモデリング
SQLAlchemyは大きなプロジェクトであり、Pythonを使用してデータベースを操作するための多くの機能を提供します。それが提供するものの1つは、ORM、つまりオブジェクトリレーショナルマッパーです。これは、personを作成して操作するために使用するものです。 データベーステーブル。これにより、データベーステーブルのフィールドの行をPythonオブジェクトにマップできます。
オブジェクト指向プログラミングを使用すると、データを動作、つまりそのデータを操作する関数と結び付けることができます。 SQLAlchemyクラスを作成することで、データベーステーブルの行のフィールドを動作に接続し、データを操作できるようになります。 personのデータのSQLAlchemyクラス定義は次のとおりです。 データベーステーブル:
class Person(db.Model):
    __tablename__ = 'person'
    person_id = db.Column(db.Integer,
                          primary_key=True)
    lname = db.Column(db.String)
    fname = db.Column(db.String)
    timestamp = db.Column(db.DateTime,
                          default=datetime.utcnow,
                          onupdate=datetime.utcnow)
クラスPerson db.Modelから継承します 、プログラムコードの作成を開始すると表示されます。今のところ、これはModelという基本クラスから継承していることを意味します 、それから派生したすべてのクラスに共通の属性と機能を提供します。
残りの定義は、次のように定義されたクラスレベルの属性です。
-
__tablename__ = 'person'クラス定義をpersonに接続します データベーステーブル。 -
person_id = db.Column(db.Integer, primary_key=True)テーブルの主キーとして機能する整数を含むデータベース列を作成します。これにより、データベースにperson_id自動インクリメントの整数値になります。 -
lname = db.Column(db.String)文字列値を含むデータベース列である姓のフィールドを作成します。 -
fname = db.Column(db.String)文字列値を含むデータベース列である名フィールドを作成します。 -
timestamp = db.Column(db.DateTime, default=datetime.utcnow, onupdate=datetime.utcnow)タイムスタンプフィールド、日付/時刻値を含むデータベース列を作成します。default=datetime.utcnowパラメータは、タイムスタンプ値を現在のutcnowにデフォルト設定します レコードが作成されたときの値。onupdate=datetime.utcnowパラメータは、タイムスタンプを現在のutcnowで更新します レコードが更新されたときの値。
注:UTCタイムスタンプ
上記のクラスのタイムスタンプがデフォルトでdatetime.utcnow()によって更新されるのはなぜか、疑問に思われるかもしれません。 UTCまたは協定世界時を返すメソッド。これは、タイムスタンプのソースを標準化する方法です。
ソース、つまりゼロタイムは、地球の北極から南極まで英国を南北に走る線です。これは、他のすべてのタイムゾーンがオフセットされるゼロタイムゾーンです。これをゼロタイムソースとして使用することにより、タイムスタンプはこの標準参照ポイントからオフセットされます。
異なるタイムゾーンからアプリケーションにアクセスする場合は、日付/時刻の計算を実行する方法があります。必要なのは、UTCタイムスタンプと宛先タイムゾーンだけです。
タイムスタンプソースとしてローカルタイムゾーンを使用する場合、ゼロ時間からオフセットされたローカルタイムゾーンに関する情報がないと、日付/時刻の計算を実行できません。タイムスタンプのソース情報がないと、日付と時刻の比較や計算をまったく行うことができませんでした。
UTCに基づくタイムスタンプを使用することは、従うべき適切な標準です。これは、それらを操作してよりよく理解するためのツールキットサイトです。
このPersonでどこに向かっていますか クラス定義?最終的な目標は、SQLAlchemyを使用してクエリを実行し、Personのインスタンスのリストを取得できるようにすることです。 クラス。例として、前のSQLステートメントを見てみましょう。
SELECT * FROM people ORDER BY lname;
上から同じ小さなサンプルプログラムを表示しますが、SQLAlchemyを使用しています:
 1from models import Person
 2
 3people = Person.query.order_by(Person.lname).all()
 4for person in people:
 5    print(f'{person.fname} {person.lname}')
今のところ1行目を無視すると、必要なのはすべてのpersonです。 lnameの昇順で並べ替えられたレコード 分野。 SQLAlchemyステートメントから返されるものPerson.query.order_by(Person.lname).all() Personのリストです personのすべてのレコードのオブジェクト この順序でデータベーステーブル。上記のプログラムでは、people 変数には、Personのリストが含まれています オブジェクト。
プログラムはpeopleを繰り返し処理します 変数、各person 次に、データベースから人の名前と名前を印刷します。プログラムがfnameを取得するためにインデックスを使用する必要がないことに注意してください またはlname 値:Personで定義された属性を使用します オブジェクト。
SQLAlchemyを使用すると、生のSQLではなく、動作を伴うオブジェクトの観点から考えることができます。 。これは、データベーステーブルが大きくなり、相互作用がより複雑になると、さらに有益になります。
モデル化されたデータのシリアル化/逆シリアル化
プログラム内でSQLAlchemyでモデル化されたデータを操作すると非常に便利です。これは、データを操作するプログラムで特に便利です。おそらく、計算を行ったり、データを使用して画面上にプレゼンテーションを作成したりします。アプリケーションは基本的にデータに対するCRUD操作を提供するRESTAPIであるため、データ操作をあまり実行しません。
REST APIはJSONデータで機能します。ここで、SQLAlchemyモデルで問題が発生する可能性があります。 SQLAlchemyによって返されるデータはPythonクラスインスタンスであるため、ConnexionはこれらのクラスインスタンスをJSON形式のデータにシリアル化できません。パート1から、ConnexionはYAMLファイルを使用してREST APIを設計および構成し、Pythonメソッドをそれに接続するために使用したツールであることを思い出してください。
このコンテキストでは、シリアル化とは、他のPythonオブジェクトや複雑なデータ型を含む可能性のあるPythonオブジェクトを、ここにリストされているJSONデータ型に解析できるより単純なデータ構造に変換することを意味します。
string: 文字列タイプnumber: Pythonでサポートされている数値(整数、浮動小数点数、長整数)object: JSONオブジェクト。これはPythonディクショナリとほぼ同等ですarray: Pythonリストとほぼ同等ですboolean: JSONではtrueとして表されます またはfalse、ただしPythonではTrueまたはFalse-
null: 基本的にNonePythonで
例として、Person クラスには、PythonのDateTimeであるタイムスタンプが含まれています 。 JSONには日付/時刻の定義がないため、JSON構造に存在するには、タイムスタンプを文字列に変換する必要があります。
あなたのPerson クラスは非常に単純なので、クラスからデータ属性を取得し、RESTURLエンドポイントから返す辞書を手動で作成することはそれほど難しくありません。多くのより大きなSQLAlchemyモデルを使用するより複雑なアプリケーションでは、これは当てはまりません。より良い解決策は、マシュマロと呼ばれるモジュールを使用して作業を行うことです。
マシュマロは、PersonSchemaの作成に役立ちます クラス。SQLAlchemyのPersonに似ています。 作成したクラス。ただし、ここでは、データベーステーブルとフィールド名をクラスとその属性にマッピングする代わりに、PersonSchema classは、クラスの属性をJSON対応の形式に変換する方法を定義します。 personのデータのマシュマロクラスの定義は次のとおりです。 テーブル:
class PersonSchema(ma.ModelSchema):
    class Meta:
        model = Person
        sqla_session = db.session
クラスPersonSchema ma.ModelSchemaから継承します 、プログラムコードの作成を開始すると表示されます。今のところ、これはPersonSchemaを意味します ModelSchemaと呼ばれるマシュマロ基本クラスから継承しています 、それから派生したすべてのクラスに共通の属性と機能を提供します。
残りの定義は次のとおりです。
-
class MetaMetaという名前のクラスを定義します クラス内。ModelSchemaPersonSchemaが クラスは、この内部Metaの検索から継承します クラスを作成し、それを使用してSQLAlchemyモデルのPersonを検索します およびdb.session。これは、マシュマロがPersonで属性を見つける方法です。 クラスとそれらの属性のタイプ。これにより、それらをシリアル化/逆シリアル化する方法がわかります。 -
modelデータのシリアル化/逆シリアル化に使用するSQLAlchemyモデルをクラスに指示します。 -
db.session属性データ型をイントロスペクトおよび決定するために使用するデータベースセッションをクラスに指示します。
このクラス定義はどこに向かっていますか? Personのインスタンスをシリアル化できるようにする必要があります クラスをJSONデータに変換し、JSONデータを逆シリアル化してPersonを作成します そこからのクラスインスタンス。
初期化されたデータベースを作成する
SQLAlchemyは、特定のデータベースに固有の相互作用の多くを処理し、データモデルとその使用方法に焦点を当てることができます。
前述のように、実際にデータベースを作成するので、SQLiteを使用します。これを行っている理由はいくつかあります。 Pythonに付属しており、個別のモジュールとしてインストールする必要はありません。すべてのデータベース情報を1つのファイルに保存するため、セットアップと使用が簡単です。
MySQLやPostgreSQLなどの別のデータベースサーバーをインストールすることは問題なく機能しますが、これらのシステムをインストールして稼働させる必要があります。これは、この記事の範囲を超えています。
SQLAlchemyはデータベースを処理するため、多くの点で、基盤となるデータベースが何であるかは実際には重要ではありません。
build_database.pyという新しいユーティリティプログラムを作成します SQLite people.dbを作成して初期化する personを含むデータベースファイル データベーステーブル。その過程で、2つのPythonモジュールconfig.pyを作成します。 およびmodels.py 、build_database.pyによって使用されます および変更されたserver.py パート1から。
ここで、作成しようとしているモジュールのソースコードを見つけることができます。これは、ここで紹介されています:
-
config.py必要なモジュールをプログラムにインポートして構成します。これには、Flask、Connexion、SQLAlchemy、およびMarshmallowが含まれます。build_database.pyの両方で使用されるため およびserver.py、構成の一部はserver.pyにのみ適用されます アプリケーション。 -
models.pyPersonを作成するモジュールです SQLAlchemyとPersonSchema上記のマシュマロクラスの定義。このモジュールはconfig.pyに依存しています そこで作成および構成されたオブジェクトの一部。
構成モジュール
config.py モジュールは、その名前が示すように、すべての構成情報が作成および初期化される場所です。このモジュールは、build_database.pyの両方に使用します。 プログラムファイルと間もなく更新されるserver.py パート1の記事からのファイル。これは、ここでFlask、Connexion、SQLAlchemy、およびMarshmallowを構成することを意味します。
build_database.py プログラムはFlask、Connexion、またはMarshmallowを使用せず、SQLAlchemyを使用してSQLiteデータベースへの接続を作成します。 config.pyのコードは次のとおりです モジュール:
 1import os
 2import connexion
 3from flask_sqlalchemy import SQLAlchemy
 4from flask_marshmallow import Marshmallow
 5
 6basedir = os.path.abspath(os.path.dirname(__file__))
 7
 8# Create the Connexion application instance
 9connex_app = connexion.App(__name__, specification_dir=basedir)
10
11# Get the underlying Flask app instance
12app = connex_app.app
13
14# Configure the SQLAlchemy part of the app instance
15app.config['SQLALCHEMY_ECHO'] = True
16app.config['SQLALCHEMY_DATABASE_URI'] = 'sqlite:////' + os.path.join(basedir, 'people.db')
17app.config['SQLALCHEMY_TRACK_MODIFICATIONS'] = False
18
19# Create the SQLAlchemy db instance
20db = SQLAlchemy(app)
21
22# Initialize Marshmallow
23ma = Marshmallow(app)
上記のコードの機能は次のとおりです。
-
2〜4行目
server.pyで行ったようにConnexionをインポートします パート1のプログラム。SQLAlchemyもインポートします。flask_sqlalchemyから モジュール。これにより、プログラムデータベースにアクセスできるようになります。最後に、Marshmallowをインポートしますflask_marshamllowから モジュール。 -
6行目 変数
basedirを作成します プログラムが実行されているディレクトリを指しています。 -
9行目
basedirを使用します Connexionアプリインスタンスを作成し、それにswagger.ymlへのパスを指定する変数 ファイル。 -
12行目 変数
appを作成します 、これはConnexionによって初期化されたFlaskインスタンスです。 -
15行目
appを使用します SQLAlchemyで使用される値を構成する変数。まず、SQLALCHEMY_ECHOを設定しますTrueに 。これにより、SQLAlchemyは実行するSQLステートメントをコンソールにエコーします。これは、データベースプログラムを構築するときに問題をデバッグするのに非常に役立ちます。これをFalseに設定します 実稼働環境向け。 -
16行目
SQLALCHEMY_DATABASE_URIを設定しますsqlite:////' + os.path.join(basedir, 'people.db')へ 。これは、SQLAlchemyにデータベースとしてSQLiteを使用し、people.dbという名前のファイルを使用するように指示します。 データベースファイルとして現在のディレクトリにあります。 MySQLやPostgreSQLなどのデータベースエンジンが異なれば、SQLALCHEMY_DATABASE_URIも異なります。 それらを構成するための文字列。 -
17行目
SQLALCHEMY_TRACK_MODIFICATIONSを設定しますFalseへ 、デフォルトでオンになっているSQLAlchemyイベントシステムをオフにします。イベントシステムは、イベント駆動型プログラムで役立つイベントを生成しますが、かなりのオーバーヘッドが追加されます。イベントドリブンプログラムを作成していないため、この機能をオフにしてください。 -
19行目
dbを作成しますSQLAlchemy(app)を呼び出すことで変数 。これにより、appを渡すことでSQLAlchemyが初期化されます。 設定したばかりの構成情報。db変数は、build_database.pyにインポートされるものです SQLAlchemyとデータベースへのアクセスを許可するプログラム。server.pyでも同じ目的を果たします プログラムとpeople.pyモジュール。 -
23行目
maを作成しますMarshmallow(app)を呼び出すことで変数 。これにより、Marshmallowが初期化され、アプリに接続されているSQLAlchemyコンポーネントをイントロスペクトできるようになります。これが、マシュマロがSQLAlchemyの後に初期化される理由です。
モデルモジュール
models.py モジュールは、Personを提供するために作成されます およびPersonSchema データのモデリングとシリアル化に関する上記のセクションで説明したとおりのクラス。そのモジュールのコードは次のとおりです。
 1from datetime import datetime
 2from config import db, ma
 3
 4class Person(db.Model):
 5    __tablename__ = 'person'
 6    person_id = db.Column(db.Integer, primary_key=True)
 7    lname = db.Column(db.String(32), index=True)
 8    fname = db.Column(db.String(32))
 9    timestamp = db.Column(db.DateTime, default=datetime.utcnow, onupdate=datetime.utcnow)
10
11class PersonSchema(ma.ModelSchema):
12    class Meta:
13        model = Person
14        sqla_session = db.session
上記のコードの機能は次のとおりです。
-
1行目
datetimeをインポートしますdatetimeからのオブジェクト Pythonに付属するモジュール。これにより、Personにタイムスタンプを作成する方法が提供されます クラス。 -
2行目
dbをインポートします およびmaconfig.pyで定義されたインスタンス変数 モジュール。これにより、モジュールはdbにアタッチされたSQLAlchemy属性とメソッドにアクセスできます。 変数、およびmaに付加されたマシュマロ属性とメソッド 変数。 -
4〜9行目
Personを定義します 上記のデータモデリングのセクションで説明したクラスですが、db.Modelがどこにあるかがわかります。 クラスが継承するものが起源です。これにより、Personデータベースへの接続やそのテーブルへのアクセスなど、クラスSQLAlchemyの機能。 -
11〜14行目
PersonSchemaを定義します class as was discussed in the data serialzation section above. This class inherits fromma.ModelSchemaand gives thePersonSchemaclass Marshmallow features, like introspecting thePersonclass to help serialize/deserialize instances of that class.
Creating the Database
You’ve seen how database tables can be mapped to SQLAlchemy classes. Now use what you’ve learned to create the database and populate it with data. You’re going to build a small utility program to create and build the database with the People データ。 Here’s the build_database.py program:
 1import os
 2from config import db
 3from models import Person
 4
 5# Data to initialize database with
 6PEOPLE = [
 7    {'fname': 'Doug', 'lname': 'Farrell'},
 8    {'fname': 'Kent', 'lname': 'Brockman'},
 9    {'fname': 'Bunny','lname': 'Easter'}
10]
11
12# Delete database file if it exists currently
13if os.path.exists('people.db'):
14    os.remove('people.db')
15
16# Create the database
17db.create_all()
18
19# Iterate over the PEOPLE structure and populate the database
20for person in PEOPLE:
21    p = Person(lname=person['lname'], fname=person['fname'])
22    db.session.add(p)
23
24db.session.commit()
Here’s what the above code is doing:
-
Line 2 imports the
dbinstance from theconfig.pymodule. -
Line 3 imports the
Personclass definition from themodels.pymodule. -
Lines 6 – 10 create the
PEOPLEdata structure, which is a list of dictionaries containing your data. The structure has been condensed to save presentation space. -
Lines 13 &14 perform some simple housekeeping to delete the
people.dbfile, if it exists. This file is where the SQLite database is maintained. If you ever have to re-initialize the database to get a clean start, this makes sure you’re starting from scratch when you build the database. -
Line 17 creates the database with the
db.create_all()電話。 This creates the database by using thedbinstance imported from theconfigモジュール。 Thedbinstance is our connection to the database. -
Lines 20 – 22 iterate over the
PEOPLElist and use the dictionaries within to instantiate aPersonクラス。 After it is instantiated, you call thedb.session.add(p)働き。 This uses the database connection instancedbto access thesession物体。 The session is what manages the database actions, which are recorded in the session. In this case, you are executing theadd(p)method to add the newPersoninstance to thesessionobject. -
Line 24 calls
db.session.commit()to actually save all the person objects created to the database.
注: At Line 22, no data has been added to the database. Everything is being saved within the session 物体。 Only when you execute the db.session.commit() call at Line 24 does the session interact with the database and commit the actions to it.
In SQLAlchemy, the session is an important object. It acts as the conduit between the database and the SQLAlchemy Python objects created in a program. The session helps maintain the consistency between data in the program and the same data as it exists in the database. It saves all database actions and will update the underlying database accordingly by both explicit and implicit actions taken by the program.
Now you’re ready to run the build_database.py program to create and initialize the new database. You do so with the following command, with your Python virtual environment active:
python build_database.py
When the program runs, it will print SQLAlchemy log messages to the console. These are the result of setting SQLALCHEMY_ECHO to True in the config.py ファイル。 Much of what’s being logged by SQLAlchemy is the SQL commands it’s generating to create and build the people.db SQLite database file. Here’s an example of what’s printed out when the program is run:
2018-09-11 22:20:29,951 INFO sqlalchemy.engine.base.Engine SELECT CAST('test plain returns' AS VARCHAR(60)) AS anon_1
2018-09-11 22:20:29,951 INFO sqlalchemy.engine.base.Engine ()
2018-09-11 22:20:29,952 INFO sqlalchemy.engine.base.Engine SELECT CAST('test unicode returns' AS VARCHAR(60)) AS anon_1
2018-09-11 22:20:29,952 INFO sqlalchemy.engine.base.Engine ()
2018-09-11 22:20:29,956 INFO sqlalchemy.engine.base.Engine PRAGMA table_info("person")
2018-09-11 22:20:29,956 INFO sqlalchemy.engine.base.Engine ()
2018-09-11 22:20:29,959 INFO sqlalchemy.engine.base.Engine
CREATE TABLE person (
    person_id INTEGER NOT NULL,
    lname VARCHAR,
    fname VARCHAR,
    timestamp DATETIME,
    PRIMARY KEY (person_id)
)
2018-09-11 22:20:29,959 INFO sqlalchemy.engine.base.Engine ()
2018-09-11 22:20:29,975 INFO sqlalchemy.engine.base.Engine COMMIT
2018-09-11 22:20:29,980 INFO sqlalchemy.engine.base.Engine BEGIN (implicit)
2018-09-11 22:20:29,983 INFO sqlalchemy.engine.base.Engine INSERT INTO person (lname, fname, timestamp) VALUES (?, ?, ?)
2018-09-11 22:20:29,983 INFO sqlalchemy.engine.base.Engine ('Farrell', 'Doug', '2018-09-12 02:20:29.983143')
2018-09-11 22:20:29,984 INFO sqlalchemy.engine.base.Engine INSERT INTO person (lname, fname, timestamp) VALUES (?, ?, ?)
2018-09-11 22:20:29,985 INFO sqlalchemy.engine.base.Engine ('Brockman', 'Kent', '2018-09-12 02:20:29.984821')
2018-09-11 22:20:29,985 INFO sqlalchemy.engine.base.Engine INSERT INTO person (lname, fname, timestamp) VALUES (?, ?, ?)
2018-09-11 22:20:29,985 INFO sqlalchemy.engine.base.Engine ('Easter', 'Bunny', '2018-09-12 02:20:29.985462')
2018-09-11 22:20:29,986 INFO sqlalchemy.engine.base.Engine COMMIT
Using the Database
Once the database has been created, you can modify the existing code from Part 1 to make use of it. All of the modifications necessary are due to creating the person_id primary key value in our database as the unique identifier rather than the lname value.
Update the REST API
None of the changes are very dramatic, and you’ll start by re-defining the REST API. The list below shows the API definition from Part 1 but is updated to use the person_id variable in the URL path:
| Action | HTTP Verb | URL Path | Description |
|---|---|---|---|
| Create | POST | /api/people | Defines a unique URL to create a new person |
| Read | GET | /api/people | Defines a unique URL to read a collection of people |
| Read | GET | /api/people/{person_id} | Defines a unique URL to read a particular person by person_id |
| Update | PUT | /api/people/{person_id} | Defines a unique URL to update an existing person by person_id |
| Delete | DELETE | /api/orders/{person_id} | Defines a unique URL to delete an existing person by person_id |
Where the URL definitions required an lname value, they now require the person_id (primary key) for the person record in the people テーブル。 This allows you to remove the code in the previous app that artificially restricted users from editing a person’s last name.
In order for you to implement these changes, the swagger.yml file from Part 1 will have to be edited. For the most part, any lname parameter value will be changed to person_id , and person_id will be added to the POST and PUT 反応。 You can check out the updated swagger.yml ファイル。
Update the REST API Handlers
With the swagger.yml file updated to support the use of the person_id identifier, you’ll also need to update the handlers in the people.py file to support these changes. In the same way that the swagger.yml file was updated, you need to change the people.py file to use the person_id value rather than lname 。
Here’s part of the updated person.py module showing the handler for the REST URL endpoint GET /api/people :
 1from flask import (
 2    make_response,
 3    abort,
 4)
 5from config import db
 6from models import (
 7    Person,
 8    PersonSchema,
 9)
10
11def read_all():
12    """
13    This function responds to a request for /api/people
14    with the complete lists of people
15
16    :return:        json string of list of people
17    """
18    # Create the list of people from our data
19    people = Person.query \
20        .order_by(Person.lname) \
21        .all()
22
23    # Serialize the data for the response
24    person_schema = PersonSchema(many=True)
25    return person_schema.dump(people).data
Here’s what the above code is doing:
-
Lines 1 – 9 import some Flask modules to create the REST API responses, as well as importing the
dbinstance from theconfig.pyモジュール。 In addition, it imports the SQLAlchemyPersonand MarshmallowPersonSchemaclasses to access thepersondatabase table and serialize the results. -
Line 11 starts the definition of
read_all()that responds to the REST API URL endpointGET /api/peopleand returns all the records in thepersondatabase table sorted in ascending order by last name. -
Lines 19 – 22 tell SQLAlchemy to query the
persondatabase table for all the records, sort them in ascending order (the default sorting order), and return a list ofPersonPython objects as the variablepeople。 -
Line 24 is where the Marshmallow
PersonSchemaclass definition becomes valuable. You create an instance of thePersonSchema, passing it the parametermany=True。 This tellsPersonSchemato expect an interable to serialize, which is what thepeoplevariable is. -
Line 25 uses the
PersonSchemainstance variable (person_schema), calling itsdump()method with thepeopleリスト。 The result is an object having adataattribute, an object containing apeoplelist that can be converted to JSON. This is returned and converted by Connexion to JSON as the response to the REST API call.
注: The people list variable created on Line 24 above can’t be returned directly because Connexion won’t know how to convert the timestamp field into JSON. Returning the list of people without processing it with Marshmallow results in a long error traceback and finally this Exception:
TypeError: Object of type Person is not JSON serializable
Here’s another part of the person.py module that makes a request for a single person from the person データベース。 Here, read_one(person_id) function receives a person_id from the REST URL path, indicating the user is looking for a specific person. Here’s part of the updated person.py module showing the handler for the REST URL endpoint GET /api/people/{person_id} :
 1def read_one(person_id):
 2    """
 3    This function responds to a request for /api/people/{person_id}
 4    with one matching person from people
 5
 6    :param person_id:   ID of person to find
 7    :return:            person matching ID
 8    """
 9    # Get the person requested
10    person = Person.query \
11        .filter(Person.person_id == person_id) \
12        .one_or_none()
13
14    # Did we find a person?
15    if person is not None:
16
17        # Serialize the data for the response
18        person_schema = PersonSchema()
19        return person_schema.dump(person).data
20
21    # Otherwise, nope, didn't find that person
22    else:
23        abort(404, 'Person not found for Id: {person_id}'.format(person_id=person_id))
Here’s what the above code is doing:
-
Lines 10 – 12 use the
person_idparameter in a SQLAlchemy query using thefiltermethod of the query object to search for a person with aperson_idattribute matching the passed-inperson_id。 Rather than using theall()query method, use theone_or_none()method to get one person, or returnNoneif no match is found. -
Line 15 determines whether a
personwas found or not. -
Line 17 shows that, if
personwas notNone(a matchingpersonwas found), then serializing the data is a little different. You don’t pass themany=Trueparameter to the creation of thePersonSchema()実例。 Instead, you passmany=Falsebecause only a single object is passed in to serialize. -
Line 18 is where the
dumpmethod ofperson_schemais called, and thedataattribute of the resulting object is returned. -
Line 23 shows that, if
personwasNone(a matching person wasn’t found), then the Flaskabort()method is called to return an error.
Another modification to person.py is creating a new person in the database. This gives you an opportunity to use the Marshmallow PersonSchema to deserialize a JSON structure sent with the HTTP request to create a SQLAlchemy Person 物体。 Here’s part of the updated person.py module showing the handler for the REST URL endpoint POST /api/people :
 1def create(person):
 2    """
 3    This function creates a new person in the people structure
 4    based on the passed-in person data
 5
 6    :param person:  person to create in people structure
 7    :return:        201 on success, 406 on person exists
 8    """
 9    fname = person.get('fname')
10    lname = person.get('lname')
11
12    existing_person = Person.query \
13        .filter(Person.fname == fname) \
14        .filter(Person.lname == lname) \
15        .one_or_none()
16
17    # Can we insert this person?
18    if existing_person is None:
19
20        # Create a person instance using the schema and the passed-in person
21        schema = PersonSchema()
22        new_person = schema.load(person, session=db.session).data
23
24        # Add the person to the database
25        db.session.add(new_person)
26        db.session.commit()
27
28        # Serialize and return the newly created person in the response
29        return schema.dump(new_person).data, 201
30
31    # Otherwise, nope, person exists already
32    else:
33        abort(409, f'Person {fname} {lname} exists already')
Here’s what the above code is doing:
-
Line 9 &10 set the
fnameandlnamevariables based on thePersondata structure sent as thePOSTbody of the HTTP request. -
Lines 12 – 15 use the SQLAlchemy
Personclass to query the database for the existence of a person with the samefnameandlnameas the passed-inperson。 -
Line 18 addresses whether
existing_personisNone。 (existing_personwas not found.) -
Line 21 creates a
PersonSchema()instance calledschema。 -
Line 22 uses the
schemavariable to load the data contained in thepersonparameter variable and create a new SQLAlchemyPersoninstance variable callednew_person。 -
Line 25 adds the
new_personinstance to thedb.session。 -
Line 26 commits the
new_personinstance to the database, which also assigns it a new primary key value (based on the auto-incrementing integer) and a UTC-based timestamp. -
Line 33 shows that, if
existing_personis notNone(a matching person was found), then the Flaskabort()method is called to return an error.
Update the Swagger UI
With the above changes in place, your REST API is now functional. The changes you’ve made are also reflected in an updated swagger UI interface and can be interacted with in the same manner. Below is a screenshot of the updated swagger UI opened to the GET /people/{person_id} セクション。 This section of the UI gets a single person from the database and looks like this:
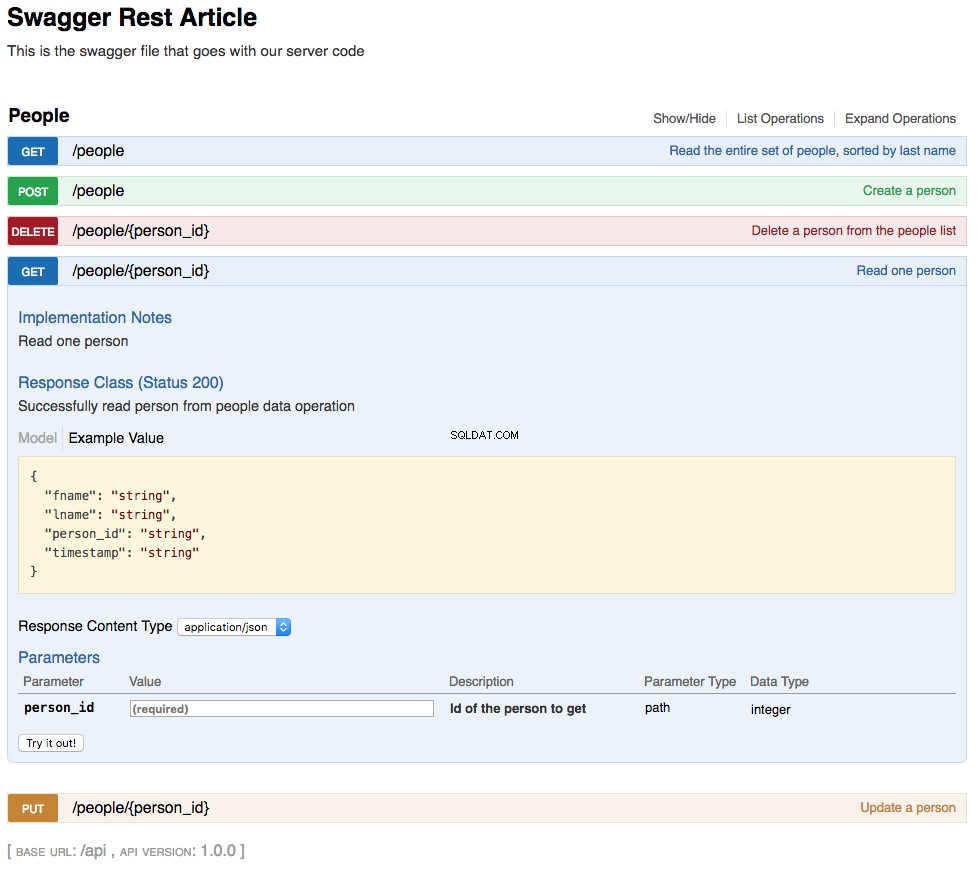
As shown in the above screenshot, the path parameter lname has been replaced by person_id , which is the primary key for a person in the REST API. The changes to the UI are a combined result of changing the swagger.yml file and the code changes made to support that.
Update the Web Application
The REST API is running, and CRUD operations are being persisted to the database. So that it is possible to view the demonstration web application, the JavaScript code has to be updated.
The updates are again related to using person_id instead of lname as the primary key for person data. In addition, the person_id is attached to the rows of the display table as HTML data attributes named data-person-id , so the value can be retrieved and used by the JavaScript code.
This article focused on the database and making your REST API use it, which is why there’s just a link to the updated JavaScript source and not much discussion of what it does.
Example Code
All of the example code for this article is available here. There’s one version of the code containing all the files, including the build_database.py utility program and the server.py modified example program from Part 1.
結論
Congratulations, you’ve covered a lot of new material in this article and added useful tools to your arsenal!
You’ve learned how to save Python objects to a database using SQLAlchemy. You’ve also learned how to use Marshmallow to serialize and deserialize SQLAlchemy objects and use them with a JSON REST API. The things you’ve learned have certainly been a step up in complexity from the simple REST API of Part 1, but that step has given you two very powerful tools to use when creating more complex applications.
SQLAlchemy and Marshmallow are amazing tools in their own right. Using them together gives you a great leg up to create your own web applications backed by a database.
In Part 3 of this series, you’ll focus on the R part of RDBMS :relationships, which provide even more power when you are using a database.