ClickHouseとは何ですか?

ClickHouseは、主にOLAP(またはクエリのオンライン分析処理)に使用されるオープンソースの列指向DBMS(またはデータベース管理システム)です。 SQLクエリを利用して、リアルタイムの分析データとレポートを高速で生成できます。フォールトトレラント、スケーラブル、信頼性が高く、機能豊富なツールセットが含まれています。
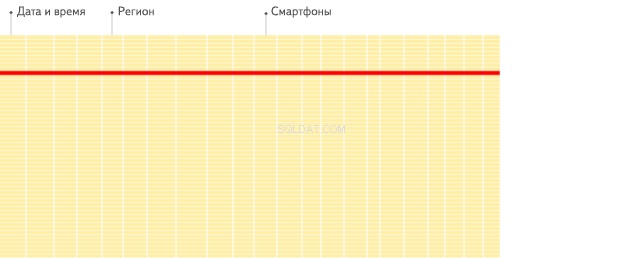
通常のデータベースでは、データはテーブル、列、および行に格納されます。テーブルでは、関連する値が1つの行に物理的に並べて格納されます。これは、テーブルの動作に不可欠です。これは、ほとんどの文字列タイプのデータベースが機能する方法です。

この形式のデータベースのいくつかの例は次のとおりです。
- MySQL
- SQLite
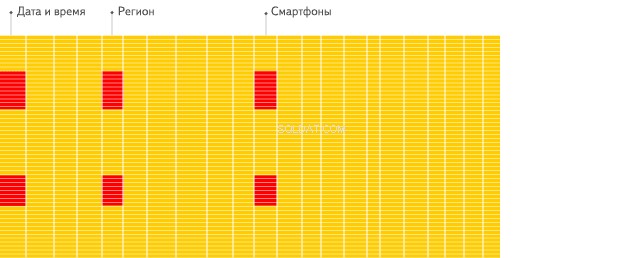
データは、以下に示すように列型データベースに保存されます。

見た目は似ていますが、違いは次のとおりです。異なる列の値は別々に保存され、1つの列のデータは一緒に保存されます。列指向テーブルの例:
- InfiniDB
- Google Dremel
このようなDBMSは、行ではなく列でグループ化されたブロックにレコードを格納します。列のデータをロードしないことにより、クエリの実行時にデータの読み取りに費やす時間が短縮され、DBMSがデータを計算して、ブロックにグループ化されたデータベースよりもはるかに高速に結果を返すことができます。通常、列指向データベースは、文字列タイプのデータベースと比較して、ほとんどのクエリの処理が通常100倍高速であるOLAPシナリオに最適です。


上記の図からわかるように、OLAPを使用すると、大量のデータを整理し、通常のデータベースよりも数桁速く複雑なクエリを実行できます。したがって、データの分析やビジネス分析が必要な場合に、大量の入力を処理するのに非常に役立ちます。
SQLの使用法
ClickHouseはSQLの方言を使用します。これは、標準の構造化クエリ言語に似ていますが、さまざまな配列、高階関数、ネストされた構造、URLを操作する関数、外部辞書を操作する機能などの追加の拡張機能が含まれています。など
スピードとビッグデータ処理を向上させる一方で、次のオプションを含む他の側面も失います。
それにもかかわらず、ClickHouseは高いパフォーマンスを発揮し、多くの競合他社に勝ちます。 ClickHouseは、世界で3番目に人気のあるWeb分析システムであるYandex.MetricaのWeb分析の問題を解決するために開発されました。また、Cloudflareがユーザーのウェブサイト統計を処理するためにも使用されています。
前提条件
インストールするには、次のものが必要です。
- 2GB以上のRAMを使用する2コアサーバー
- Ubuntu 20.04 LTS OS
- rootユーザーアカウントへのアクセス(すべてのアクションがrootとして実行されるため)。
Ubuntu20.04へのClickHouseのインストール
インストールする前に、サーバー上のシステムとパッケージを更新します。
root@host:~# apt update && apt -y upgrade
Hit:1 http://by.archive.ubuntu.com/ubuntu focal InRelease
Hit:2 http://by.archive.ubuntu.com/ubuntu focal-updates InRelease
Hit:3 http://by.archive.ubuntu.com/ubuntu focal-backports InRelease
Get:4 http://security.ubuntu.com/ubuntu focal-security InRelease [109 kB]
Hit:5 https://download.docker.com/linux/ubuntu focal InRelease
Hit:6 https://debian.neo4j.com stable InRelease
Fetched 109 kB in 0s (231 kB/s)
Reading package lists... Done
Building dependency tree
Reading state information... Done
All packages are up to date.
Reading package lists... Done
Building dependency tree
Reading state information... Done
Calculating upgrade... Done
0 upgraded, 0 newly installed, 0 to remove and 0 not upgraded.
root@host:~#
Yandexは、最新バージョンのClickHouseを含むリポジトリを維持しているため、追加する必要があります。また、GPGキーを追加してリポジトリをチェックアウトし、ClickHouseと将来のアップデートを安全にインストールします。
root@host:~#  apt-key adv --keyserver keyserver.ubuntu.com --recv E0C56BD4
Executing: /tmp/apt-key-gpghome.5KK4WZQb0R/gpg.1.sh --keyserver keyserver.ubuntu.com --recv E0C56BD4
gpg: key C8F1E19FE0C56BD4: public key "ClickHouse Repository Key <[email protected]>" imported
gpg: Total number processed: 1
gpg:               imported: 1
root@host:~#
リポジトリをAPKリポジトリのリストに追加します。
root@host:~# echo "deb http://repo.yandex.ru/clickhouse/deb/stable/ main/" |  tee /etc/apt/sources.list.d/clickhouse.list
deb http://repo.yandex.ru/clickhouse/deb/stable/ main/
root@host:~#
次に、サーバーパッケージを更新します。
root@host:~#  apt update
Hit:1 http://by.archive.ubuntu.com/ubuntu focal InRelease
Hit:2 http://by.archive.ubuntu.com/ubuntu focal-updates InRelease
Hit:3 http://by.archive.ubuntu.com/ubuntu focal-backports InRelease
Get:4 http://security.ubuntu.com/ubuntu focal-security InRelease [109 kB]
Ign:5 http://repo.yandex.ru/clickhouse/deb/stable main/ InRelease
Get:6 http://repo.yandex.ru/clickhouse/deb/stable main/ Release [749 B]
Get:7 http://repo.yandex.ru/clickhouse/deb/stable main/ Release.gpg [836 B]
Hit:8 https://download.docker.com/linux/ubuntu focal InRelease
Get:9 http://repo.yandex.ru/clickhouse/deb/stable main/ Packages [152 kB]
Hit:10 https://debian.neo4j.com stable InRelease
Fetched 263 kB in 0s (536 kB/s)
Reading package lists... Done
Building dependency tree
Reading state information... Done
All packages are up to date.
root@host:~#
最後に、ClickHouseをインストールできます。プロンプトが表示されたら、パスワードを入力します。
root@host:~#  apt install -y clickhouse-server clickhouse-client
Reading package lists... Done
Building dependency tree
Reading state information... Done
The following additional packages will be installed:
  clickhouse-common-static
Suggested packages:
  clickhouse-common-static-dbg
The following NEW packages will be installed:
  clickhouse-client clickhouse-common-static clickhouse-server
0 upgraded, 3 newly installed, 0 to remove and 0 not upgraded.
Need to get 119 MB of archives.
After this operation, 401 MB of additional disk space will be used.
...
Preconfiguring packages ...
Selecting previously unselected package clickhouse-common-static.
(Reading database ... 164995 files and directories currently installed.)
Preparing to unpack .../clickhouse-common-static_20.12.5.14_amd64.deb ...
Unpacking clickhouse-common-static (20.12.5.14) ...
Selecting previously unselected package clickhouse-client.
Preparing to unpack .../clickhouse-client_20.12.5.14_all.deb ...
Unpacking clickhouse-client (20.12.5.14) ...
Selecting previously unselected package clickhouse-server.
Preparing to unpack .../clickhouse-server_20.12.5.14_all.deb ...
Unpacking clickhouse-server (20.12.5.14) ...
Setting up clickhouse-common-static (20.12.5.14) ...
Setting up clickhouse-server (20.12.5.14) ...
ClickHouse init script has migrated to systemd. Please manually stop old server
and restart the service:  killall clickhouse-server && sleep 5 &&  servi
ce clickhouse-server restart
Synchronizing state of clickhouse-server.service with SysV service script with /
lib/systemd/systemd-sysv-install.
Executing: /lib/systemd/systemd-sysv-install enable clickhouse-server
Created symlink /etc/systemd/system/multi-user.target.wants/clickhouse-server.se
rvice → /etc/systemd/system/clickhouse-server.service.
Copying ClickHouse binary to /usr/bin/clickhouse.new
/usr/bin/clickhouse already exists, will rename existing binary to /usr/bin/clic
khouse.old and put the new binary in place
Renaming /usr/bin/clickhouse.new to /usr/bin/clickhouse.
Symlink /usr/bin/clickhouse-server already exists but it points to /clickhouse.
Will replace the old symlink to /usr/bin/clickhouse.
Creating symlink /usr/bin/clickhouse-server to /usr/bin/clickhouse.
Symlink /usr/bin/clickhouse-client already exists but it points to /clickhouse.
Will replace the old symlink to /usr/bin/clickhouse.
Creating symlink /usr/bin/clickhouse-client to /usr/bin/clickhouse.
Symlink /usr/bin/clickhouse-local already exists but it points to /clickhouse. W
ill replace the old symlink to /usr/bin/clickhouse.
Creating symlink /usr/bin/clickhouse-local to /usr/bin/clickhouse.
Symlink /usr/bin/clickhouse-benchmark already exists but it points to /clickhous
e. Will replace the old symlink to /usr/bin/clickhouse.
Creating symlink /usr/bin/clickhouse-benchmark to /usr/bin/clickhouse.
Symlink /usr/bin/clickhouse-copier already exists but it points to /clickhouse.
Will replace the old symlink to /usr/bin/clickhouse.
Creating symlink /usr/bin/clickhouse-copier to /usr/bin/clickhouse.
Symlink /usr/bin/clickhouse-obfuscator already exists but it points to /clickhou
se. Will replace the old symlink to /usr/bin/clickhouse.
Creating symlink /usr/bin/clickhouse-obfuscator to /usr/bin/clickhouse.
Creating symlink /usr/bin/clickhouse-git-import to /usr/bin/clickhouse.
Symlink /usr/bin/clickhouse-compressor already exists but it points to /clickhou
se. Will replace the old symlink to /usr/bin/clickhouse.
Creating symlink /usr/bin/clickhouse-compressor to /usr/bin/clickhouse.
Symlink /usr/bin/clickhouse-format already exists but it points to /clickhouse.
Will replace the old symlink to /usr/bin/clickhouse.
Creating symlink /usr/bin/clickhouse-format to /usr/bin/clickhouse.
Symlink /usr/bin/clickhouse-extract-from-config already exists but it points to
/clickhouse. Will replace the old symlink to /usr/bin/clickhouse.
Creating symlink /usr/bin/clickhouse-extract-from-config to /usr/bin/clickhouse.
Creating clickhouse group if it does not exist.
 groupadd -r clickhouse
Creating clickhouse user if it does not exist.
 useradd -r --shell /bin/false --home-dir /nonexistent -g clickhouse clickhouse
Will set ulimits for clickhouse user in /etc/security/limits.d/clickhouse.conf.
Creating config directory /etc/clickhouse-server/config.d that is used for tweak
s of main server configuration.
Creating config directory /etc/clickhouse-server/users.d that is used for tweaks
 of users configuration.
Config file /etc/clickhouse-server/config.xml already exists, will keep it and e
xtract path info from it.
/etc/clickhouse-server/config.xml has /var/lib/clickhouse/ as data path.
/etc/clickhouse-server/config.xml has /var/log/clickhouse-server/ as log path.
Users config file /etc/clickhouse-server/users.xml already exists, will keep it
and extract users info from it.
 chown --recursive clickhouse:clickhouse '/etc/clickhouse-server'
Creating log directory /var/log/clickhouse-server/.
Creating data directory /var/lib/clickhouse/.
Creating pid directory /var/run/clickhouse-server.
 chown --recursive clickhouse:clickhouse '/var/log/clickhouse-server/'
 chown --recursive clickhouse:clickhouse '/var/run/clickhouse-server'
 chown clickhouse:clickhouse '/var/lib/clickhouse/'
Password for default user is already specified. To remind or reset, see /etc/cli
ckhouse-server/users.xml and /etc/clickhouse-server/users.d.
Setting capabilities for clickhouse binary. This is optional.
 command -v setcap >/dev/null && echo > /tmp/test_setcap.sh && chmod a+x /tmp/te
st_setcap.sh && /tmp/test_setcap.sh && setcap 'cap_net_admin,cap_ipc_lock,cap_sy
s_nice+ep' /tmp/test_setcap.sh && /tmp/test_setcap.sh && rm /tmp/test_setcap.sh
&& setcap 'cap_net_admin,cap_ipc_lock,cap_sys_nice+ep' /usr/bin/clickhouse || ec
ho "Cannot set 'net_admin' or 'ipc_lock' or 'sys_nice' capability for clickhouse
 binary. This is optional. Taskstats accounting will be disabled. To enable task
stats accounting you may add the required capability later manually."

ClickHouse has been successfully installed.

Start clickhouse-server with:
 clickhouse start

Start clickhouse-client with:
 clickhouse-client --password

Setting up clickhouse-client (20.12.5.14) ...
Processing triggers for systemd (245.4-4ubuntu3.3) ...
root@host:~#
ClickHouseサービスを開始する
ClickHouseをインストールしたので、バックグラウンドで実行してみましょう。
root@host:~#  service clickhouse-server start
root@host:~#
ステータスの確認
このステップでは、すべてが期待どおりに機能していることを確認するだけです。
root@host:~#  service clickhouse-server status
● clickhouse-server.service - ClickHouse Server (analytic DBMS for big data)
     Loaded: loaded (/etc/systemd/system/clickhouse-server.service; enabled; ve>
     Active: active (running) since Wed 2020-12-30 22:08:26 +03; 25s ago
   Main PID: 5553 (clickhouse-serv)
      Tasks: 48 (limit: 9489)
     Memory: 45.8M
     CGroup: /system.slice/clickhouse-server.service
             └─5553 /usr/bin/clickhouse-server --config=/etc/clickhouse-server/>

сне 30 22:08:26 host clickhouse-server[5553]: Include not found: clickhouse_com>
сне 30 22:08:26 host clickhouse-server[5553]: Logging trace to /var/log/clickho>
сне 30 22:08:26 host clickhouse-server[5553]: Logging errors to /var/log/clickh>
сне 30 22:08:26 host clickhouse-server[5553]: Processing configuration file '/e>
сне 30 22:08:26 host clickhouse-server[5553]: Include not found: networks
сне 30 22:08:26 host clickhouse-server[5553]: Saved preprocessed configuration >
сне 30 22:08:28 host clickhouse-server[5553]: Processing configuration file '/e>
сне 30 22:08:28 host clickhouse-server[5553]: Include not found: clickhouse_rem>
сне 30 22:08:28 host clickhouse-server[5553]: Include not found: clickhouse_com>
сне 30 22:08:28 host clickhouse-server[5553]: Saved preprocessed configuration >
lines 1-19/19 (END)
以下の行は、私たちが細心の注意を払う必要がある行です。
   Loaded: loaded (/etc/systemd/system/clickhouse-server.service; enabled; ve>
     Active: active (running) since Wed 2020-12-30 22:08:26 +03; 25s ago
ファイアウォールの構成
ファイアウォールを使用していない場合は、この手順をスキップしてください。リモート接続を計画していてファイアウォールを有効にしている場合は、この手順が必要です。構成ファイルを開いて編集し、以下の行のコメントを解除します。
<!-- <listen_host>0.0.0.0</listen_host> →編集が完了したら、 Ctrl + Sを使用してファイルを保存します およびCtrl+ X キーを押してから、ClickHouseサービスを再起動します。
root@host:~#  service clickhouse-server restart
root@host:~#
開いているポート
次に、ファイアウォールのポート8123を開いて、IPアドレスへのアクセスを許可します。
ufw allow from YOUR_IP_SERVER/32 to any port 8123次に、clickhouse-clientののポート9000を開きます。 IPアドレス。
 root@host:~#  ufw allow from 192.168.13.1/32 to any port 8123
Rules updated
root@host:~#
root@host:~#  ufw allow from 192.168.13.1/32 to any port 9000
Rules updated
root@host:~#
接続の確認
リモート接続時にすべてが機能することを確認するには、次のクエリを使用します。
clickhouse-client --host 192.168.13.1 --passwordroot@host:~# clickhouse-client --host 192.168.13.1 --password
Password for user (default):
Connecting to 192.168.13.1:9000 as user default.
Connected to ClickHouse server version 20.12.5 revision 54442.
host :)基本コマンドと相互作用の学習
ClickHouseでは、変更されたSQL構文を使用してデータベースを作成および削除できます。以下の例を見てみましょう。まず、ClickHouseに接続しましょう。
root@host:~# clickhouse-client
ClickHouse client version 20.12.5.14 (official build).
Connecting to localhost:9000 as user default.
Connected to ClickHouse server version 20.12.5 revision 54442.

host :)
データベースの作成
ClickHouseコマンドラインに入ると、次の構文を使用してliquidwebという名前のデータベースを作成します。
host :) CREATE DATABASE liquidweb;

CREATE DATABASE liquidweb

Query id: 9169dbaa-402e-4d37-828f-5fde43d4a91d

Ok.

0 rows in set. Elapsed: 0.004 sec.

host :)
ClickHouseでは、テーブルは他のデータベースとほぼ同じであり、構造化された形式の関連データのセットがあります。列とそのタイプを指定したり、行を追加したり、DBに対してさまざまな種類のクエリを実行したりできます。
テーブルの作成
テーブルを作成する前に、使用できる列のタイプを理解しておくことが重要です。次の列タイプが実行可能です:
- UInt64 —このテーブルは、0〜18446744073709551615の範囲の整数を格納するために使用されます。
- Float64 — Float64を使用する各テーブルには、10.5、18754.067などの浮動小数点数を格納できます。
- 文字列 —ここで、文字列テーブルは、さまざまなDBMSのVARCHAR、BLOB、CLOB、およびその他のタイプを置き換えます。
- 日付 —このテーブルは、YYYY-MM-DD形式で日付を格納するために使用されます。
- DateTime —ここで、DateTimeテーブルは、日付と時刻をより正確なYYYY-MM-DD HH:MM:SS形式で格納するために使用されます
データ構造
ClickHouseは、正確なデータ、テーブルをクエリする機能、テーブルへの同時アクセスのモード、およびインデックスのサポートを記述することにより、基になるデータの構造を定義します。 ClickHouseには、さまざまな使用条件に適したさまざまな機能があります。
MergeTree
最も広く使用されているメカニズムは、 MergeTreeと呼ばれるテーブルエンジン操作です。 。この関数は、テーブルに大量のデータを挿入するために設計されています。大量のリアルタイムアセットを挿入するための最適化されたサポート、および信頼性とクエリのサポートにより、本番データベースでの使用を強くお勧めします。
データベースの選択
さらなる練習に進みましょう。まず、テーブルを作成するデータベースを選択しましょう。
host :) USE liquidweb;

USE liquidweb

Query id: aba15bcb-224b-426d-9f74-350a88346115

Ok.

0 rows in set. Elapsed: 0.001 sec.

host :)
テーブルの作成
次に、同僚というテーブルを作成します 。
host :) CREATE TABLE colleagues  (  id UInt64,  name String,  url String,  created DateTime ) ENGINE = MergeTree() PRIMARY KEY id ORDER BY id;

CREATE TABLE colleagues
(
    `id` UInt64,
    `name` String,
    `url` String,
    `created` DateTime
)
ENGINE = MergeTree()
PRIMARY KEY id
ORDER BY id

Query id: 08223a2f-d365-43cb-8627-d22674d1c47c

Ok.

0 rows in set. Elapsed: 0.004 sec.

host :)
追加した値を確認しましょう。
- id -これは主キー列です。各行には一意の識別子が必要です。
- 名前 -文字列値を持つ列。
- url -プロファイルへのリンクを含む文字列値を持つ列。
- 作成済み -従業員がシステムに登場した日付。
テーブルの列を定義した後、 MergeTreeを指定します テーブルを格納するためのメカニズム。次に、列を指定してから、テーブルレベルの列を定義します。
- 主キー -主キー列を指定します。
- ORDERY BY -保存されたテーブル値はid列でソートされます。
データの追加
これで、テーブルを操作できます。 同僚にデータを追加しましょう テーブル。
host :) INSERT INTO colleagues VALUES (1, 'margaret', 'http://1.com', '2021-01-01 00:01:01');

INSERT INTO colleagues VALUES

Query id: 42dbde52-6d7e-4849-ac5e-280590f3232d

Ok.

1 rows in set. Elapsed: 0.002 sec.

host :)
さらにデータを追加しましょう。
host :) INSERT INTO colleagues VALUES (2, 'john', 'http://2.com', '2021-01-01 00:01:01');

INSERT INTO colleagues VALUES

Query id: a9b34f78-2caa-4b41-bd4e-91bf8049a04b

Ok.

1 rows in set. Elapsed: 0.001 sec.

host :)
host :) INSERT INTO colleagues VALUES (3, 'kingsman', 'http://3.com', '2021-01-01 00:01:01');
INSERT INTO colleagues VALUES
Query id: df5133c1-b404-4569-8123-f0728c172c87
Ok.
1 rows in set. Elapsed: 0.003 sec.
host :) host :) INSERT INTO colleagues VALUES (4, 'tor', 'http://4.com', '2021-01-01 00:01:01');
INSERT INTO colleagues VALUES
Query id: 14f56b86-fae7-4af2-b506-18c351b92853
Ok.
1 rows in set. Elapsed: 0.001 sec.
host :) 列の追加
いくつかの値を追加しましたが、別の列を追加するのを忘れていることに気付いたので、以下に追加する必要があります。
host :) ALTER TABLE colleagues ADD COLUMN location String;

ALTER TABLE colleagues
    ADD COLUMN `location` String


Query id: 002900f4-9fd9-4302-a10f-6aa5b818f9ae

Ok.

0 rows in set. Elapsed: 0.005 sec.

host :)
データの編集
ここで、古いデータを何らかの方法で変更する必要があります。バージョン19.13では、ClickHouseはその実装により、個々の行の更新と削除をサポートしていません。ただし、ClickHouseは一括更新と削除をサポートしており、これらの操作のための独自の構文もあります。
次に、行を更新します。
host :) ALTER TABLE colleagues UPDATE url ='http://1.com' WHERE id < 15;

ALTER TABLE colleagues
    UPDATE url = 'http://1.com' WHERE id < 15


Query id: 6fc6620e-fd90-43aa-8d7f-8a34cfb73650

Ok.

0 rows in set. Elapsed: 0.004 sec.

host :)場所の後 、フィルタパラメータを設定し、不要なパラメータを削除することもできます。
host :) ALTER TABLE colleagues  DELETE WHERE id < 2;

ALTER TABLE colleagues
    DELETE WHERE id < 2


Query id: 354e27fc-70c9-480b-bb1d-067591924c6e

Ok.

0 rows in set. Elapsed: 0.005 sec.

host :)
列を削除
テーブルから列を削除するには、次の手順を実行します。
host :) ALTER TABLE colleagues DROP COLUMN location;

ALTER TABLE colleagues
    DROP COLUMN location


Query id: da361478-0619-4c31-8422-f59ee14a57d7

Ok.

0 rows in set. Elapsed: 0.008 sec.

host :)
クエリによるデータ取得
次に、クエリを使用したデータ取得のデモンストレーションに進みます。 ClickHouseは、ここでSQL構文とその追加を使用しています。基本的な情報を集めてみましょう。
host :) SELECT url, name FROM colleagues WHERE url = 'http://1.com' LIMIT 1;

SELECT
    url,
    name
FROM colleagues WHERE url = 'http://1.com'
LIMIT 1

Query id: 8a5cbf9a-f187-440c-9a60-2d23029b4bd1

┌─url──────────┬─name─┐
│ http://1.com │ john │
└──────────────┴──────┘

1 rows in set. Elapsed: 0.003 sec.

host :) - SELECT -いくつかのパラメータを選択します。
- FROM -値を受け取るテーブルを決定します。
- 場所 -どの値と量に関するパラメータとフィルタを設定します。
次のような追加の検索パラメータを使用することもできます:
- カウント -条件に一致する行数を返します。
- 合計 -選択した値の合計を返します。
- avg -選択したアイテムの平均を返します。
- uniq -一致した単一行のおおよその数を返します。
- topK -アルゴリズムを使用して、特定の列の最も頻繁な値の配列を返します。
ドロップテーブルとデータベース
次に、テーブルとデータベースの削除に移ります。まず、テーブルを削除しましょう。
host :) DROP TABLE colleagues;

DROP TABLE colleagues

Query id: 21048fe4-d379-48ac-b9a7-71f0b3fe93e1

Ok.

0 rows in set. Elapsed: 0.001 sec.

host :)
次に、データベースを削除します。
host :) DROP DATABASE liquidweb;

DROP DATABASE liquidweb

Query id: 4ad9a51a-f89d-4be5-be9c-92b8cb38614b

Ok.

0 rows in set. Elapsed: 0.001 sec.

host :)
データベースを終了するには、標準の「exit」値を入力します。
host :) exit
Bye.
root@host:~#
ユーザーの作成
すべての基本機能をカバーしたので、いくつかのデータベースユーザーを作成します。 ClickHouse構成ファイルは、次のパス/etc/clickhouse-client/config.xmlにあります。 このファイルに移動し、vimまたはnanoで開き、次の順序で値を指定します。
<config> <user>username</user> <password>password</password> <secure>False</secure></config>ファイルの編集にはnanoエディターを使用します。
root@host:~#  nano /etc/clickhouse-client/config.xml
root@host:~#
必要な情報を入力し、 Ctrl + Sを使用して変更を保存します およびCtrl+ X キー
ClickHouseに接続
最後に、ClickHouseに接続するには、ターミナルで次のコマンドを入力します。
root@host:~# clickhouse-client -u margaret --password
ClickHouse client version 20.12.5.14 (official build).
Password for user (margaret):
Connecting to localhost:9440 as user margaret.
Connected to ClickHouse server version 20.12.5 revision 54442.

host :)
結論
このチュートリアルでは、ClickHouseの多くの側面を発見しました。それがどのように機能するか、いつ適用できるか、そしてどのような状況で役立つかを発見しました。キーとリポジトリを追加してから、ClickHouseソフトウェアをインストールする方法を特定しました。同様に、アクセスを許可するようにファイアウォールを設定および構成しました。さらに、データベースとテーブルを作成し、列とデータを追加してから、それらを更新および削除しました。最後に、構成ファイルでユーザーを作成する方法を示しました。
私たちは、Hosting™で最も役立つ人間であることに誇りを持っています!私たちのサポートチームは、この記事で説明されているものを含め、複数のWebホスティングテクノロジーに精通している経験豊富なLinux技術者と才能のあるシステム管理者でいっぱいです。
この記事に関するお問い合わせは、常にありますこの記事に関連する質問に24時間年中無休で情報を提供するために利用できます。
フルマネージドVPSサーバー、クラウド専用、VMWareプライベートクラウド、プライベート親サーバー、マネージドクラウドサーバー、または専用サーバーの所有者であり、概説されている手順のいずれかを実行することに不安がある場合は、このプロセスを支援するためのチャットまたはサポートチケットである@800.580.4985に電話で連絡できます。
