はじめに
遅かれ早かれ、どの情報システムもデータベースを取得します。多くの場合、複数のデータベースを取得します。時間の経過とともに、そのデータベースは数GBから数十TBまでの非常に多くのデータを収集します。データ量が増加したときに機能がどのように機能するかを理解するには、そのデータベースを満たすためのデータを生成する必要があります。

提示および実装されたすべてのスクリプトは、 JobEmplDBで実行されます。 求人サービスのデータベース。データベースの実現はここから入手できます。
テストと開発のためにデータベースに入力するデータへのアプローチ
データベースの開発とテストには、データを入力するための2つの主要なアプローチが含まれます。
- 個人データやその他の機密データを変更して、本番環境からデータベース全体をコピーすること。このようにして、データを確保し、機密データを消去します。
- 合成データを生成するため。これは、外観、プロパティ、相互接続において実際のデータと同様のテストデータを生成することを意味します。
アプローチ1の利点は、データとその分布をさまざまな基準で本番データベースに近似することです。これにより、すべてを正確に分析できるため、それに応じて結論と予測を行うことができます。
ただし、このアプローチでは、データベース自体を何度も増やすことはできません。将来、情報システム全体の機能の変化を予測することは問題になります。
逆に、本番データベースから取得した非個人的なサニタイズされたデータを分析することもできます。それらに基づいて、外観、プロパティ、および相互関係によって実際のデータのようになるテストデータを生成する方法を定義できます。このようにして、アプローチ1はアプローチ2を生成します。
それでは、テストと開発のためにデータベースにデータを入力するための両方のアプローチを詳しく確認しましょう。
本番データベースでのデータのコピーと変更
まず、本番環境からデータをコピーして変更する一般的なアルゴリズムを定義しましょう。
一般的なアルゴリズム
一般的なアルゴリズムは次のとおりです。
- 新しい空のデータベースを作成します。
- 新しく作成されたデータベースにスキームを作成します–本番データベースと同じシステムです。
- 必要なデータを本番データベースから新しく作成されたデータベースにコピーします。
- 新しいデータベースのシークレットデータをサニタイズして変更します。
- 新しく作成したデータベースのバックアップを作成します。
- 必要な環境でバックアップを配信して復元します。
ただし、ステップ5の後、アルゴリズムはより複雑になります。たとえば、ステップ6では、予備テストのために特定の保護された環境が必要です。その段階では、すべてのデータが非個人的であり、秘密のデータが変更されていることを確認する必要があります。
その段階の後、保護された非実稼働環境でテストされたデータベースのステップ5に再び戻ることができます。次に、テストしたバックアップを必要な環境に転送して復元し、開発とテストに使用します。
本番データベースのデータのコピーと変更の一般的なアルゴリズムを紹介しました。実装方法を説明しましょう。
一般的なアルゴリズムの実現
新しい空のデータベースの作成
ここにあるように、CREATE DATABASE構造を使用して、空のデータベースを作成できます。
データベースの名前はJobEmplDB_Test 。 3つのファイルグループがあります:
- プライマリ –デフォルトではプライマリファイルグループです。 2つのファイルを定義します: JobEmplDB_Test1(path D:\ DBData \ JobEmplDB_Test1.mdf) 、および JobEmplDB_Test2(パスD:\ DBData \ JobEmplDB_Test2.ndf) 。各ファイルの初期サイズは64Mbで、ファイルごとの拡張ステップは8Mbです。
- DBTableGroup – 2つのファイルを決定するカスタムファイルグループ: JobEmplDB_TestTableGroup1(パスD:\ DBData \ JobEmplDB_TestTableGroup1.ndf) およびJobEmplDB_TestTableGroup2(パスD:\ DBData \ JobEmplDB_TestTableGroup2.ndf) 。各ファイルの初期サイズは8Gbで、拡張ステップはファイルごとに1Gbです。
- DBIndexGroup – 2つのファイルを決定するカスタムファイルグループ: JobEmplDB_TestIndexGroup1(パスD:\ DBData \ JobEmplDB_TestIndexGroup1.ndf) 、および JobEmplDB_TestIndexGroup2(パスD:\ DBData \ JobEmplDB_TestIndexGroup2.ndf) 。初期サイズはファイルごとに16Gbで、拡張ステップはファイルごとに1Gbです。
また、このデータベースには、トランザクションのジャーナルが1つ含まれています: JobEmplDB_Testlog 、パス E:\ DBLog \ JobEmplDB_Testlog.ldf 。ファイルの初期サイズは8Gbで、拡張ステップは1Gbです。
スキームと必要なデータを本番データベースから新しく作成されたデータベースにコピーする
スキームと必要なデータを本番データベースから新しいデータベースにコピーするには、いくつかのツールを使用できます。まず、Visual Studio(SSDT)です。または、次のようなサードパーティのユーティリティを使用できます:
- DbForgeスキーマ比較とDbForgeデータ比較
- ApexSQLDiffおよびApexDataDiff
- SQL比較ツールとSQLデータ比較ツール
データ変更用のスクリプトの作成
データ変更のスクリプトの必須要件
1.そのスクリプトを使用して実際のデータを復元することは不可能でなければなりません。
たとえば、実際のデータを復元できるため、線の反転は適していません。通常、この方法は、各文字またはバイトを疑似ランダム文字またはバイトに置き換えることです。同じことが日時にも当てはまります。
2.データの変更により、値の選択性が変更されてはなりません。
テーブルのフィールドにNULLを割り当てることはできません。代わりに、実際のデータの同じ値が変更されたデータでも同じままであることを確認する必要があります。たとえば、実際のデータでは、テーブルで12回見つかった103785の値があります。変更されたデータでこの値を変更する場合、新しい値はテーブルの同じフィールドに12回残る必要があります。
3.値のサイズと長さは、変更されたデータで大幅に異なるべきではありません。たとえば、各バイトまたは文字を疑似ランダムバイトまたは文字に置き換えます。最初の文字列のサイズと長さは同じです。
4.変更後にデータの相互関係を壊してはなりません。これは、外部キーおよび変更されたデータを参照する他のすべてのケースに関連しています。変更されたデータは、実際のデータと同じ関係にある必要があります。
データ変更スクリプトの実装
それでは、秘密情報を非個人化して非表示にするためにデータが変更された特定のケースを確認しましょう。サンプルは採用データベースです。
サンプルデータベースには、離人する必要がある次の個人データが含まれています。
- 姓名;
- 生年月日;
- IDカードの発行日;
- バイトシーケンスとしてのリモートアクセス証明書;
- 履歴書プロモーションのサービス料。
まず、変更されたデータの種類ごとに簡単な例を確認します。
- 日時の変更;
- 数値の変化;
- バイトシーケンスの変更;
- 文字データの変更。
日時の変更
次のスクリプトを使用して、ランダムな日付と時刻を取得できます。
DECLARE @dt DATETIME;

SET @dt = CAST(CAST(@StartDate AS FLOAT) + (CAST(@FinishDate AS FLOAT) - CAST(@StartDate AS FLOAT)) * RAND(CHECKSUM(NEWID())) AS DATETIME);
ここでは、 @StartDate および@FinishDate 範囲の開始値と終了値です。それらは、擬似ランダムな日付と時刻の生成に対してそれぞれ相関します。
これらのデータを生成するには、システム関数RAND、CHECKSUM、およびNEWIDを使用します。
UPDATE [dbo].[Employee]
SET [DocDate] = CAST(CAST(CAST(CAST([BirthDate] AS DATETIME) AS FLOAT) + (CAST(GETDATE() AS FLOAT) - CAST(CAST([BirthDate] AS DATETIME) AS FLOAT)) * RAND(CHECKSUM(NEWID())) AS DATETIME) AS DATE);
[DocDate]フィールドは、ドキュメントの発行日を表します。日付の範囲とその制限を考慮して、疑似ランダム日付に置き換えます。
「下限」は候補者の生年月日です。 「上端」は現在の日付です。ここでは時間が必要ないため、必要な日付への日時形式の変換が終了します。同じ方法で、日付と時刻の任意の部分の疑似乱数値を取得できます。
数値の変化
次のスクリプトを使用して、ランダムな整数を取得できます。
DECLARE @Int INT;

SET @Int = CAST(((@MaxVal + 1) - @MinVal) *
    RAND(CHECKSUM(NEWID())) + @MinVal AS INT);
@MinVal и@MaxVal は、疑似乱数生成の開始範囲と終了範囲の値です。システム関数RAND、CHECKSUM、およびNEWIDを使用して生成します。
UPDATE [dbo].[Employee]
SET [CountRequest] = CAST(((@MaxVal + 1) - @MinVal) *
    RAND(CHECKSUM(NEWID())) + @MinVal AS INT);
[CountRequest]フィールドは、企業がこの候補者の履歴書に対して行うリクエストの数を表します。
同様に、任意の数値の疑似乱数値を取得できます。たとえば、10進数タイプ(18,2)世代のランダムな数値を見てください:
DECLARE @Dec DECIMAL(18,2);

SET @Dec=CAST(((@MaxVal + 1) - @MinVal) *
    RAND(CHECKSUM(NEWID())) + @MinVal AS DECIMAL(18,2));
したがって、次の方法で履歴書プロモーションサービス料金を更新できます。
UPDATE [dbo].[Employee]
SET [PaymentAmount] = CAST(((@MaxVal + 1) - @MinVal) *
    RAND(CHECKSUM(NEWID())) + @MinVal AS DECIMAL(18,2));
バイトシーケンスの変更
次のスクリプトを使用して、ランダムなバイトシーケンスを取得できます。
DECLARE @res VARBINARY(MAX);

SET @res = CRYPT_GEN_RANDOM(@Length, CAST(NEWID() AS VARBINARY(16)));
@Length シーケンスの長さを表します。返されるバイト数を定義します。ここで、@Lengthは16より大きくてはなりません。
生成は、システム関数CRYPT_GEN_RANDOMおよびNEWIDを使用して行われます。
たとえば、次の方法で各候補のリモートアクセス証明書を更新できます。
UPDATE [dbo].[Employee]
SET [RemoteAccessCertificate] = CRYPT_GEN_RANDOM(CAST(LEN([RemoteAccessCertificate]) AS INT), CAST(NEWID() AS VARBINARY(16)));
変更時に[RemoteAccessCertificate]フィールドに存在する同じ長さの疑似ランダムバイトシーケンスを生成します。バイトシーケンスの長さは16を超えないと仮定します。
同様に、任意の長さの疑似ランダムバイトシーケンスを返す関数を作成できます。単純な「+」加算演算子を使用して、システム関数CRYPT_GEN_RANDOMの結果をまとめます。ただし、実際には通常16バイトで十分です。
一定の長さの疑似ランダムバイトシーケンスを返すサンプル関数を作成してみましょう。ここでは、16バイトを超える長さを設定できます。このために、次のプレゼンテーションを行います。
CREATE VIEW [test].[GetNewID]
AS
SELECT NEWID() AS [NewID];
GO
関数内でNEWIDを使用することを禁じている制限を回避するために必要です。
同様に、同じ目的で次のプレゼンテーションを作成します。
CREATE VIEW [test].[GetRand]
AS
SELECT RAND(CHECKSUM((SELECT TOP(1) [NewID] FROM [test].[GetNewID]))) AS [Value];
GO
もう1つのプレゼンテーションを作成します:
CREATE VIEW [test].[GetRandVarbinary16]
AS
SELECT CRYPT_GEN_RANDOM(16, CAST((SELECT TOP(1) [NewID] FROM [test].[GetNewID]) AS VARBINARY(16))) AS [Value];
GO
3つの関数の定義はすべてここにあります。そして、これが一定の長さの疑似ランダムバイトシーケンスを返す関数の実装です。
まず、必要な機能が存在するかどうかを定義します。そうでない場合は、最初にスタッドを作成します。いずれの場合も、コードには関数の定義を適切に変更することが含まれます。最後に、拡張プロパティを介して関数の説明を追加します。データベースのドキュメントの詳細については、この記事をご覧ください。
各候補者のリモートアクセス証明書を更新するには、次のようにします。
UPDATE [dbo].[Employee]
SET [RemoteAccessCertificate] = [test].[GetRandVarbinary](CAST(LEN([RemoteAccessCertificate]) AS INT));
ご覧のとおり、ここではバイトシーケンスの長さに制限はありません。
データ変更–文字データ変更
ここでは、英語とロシア語のアルファベットの例を取り上げますが、他のアルファベットでも同じことができます。唯一の条件は、その文字がNCHARタイプに存在する必要があることです。
行を受け入れ、すべての文字を疑似ランダム文字に置き換え、結果をまとめて返す関数を作成する必要があります。
ただし、最初に必要な文字を理解する必要があります。そのために、次のスクリプトを実行できます。
DECLARE @tbl TABLE ([ValueInt] INT, [ValueNChar] NCHAR(1), [ValueChar] CHAR(1));

DECLARE @ind int=0;
DECLARE @count INT=65535;

WHILE(@count>=0)
BEGIN
	INSERT INTO @tbl ([ValueInt], [ValueNChar], [ValueChar])
	SELECT @ind, NCHAR(@ind), CHAR(@ind)

	SET @ind+=1;
	SET @count-=1;
END

SELECT *
INTO [test].[TblCharactersCode]
FROM @tbl;
次のフィールドを含む[test]。[TblCharacterCode]テーブルを作成しています:
- ValueInt –文字の数値;
- ValueNChar –NCHARタイプの文字;
- ValueChar –CHARタイプの文字。
この表の内容を確認しましょう。次のリクエストが必要です:
SELECT [ValueInt]
      ,[ValueNChar]
      ,[ValueChar]
  FROM [test].[TblCharactersCode];
数字は48から57の範囲です:
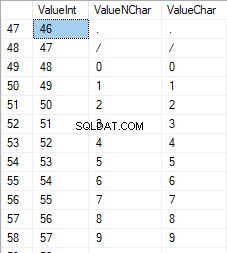
大文字のラテン文字は65から90の範囲です:

ローワーケアのラテン文字は97から122の範囲です:
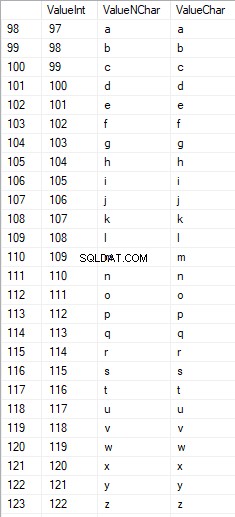
大文字のロシア語の文字は1040から1071の範囲です:

小文字のロシア語の文字は1072から1103の範囲です:


そして、58から64の範囲の文字:

必要な文字を選択し、次の方法で[test]。[SelectCharactersCode]テーブルに配置します。
SELECT
	[ValueInt]
   ,[ValueNChar]
   ,[ValueChar]
   ,CASE
		WHEN ([ValueInt] BETWEEN 48 AND 57) THEN 1
		ELSE 0
	END AS [IsNumeral]
   ,CASE
		WHEN (([ValueInt] BETWEEN 65 AND 90) OR
			([ValueInt] BETWEEN 1040 AND 1071)) THEN 1
		ELSE 0
	END AS [IsUpperCase]
   ,CASE
		WHEN (([ValueInt] BETWEEN 65 AND 90) OR
			([ValueInt] BETWEEN 97 AND 122)) THEN 1
		ELSE 0
	END AS [IsLatin]
   ,CASE
		WHEN (([ValueInt] BETWEEN 1040 AND 1071) OR
			([ValueInt] BETWEEN 1072 AND 1103)) THEN 1
		ELSE 0
	END AS [IsRus]
   ,CASE
		WHEN (([ValueInt] BETWEEN 33 AND 47) OR
			([ValueInt] BETWEEN 58 AND 64)) THEN 1
		ELSE 0
	END AS [IsExtra]
INTO [test].[SelectCharactersCode]
FROM [test].[TblCharactersCode]
WHERE ([ValueInt] BETWEEN 48 AND 57)
OR ([ValueInt] BETWEEN 65 AND 90)
OR ([ValueInt] BETWEEN 97 AND 122)
OR ([ValueInt] BETWEEN 1040 AND 1071)
OR ([ValueInt] BETWEEN 1072 AND 1103)
OR ([ValueInt] BETWEEN 33 AND 47)
OR ([ValueInt] BETWEEN 58 AND 64);
それでは、次のスクリプトを使用して、このテーブルの内容を調べてみましょう。
SELECT [ValueInt]
      ,[ValueNChar]
      ,[ValueChar]
      ,[IsNumeral]
      ,[IsUpperCase]
      ,[IsLatin]
      ,[IsRus]
      ,[IsExtra]
  FROM [test].[SelectCharactersCode];
次の結果が得られます:

このようにして、[test]。[SelectCharactersCode] テーブル、ここで:
- ValueInt –文字の数値
- ValueNChar –NCHARタイプの文字
- ValueChar –CHARタイプの文字
- IsNumeral –文字が数字であるという基準
- IsUpperCase –大文字の文字の基準
- IsLatin –文字がラテン文字であるという基準。
- IsRus –キャラクターがロシアのキャラクターであるという基準
- IsExtra –キャラクターが追加キャラクターであるという基準
これで、必要な文字を挿入するためのコードを取得できます。たとえば、これは小文字のラテン文字に対してこれを行う方法です:
SELECT 'SELECT '+CAST([ValueInt] AS NVARCHAR(255))+' AS [ValueInt], '+''''+[ValueNChar]+''''+' AS [ValueNChar], '+''''+[ValueChar]+''''+' AS [ValueChar] UNION ALL'
  FROM [test].[SelectCharactersCode]
  WHERE [IsUpperCase]=0
    AND [IsLatin]=1;
次の結果が得られます:

小文字のロシア語の文字についても同じです:
SELECT 'SELECT '+CAST([ValueInt] AS NVARCHAR(255))+' AS [ValueInt], '+''''+[ValueNChar]+''''+' AS [ValueNChar], '+COALESCE(''''+[ValueChar]+'''', 'NULL')+' AS [ValueChar] UNION ALL'
  FROM [test].[SelectCharactersCode]
  WHERE [IsUpperCase]=0
    AND [IsRus]=1;
次の結果が得られます:

キャラクターも同じです:
SELECT 'SELECT '+CAST([ValueInt] AS NVARCHAR(255))+' AS [ValueInt], '+''''+[ValueNChar]+''''+' AS [ValueNChar], '+''''+[ValueChar]+''''+' AS [ValueChar] UNION ALL'
  FROM [test].[SelectCharactersCode]
  WHERE [IsNumeral]=1;
結果は次のとおりです。

したがって、次のデータを個別に挿入するためのコードがあります。
- 小文字のラテン文字。
- 小文字のロシア文字。
- 数字。
NCHARタイプとCHARタイプの両方で機能します。
同様に、任意の文字セットの挿入スクリプトを準備できます。さらに、各セットには独自の集計機能があります。
簡単にするために、次の方法で以前に選択したデータに必要なデータセットを返す一般的な集計関数を実装します。
SELECT
	'SELECT ' + CAST([ValueInt] AS NVARCHAR(255)) + ' AS [ValueInt], '
	+ '''' + [ValueNChar] + '''' + ' AS [ValueNChar], '
	+ COALESCE('''' + [ValueChar] + '''', ‘NULL’) + ' AS [ValueChar], '
	+ CAST([IsNumeral] AS NCHAR(1)) + ' AS [IsNumeral], ' +
	+CAST([IsUpperCase] AS NCHAR(1)) + ' AS [IsUpperCase], ' +
	+CAST([IsLatin] AS NCHAR(1)) + ' AS [IsLatin], ' +
	+CAST([IsRus] AS NCHAR(1)) + ' AS [IsRus], ' +
	+CAST([IsExtra] AS NCHAR(1)) + ' AS [IsExtra]' +
	+' UNION ALL'
FROM [test].[SelectCharactersCode];
最終結果は次のとおりです。

準備ができたスクリプトは、集計関数[test]。[GetSelectCharacters]にまとめられています。
生成されたスクリプトの最後にある余分なUNIONALLを削除することが重要です。また、[ValueInt] =39では、”’を””に変更する必要があります:
SELECT 39 AS [ValueInt], '''' AS [ValueNChar], '''' AS [ValueChar], 0 AS [IsNumeral], 0 AS [IsUpperCase], 0 AS [IsLatin], 0 AS [IsRus], 1 AS [IsExtra] UNION ALLこの集計関数は、次の一連のフィールドを返します。
- 番号 –返されたデータセットの行番号。
- ValueInt –文字の数値;
- ValueNChar –NCHARタイプの文字;
- ValueChar –CHARタイプの文字;
- IsNumeral –文字が数字であるという基準。
- IsUpperCase –文字が大文字であることを定義する基準。
- IsLatin –文字がラテン文字であることを定義する基準。
- IsRus –キャラクターがロシアのキャラクターであることを定義する基準。
- IsExtra –キャラクターが余分なものであることを定義する基準。
入力には、次のパラメーターがあります。
- @IsNumeral –数値を返す必要がある場合;
- @IsUpperCase :
- 0 –文字の場合は小文字のみを返す必要があります;
- 1 –大文字のみを返す必要があります;
- NULL –すべての場合に文字を返す必要があります。
- @IsLatin –ラテン文字を返す必要があります
- @IsRus –ロシア語の文字を返す必要があります
- @IsExtra –追加の文字を返す必要があります。
すべてのフラグは、論理ORに従って使用されます。たとえば、小文字の数字とラテン文字を返す必要がある場合は、次の方法で集計関数を呼び出します。
次の結果が得られます:
declare
@IsNumeral BIT=1
   ,@IsUpperCase BIT=0
   ,@IsLatin BIT=1
   ,@IsRus BIT=0
   ,@IsExtra BIT=0;

SELECT *
FROM [test].[GetSelectCharacters](@IsNumeral, @IsUpperCase, @IsLatin, @IsRus, @IsExtra);
次の結果が得られます:

[test]。[GetRandString]関数を実装します。この関数は、最初の文字列の長さを維持したまま、行を疑似ランダム文字に置き換えます。この関数には、数字のみの文字を操作する可能性が含まれている必要があります。たとえば、IDカードのシリーズと番号を変更するときに便利です。
[test]。[GetRandString]関数を実装すると、最初に、入力パラメーター@Lengthで指定された長さの疑似ランダム行を生成するために必要な文字のセットを取得します。残りのパラメータは上記のように機能します。
次に、受信したデータセットを集計変数 @tblに入れます。 。このテーブルは、フィールド[ID] –結果の文字テーブルの注文番号、および[Value] –NCHARタイプでの文字の表示を保存します。
その後、サイクル内で、1から以前に受信した@tbl文字のカーディナリティまでの範囲の疑似乱数が生成されます。この数値を集計変数@tblの[ID]に入れて検索します。検索で行が返されると、[Value]文字を取得し、結果の行@resに「接着」します。
サイクルの作業が終了すると、受信した行は@res変数を介して返されます。
次の方法で、候補者の名前と名前の両方を変更できます。
UPDATE [dbo].[Employee]
SET [FirstName] = [test].[GetRandString](LEN([FirstName])),
        [LastName] = [test].[GetRandString](LEN([LastName]));
したがって、関数の実装と、NCHAR型およびNVARCHAR型の使用法を調べました。 CHAR型とVARCHAR型でも同じことが簡単にできます。
ただし、アルファベットの文字や数字ではなく、設定された文字に従って行を生成する必要がある場合があります。このように、最初に次のマルチオペレーター関数[test]。[GetListCharacters]を使用する必要があります。
[test]。[GetListCharacters]関数は、入力用に次の2つのパラメーターを取得します。
- @str –文字の行自体;
- @IsGroupUnique –行内の一意の文字をグループ化する必要があるかどうかを定義します。
再帰CTEを使用すると、入力行@strが文字のテーブル(@ListCharacters)に変換されます。このテーブルには、次のフィールドが含まれています。
- ID –結果の文字テーブルの行の注文番号。
- キャラクター – NCHAR(1)でのキャラクターの表示
- カウント –行内の文字の繰り返し回数(パラメーター@ IsGroupUnique =0の場合は常に1)
この関数の動作をよりよく理解するために、この関数の使用法の2つの例を見てみましょう。
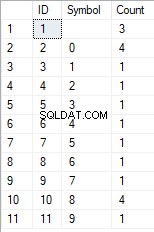
- 行を一意でない文字のリストに変換する:
SELECT *
FROM [test].[GetListCharacters]('123456888  789 0000', 0);
結果が得られます:

この例は、行が文字の一意性によってグループ化されることなく、「そのまま」文字のリストに変換されることを示しています([Count]フィールドには常に1が含まれます)。
- 行の一意の文字のリストへの変換
SELECT *
FROM [test].[GetListCharacters]('123456888  789 0000', 1);
結果は次のとおりです。
この例は、行が一意性によってグループ化された文字のリストに変換されることを示しています。 [カウント]フィールドには、入力行の各文字の検索結果の数が表示されます。
マルチ演算子関数[test]。[GetListCharacters]に基づいて、スカラー関数[test]。[GetRandString2]を作成します。
新しいスカラー関数の定義は、[test]。[GetRandString]スカラー関数との類似性を示しています。唯一の違いは、[test]。[GetSelectCharacters]タブ関数の代わりに[test]。[GetListCharacters]マルチ演算子関数を使用することです。
ここでは、実装されたスカラー関数の使用法の2つの例を確認しましょう。 :
一意性によってグループ化されていない文字の入力行から、12文字の長さの疑似ランダム行を生成します:
SELECT [test].[GetRandString2](12, '123456789!!!!!!!!0!!!', DEFAULT);結果は次のとおりです。
64017 !! 5 !!! 7
キーワードはDEFAULTです。デフォルト値がパラメータを設定すると述べています。ここでは、ゼロ(0)です。
または
一意性によってグループ化された文字の入力行から、12文字の長さの疑似ランダム行を生成します:
SELECT [test].[GetRandString2](12, '123456789!!!!!!!!0!!!', 1);結果は次のとおりです。
35792!428273
データのサニタイズとシークレットデータの変更のための一般的なスクリプトの実装
変更されたデータの種類ごとに簡単な例を検討しました:
- 日付と時刻の変更;
- 数値の変更;
- バイトシーケンスの変更;
- キャラクターのデータを変更する。
ただし、これらの例は、データ変更スクリプトの基準2および3を満たしていません。
- 基準2 :変更されたデータでは、値の選択性が大幅に変わることはありません。テーブルのフィールドにNULLを使用することはできません。代わりに、変更されたデータで同じ実際のデータ値が同じままであることを確認する必要があります。たとえば、実際のデータの103785値が変更される可能性のあるテーブルのフィールドに12回含まれている場合、変更されたデータには、テーブルの同じフィールドで12回検出された別の(変更された)値が含まれている必要があります。
- 基準3 :変更されたデータでは、値の長さとサイズを大幅に変更しないでください。たとえば、各文字/バイトを疑似ランダム文字/バイトに置き換えます。
したがって、テーブルのフィールドでの値の選択性を考慮してスクリプトを作成する必要があります。
採用サービスのデータベースを見てみましょう。ご覧のとおり、個人データは候補者のテーブルに[dbo]。[従業員]のみ存在します。
テーブルに次のフィールドが含まれていると想定します。
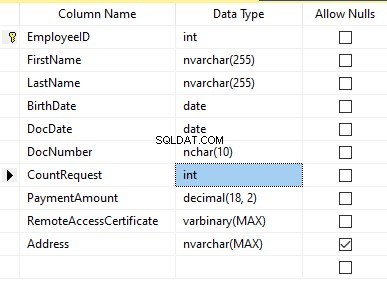
説明:
- FirstName –名前、行NVARCHAR(255)
- LastName –姓、行NVARCHAR(255)
- 生年月日 –生年月日、日付
- DocNumber –パスポートシリーズの先頭に2桁のIDカード番号があり、次の7桁はドキュメントの番号です。それらの間に、NCHAR(10)行としてハイフンがあります。
- DocDate –IDカードの発行日DATE
- CountRequest –履歴書の検索中にその候補者に要求された数、整数INT
- PaymentAmount –受け取った履歴書プロモーションサービス料金、10進数(18,2)
- RemoteAccessCertificate –リモートアクセス証明書、バイトシーケンスVARBINARY
- 住所 –居住地住所または登録住所、行NVARCHAR(MAX)
次に、初期の選択性を維持するために、次のアルゴリズムを実装する必要があります。
- 各フィールドのすべての一意の値を抽出し、その結果を一時テーブルまたは集計変数に保持します。
- 一意の値ごとに疑似乱数値を生成します。この疑似乱数値は、長さとサイズが元の値と大幅に異なってはなりません。ポイント1の結果を保存したのと同じ場所に結果を保存します。新しく生成された各値には、一意の現在の値が関連付けられている必要があります。
- テーブル内のすべての値をポイント2の新しい値に置き換えます。
最初に、候補者の名前と名前を非個人化します。姓名は常に存在し、各フィールドの長さは2文字以上であると想定しています。
まず、一意の名前を選択します。次に、名前ごとに疑似乱数行を生成します。名前の長さは同じままです。最初の文字は大文字で、他の文字は小文字です。以前に作成した[test]。[GetRandString]スカラー関数を使用して、定義された文字の基準に従って特定の長さの疑似ランダム行を生成します。
次に、候補者のテーブルの名前を一意の値に従って更新します。姓も同じです。
DocNumberフィールドを非個人化します。 IDカード(パスポート)番号です。最初の2文字はドキュメントのシリーズを表し、最後の7桁はドキュメントの番号です。ハイフンはそれらの間にあります。次に、消毒操作を実行します。
すべての一意のドキュメントの番号を収集し、それぞれに疑似乱数行を生成します。行の形式は「XX-XXXXXXX」です。ここで、Xは0〜9の範囲の数字です。ここでは、以前に作成した[test]。[GetRandString]スカラー関数を使用して、に従って指定された長さの疑似ランダム行を生成します。キャラクターのパラメーターセット。
その後、候補者のテーブル[dbo]。[Employee]の[DocNumber]フィールドが更新されます。
DocDateフィールド(IDカードの発行日)とBirthDateフィールド(候補者の生年月日)を非個人化します。
First, we select all the unique pairs made of “date of birth &date of the ID-card issue.” For each such pair, we create a pseudorandom date for the date of birth. The pseudorandom date of the ID-card issue is made according to that “date of birth” – the date of the document’s issue must not be earlier than the date of birth.
After that, these data are updated in the respective fields of the candidates’ table [dbo].[Employee].
And, we update the remaining fields of the table.
The CountRequest value stands for the number of requests made for that candidate by companies during the resume search.
The PaymentAmount is the final amount of the resume promotion service fee paid. We calculate these numbers similarly to the previous fields.
Note that it generates a pseudorandom integer for the first case and a pseudorandom decimal for the second case. In both cases, the pseudorandom number generation occurs in the range of “two times less than original” to “two times more than original.” The selectivity of values in the fields is not changed too much.
After that, it writes the values into the fields of the candidates’ table [dbo].[Employee].
Further, we collect unique values of the RemoteAccessCertificate field for the remote access certificate. We generate a pseudorandom byte sequence for each such value. The length of the sequence must be the same as the original. Here, we use the previously created [test].[GetRandVarbinary] scalar function to generate the pseudorandom byte sequence of the specified length.
Then recording into the respective field [RemoteAccessCertificate] of the [dbo].[Employee] candidates’ table takes place.
The last step is the collection of the unique addresses from the [Address] field. For each value, we generate a pseudorandom line of the same length as the original. Note that if it was NULL originally, it must be NULL in the generated field. It allows you to keep NULL and don’t replace it with an empty line. It minimizes the selectivity values’ mismatch in this field between the production database and the altered data.
We use the previously created [test].[GetRandString] scalar function to generate the pseudorandom line of the specified length according to the characters’ parameters defined.
It then records the data into the respective [Address] field of the candidates’ table [dbo].[Employee].
This way, we get the full script for depersonalization and altering of the confidential data.
Finally, we get the database with altered personal and confidential data. The algorithms we used make it impossible to restore the original data from the altered data. Also, the values’ selectivity, length, and size aren’t changed significantly. So, the three criteria for the personal and secret data altering scripts are ensured.
We won’t review the criterion 4 separately here. Our database contains all the data subject to change in one candidates’ table [dbo].[Employee]. The data conformity is needed within this table only. Thus, criterion 4 is also here. However, we need to remember this criterion 4 claiming that all interrelations must remain the same in the altered data.
We often see other conditions for personal and confidential data altering algorithms, but we won’t review them here. Besides, the four criteria described above are always present. In many cases, it is enough to estimate the functionality of the algorithm suitable to use it.
Now, we need to make a backup of the created database, check it by restoring on another instance, and transfer that copy into the necessary environment for development and testing. For this, we examine the full database backup creation.
Full database backup creation
We can make a database backup with construction BACKUP DATABASE as in our example.
Make a compressed full backup of the database JobEmplDB_Test. The checksum calculation takes place in the file E:\Backup\JobEmplDB_Test.bak. Further, we check the backup created.
Then, we check the backup created by restoring the database for it. Let’s examine the database restoring.
Restoring the database
You can restore the database with the help of RESTORE DATABASE construction in the following way:
USE [master]
RESTORE DATABASE [JobEmplDB_Test]
FROM  DISK = N'E:\Backup\JobEmplDB_Test.bak' WITH  FILE = 1,
MOVE N'JobEmplDB' TO N'E:\DBData\JobEmplDB.mdf',
MOVE N'JobEmplDB_log' TO N'F:\DBLog\JobEmplDB_log.ldf',
NOUNLOAD,
REPLACE,
STATS = 5;
GO
We restore the JobEmplDB_Test database of the E:\Backup\JobEmplDB_Test.bak backup. The files will be overwritten, and the data file will be transferred into the file E:\DBData\JobEmplDB.mdf , while the transactions log file will be moved into F:\DBLog\JobEmplDB_log.ldf 。
After we successfully check how the database is restored from the backup, we forward the backup to the development and testing environments. It will be restored again with the same method as described above.
We’ve examined the first approach to the data populating into the database for testing and development. This approach implies copying and altering the data from the production database. Now, we’ll examine the second approach – the synthetic data generation.
Synthetic data generation
The General algorithm for the synthetic data generation is following:
- Make a new empty database or clear a previously created database by purging all data.
- Create or renew a scheme in the newly created database – the same as that of the production databases.
- Copy of renew guidelines and regulations from the production database and transfer them into the new database.
- Generate synthetic data into the necessary tables of the new database.
- Make a backup of a new database.
- Deliver and restore the new backup in the necessary environment.
We already have the JobEmplDB_Test database to practice, and we have reviewed the means of creating a schema in the new database. Let’s focus on the tasks that are specific to this approach.
Clean up the database with the data purge
To clear the database off all its data, we need to do the following:
- Keep the definitions of all external keys.
- Disable all limitations and triggers.
- Delete all external keys.
- Clear the tables using the TRUNCATE construction.
- Restore all the external keys deleted in point 3.
- Enable all the limitations disabled in point 2.
You can save the definitions of all external keys with the following script:
1. The external keys’ definitions are saved in the tabulation variable @tbl_create_FK
2. You can disable the limitations and triggers with the following script:
EXEC sp_MSforeachtable "ALTER TABLE ? NOCHECK CONSTRAINT ALL";
EXEC sp_MSforeachtable "ALTER TABLE ? DISABLE TRIGGER ALL";
To enable the limitations and triggers, you can use the following script:
EXEC sp_MSforeachtable "ALTER TABLE ? WITH CHECK CHECK CONSTRAINT ALL";
EXEC sp_MSforeachtable "ALTER TABLE ? ENABLE TRIGGER ALL";
Here, we use the saved procedure sp_MSforeachtable that applies the construction to all the database’s tables.
3. To delete external keys, use the special script. Here, we receive the information about the external keys through the INFORMATION_SCHEMA.TABLE_CONSTRAINTS system presentation. We delete external keys through the cursor, one by one, using the formed dynamic script T-SQL, transferring the request into the system saved procedure sp_executesql 。
4. To clear the tables with the TRUNCATE construction, use the dedicated script. The script works in the same way as above, but it receives the data for tables, and then it clears the tables one by one through the cursor, using the TRUNCATE construction.
5. Restoring the external keys is possible with the below script (earlier, we saved the external keys’ definitions in the tabulation variable @tbl_create_FK):
DECLARE @tsql NVARCHAR(4000);

DECLARE FK_Create CURSOR LOCAL FOR SELECT
	[Script]
FROM @tbl_create_FK;

OPEN FK_Create;

FETCH NEXT FROM FK_Create INTO @tsql;

WHILE (@@fetch_status = 0)
BEGIN
	EXEC sp_executesql @tsql = @tsql;
	FETCH NEXT FROM FK_Create INTO @tsql;
END

CLOSE FK_Create;
DEALLOCATE FK_Create;
The script works in the same way as the two other scripts we mentioned above. But it restores the external keys’ definitions through the cursor, one for each iteration.
A particular case of data purging in the database is the current script. To get this output, we need the below construction in the scripts:
EXEC sp_executesql @tsql = @tsql;Before this construction, or instead of it, we need to write the generated construction output. It is necessary to call it manually or via the dynamic T-SQL query. We do it via the system saved procedure sp_executesql.
Instead of the below code fragment in all cases:
WHILE (@@fetch_status = 0)
BEGIN
	EXEC sp_executesql @tsql = @tsql;
...

We write:

WHILE (@@fetch_status = 0)
BEGIN
	PRINT @tsql;

	EXEC sp_executesql @tsql = @tsql;
...
Or:
WHILE (@@fetch_status = 0)
BEGIN
	PRINT @tsql;
...
The first case implies both the output of constructions and their execution. The second case if for the output only – it is helpful for the scripts’ debugging.
Thus, we get the general database cleaning script.
Copy guidelines and references from the production database to the new one
Here you can use the T-SQL scripts. Our example database of the recruitment service includes 5 guidelines:
- [dbo].[Company] – companies
- [dbo].[Skill] – skills
- [dbo].[Position] – positions (occupation)
- [dbo].[Project] – projects
- [dbo].[ProjectSkill] – project and skills’ correlations
The “skills” table [dbo].[Skill] serves to show how to make a script for the data insertion from the production database into the test database.
We form the following script:
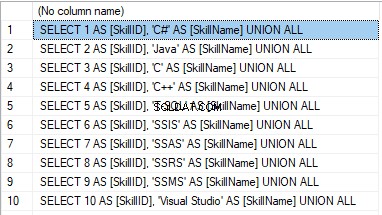
SELECT 'SELECT '+CAST([SkillID] AS NVARCHAR(255))+' AS [SkillID], '+''''+[SkillName]+''''+' AS [SkillName] UNION ALL'
  FROM [dbo].[Skill]
ORDER BY [SkillID];
We execute it in a copy of the production database that is usually available in read-only mode. It is a replica of the production database.
結果は次のとおりです。
Now, wrap the result up into the script for the data adding as here. We have a script for the skills’ guideline compilation. The scripts for other guidelines are made in the same way.
However, it is much easier to copy the guidelines’ data through the data export and import in SSMS. Or, you can use the data import and export wizard.
Generate synthetic data
We’ve determined the pseudorandom values’ generation for lines, numbers, and byte sequences. It took place when we examined the implementation of the data sanitization and the confidential data altering algorithms for approach 1. Those implemented functions and scripts are also used for the synthetic data generation.
The recruitment service database requires us to fill the synthetic data in two tables only:
- [dbo].[Employee] – candidates
- [dbo].[JobHistory] – a candidate’s work history (experience), the resume itself
We can fill the candidates’ table [dbo].[Employee] with synthetic data using this script.
At the beginning of the script, we set the following parameters:
- @count – the number of lines to be generated
- @LengthFirstName – the name’s length
- @LengthLastName – the last name’s length
- @StartBirthDate – the lower limit of the date for the date of birth
- @FinishBirthDate – the upper limit of the date for the date of birth
- @StartCountRequest – the lower limit for the field [CountRequest]
- @FinishCountRequest – the upper limit for the field [CountRequest]
- @StartPaymentAmount – the lower limit for the field [PaymentAmount]
- @FinishPaymentAmount – the upper limit for the field [PaymentAmount]
- @LengthRemoteAccessCertificate – the byte sequence’s length for the certificate
- @LengthAddress – the length for the field [Address]
- @count_get_unique_DocNumber – the number of attempts to generate the unique document’s number [DocNumber]
The script complies with the uniqueness of the [DocNumber] field’s value.
Now, let’s fill the [dbo].[JobHistory] table with synthetic data as follows.
The start date of work [StartDate] is later than the issuing date of the candidate’s document [DocDate]. The end date of work [FinishDate] is later than the start date of work [StartDate].
It is important to note that the current script is simplified, as it does not deal with parameters of the generated data selectivity configuration.
Make a full database backup
We can make a database backup with the construction BACKUP DATABASE, using our script.
We create a full compressed backup of the database JobEmplDB_Test. The checksum is calculated into the file E:\Backup\JobEmplDB_Test.bak. It also ensures further testing of the backup.
Let’s check the backup by restoring the database from it. We need to examine the database restoring then.
Restore the database
You can restore the database with the help of the RESTORE DATABASE construction, as shown below:
USE [master]
RESTORE DATABASE [JobEmplDB_Test]
FROM  DISK = N'E:\Backup\JobEmplDB_Test.bak' WITH  FILE = 1,
MOVE N'JobEmplDB' TO N'E:\DBData\JobEmplDB.mdf',
MOVE N'JobEmplDB_log' TO N'F:\DBLog\JobEmplDB_log.ldf',
NOUNLOAD,
REPLACE,
STATS = 5;
GO
We restore the database JobEmplDB_Test from the backup E:\Backup\JobEmplDB_Test.bak. The files are overwritten, and the data file is transferred to the file E:\DBData\JobEmplDB.mdf. The transaction log file is transferred to file F:\DBLog\JobEmplDB_log.ldf.
After checking the database restoring from the backup successfully, we transfer the backup to the necessary environments. It will be used for testing and development, and further deployment through the database restoring, as described above.
This way, we’ve examined the second approach to filling the database in with data for testing and development purposes. It is the synthetic data generation approach.
Data generation tools (for external resources)
When we have a job to fill in the database with data for testing and development purposes, it can be much faster and easier with the help of specialized tools. Let’s review the most popular and powerful data generation tools and explore their practical usage.
Full list of tools
DATPROF
IRI RowGen
Data Generator for SQL Server
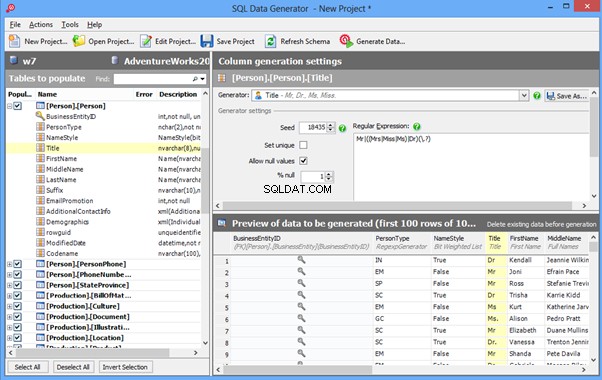
Redgate SQL Data Generator
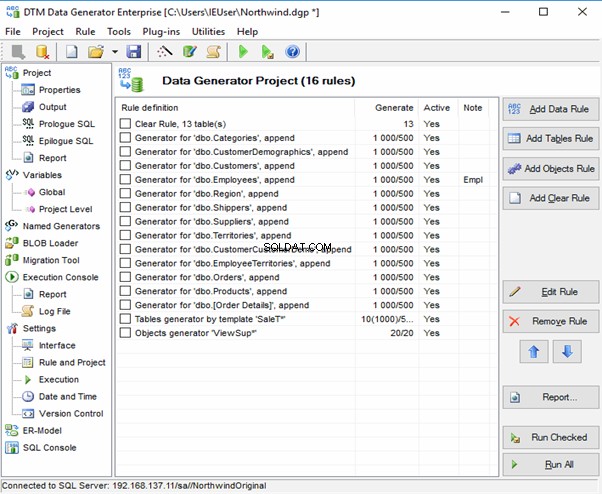
DTM Data Generator
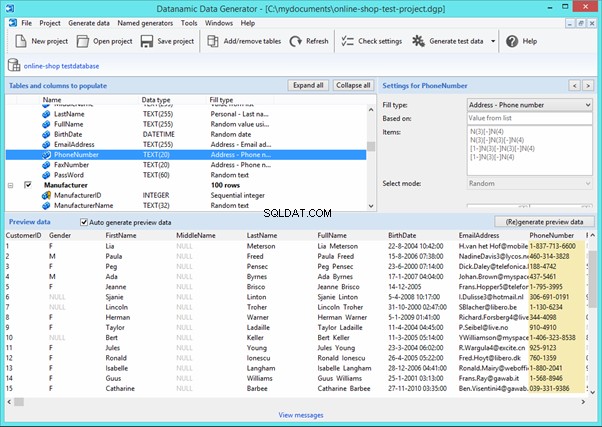
Datanamic Data Generator MultiDB
Now, let’s examine one of these tools more precisely.
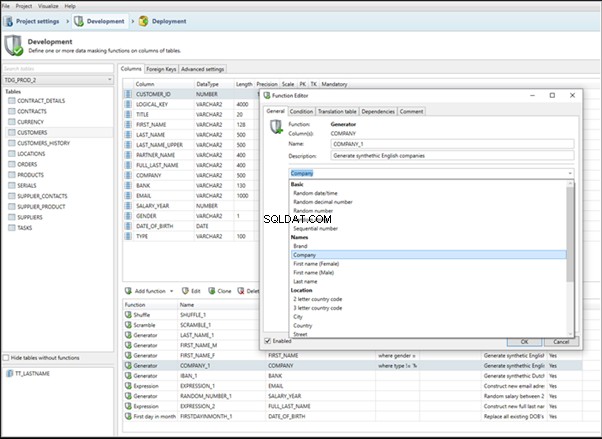
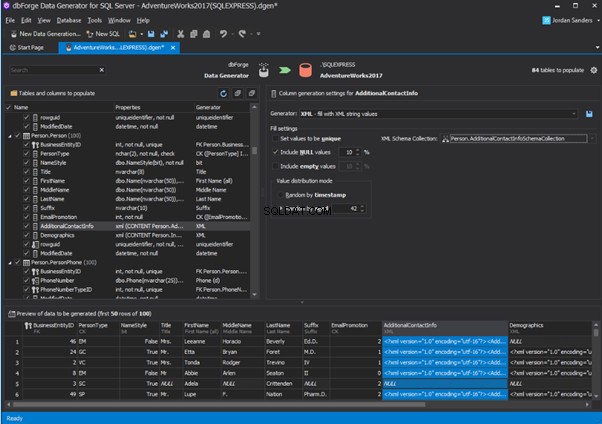
An overview of the employees’ generation by the Data Generator for SQL Server
The Data Generator for SQL Server utility is embedded in SSMS, and also it is a part of dbForge Studio. We reviewed this utility here. Let’s now examine how it works for synthetic data generation. As examples, we use the [dbo].[Employee] and the [dbo].[JobHistory] tables.
This generator can quickly generate first and last names of candidates for the [FirstName] and [LastName] fields respectively:
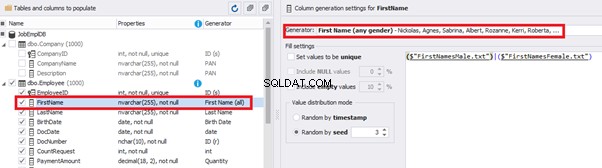
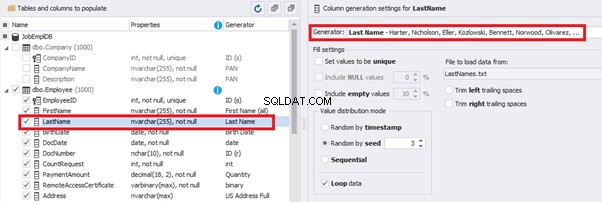
Note that FirstName requires choosing the “First Name” value in the “Generator” section. For LastName, you need to select the “Last Name” value from the “Generator” section.
It is important to note that the generator automatically determines which generation type it needs to apply to every field. The settings above were set by the generator itself, without manual correction.
You can configure distribution of values for the date of birth [BirthDate]:
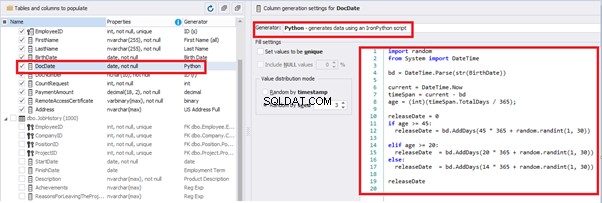
Set the distribution for the document’s date of issue [DocDate] through the Phyton generator using the below script:
import random
from System import DateTime
# receive the value from the Birthday field
bd = DateTime.Parse(str(BirthDate))
# receive the current date
current = DateTime.Now
# calculate the age in years
timeSpan = current - bd
age = (int)(timeSpan.TotalDays / 365);
# passport’s date of issue
releaseDate = 0
if age >= 45:
releaseDate = bd.AddDays(45 * 365 + random.randint(1, 30))
# randomize the issue during the month
elif age >= 20:
  releaseDate  = bd.AddDays(20 * 365 + random.randint(1, 30))
 # randomize the issue during the month
else:
  releaseDate  = bd.AddDays(14 * 365 + random.randint(1, 30))
# randomize the issue during the month
releaseDate
This way, the [DocDate] configuration will look as follows:
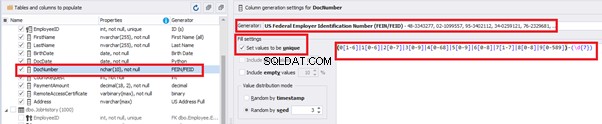
For the document’s number [DocNumber], we can select the necessary type of unique data generation, and edit the generated data format, if needed:
E.g., instead of the format
(0[1-6]|1[0-6]|2[0-7]|3[0-9]|4[0-68]|5[0-9]|6[0-8]|7[1-7]|8[0-8]|9[0-589])-(\d{7})We can set the following format:
(\d{2})-(\d{7})This format means that the line will be generated in format XX-XXXXXXX (X – is a digit in the range of 0 to 9).
We set up the generator for [CountRequest] and [PaymentAmount] fields in the same way, according to the generated data type:
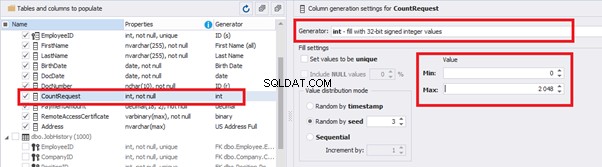
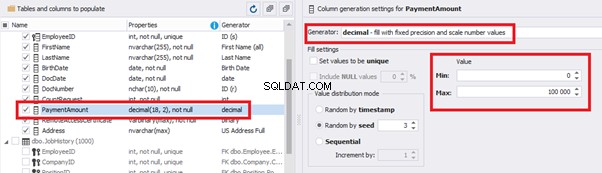
In the first case, we set the values’ range of 0 to 2048 for [CountRequest]. In the second case, it is the range of 0 to 100000 for [PaymentAmount].
We configure generation for [RemoteAccessCertificate] and [Address] fields in the same way:
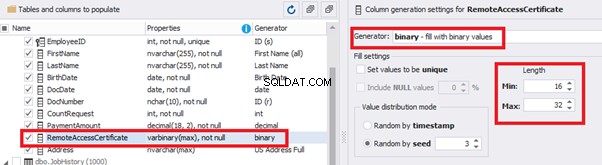
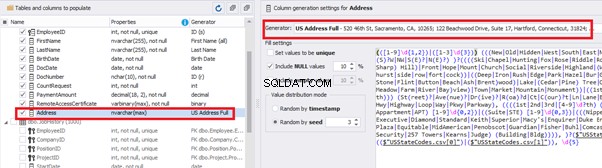
In the first case, we limit the byte sequence [RemoteAccessCertificate] with the range of lengths of 16 to 32. In the second case, we select values for [Address] as real addresses. It makes the generated values looking like the real ones.
This way, we’ve configured the synthetic data generation settings for the candidates’ table [dbo].[Employee]. Let’s now set up the synthetic data generation for the [dbo].[JobHistory] table.
We set it to take the data for the [EmployeeID] field from the candidates’ table [dbo].[Employee] in the following way:
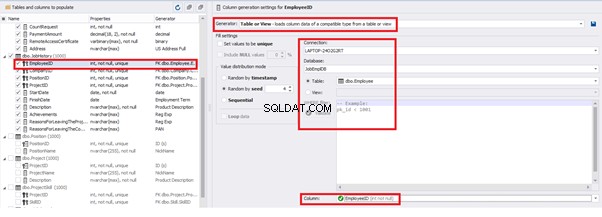
We select the generator’s type from the table or presentation. We then define the sample of MS SQL Server, the database, and the table to take the data from. We can also configure filters in the “WHERE filter” section, and select the [EmployeeID] field.
Here we suppose that we generate the “employees” first, and then we generate the data for the [dbo].[JobHistory] table, basing on the filled [dbo].[Employee] reference.
However, if we need to generate the data for both [dbo].[Employee] and [dbo].[JobHistory] at the same time, we need to select “Foreign Key (manually assigned) – references a column from the parent table,” referring to the [dbo].[Employee].[EmployeeID] column:
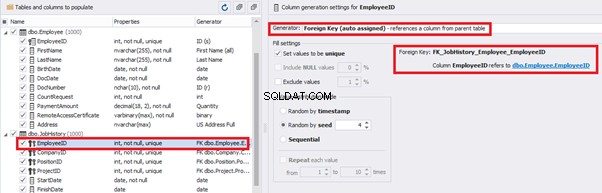
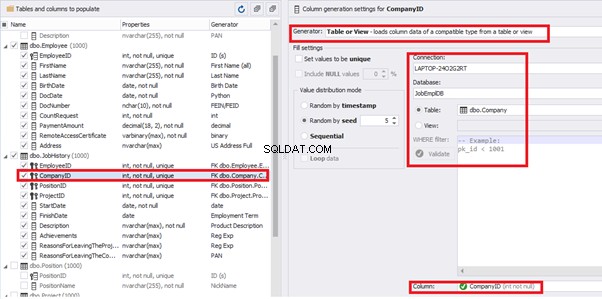
Similarly, we set up the data generation for the following fields.
[CompanyID] – from [dbo].[Company], the “companies” table:
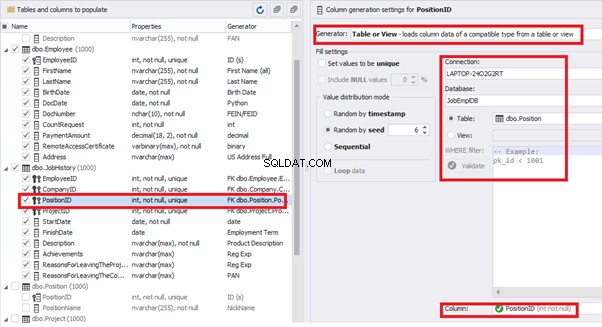
[PositionID] – from the table of positions [dbo].[Position]:
[ProjectID] – from the table of projects [dbo].[Project]:

The tool cannot link the columns from different tables and shift them in some way. However, the generator can shift the date within one table – the “date” generator – fill with date values with Range – Offset from the column. Also, it can use data from a different table, but without any transformation (Table or View, SQL query, Foreign key generators).
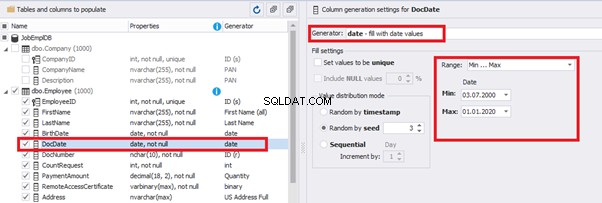
That’s why we resolve the dates’ problem (BirthDate
E.g., we limit the BirthDate with the 40-50 years’ interval. Then, we restrict the DocDate with 20-40 years’ interval. The StartDate is, respectively, limited with 25-35 years’ interval, and we set up the FinishDate with the offset from StartDate.
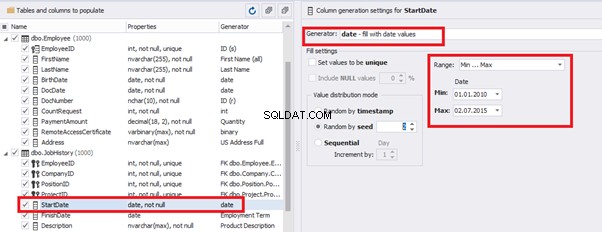
We set up the date of birth:
Set up the date of the document’s issue
Then, the StartDate will match the age from 35 to 45:
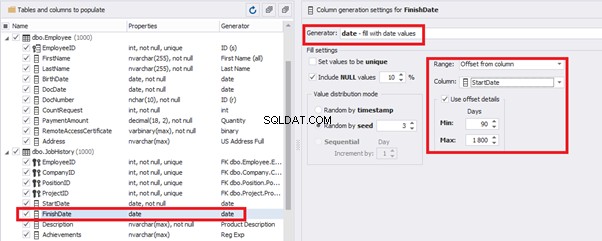
The simple offset generator sets FinishDate:
The result is, a person has worked for three months till the current date.
Also, to configure the date of the working end, we can use a small Python script:
This way, we receive the below configuration for the dates of work end [FinishDate] data generation:
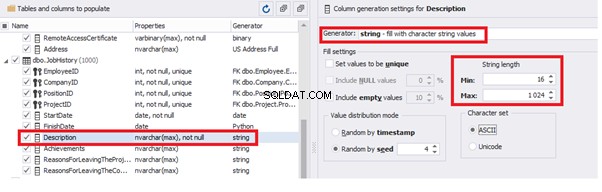
Similarly, we fill in the rest of fields. We set the generator type – string, and set the range for generated lines’ lengths:
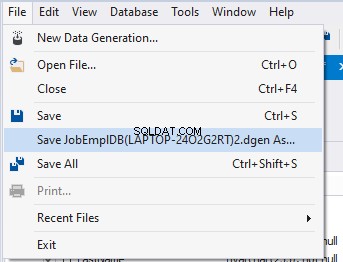
Also, you can save the data generation project as dgen-file consisting of:
We can save all these settings:it is enough to keep the project’s file and work with the database further, using that file:
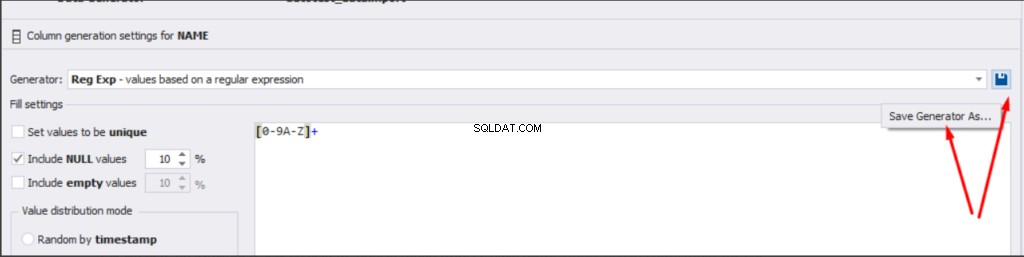
There is also the possibility to both save the new generators from scratch and save the custom settings in a new generator:
Thus, we’ve configured the synthetic data generation settings used for the jobs’ history table [dbo].[JobHistory].
We have examined two approaches to filling the data in the database for testing and development:
We’ve defied the objects for each approach and each script implementation. These objects are here. We’ve also provided scripts for changing the data from the production database and synthetic data generation. An example is the database of recruitment services. In the end, we’ve examined popular data generation tools and explored one of these tools in detail.
SQL SERVER – How to Disable and Enable All Constraint for Table and Database 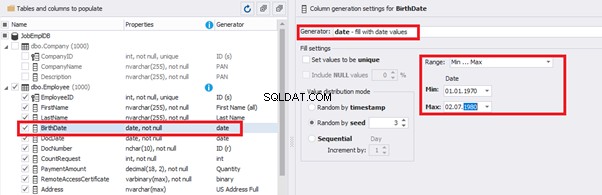
import random
from System import DateTime

bd = DateTime.Parse(str(StartDate))

releaseDate = bd.AddDays(random.randint(1, 30))

releaseDate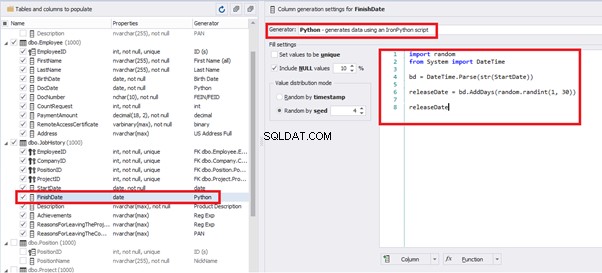
結論
参考資料
Microsoft TechNet Wiki
Top 10 Best Test Data Generation Tools In 2020
SQL Server Documentation