最近、さまざまな改善と新たに追加された機能を含むClusterControl1.7.3のリリースを発表しました。これらの新機能の1つは、ユーザーが同じホスト上で複数のPostgreSQLインスタンスをセットアップおよび管理できるようにするClusterControlのサポートの追加です。この新機能については、以下のブログで説明します。このタイプのセットアップがリソースの節約に役立つ理由や、ClusterControlでこのタイプのインストールを実現するためのステップバイステップの手順を提供する理由も含まれます。
単一のホストに複数のPostgreSQLをインストールする必要があるのはなぜですか?
今日のハードウェアからソフトウェアへのテクノロジーの急速な開発と改善により、要件の範囲はより適応性があり、柔軟性があり、スケーラブルになっています。スケーリングが容易なため、テクノロジースタックを活用することを好む組織もあります。さらに、大容量のCPU、大量のメモリ、SSD /FusionIOなどの高速で強力な不揮発性ストレージデバイスを含むハイエンドの強力なサーバーにデータベースサーバーを展開したい場合があります。 /NVMe。ただし、データベースサーバーの共有リソースを実行しようとしている場合(スレーブ、ホットバックアップマシン、またはバックアップ検証サーバーとして使用する場合など)、これはリソースの浪費になることがあります。特定のセットアップでは、強力なサーバーで利用可能なリソースを開発サーバーとQAサーバーの両方として使用して、不要なハードウェアコストを回避することができます(専用のマシンを購入したり、クラウドに新しいコンピューティングインスタンスを生成したりする代わりに)。
マルチPostgreSQLインストールをセットアップする方法
この例では、ClusterControlを使用して、単一のホストで複数のPostgreSQLを実行しているインスタンスとともにマルチPostgreSQLをインストールしたクラスターを作成します。
注:現在のバージョン(つまり、ClusterControl 1.7.3)の時点では、マルチバージョンがインストールされているPostgreSQLまたはマルチバージョンでマスターおよびスレーブ情報を指定した場合、ClusterControlではクラスターの作成またはクラスターの初期化はできません。 -単一のホスト内で実行されているPostgreSQLのインスタンス。ただし、マルチバージョンがインストールされているノード、または単一のホストで実行されているPostgreSQLのマルチインスタンスをインポートすることはできます。
サーバーの詳細と情報
PostgreSQLの複数のバージョンがインストールされている場合、現在クラスターを開始または作成できないため、PostgreSQLの既存または実行中のインスタンスをインポートします。以下はサーバー情報です。
IP: 192.168.30.10
OSユーザー: vagrant
OSの種類とバージョン: Ubuntu 16.04.6 LTS(ゼニアル)
そして私の/etc/postgresql/9.6/multi_pg/postgresql.confからのいくつかの情報
data_directory = '/data/pgsql/master/data'
hba_file = '/etc/postgresql/9.6/multi_pg/pg_hba.conf'
ident_file = '/etc/postgresql/9.6/multi_pg/pg_ident.conf'
external_pid_file = '/var/run/postgresql/9.6-main.pid'
listen_addresses = '*'
port = 7654
max_connections = 100
shared_buffers = 511995kB
work_mem = 10239kB
maintenance_work_mem = 127998kB
dynamic_shared_memory_type = posix
wal_level = hot_standby
full_page_writes = on
wal_log_hints = on
checkpoint_completion_target = 0.9
max_wal_senders = 16
wal_keep_segments = 32
hot_standby = on
effective_cache_size = 1535985kB
logging_collector = on
log_timezone = 'Etc/UTC'
cluster_name = '9.6/multi_pg'
stats_temp_directory = '/var/run/postgresql/9.6-main.pg_stat_tmp'
datestyle = 'iso, mdy'
timezone = 'Etc/UTC'
lc_messages = 'en_US.UTF-8'
lc_monetary = 'en_US.UTF-8'
lc_numeric = 'en_US.UTF-8'
lc_time = 'en_US.UTF-8'
default_text_search_config = 'pg_catalog.english'
既存のバージョンがすでにインストールされている場合:
example@sqldat.com:/home/vagrant# dpkg -l | grep 'object-relational'
ii  postgresql-11                     11.4-1.pgdg16.04+1                         amd64        object-relational SQL database, version 11 server
ii  postgresql-9.2                    9.2.24-1.pgdg16.04+1                       amd64        object-relational SQL database, version 9.2 server
ii  postgresql-9.6                    9.6.14-1.pgdg16.04+1                       amd64        object-relational SQL database, version 9.6 server
さらに、このセットアップでは、実行中の追加のインスタンスがあります...
example@sqldat.com:/data/pgsql/master# ps axufwww | grep 'postgre[s]'
postgres  1243  0.0  0.8 186064 17916 ?        S    15:59   0:00 /usr/lib/postgresql/9.2/bin/postgres -D /var/lib/postgresql/9.2/main -c config_file=/etc/postgresql/9.2/main/postgresql.conf
postgres  1285  0.0  0.1 186064  3860 ?        Ss   15:59   0:00  \_ postgres: checkpointer process
postgres  1286  0.0  0.2 186064  4620 ?        Ss   15:59   0:00  \_ postgres: writer process
postgres  1287  0.0  0.1 186064  3860 ?        Ss   15:59   0:00  \_ postgres: wal writer process
postgres  1288  0.0  0.2 186808  6008 ?        Ss   15:59   0:00  \_ postgres: autovacuum launcher process
postgres  1289  0.0  0.1 145808  3736 ?        Ss   15:59   0:00  \_ postgres: stats collector process
postgres  1246  0.0  1.2 309600 25884 ?        S    15:59   0:00 /usr/lib/postgresql/11/bin/postgres -D /var/lib/postgresql/11/main -c config_file=/etc/postgresql/11/main/postgresql.conf
postgres  1279  0.0  0.1 309600  4028 ?        Ss   15:59   0:00  \_ postgres: 11/main: checkpointer
postgres  1280  0.0  0.1 309600  4028 ?        Ss   15:59   0:00  \_ postgres: 11/main: background writer
postgres  1281  0.0  0.4 309600  9072 ?        Ss   15:59   0:00  \_ postgres: 11/main: walwriter
postgres  1282  0.0  0.3 310012  6496 ?        Ss   15:59   0:00  \_ postgres: 11/main: autovacuum launcher
postgres  1283  0.0  0.1 164516  3528 ?        Ss   15:59   0:00  \_ postgres: 11/main: stats collector
postgres  1284  0.0  0.3 309892  6596 ?        Ss   15:59   0:00  \_ postgres: 11/main: logical replication launcher
この例では、PostgreSQL9.6を使用します。
マスタースレーブPostgreSQLクラスターの構築
クラスターを作成するには、PostgreSQLインスタンスを手動でセットアップし、後でそのインスタンスをClusterControlにインポートする必要があります。または、マスターノードが1つだけのクラスターを作成し、ClusterControlに処理させることもできますが、これを行うには、実行中の他のすべてのノードをシャットダウンする必要があります。忙しいPostgreSQLデータベースサーバーで操作している場合、これは理想的ではありません。
それでは、手動セットアップを行いましょう...
example@sqldat.com:/etc/postgresql/9.6/multi_pg# sudo -iu postgres /usr/lib/postgresql/9.6/bin/pg_ctl -D /data/pgsql/master/data initdb
The files belonging to this database system will be owned by user "postgres".
This user must also own the server process.

The database cluster will be initialized with locale "en_US.UTF-8".
The default database encoding has accordingly been set to "UTF8".
The default text search configuration will be set to "english".

Data page checksums are disabled.

creating directory /data/pgsql/master/data ... ok
creating subdirectories ... ok
selecting default max_connections ... 100
selecting default shared_buffers ... 128MB
selecting default timezone ... Etc/UTC
selecting dynamic shared memory implementation ... posix
creating configuration files ... ok
running bootstrap script ... ok
performing post-bootstrap initialization ... ok
syncing data to disk ... ok

WARNING: enabling "trust" authentication for local connections
You can change this by editing pg_hba.conf or using the option -A, or
--auth-local and --auth-host, the next time you run initdb.

Success. You can now start the database server using:

    /usr/lib/postgresql/9.6/bin/pg_ctl -D /data/pgsql/master/data -l logfile start
次に、以下のコマンドを実行してデータベースを起動します。
example@sqldat.com:/etc/postgresql/9.6/multi_pg# sudo -iu postgres /usr/lib/postgresql/9.6/bin/pg_ctl -D /data/pgsql/master/data  -o "-c config_file=/etc/postgresql/9.6/multi_pg/postgresql.conf" -l /var/log/postgresql/postgresql-9.6-master.log start
server starting
次に、インスタンスが実行され、使用した目的のポートを使用しているかどうかを確認しましょう。
example@sqldat.com:/etc/postgresql/9.6/multi_pg# netstat -ntlvp46|grep postgres
tcp        0      0 127.0.0.1:5432          0.0.0.0:*               LISTEN      1246/postgres
tcp        0      0 127.0.0.1:5433          0.0.0.0:*               LISTEN      1243/postgres
tcp        0      0 0.0.0.0:7654            0.0.0.0:*               LISTEN      18403/postgres
tcp6       0      0 :::7654                 :::*
今、それは正しいように見えます。 18403のpid は、それを実行でき、IPv4とIPv6の両方が開いていることを示しています。
それでは、これをClusterControlにインポートしましょう。 展開→既存のサーバー/データベースのインポートに移動します 、セットアップしたばかりの目的のマスターノードをインポートします。
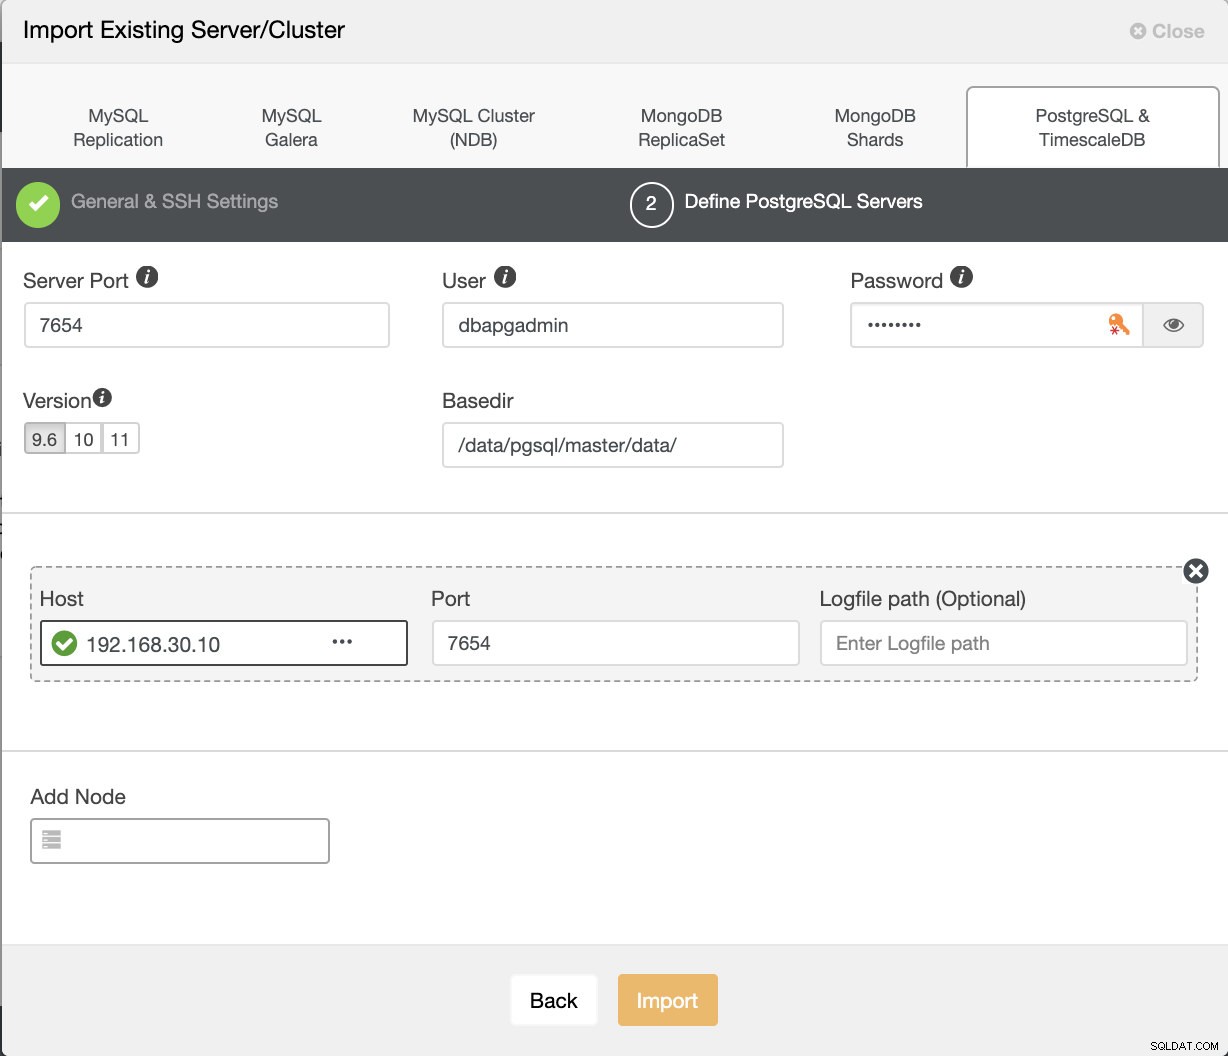
[インポート]ボタンを押すと、次のように1つのマスターノードを持つクラスターを作成できます。

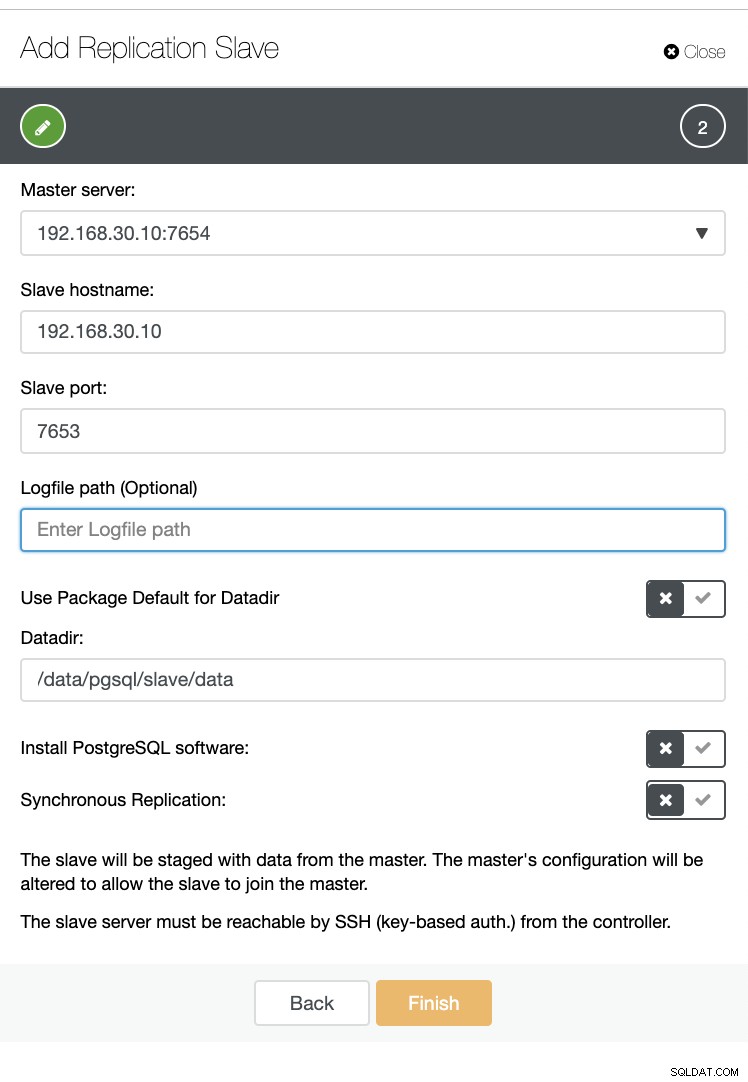
それでは、同じホスト内に(つまり、IP 192.168.30.10を使用して)スレーブを作成しましょう。
心配しないでください。以下に示すように、ClusterControlがそれを処理します。サンプルのジョブアクティビティログが表示されます。
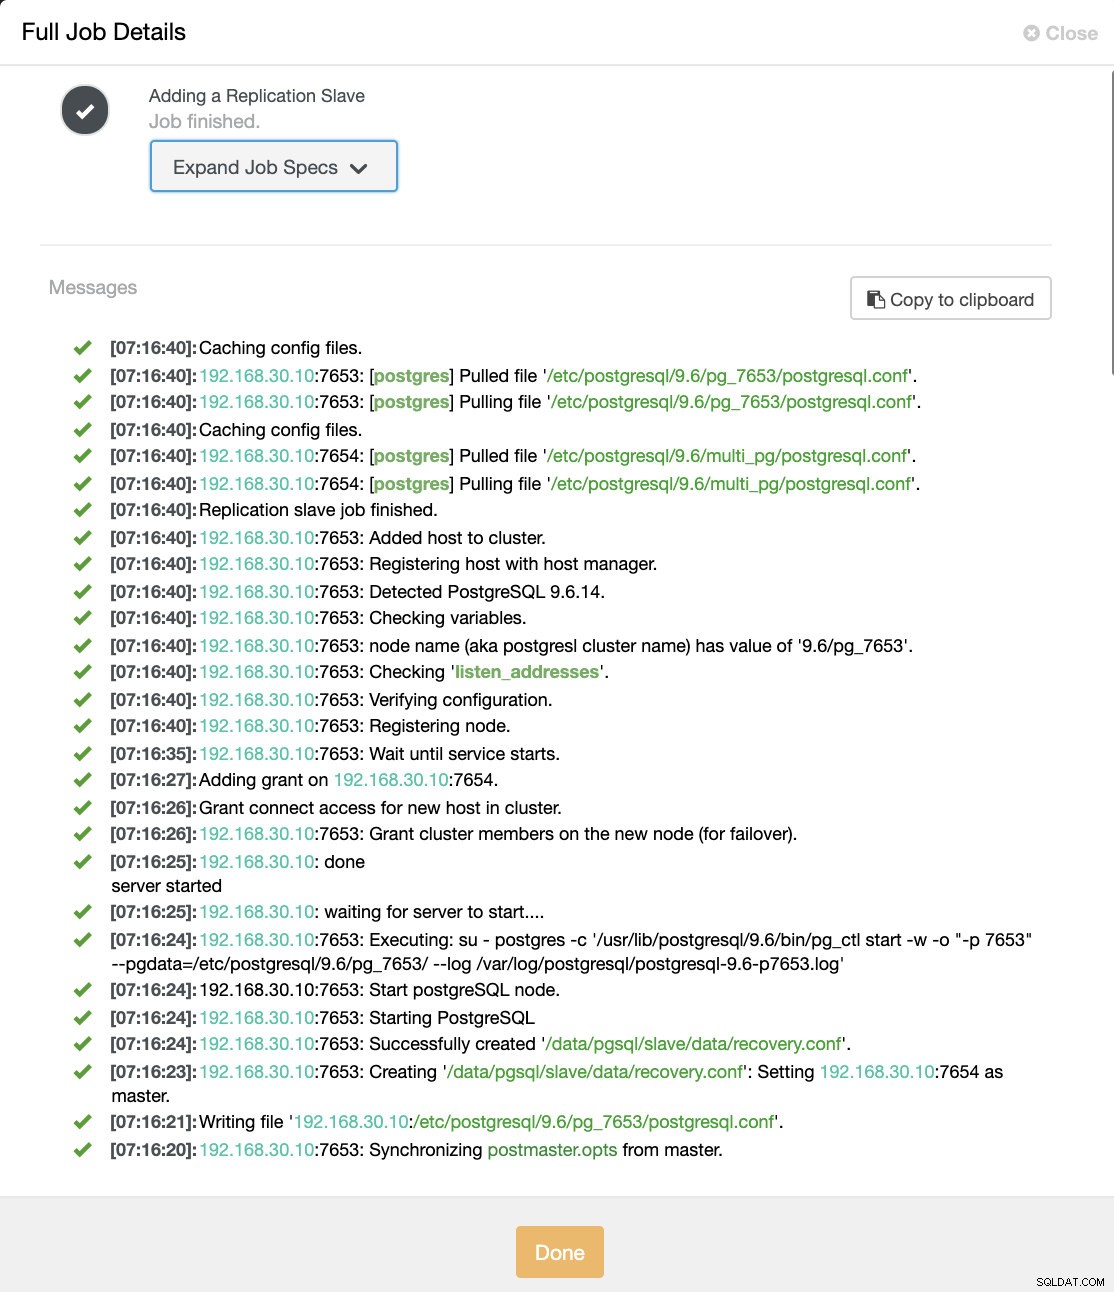
正常にセットアップおよびインストールされたことがわかります。技術的には、ClusterControlは / etc / postgresql /
それでは、 pg_lsclustersで確認しましょう マルチPostgreSQLインスタンスがホストで並行して実行されているかどうかを確認します。以下を参照してください:
example@sqldat.com:/var/log/postgresql# pg_lsclusters
Ver Cluster Port Status Owner Data directory Log file
9.2 main 5433 online postgres /var/lib/postgresql/9.2/main /var/log/postgresql/postgresql-9.2-main.log
9.6 multi_pg 7654 online postgres /data/pgsql/master/data /var/log/postgresql/postgresql-9.6-master.log
9.6 pg_7653 7653 online,recovery postgres /data/pgsql/slave/data pg_log/postgresql-%Y-%m-%d_%H%M%S.log
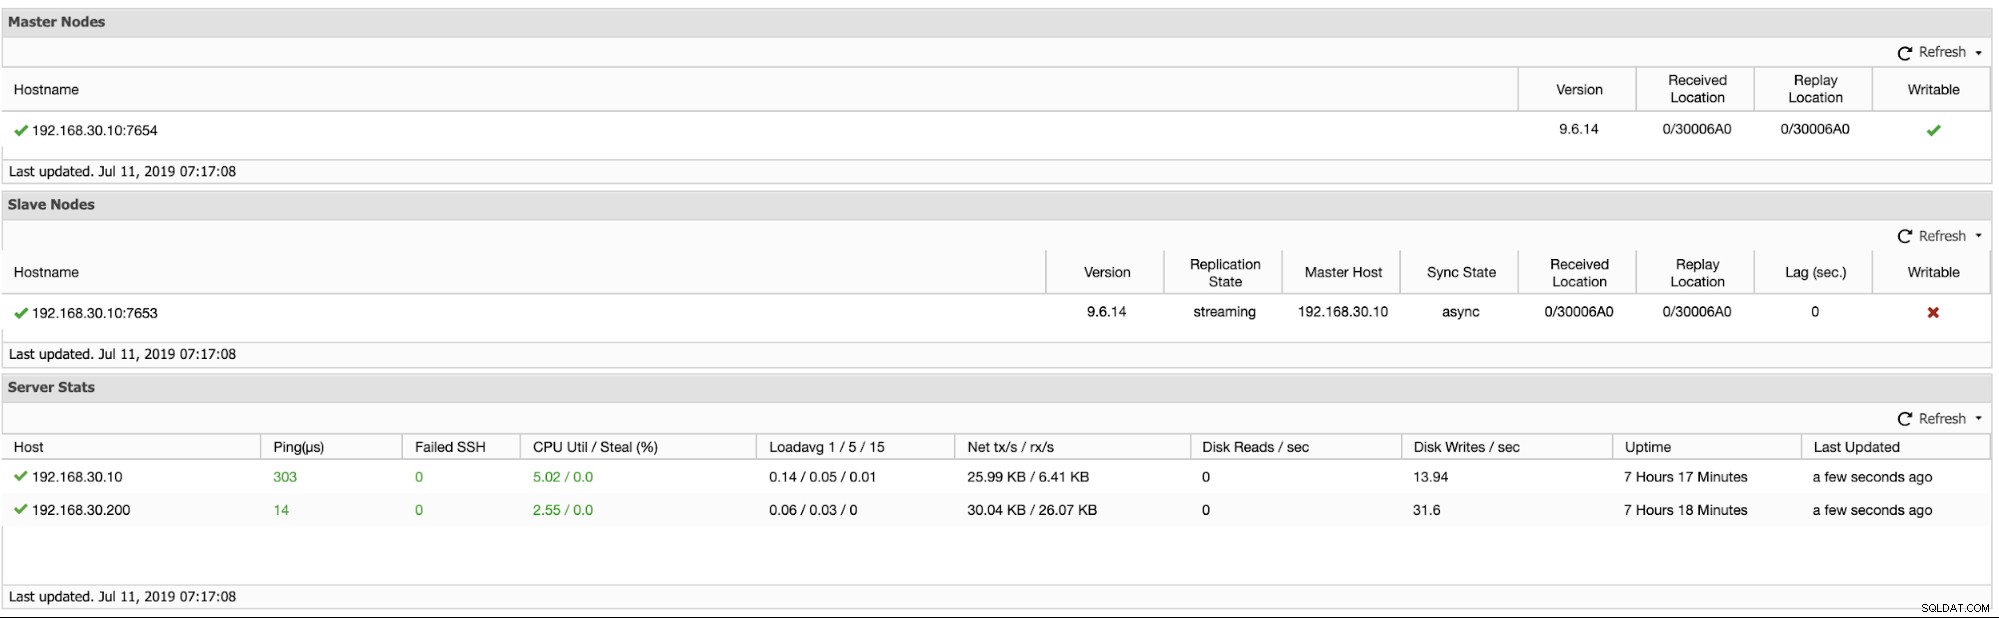
11 main 5432 online postgres /var/lib/postgresql/11/main /var/log/postgresql/postgresql-11-main.logこれに加えて、論理レプリケーションクラスターに関するメトリックを以下に示します。
単一のホストでインスタンスを実行しているマルチPostgreSQLでスレーブをプロモートする
スレーブの昇格は、単一のホストでインスタンスを実行しているマルチPostgreSQLにとって簡単です。以下に示すように、このタイプの環境は、ClusterControlによって処理されるときに問題なく機能します。
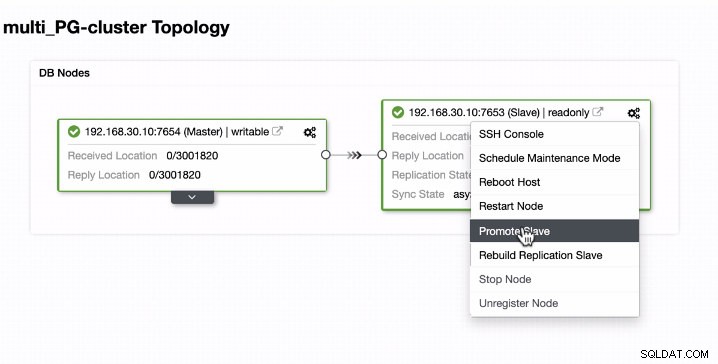
ここで、ClusterControlがスレーブをプロモートしている間にバックグラウンドで何が起こるかを見てみましょう。完全なジョブの仕様と詳細を見る
[09:01:02]:Successfully promoted a new master.
[09:01:02]:<em style='color: #1abc9c;'>192.168.30.10</em>:7653: promote finished (this is the new master).
[09:01:02]:Servers after promote:
<em style='color: #1abc9c;'>192.168.30.10</em>:7653:
• Role: master (slaves: 1)
• Status: CmonHostOnline (NODE_CONNECTED)
• Receive/replay: 0/30020C0; 0/30020C0
<em style='color: #1abc9c;'>192.168.30.10</em>:7654:
• Role: slave (slaves: 0)
• Status: CmonHostOnline (NODE_CONNECTED)
• Receive/replay: 0/30020C0; 0/30020C0
• Master: 192.168.30.10:7653
[09:01:02]:<em style='color: #1abc9c;'>192.168.30.10</em>:7654: Restarted with new master.
[09:01:02]:<em style='color: #1abc9c;'>192.168.30.10</em>:7654: Started PostgreSQL.
[09:00:53]:<em style='color: #1abc9c;'>192.168.30.10</em>: done
server started
[09:00:53]:<em style='color: #1abc9c;'>192.168.30.10</em>: waiting for server to start....
[09:00:52]:<em style='color: #1abc9c;'>192.168.30.10</em>:7654: Executing: su - postgres -c '/usr/lib/postgresql/9.6/bin/pg_ctl start -w -o "-p 7654" --pgdata=/etc/postgresql/9.6/multi_pg/ --log /var/log/postgresql/postgresql-11-main.log'
[09:00:51]:192.168.30.10:7654: Start postgreSQL node.
[09:00:51]:<em style='color: #1abc9c;'>192.168.30.10</em>:7654: Starting PostgreSQL.
[09:00:51]:<em style='color: #1abc9c;'>192.168.30.10</em>:7654: Successfully created '<em style='color: #109602;'>/data/pgsql/master/data/recovery.conf</em>'.
[09:00:50]:<em style='color: #1abc9c;'>192.168.30.10</em>:7654: Creating '<em style='color: #109602;'>/data/pgsql/master/data/recovery.conf</em>': Setting <em style='color: #1abc9c;'>192.168.30.10</em>:7653 as master.
[09:00:50]:<em style='color: #1abc9c;'>192.168.30.10</em>: servers diverged at WAL position 0/3001890 on timeline 1
no rewind required
[09:00:49]:Running /usr/lib/postgresql/9.6/bin/pg_rewind --target-pgdata=/data/pgsql/master/data --source-server="host=192.168.30.10 port=7653 user=dbapgadmin password=***** dbname=postgres"
[09:00:47]:<em style='color: #1abc9c;'>192.168.30.10</em>:7653: Granting host (<em style='color: #1abc9c;'>192.168.30.10</em>:7654).
[09:00:45]:<em style='color: #1abc9c;'>192.168.30.10</em>:7654: Stopped PostgreSQL.
[09:00:38]:<em style='color: #1abc9c;'>192.168.30.10</em>:7654: Waiting to stop.
[09:00:38]:192.168.30.10:7654: node is already stopped. No need to stop it.
[09:00:38]:192.168.30.10:7654: Stop postgreSQL node.
[09:00:38]:<em style='color: #1abc9c;'>192.168.30.10</em>:7654: Stopping PostgreSQL.
[09:00:38]:Switching slaves to the new master.
[09:00:38]:<em style='color: #1abc9c;'>192.168.30.10</em>:7653: Became master, ok.
[09:00:37]:<em style='color: #1abc9c;'>192.168.30.10</em>:7653: Waiting to become a master.
[09:00:37]:<em style='color: #1abc9c;'>192.168.30.10</em>: server promoting
[09:00:36]:<em style='color: #1abc9c;'>192.168.30.10</em>:7653: Attempting to promote using <strong style='color: #59a449;'>pg_ctl</strong>.
[09:00:36]:<em style='color: #1abc9c;'>192.168.30.10</em>:7653: Promoting host.
[09:00:35]:<em style='color: #1abc9c;'>192.168.30.10</em>:7654: Stopped PostgreSQL.
[09:00:28]:<em style='color: #1abc9c;'>192.168.30.10</em>:7654: Waiting to stop.
[09:00:28]:<em style='color: #1abc9c;'>192.168.30.10</em>: done
server stopped
[09:00:28]:<em style='color: #1abc9c;'>192.168.30.10</em>: waiting for server to shut down....
[09:00:27]:<em style='color: #1abc9c;'>192.168.30.10</em>:7654: Executing: su - postgres -c '/usr/lib/postgresql/9.6/bin/pg_ctl stop --pgdata=/etc/postgresql/9.6/multi_pg/'
[09:00:26]:192.168.30.10:7654: Stop postgreSQL node.
[09:00:26]:<em style='color: #1abc9c;'>192.168.30.10</em>:7654: Stopping PostgreSQL.
[09:00:26]:<em style='color: #1abc9c;'>192.168.30.10</em>:7654: Stopping the current master.
[09:00:26]:Switching over to <em style='color: #1abc9c;'>192.168.30.10</em>:7653 (previous master is <em style='color: #1abc9c;'>192.168.30.10</em>:7654)
[09:00:26]:Servers:
<em style='color: #1abc9c;'>192.168.30.10</em>:7653:
• Role: slave (slaves: 0)
• Status: CmonHostOnline (NODE_CONNECTED)
• Receive/replay: 0/3001820; 0/3001820
• Master: 192.168.30.10:7654
<em style='color: #1abc9c;'>192.168.30.10</em>:7654:
• Role: master (slaves: 1)
• Status: CmonHostOnline (NODE_CONNECTED)
• Receive/replay: 0/3001820; 0/3001820
[09:00:26]:<em style='color: #1abc9c;'>192.168.30.10</em>:7653: Current master is <em style='color: #1abc9c;'>192.168.30.10</em>:7654.
[09:00:26]:<em style='color: #1abc9c;'>192.168.30.10</em>:7653: Promoting server to master.
Job spec: {
"command": "promote_replication_slave",
"group_id": 1,
"group_name": "admins",
"job_data":
{
"clusterId": "6",
"slave_address": "192.168.30.10:7653"
},
"user_id": 1,
"user_name": "example@sqldat.com"
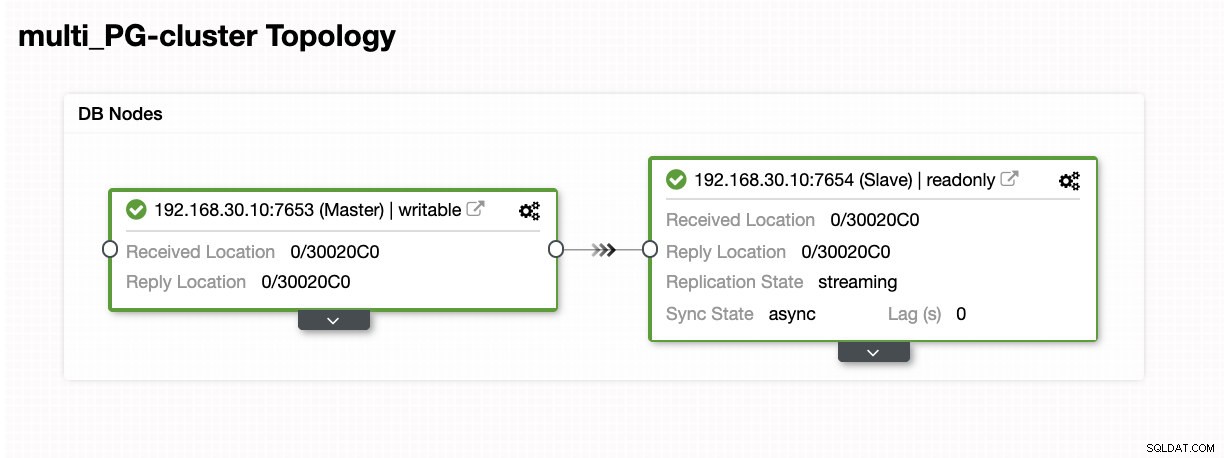
}ご覧のとおり、同じホストでもスムーズに処理されました。トポロジの結果は、正常にプロモートされたことを示しています。
結論
ClusterControl 1.7.3のリリースには、提供できるものがたくさんあると思います。また、同じホスト機能で実行されるこの新しいMulti-PostgreSQLインスタンスは、PostgreSQLの全体的なサポートを改善するためのもう1つの大きなステップであると考えています。試してみて、この新機能について以下の感想をお聞かせください。